Nautilus Drydocks - Yesterday's work

Collapse
X
 
  • Time
  • Show
Clear All
new posts
  • george
    Captain
    • Dec 2010
    • 727

    #16
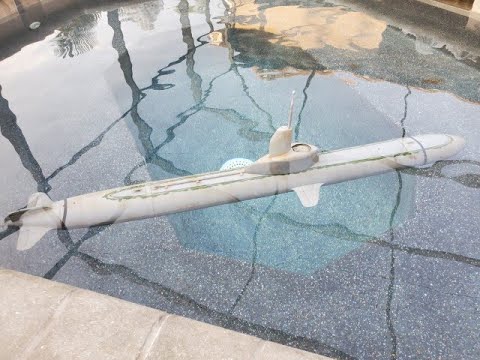
    A question for Bob reg. the melted sub hull.
    Bob do you think in your video of the Astute assembly, you recommended a coating of epoxy covering the Astute hull and painting the interior. Do you think that should be enough to prevent such outdoor heat damage? What about the appendages?

    Comment

    • RCSubGuy
      Welcome to my underwater realm!
      • Aug 2009
      • 1768

      #17
      It will help, but even epoxy tends to soften up in high heat.

      To be honest, there is no substitute for a solid, fiberglass hull. That said, I the reason I am going down the path of making these files is to hook people into the hobby at a cheaper price point. Once they have the taste, they can invest in a more traditionally manufactured hull that will last decades.

      My next 3D file will be USS Nautilus, SSN 571 in 1/72 scale. I've got the files done and I'm currently printing the prototype in ABS plastic. No worries about heat, and the details are turning out really well so far. I realize that most people don't have printers capable of ABS printing. Most cheap ones out there will only be PLA and similar. Like everything else in this hobby, you pay to play. If you go the 3D route, you need to invest in something that will be able to print in durable material. ABS is a great choice.

      Yesterday's work!:

      Spent the morning with Logan packing up orders, including that monster 35th scale Disney Nautilus, which sold within an hour of listing it up! Packing consisted of reinforcement of all protruding appendages with 1" thick styrofoam board, then 3" of 1/2" bubble wrap, a glued double cardboard box, and expanding foam packs to hold it all in place.

      Click image for larger version

Name:	20200406_102018.jpg
Views:	877
Size:	64.6 KB
ID:	137732

      Some work on the Batsub! Swapped out the pair of LiPo's for a single larger cell contained in the cylinder versus outside it as is the usual case with the older D&E design. It's completely self-contained now. Linkages cleaned up a bit, existing bulkhead expanded to accommodate a 3.5" versus the original 3" cylinder., bulkhead re-adhered to the hull, and new support brackets fabricated and on the printer.

      Click image for larger version

Name:	20200406_152719.jpg
Views:	903
Size:	64.4 KB
ID:	137736

      The rest of the day was spent on the XXI. The forward module is about 90% done now. I just need to install the servo headers to connect the boxes so that they can talk to one another. Other than that, they're getting close to ready for install. Here is the forward box sitting in place about where it will be installed in the model:

      Click image for larger version

Name:	20200406_152506.jpg
Views:	854
Size:	66.3 KB
ID:	137738


      I finished printing out one of Oto Gerza's spectacular 48th scale German Type XXI models. The photoetch is on it's way to me. I'm astounded at the degree of engineering that he put into the kit. It really is outstanding. Hull access is via a transverse break forward and aft, so you slip your cylinder in from the front or back. It's set up for a 3.5" cylinder. I'll play with this in my free time (chuckle). This print is in PLA, but I'm thinking of re-printing in ABS so it's bulletproof before I put all that gorgeous photoetch on it.

      Click image for larger version

Name:	20200406_152558.jpg
Views:	926
Size:	60.8 KB
ID:	137731Click image for larger version

Name:	20200406_152602.jpg
Views:	849
Size:	63.6 KB
ID:	137734

      Here is the rear motor module of the big XXI. The motor shafts form the rear holddown mechanism. Installation will be exceptionally easy, and you'll have complete access to the interior without having to remove the box, too!


      Click image for larger version

Name:	20200406_152539.jpg
Views:	871
Size:	64.5 KB
ID:	137735Click image for larger version

Name:	20200406_152544.jpg
Views:	855
Size:	65.6 KB
ID:	137737

      Bow thrusters are mounted, too! I used a pair of stainless steel brackets epoxies to the hull. I'm hoping these 1100gph bilge pumps will turn this beast well!

      Click image for larger version

Name:	20200406_152510.jpg
Views:	856
Size:	61.3 KB
ID:	137739
      Attached Files

      Comment

      • Subculture
        Admiral
        • Feb 2009
        • 2119

        #18
        For ABS Just need a heated bed (most printers have them), a reasonable hot end to cope with the higher temps and encase the whole thing in a box to keep temperatures constant . A cardboard box with a plastic window works well enough. Doesn't smell as nice as PLA though.

        I have a Creality Ender 2, which I think is now out of production, but you can get an ender 3, which is every bit as good and gives you a bit more bed space. Good value machine IMO, you'll have to spend a LOT more to get a better machine for FDM.

        Comment

        • RCSubGuy
          Welcome to my underwater realm!
          • Aug 2009
          • 1768

          #19
          Yesterday's work!


          Not much in the way of photos, but lots done yesterday! The morning was taken up putting together a wooden bar that we'd ordered back in December. We are renovating our outdoor patio area and we'd been waiting on the mail-order bar forever. Turned out to be pretty cheap construction, but it was also inexpensive and easy to put together. Word to the wise... don't order from www.johnsbars.com!.

          Work on the control boxes for XXI! Got all of the wiring completed for control of the bow thrusters, installed the linkage outputs for the four forward servos, installed the magnetic mount for the rear control box, created the wire harness for the bow thrusters and vent solenoids.

          Click image for larger version

Name:	20200407_151728.jpg
Views:	835
Size:	71.6 KB
ID:	137756Click image for larger version

Name:	20200407_151735.jpg
Views:	832
Size:	70.5 KB
ID:	137757Click image for larger version

Name:	20200407_151719.jpg
Views:	832
Size:	68.4 KB
ID:	137759

          Logan and I also got a lot of work done on the Batsub. New cylinder mounting brackets installed, linkages connected, and we decided we're going to outfit it with a complete LED lighting system as well!

          Click image for larger version

Name:	20200407_135833.jpg
Views:	816
Size:	69.5 KB
ID:	137758

          Comment

          • RCSubGuy
            Welcome to my underwater realm!
            • Aug 2009
            • 1768

            #20
            More picky work with the electronic guts of the XXI. I also ran the linkages to the rear planes and rudder, and cut the internal bulkheads to allow pass-through of the twin drive shafts and linkage rods.

            Click image for larger version

Name:	20200408_202004.jpg
Views:	796
Size:	71.0 KB
ID:	137793

            The Batsub is coming along great! Logan is doing very good work. He's a very good student, and a patient worker. LED lights installed, cylinder outfitted with lighting output and a remote on/off switch.

            Click image for larger version

Name:	20200408_201833.jpg
Views:	834
Size:	51.6 KB
ID:	137794Click image for larger version

Name:	20200408_201932.jpg
Views:	793
Size:	25.4 KB
ID:	137791

            I'm a couple of parts into the prototype print of the USS Nautilus 571. They're turning out really well so far. ABS plastic in 72nd scale.

            Click image for larger version

Name:	20200408_202041.jpg
Views:	825
Size:	97.7 KB
ID:	137795
            Attached Files

            Comment

            • SteveNeill
              Commander
              • Apr 2020
              • 315

              #21
              So cool Bob! Love seeing all this!

              Comment

              • RCSubGuy
                Welcome to my underwater realm!
                • Aug 2009
                • 1768

                #22
                So, Easter weekend didn't see a ton of progress on much of anything other than my sanity and a slough of house projects. For the most part, all three of us (well, four if you count our dog, Gracie) relaxed and enjoyed the Easter break. I will say, however, that I was surprised at the number of emails, texts and phone calls from customers on Easter Sunday.

                Yesterday, however, was back in the shop!

                Lots of orders shipped out in the AM. That took up the entire morning, most of which was spend boxing up that beautiful 72nd scale Alfa for its journey to its new home.

                More progress on the XXI control boxes. Originally, I'd hoped to run a single 5V power/ground combo to the forward box, meaning that I only needed to run 4 signal wires from the aft box that houses the receiver to the forward one. I tested this prior to trying it in implementation on the control system and I could not get the servo to work supplying it power from a standalone 5V source and running signal from my servo tester. Can anyone who knows more about this shed light for future projects? It would be great to run only 6 wires for 4 remote servos than 12...

                In the meantime, for this project I will simply run servo extensions "out of the box".

                Click image for larger version

Name:	20200413_203557.jpg
Views:	581
Size:	90.0 KB
ID:	137944

                571 Nautilus is coming along nicely! 4 more parts at around 15hrs per part and I'll be ready for prototype assembly and video instructions!

                Click image for larger version

Name:	20200413_203511.jpg
Views:	683
Size:	80.7 KB
ID:	137943
                Click image for larger version

Name:	20200413_203547.jpg
Views:	616
Size:	84.9 KB
ID:	137947

                Batsub saw her first dunk in the test facility yesterday. Logan is handling the entire process and I'll be putting up a video of the process shortly. It went exceptionally well and we had her dialed in within 20 minutes. Permanently mounting foam and weight this morning, and we need to address a leaky vent valve, but we're getting close!! With luck, she'll be ready for a maiden voyage in a few days, then it's final paint and she'll be done!

                Click image for larger version

Name:	20200413_203602.jpg
Views:	639
Size:	52.3 KB
ID:	137948

                Last, but not least, I'm getting that beautiful Japanese Kaiyru set up with a new cylinder. So far it's gone flawlessly, and the 2.5 SubDriver is a perfect fit. I'm running a pitch controller and failsafe, and she'll have "bow"planes and stern plane individual control. Those forward planes are really close to center, so should offer depth control, but not a spit's worth of pitch control. I think this one will be a real blast to drive. I'm hoping it will be knocked out within the next couple of days...

                Click image for larger version

Name:	20200413_203542.jpg
Views:	634
Size:	52.3 KB
ID:	137945

                Attached Files

                Comment

                • RCSubGuy
                  Welcome to my underwater realm!
                  • Aug 2009
                  • 1768

                  #23
                  Lots of wiring battles yesterday getting the XXI modules talking to one another. With so many functions, I have some that are mated to one another, such as the torpedo shutters and bow retracts and the rudder and bow thrusters. Others are operating independently. It makes it challenging to keep it all straight, but I did manage to get it all working on the bench yesterday for the most part. Still some work to do, but I'm nearly ready for installation in the model!

                  Click image for larger version

Name:	20200414_152714.jpg
Views:	578
Size:	83.1 KB
ID:	137967

                  Got the Kaiyru trimmed out nearly perfectly. I discovered that the stock SubDriver has WAY too much buoyancy for this model. The surfaced waterline is really high in this boat, making it very challenging for trimming, though I have to say it went fairly smoothly for some strange reason. Without the internal space above surfaced waterline, there is nowhere to put flotation foam that comes into play during diving operations. That means that I need to trim her out using only foam below the waterline. Tricky, tricky...

                  Click image for larger version

Name:	20200414_131224.jpg
Views:	618
Size:	46.6 KB
ID:	137968Click image for larger version

Name:	20200414_131421.jpg
Views:	569
Size:	49.8 KB
ID:	137969

                  What I did to address the too-large ballast tank was trim the boat for perfect submerged trim, blow ballast to bring it up to surfaced waterline, then break into the boat and note the amount of water still in the tank. In this case, it was exactly 50% of the stock tank's capacity. I brought it into the shop and drilled two holes in the side of the tank at the halfway point. The beauty of this is that one can still use the cylinder in other models, simply by taping over the drilled holes.

                  In theory, you could have multiple holes for different models, each offering the perfect amount of reserve buoyancy for that specific boat.

                  Click image for larger version

Name:	20200414_134330.jpg
Views:	591
Size:	53.5 KB
ID:	137973

                  Logan continues work on the BatSub. New foam sections installed permanently along with some extra ballast weights in the stern. We identified the issue with the vent, corrected it and re-adhered it to the ballast tank. Final testing on that today now that the silicone is cured. In theory, we have final trimming to do today, then we're on to her maiden voyage!

                  Click image for larger version

Name:	20200414_143423.jpg
Views:	594
Size:	83.2 KB
ID:	137972

                  Click image for larger version

Name:	20200414_152719.jpg
Views:	576
Size:	82.2 KB
ID:	137971
                  Attached Files

                  Comment

                  • SteveNeill
                    Commander
                    • Apr 2020
                    • 315

                    #24
                    Wow you guys are having lots of fun. Good stuff Bob. I have been drafted with a customer build which has cut me down to about an hour a day to work on a personal projects like subs. Building a plastic star trek model is no as much fun.

                    Comment

                    • RCSubGuy
                      Welcome to my underwater realm!
                      • Aug 2009
                      • 1768

                      #25
                      Work paused on the XXI while I clear out some quick-turnaround builds.

                      The Kairyu was finished up last week, packed up and shipped to the new owner in the UK. Gawd, what a fun boat. I did a video tour of that one with some running footage. Check it out below:

                      .

                      Click image for larger version  Name:	20200415_083138.jpg Views:	0 Size:	48.2 KB ID:	138104Click image for larger version  Name:	20200415_133023.jpg Views:	0 Size:	72.4 KB ID:	138105

                      I managed to come across a superb DK Models (that's Dan Kachur's work up in BC, Canada) German Type VII in 48th scale. This came to me as an (almost) functional boat with an old D&E cylinder. I tore that out and am in the process of completely overhauling the sub with our new MSD brushless cylinder, new and improved linkages for better turning and diving performance, and I'll be weathering her up nicely at the end of the journey as well.

                      Click image for larger version  Name:	20200417_061550.jpg Views:	0 Size:	54.1 KB ID:	138108Click image for larger version  Name:	20200417_061447.jpg Views:	0 Size:	52.7 KB ID:	138107Click image for larger version  Name:	20200417_061809.jpg Views:	0 Size:	62.2 KB ID:	138106

                      Only one more part left to print for the prototype 571 Nautilus. I'm pretty excited to start putting it together! This is all ABS plastic, so should be WAY more durable than the PLA prints I've done previously. ABS also takes to smoothing more easily with sanding and an acetone bath. Should net a nicely finished hull!


                      Click image for larger version  Name:	20200417_061556.jpg Views:	0 Size:	50.6 KB ID:	138109

                      Batsub is nearly ready for final test and trim. We caught a big leak in the main drive seal and are in the process of replacing that.

                      Comment

                      • rwtdiver
                        Vice Admiral
                        • Feb 2019
                        • 1768

                        #26
                        Bob,

                        Your 3D Printed "571" is looking really GOOD! Don't come down to hard on the PLA printing on your submarines. With a little extra care in the construction (Like sealing the hull,(I did mine inside using ZAP Z-POXY) and using a good primer base coat and with a good quality final finish you have a doable boat. I am in Arizona and today we will be in the 90's, and you just have to allow for that heat and do NOT leave your boat sitting in the direct sun or heat for any length of time. This is not perfect by any means that's for sure, but it has worked for me!! My Astute and Redoutable are holding up great!

                        I really like what you guys are doing, and it is really inspiring to see your work in progress blogs!

                        Rob

                        "Firemen can stand the heat"


                        Comment

                        • RCSubGuy
                          Welcome to my underwater realm!
                          • Aug 2009
                          • 1768

                          #27
                          The DK Type VII is getting into the test tank (aka "pool") today.

                          Note to everyone building their cylinders. Check, check and double-check everything before you put it in the boat. Submerge and leak-check with the unit out of the boat. Case in point, I was checking the cylinder yesterday and when I blew into the antenna / pressure hose, I had an eruption of air coming from the rear bulkhead. Turns out that I neglected to plug an unused linkage seal opening during construction. Fortunately, blowing into the hose pressures up the cylinder and no water got in. It would have been a tragedy if I'd have stuffed that in the boat and went about trimming. It would have gradually got more and more stern-heavy as water filled the aft compartment, and I'd have been left scratching my head at why I couldn't get the damned trim right.

                          Aside from leak-testing the cylinder, I also spent some time assembling the prototype pieces for the 571 Nautilus in 72nd scale. Man.. it's bigger than I'd envisioned in my brain.

                          Click image for larger version

Name:	20200421_113416.jpg
Views:	605
Size:	62.8 KB
ID:	138273Click image for larger version

Name:	20200421_110855.jpg
Views:	519
Size:	78.2 KB
ID:	138274Click image for larger version

Name:	20200421_112204.jpg
Views:	617
Size:	58.4 KB
ID:	138275Click image for larger version

Name:	20200422_041354.jpg
Views:	663
Size:	94.6 KB
ID:	138276Click image for larger version

Name:	20200422_041400.jpg
Views:	643
Size:	97.0 KB
ID:	138279

                          I also started working on a personal project. Can anyone guess what it will be?:

                          Click image for larger version

Name:	20200421_155216.jpg
Views:	635
Size:	67.1 KB
ID:	138280
                          Attached Files

                          Comment

                          • He Who Shall Not Be Named
                            Moderator
                            • Aug 2008
                            • 12253

                            #28
                            NAUTILUS. From, The League Of Extraordinary Gentlemen. I love the ginger-bread work at the bow, sail, and stern.

                            A great, underrated movie.

                            David
                            Who is John Galt?

                            Comment

                            • SteveNeill
                              Commander
                              • Apr 2020
                              • 315

                              #29
                              Originally posted by He Who Shall Not Be Named
                              NAUTILUS. From, The League Of Extraordinary Gentlemen. I love the ginger-bread work at the bow, sail, and stern.

                              A great, underrated movie.

                              David
                              Yes I'd have to agree. Bob? Keep us up to date on this.

                              Comment

                              • RCSubGuy
                                Welcome to my underwater realm!
                                • Aug 2009
                                • 1768

                                #30
                                For those of you who joined us for my LIVE discussion on my Youtube channel last night, I let you know that I'm getting slammed with customer inquiries, emails, requests for quote and (mostly) requests for help with projects. Yesterday alone I sent out over 50 messages via email, text and my site's IM board. That took up over 2 hours in the morning alone.

                                I love it, but, man.. it's cutting deep into shop time.

                                That said, I did get work done, I assure you. Most of it revolved around beginning the trimming process for the 1/48 DK Type VII. What I discovered was that the 12" tank was WAY too large. I determined that I needed about half of that to float this boat, owing to the exceptionally light layup of the upper hull and detail pieces mounted to it. The beauty of the MSD is that adjusting the size of ballast tank, motor and battery compartments is exceptionally easy. The whole process of cutting it down took less than 10 minutes.

                                I also performed a linkage update to the ballast servo. I've found from time to time in the past that the linkage comes off the slotted servo horn, requiring surgery to re-attach. The new MSD design allows ample room to put a full clevis on there, eliminating the possibility of it ever coming off.

                                Click image for larger version

Name:	20200424_055137.jpg
Views:	628
Size:	53.2 KB
ID:	138345Click image for larger version

Name:	20200423_103217.jpg
Views:	635
Size:	68.2 KB
ID:	138342

                                Logan and I completed final trimming of the Batsub and did a quick weathering job on the hull. We also added a bright yellow strip along the centerline, which really helps with visibility and also helps to mimic the "Batman" colors of gray, black and yellow.

                                The true maiden voyage will be this afternoon with a night run this evening. I should be able to have the video up by the end of the weekend.

                                Click image for larger version

Name:	20200424_055147.jpg
Views:	707
Size:	19.8 KB
ID:	138340Click image for larger version

Name:	20200423_125347.jpg
Views:	596
Size:	93.3 KB
ID:	138343Click image for larger version

Name:	20200423_131738.jpg
Views:	465
Size:	83.8 KB
ID:	138344

                                The LXG Nautilus is coming along well, too. The files that I'm using were not, in any way, optimized for RC. The entire interior is full of plastic channels and blocks. I've had to manually hog everything out as I go, but it's turning out well. The detail is really good. The 6th hull section is on the printer right now, and the upper hull part of it has failed, but I'm going to let it run to finish out the bottom and just re-print the top next.

                                Click image for larger version

Name:	20200423_132742.jpg
Views:	576
Size:	73.7 KB
ID:	138346
                                Attached Files

                                Comment

                                Working...