today's work

Collapse
X
 
  • Time
  • Show
Clear All
new posts
  • He Who Shall Not Be Named
    Moderator
    • Aug 2008
    • 12253

    Originally posted by redboat219
    How did you make the gimbal, specially those trunnions?
    I bored out a length of machine brass round-stock to accommodate an Oilite propeller shaft bearing. Before that I drilled a transverse hole into the after end of the gimbal to accept the two soldered in place trunnions.

    Click image for larger version

Name:	IMG_5434.JPG
Views:	302
Size:	41.3 KB
ID:	154115

    The gimbal foundation was a larger diameter length of machine brass round-stock bored to produce a non-interference fit to the gimbal. The foundation bore ends were scalloped to permit the pitching motion of the gimbal. Further, the after end of the foundation was milled with two grooves to accept the gimbal trunnions. It is about those trunnions that the gimbal rotates.

    David
    Who is John Galt?

    Comment

    • He Who Shall Not Be Named
      Moderator
      • Aug 2008
      • 12253

      Originally posted by Ken_NJ
      David, when you solder such items as the bellcrank, do you silver solder them or do use typical 60/40 solder?
      Just nasty old 60/40, Ken. Silver solder is over-kill for our kind of work.

      Click image for larger version

Name:	DSCN0102.JPG
Views:	292
Size:	89.3 KB
ID:	154117

      David
      Who is John Galt?

      Comment

      • redboat219
        Admiral
        • Dec 2008
        • 2735

        Originally posted by He Who Shall Not Be Named

        I bored out a length of machine brass round-stock to accommodate an Oilite propeller shaft bearing. Before that I drilled a transverse hole into the after end of the gimbal to accept the two soldered in place trunnions.

        Click image for larger version

Name:	IMG_5434.JPG
Views:	302
Size:	41.3 KB
ID:	154115

        The gimbal foundation was a larger diameter length of machine brass round-stock bored to produce a non-interference fit to the gimbal. The foundation bore ends were scalloped to permit the pitching motion of the gimbal. Further, the after end of the foundation was milled with two grooves to accept the gimbal trunnions. It is about those trunnions that the gimbal rotates.

        David
        okey, got it.
        Something like a Dumas coupler. Click image for larger version

Name:	images (1).jpeg
Views:	317
Size:	12.1 KB
ID:	154120
        Make it simple, make strong, make it work!

        Comment

        • He Who Shall Not Be Named
          Moderator
          • Aug 2008
          • 12253

          Yup........
          Who is John Galt?

          Comment

          • SubDude
            Captain
            • Dec 2019
            • 803

            David, forgive me if I have asked this before but what is the resin you used to make your bulkheads, seals and other items? Is it a BJB product?

            Comment

            • He Who Shall Not Be Named
              Moderator
              • Aug 2008
              • 12253

              Originally posted by RCJetDude
              David, forgive me if I have asked this before but what is the resin you used to make your bulkheads, seals and other items? Is it a BJB product?
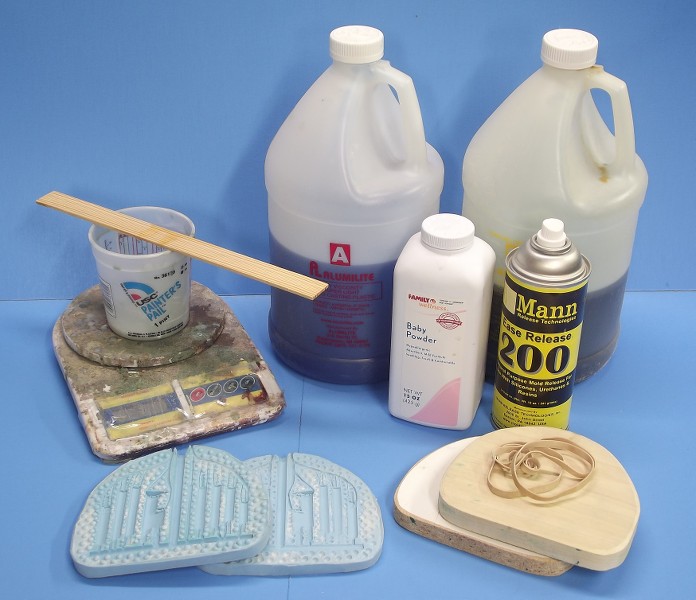
              I used to use the BJB-810. But two decades ago switched to Alumilite RC-3. Quck de-mold time, short (very short) pot-life. receptive to coloring agents and fillers, and once opened the containers have a reasonably long shelf-life. I would date the stuff if it would only answer my e-mails.

              Alumires (RC-3) Tan (alumilite.com)


              Who is John Galt?

              Comment

              • SubDude
                Captain
                • Dec 2019
                • 803

                Originally posted by He Who Shall Not Be Named

                I used to use the BJB-810. But two decades ago switched to Alumilite RC-3. Quck de-mold time, short (very short) pot-life. receptive to coloring agents and fillers, and once opened the containers have a reasonably long shelf-life. I would date the stuff if it would only answer my e-mails.

                Alumires (RC-3) Tan (alumilite.com)


                LOL! That is hilarious! Thank you.

                Comment

                • He Who Shall Not Be Named
                  Moderator
                  • Aug 2008
                  • 12253

                  One word of caution, Steve: This stuff will degrade over time, so don't buy it at the local Crafts, or Hobby shop -- no telling how long it's been cooking on the shelf. Order the stuff from the manufacturer. That way you get your resin from a recently produced batch.

                  David
                  Who is John Galt?

                  Comment

                  • Ken_NJ
                    Captain
                    • Sep 2014
                    • 744

                    The final product produced from a mold is only as good as the master. What material do you use for the mold David? Is some sort of mold release required as well?

                    I dabbled making a 54 inch surface boat mold decades ago, still have the mold. Made of polyester resin. I used a liquid mold release. Recall hearing that wonderful pop sound of the hull separating from the mold.

                    Always wanted to play with the mold process but need a subject. Thought of molding 1:24 scale people, 2.75" tall and I would need many of them, for my surface boats. Now we have 3D printing, another craft I hesitate to get into.
                    Last edited by Ken_NJ; 10-11-2021, 12:46 PM.

                    Comment

                    • He Who Shall Not Be Named
                      Moderator
                      • Aug 2008
                      • 12253

                      Originally posted by Ken_NJ
                      The final product produced from a mold is only as good as the master. What material do you use for the mold David? Is some sort of mold release required as well?

                      I dabbled making a 54 inch surface boat mold decades ago, still have the mold. Made of polyester resin. I used a liquid mold release. Recall hearing that wonderful pop sound of the hull separating from the mold.

                      Always wanted to play with the mold process but need a subject. Thought of molding 1:24 scale people, 2.75" tall and I would need many of them, for my surface boats. Now we have 3D printing, another craft I hesitate to get into.
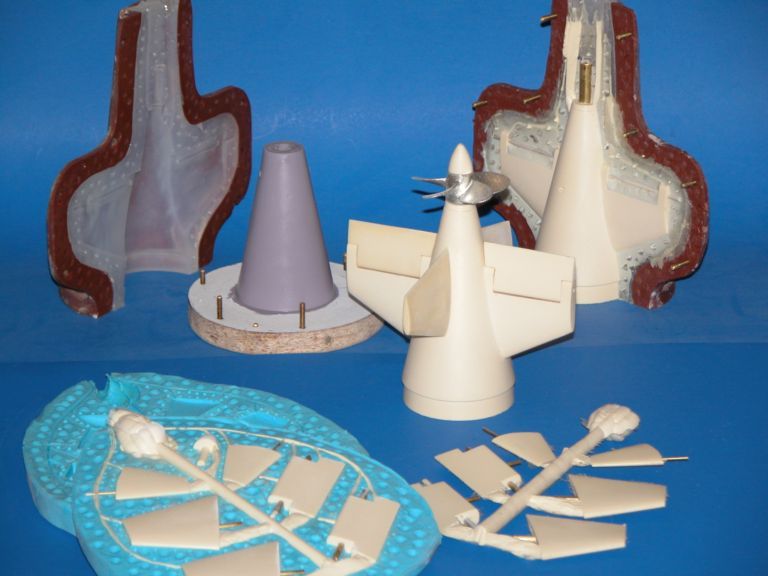
                      For almost all of my resin and metal casting tools I use BJB's, TC-5050. It's that blue stuff. The part-release system I use is a silicon oil spray followed by a dusting with corn starch or talk powder.

                      For a more in-depth look at the process I refer you to this article at another site that I recently authored: post #976 Warship Models Underway Message Board 2.2.3 - HMS Cardiff - 1/96 (mysite.com)

                      Click image for larger version

Name:	DSCF3888.JPG
Views:	226
Size:	93.2 KB
ID:	154274Click image for larger version

Name:	006.JPG
Views:	214
Size:	92.8 KB
ID:	154275Click image for larger version

Name:	003.JPG
Views:	215
Size:	80.2 KB
ID:	154276Click image for larger version

Name:	DSCF7777.JPG
Views:	214
Size:	56.8 KB
ID:	154277Click image for larger version

Name:	DSCF7787.JPG
Views:	208
Size:	46.0 KB
ID:	154278Click image for larger version

Name:	DSCN0110.JPG
Views:	207
Size:	65.9 KB
ID:	154279

                      Sounds like you were using a hard-shell tool. Your part-release system of choice should have been a good waxing followed by several layers of PVC. Works for me.

                      Click image for larger version

Name:	DSCN0038.JPG
Views:	215
Size:	54.5 KB
ID:	154287

                      The rubber I use to make large glove-molds is BJB's TC-5040.

                      Click image for larger version

Name:	DSCN0107 (2).JPG
Views:	210
Size:	70.8 KB
ID:	154280Click image for larger version

Name:	DSCN0038 (2).JPG
Views:	207
Size:	90.0 KB
ID:	154281Click image for larger version

Name:	DSCN0116.JPG
Views:	200
Size:	72.4 KB
ID:	154282Click image for larger version

Name:	DSCN0185.JPG
Views:	212
Size:	53.8 KB
ID:	154283Click image for larger version

Name:	IMG_0006.JPG
Views:	212
Size:	72.3 KB
ID:	154284Click image for larger version

Name:	IMG_0165.JPG
Views:	219
Size:	47.5 KB
ID:	154285Click image for larger version

Name:	IMG_0166.JPG
Views:	208
Size:	49.1 KB
ID:	154286

                      David
                      Who is John Galt?

                      Comment

                      • SubDude
                        Captain
                        • Dec 2019
                        • 803

                        Not to overload you with questions but I am having a hard time determining the size of the markings for my 1/72 THRESHER and a source for them. I know of the Woodland Scenics dry transfers which might work for some of the smaller markings and I got some vinyl numbers but they are crap and not the right font. Do you paint your larger numbers or use something else and where can I find a drawing or specs for the markings on the THRESHER/ PERMIT if at all? Thank you.

                        Comment

                        • He Who Shall Not Be Named
                          Moderator
                          • Aug 2008
                          • 12253

                          Originally posted by RCJetDude
                          Not to overload you with questions but I am having a hard time determining the size of the markings for my 1/72 THRESHER and a source for them. I know of the Woodland Scenics dry transfers which might work for some of the smaller markings and I got some vinyl numbers but they are crap and not the right font. Do you paint your larger numbers or use something else and where can I find a drawing or specs for the markings on the THRESHER/ PERMIT if at all? Thank you.
                          Here's how I paint on the 'navy' block style numbers. As well I've added some pointers on specialized marking tools.

                          Click image for larger version

Name:	DSCF2307.JPG
Views:	212
Size:	55.8 KB
ID:	154294Click image for larger version

Name:	DSCF2312.JPG
Views:	222
Size:	54.1 KB
ID:	154292Click image for larger version

Name:	DSCF2319.JPG
Views:	213
Size:	66.6 KB
ID:	154293Click image for larger version

Name:	DSCN0010.JPG
Views:	213
Size:	95.8 KB
ID:	154295Click image for larger version

Name:	DSCN0010 (2).JPG
Views:	206
Size:	70.5 KB
ID:	154296Click image for larger version

Name:	DSCN0012.JPG
Views:	211
Size:	75.4 KB
ID:	154297Click image for larger version

Name:	DSCN0015.JPG
Views:	210
Size:	64.1 KB
ID:	154298Click image for larger version

Name:	DSCN0029.JPG
Views:	205
Size:	49.9 KB
ID:	154299Click image for larger version

Name:	DSCN0115.JPG
Views:	210
Size:	63.9 KB
ID:	154300Click image for larger version

Name:	DSCN0119.JPG
Views:	204
Size:	61.4 KB
ID:	154301Click image for larger version

Name:	DSCN0127.JPG
Views:	212
Size:	59.7 KB
ID:	154302Click image for larger version

Name:	DSCN0134.JPG
Views:	198
Size:	66.3 KB
ID:	154303Click image for larger version

Name:	PICT0062.JPG
Views:	189
Size:	71.7 KB
ID:	154304

                          Who is John Galt?

                          Comment

                          • SubDude
                            Captain
                            • Dec 2019
                            • 803

                            Do you clear coat first to prevent any bleeding under the tape? That paint "stylus" or whatever you call it is genius! Time for more tribute.

                            Comment

                            • He Who Shall Not Be Named
                              Moderator
                              • Aug 2008
                              • 12253

                              Originally posted by RCJetDude
                              Do you clear coat first to prevent any bleeding under the tape? That paint "stylus" or whatever you call it is genius! Time for more tribute.
                              I did clear-coat first when I was painting balsa airplanes, but that was a long time ago. If you first mount a length of masking tape on a clean cutting board and cut away the factory edge, you won't have bleed problems on a well filled, primed, and painted surface.

                              What I made there, from a length of 1/8" diameter machine-brass rod, was a common old bow type drafter's pen. Old school! In Junior High we would make these things in Metal Shop, then, next period, use them during Mechanical Drawing. So... they teach this stuff anymore?! Nice thing about that pen is that opening the quill space and adjusting the viscosity of the paint, you can get a reasonably large variance in line width.

                              Click image for larger version

Name:	DSCN0127 (3).JPG
Views:	413
Size:	59.7 KB
ID:	154314Click image for larger version

Name:	DSCN0134 (2).JPG
Views:	418
Size:	66.3 KB
ID:	154315Click image for larger version

Name:	DSCN0183 (3).JPG
Views:	418
Size:	99.1 KB
ID:	154316

                              TRIBUT... I must have TRIBUT! for I am a vengeful, angry, demanding, spiteful God! TRIBUT!


                              David
                              ...reaching for the med's I missed this morning
                              Who is John Galt?

                              Comment

                              • Das Boot
                                Rear Admiral
                                • Dec 2019
                                • 1149

                                Check your email.
                                Last edited by Das Boot; 10-12-2021, 10:47 AM.
                                Of the 40,000 men who served on German submarines, 30,000 never returned.”

                                Comment

                                Working...