-
Who is John Galt? -
When the mission and design specifications were issued for the eventual SKIPJACK class it's now obvious that these combatants would hunt and kill submerged and surfaced targets and also, through the use of an extensive array of retractable sensors, grasp a real-time awareness of the surroundings through radio and optical instruments tuned to intercept just about every frequency across the sensible electromagnet spectrum. Add to the mix of sensors a snorkel mast and you have the proverbial plumbers nightmare within and atop a SKIPJACK's sail.
The six boats of the class would have a ****-load of retractable masts! And that requirement dictated a huge sail to house all those antennas, masts, mast fairings, scopes and snorkel. Not to mention the open bridge for surface navigation.
That huge sail knocked a few knots off the potential speed of the class and also presented a ship control problem during submerged, high-speed, high rate turns.
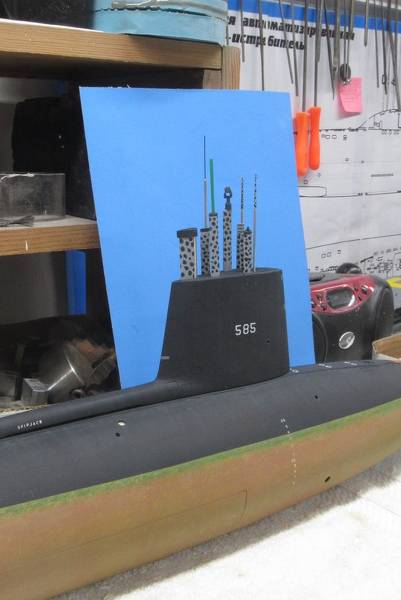
Detail idiot I am, I provided my little 1/96 SKIPJACK with all retractable masts, save the ECM. Even I have my limits as to how far afield I will go in pursuit of making the display look 'busy'.
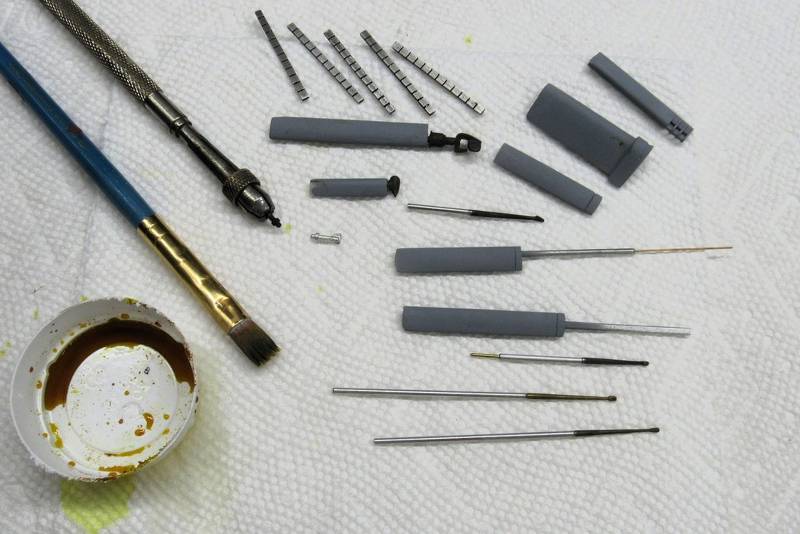
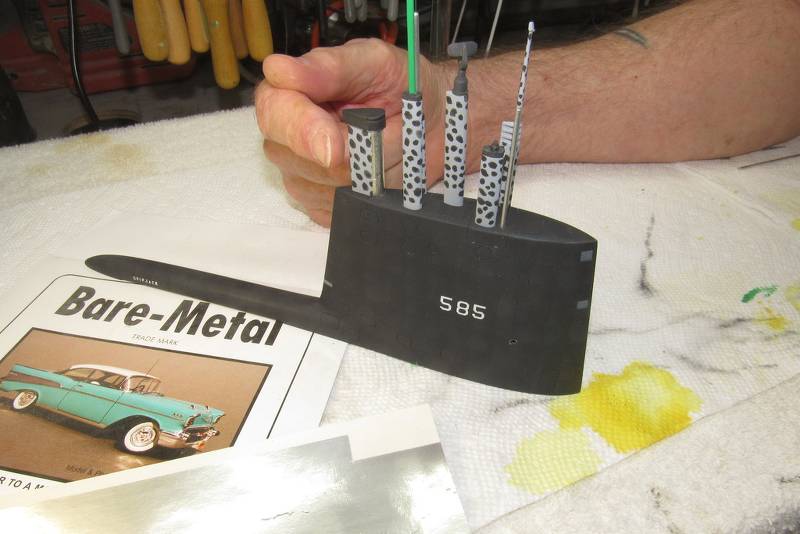
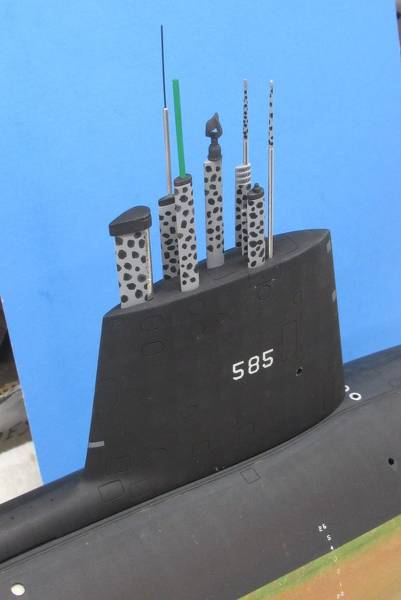
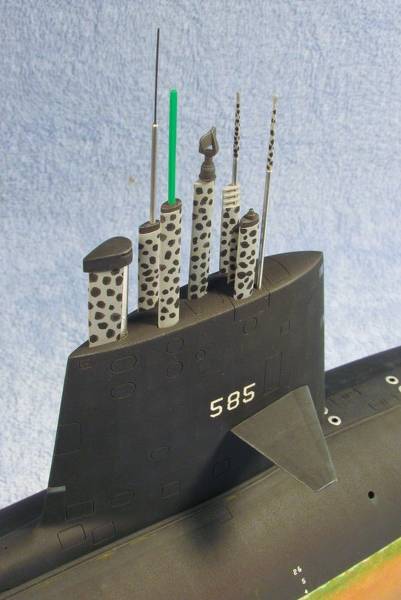
The model sail, at an early stage of mast-to-sail integration. Most of the scope heads and antennas were cast from white-metal. The attack and search periscope tubes were lengths of aluminum tube, The mast-fairings were cast from carbon strand filled polyester resin.
Additional metal parts seen here include the rudder anchor-light, and stern zincs.
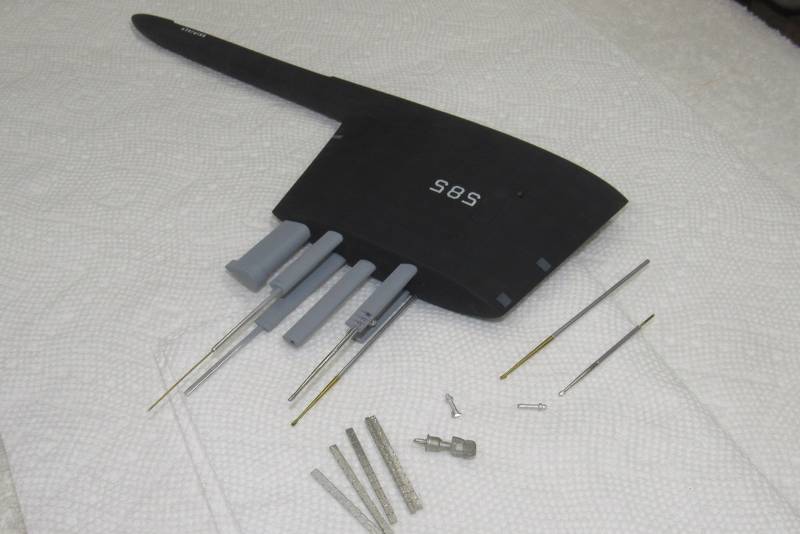
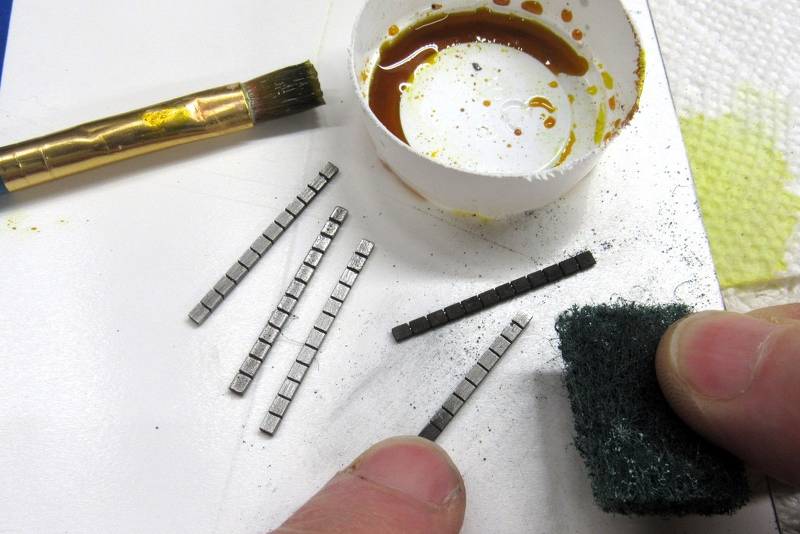
All metal parts were pickled with Ferric chloride acid. Each metal item was scrubbed with a stiff brush soaked in acid to oxidize its surface. Once a part had assumed a dark gray finish, it was rinsed in fresh water and set aside to dry. The pickling makes the metals surface receptive for paint adhesion; without the pickling, dried paint would just shrug off the metals surface.
Unlike the sail mounted items, the pickling of the zincs was done for a different reason – I wanted the space between each zinc brick to stand out, and the dark gray of oxidized white-metal worked to to do just that once I came back and abraded away the oxidized surface of each grouping of zinc bricks. A hunk of Scotch abrasive pad was the perfect tool for that job.
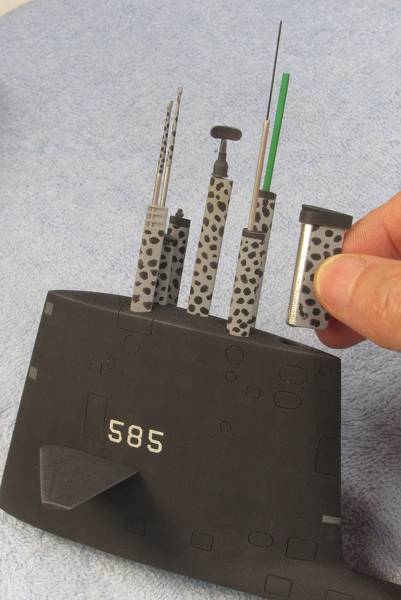
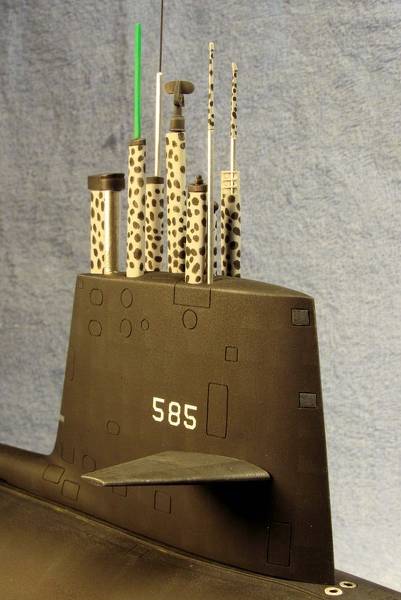
With the exception of the attack periscope, all retractable masts were sheathed in a streamlined fairing. Often the fairings were colored a haze-gray and camouflaged with what what called a leopard-spot scheme – nothing more than random sized and arranged black smears painted onto the gray fairings. The attack and search periscope heads also got the gray and spot treatment.
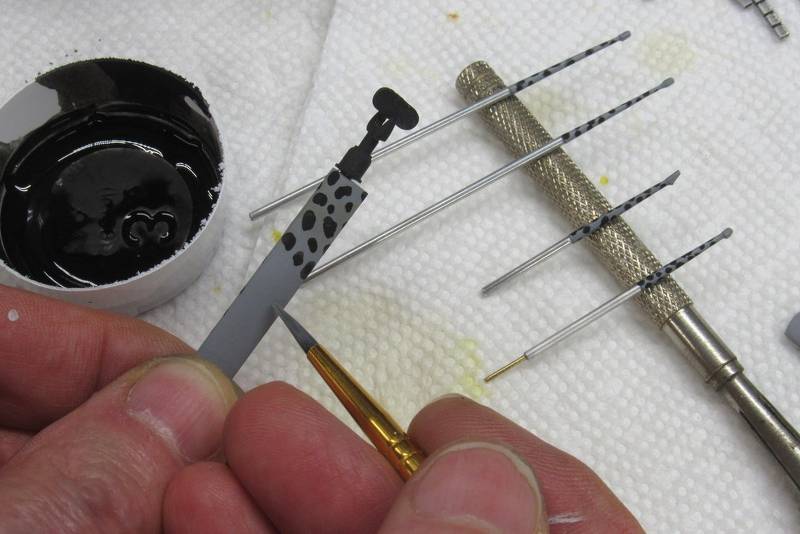
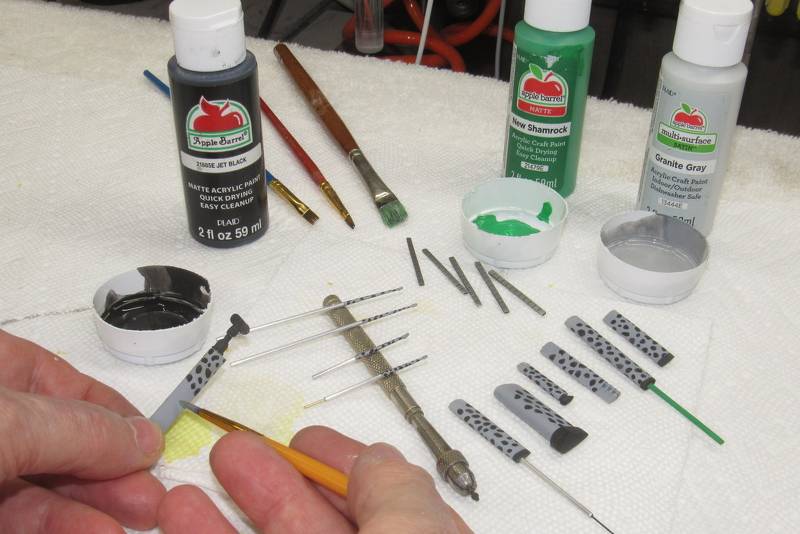
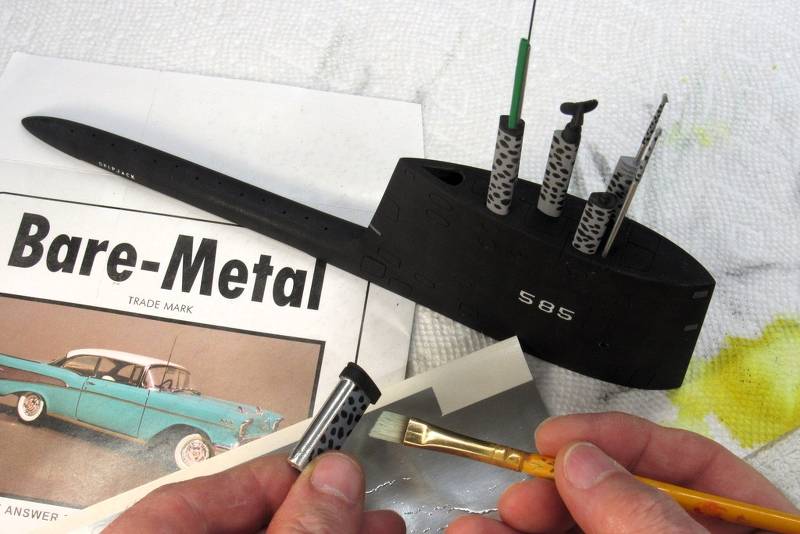
I'm pointing to the combined diesel intake-exhaust snorkel mast. It's unique in that I used a strip of self-adhesive aluminum foil to represent the bare stainless steel at the leading edge of this mast. That forward cylindrical tube was the induction side, the exhaust side is aft of it and tapers to the sharp trailing edge of the streamlined mast. The exhaust portion of the mast is painted the same gray with leopard-spots as the other masts and fairings.
The Bare-Metal foil piece was cut out from the main sheet and centered onto the leading edge of the snorkel mast. Using a very stiff bristle brush I carefully burnished the foil onto the mast – working from center outwards both sides, and a bit up, then a bit down, pushing out any air-bubbles that would otherwise spoil the look of this metal wrap.
I see missing leopard-spots at the base of the radar antenna mast fairing – I'll fix that.
As this is an r/c model submarine, and I tend to drive like a maniac, I typically only operate the model with a single 'attack' scope in place – no sense sheering off the entire array under some targets keel. Hey!... I went to all the work of representing most of the SKIPJACK's retractable masts and I didn't do so just to cream them in some 'incident at sea'. The mast array is there to make the display more interesting while sitting on the boat-stand at any event I attend. So, before plunking the model in the water all masts, with the exception of what I regard as a 'sacrificial scope', are removed and tucked safely away into my field-box.
All I need to track the model when patrolling the lake is a single mast penetrating the surface to give me my visual ques. If you can't see it, you can't drive it!
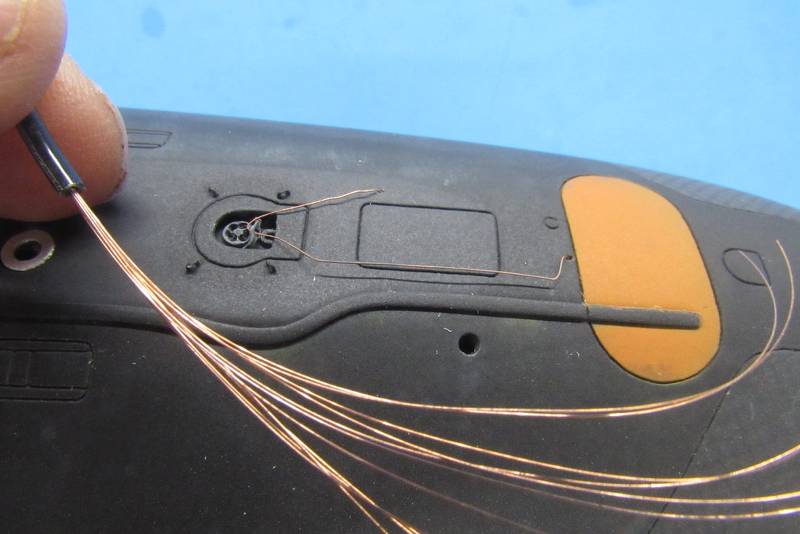
Regarding the actual SKIPJACK boats: In the very unlikely event of a submarine being stuck on the bottom – in water shallower than the boats design-depth – provision was provided to release a messenger/marker buoy to the surface tethered to a stout down-haul cable. In practice a McCann rescue chamber would be spliced into the down-haul cable and the chamber would reel itself down that cable till its circular seating surface made contact with the sunken submarines escape trunk seating surface. Venting the lower skirt area of the chamber produced the differential pressure needed to hold the chamber securely in place as personnel were transferred off the disabled submarine. Use of turnbuckles between the chamber and submarines pad-eyes were redundant – a back-up to the pressure differential holding chamber and submarine together during the rescue process.
The down-haul cable ran from a cable reel tucked away in the free-flooding space under the submarines hull, running a short distance atop the deck, passing through the fairlead 'bail' over the escape trunk access hatch, and ran on to the messenger/marker buoy.
I represented the down-haul cable with .005” conductor wire.
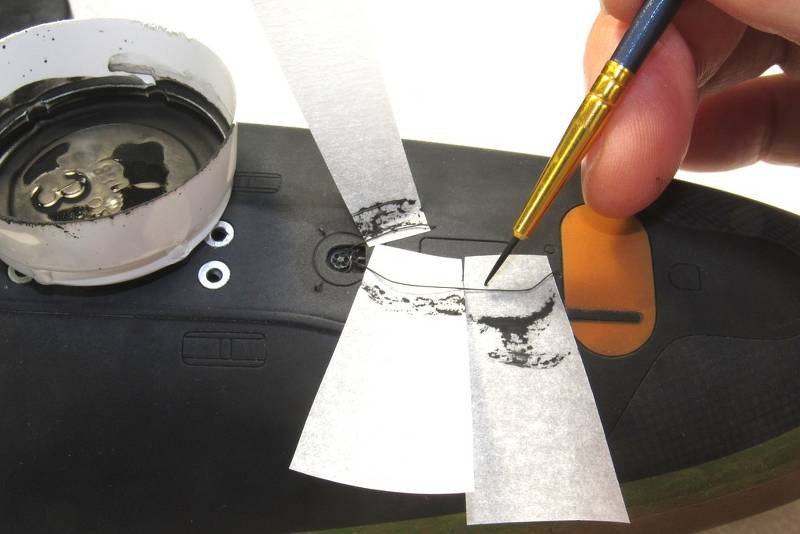
Little shards of wax-paper served as painting masks as I darkened the installed down-haul cable.
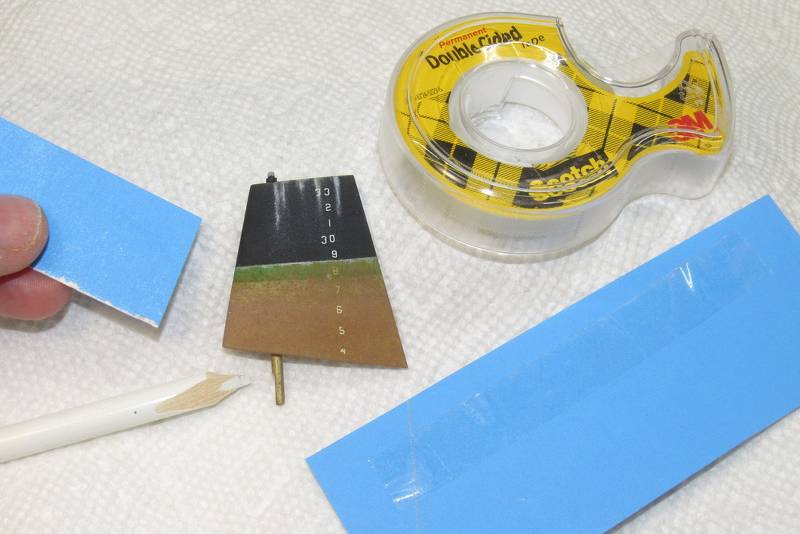
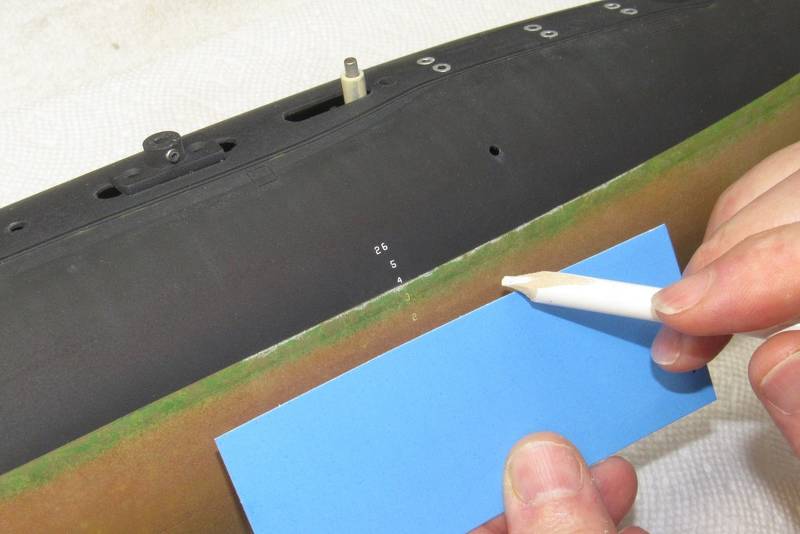
Any boat that has been in the water long enough eventually evidences a narrow, very light gray scum line right at the waterline. Dead 'sea grass'.
I represented this with a white 'Artist's' pencil whose point had been carved to a wedge shape. This marking was done free-hand only at the bow and stern oval transitions, the majority of the pencils work done with the aid of cardboard straight-edges.
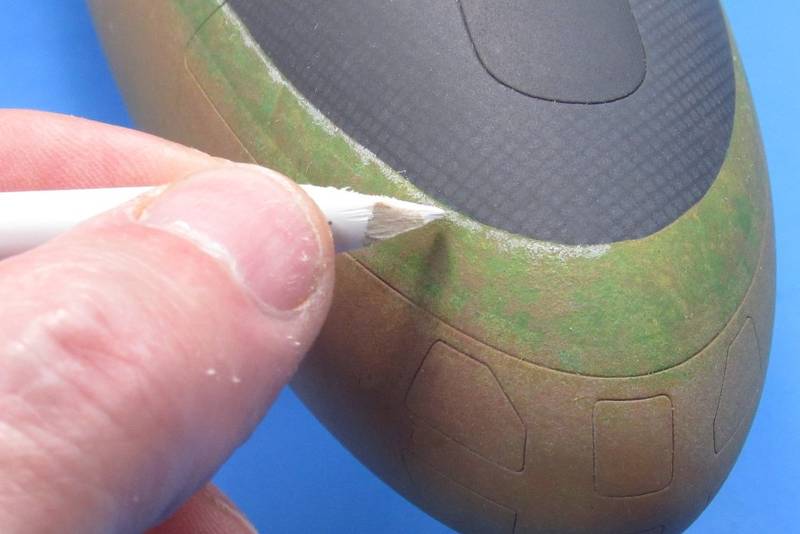
Note the use of double-sided scotch-tape on one side of a cardboard straight-edge – this kept it from sliding around on the hull or upper rudder as I pressed pencil tip home and dragged it along the work.
Last edited by He Who Shall Not Be Named; 07-09-2023, 01:04 AM.Who is John Galt?Comment
-
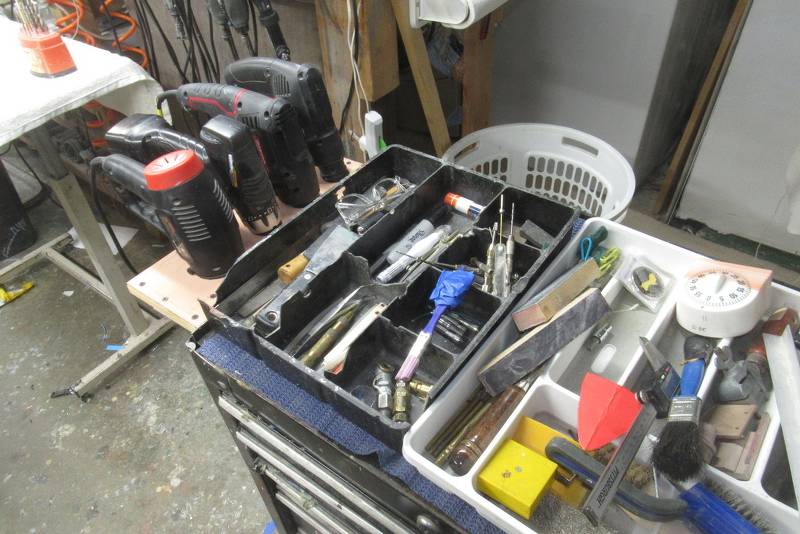
In addition to eight Dremel moot-tools – which conveniently hang off hooks over the primary work-station – I also wrangle three big drill motors and heat-gun. Until recently those big, clunky hand-held machines were forever getting in the way when not in use because – until yesterday -- I had no assigned storage caddie for them. They just sat where-ever I tossed them after use.
Time had come to organize where those big hand-tools would go, and do so in a manner that would take up the least amount of room, yet make them easily accessible.
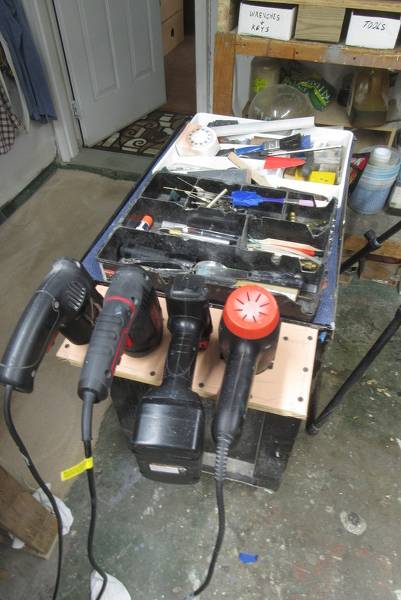
I elected to make a simple drill-motor and heat-gun caddie and mount it to my wheeled tool-chest/parts bin which is usually positioned to the right of the primary work-station.
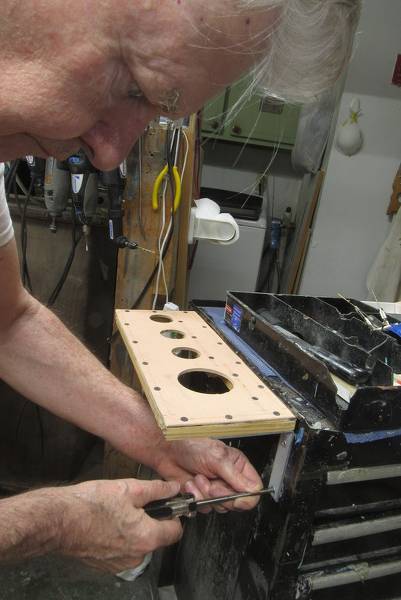
Even the mundane tasks, such as the fabrication of this drill-motor and heat-gun caddie, if the job is to be done right, demands forethought, gathering of materials, and at least a simple shop-sketch to get arrangement and dimensions worked out.
As a long-dead Junior High School shop teacher kept reminding us: “measure twice, cut once... you idiot Troglodytes!” (teachers in the early 60's were a different breed than today's blue-haired, woke Karin's who infest government schools).
You sketch out an idea; look around and find the materials and tools that will get the job done; work up a simply isometric drawing denoting key dimensions; and only then cut stuff up and start the assembly.
Measure twice. Cut once!

With the exception of the two heavy-duty mounting brackets, I had everything needed at home. A quick trip to the local Lowe's got me the brackets. To work!
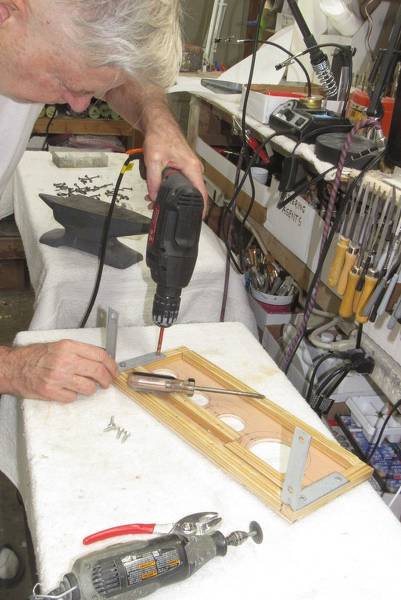
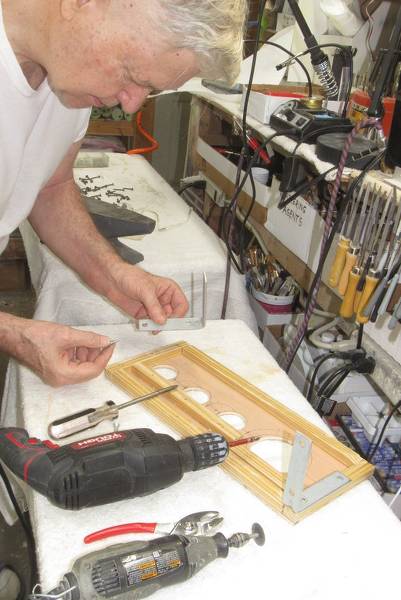
Now I have unhindered access to the drills and heat-gun.
A half-century ago these words still ring in my head:
“Return your tools to tool-issue and police your work stations! Merriman, Loman!... you two hoods tuck in your shirts... now! SHOP CLASS... DISMISSED”.
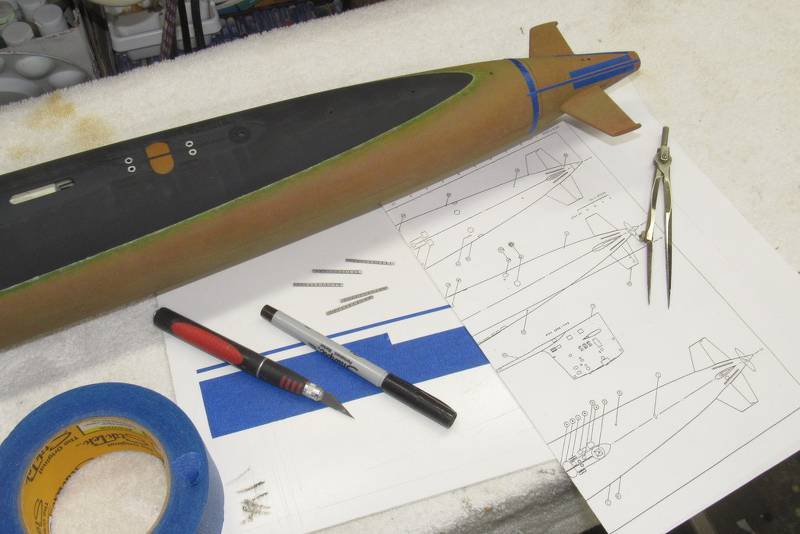
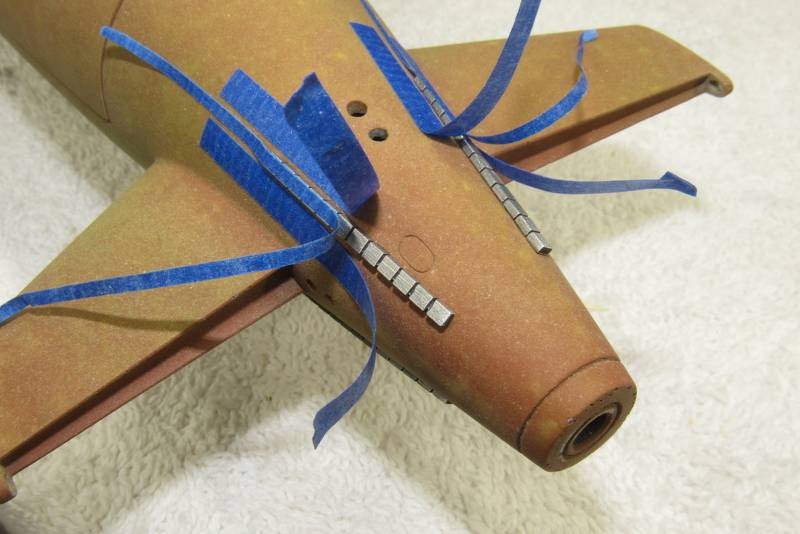
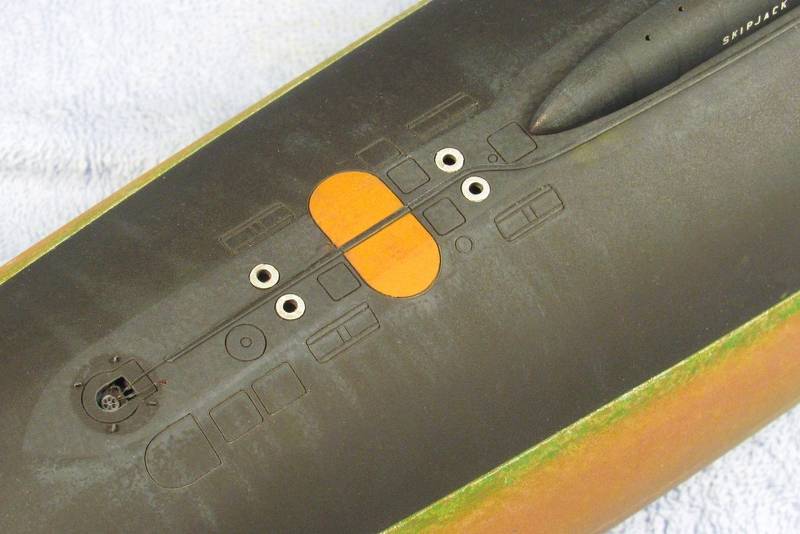
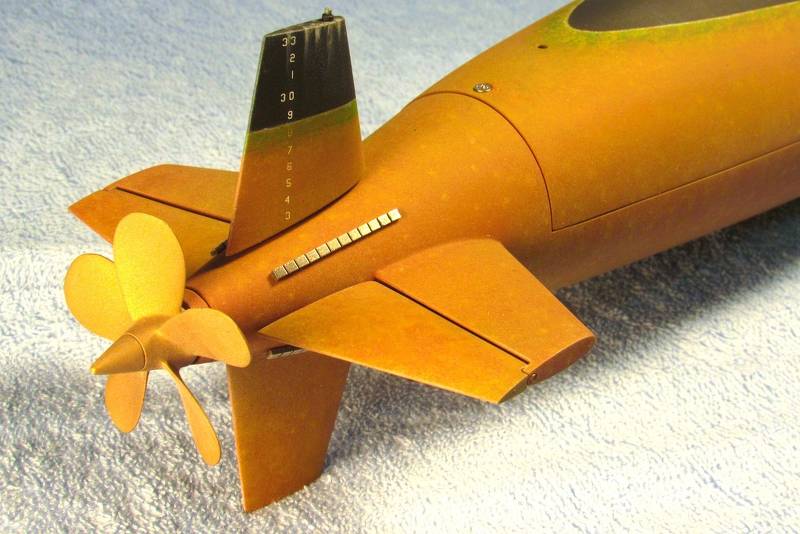
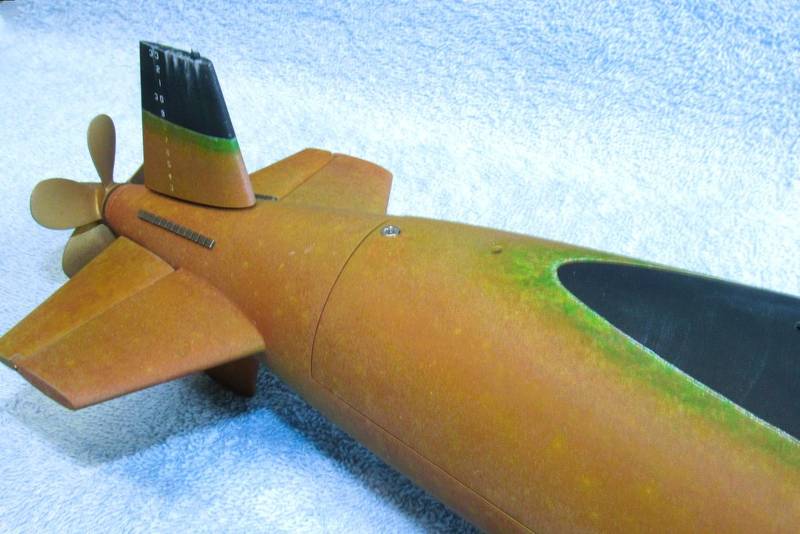
At the SKIPJACK's stern were four equally spaced rows of sacrificial zinc anodes – there to protect the brass alloy propeller and iron bearing hull from electrolysis induced corrosion. The zincs were CA'ed to the SKIPJACK's stern. The problem was how to denote their proper location about the conical section of hull.
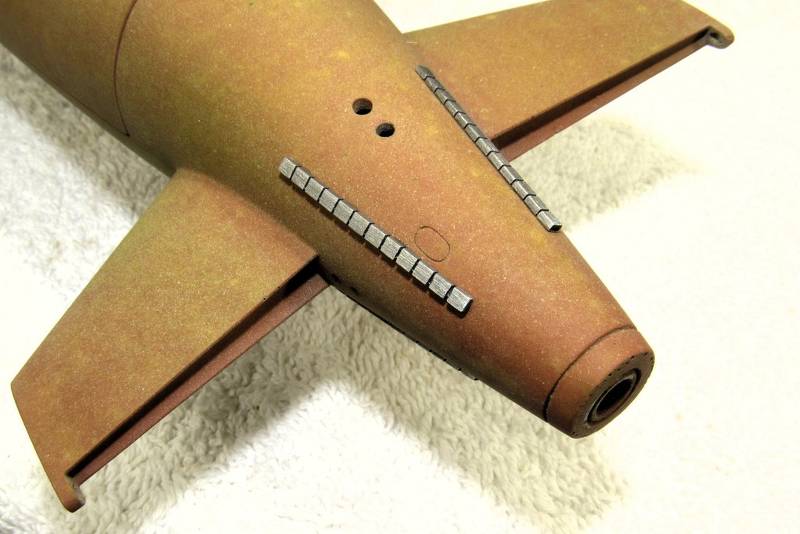
I first wrapped a narrow strip of masking tape around the circumference of the hull, well forward of where the eventual zincs would sit. The horizontal stabilizers and holes for the upper and lower rudder operating shafts guided me as I marked the masking tape with those locations. It was then a simple matter to find the half-way point – dividers was the tool of choice for this task – along the tapes circumference between each quadrant point. I then stuck down narrow lengths of masking tape running aft from a point to the stern. These strips of tape denoting the proper radial distribution and arrangement of the zincs.
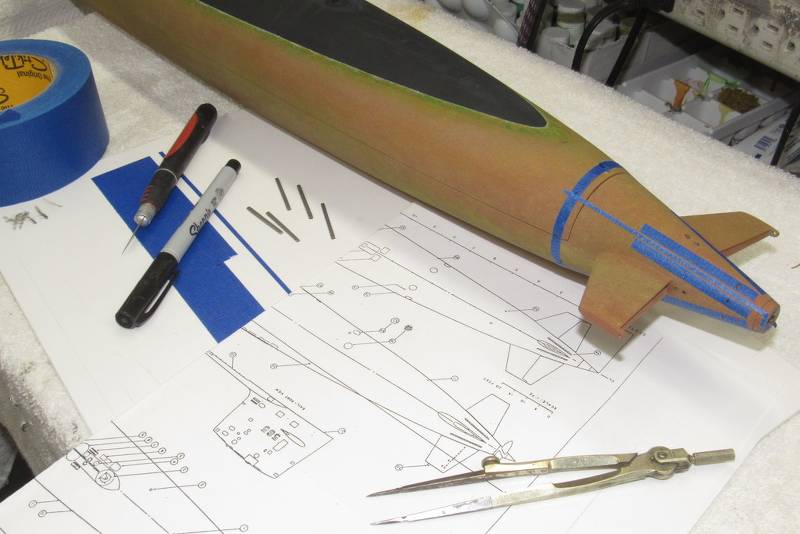
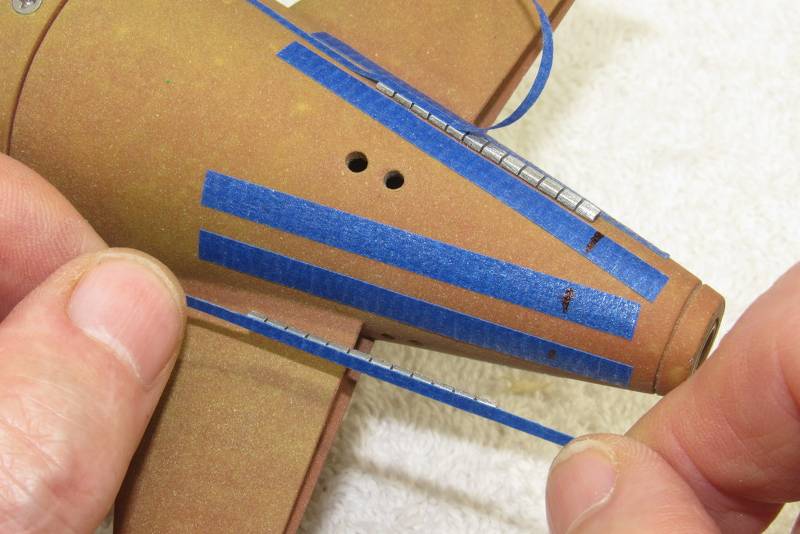
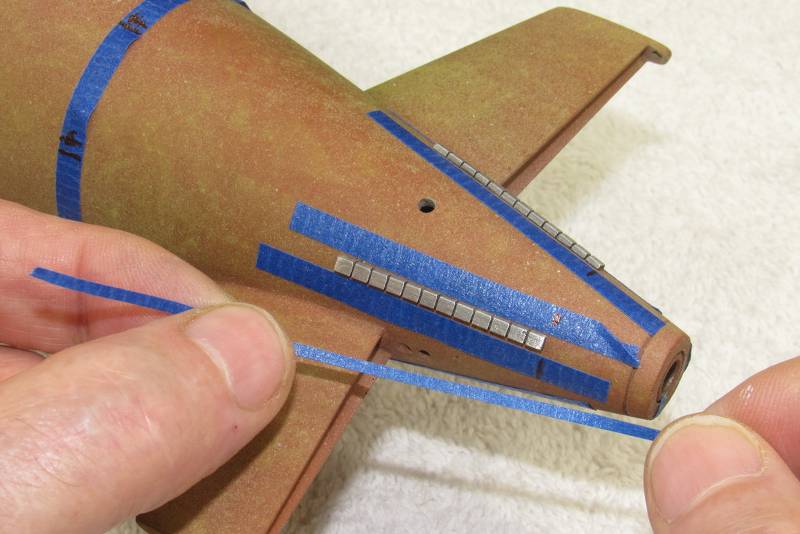
Either side of a longitudinal running strip of tape I stuck down a slightly wider strip of tape. The wider strips would help me corral the eventual zinc piece in proper place as I glued the zincs to the hulls stern.
A centrally running longitudinal piece of tape was pulled off the models stern and stuck to the top of a zinc piece. The bottom of the zinc piece received a small smear of CA adhesive and the topside masking tape used as a handle as the zinc piece was positioned and pressed into place at the SKIPJACK's stern.
Once the CA had cured hard, all masking tape was removed and I proceeded to other tasks.
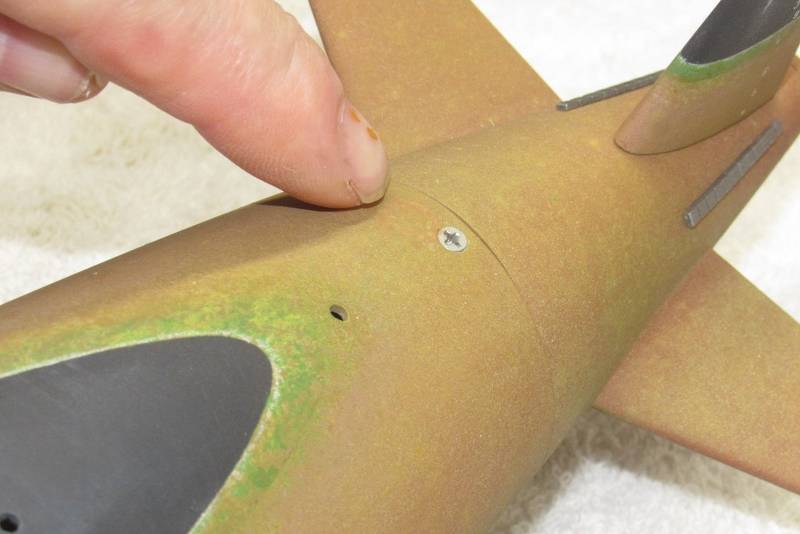
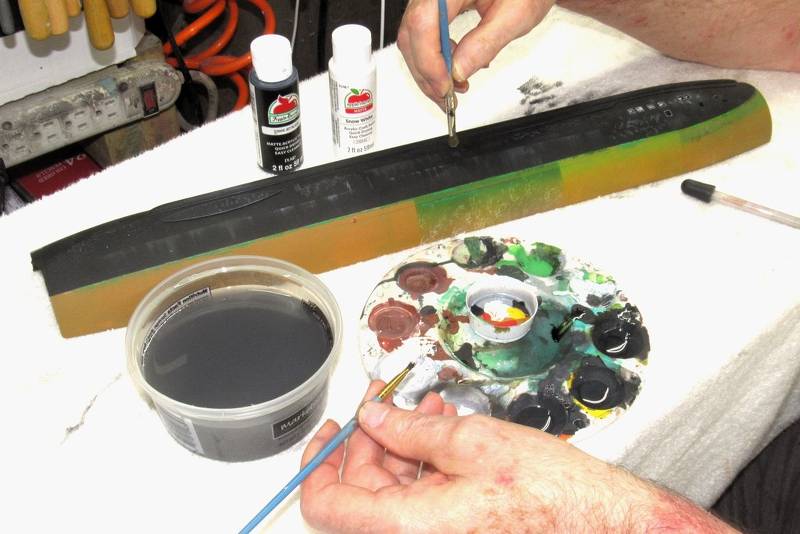
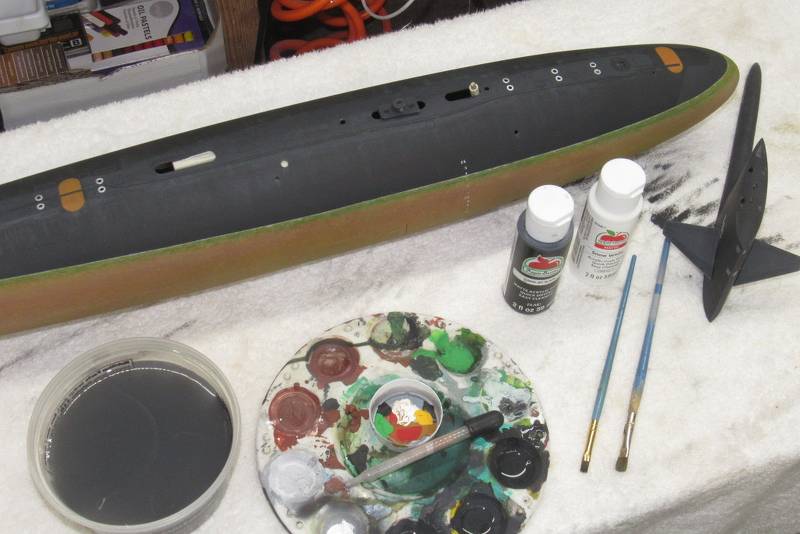
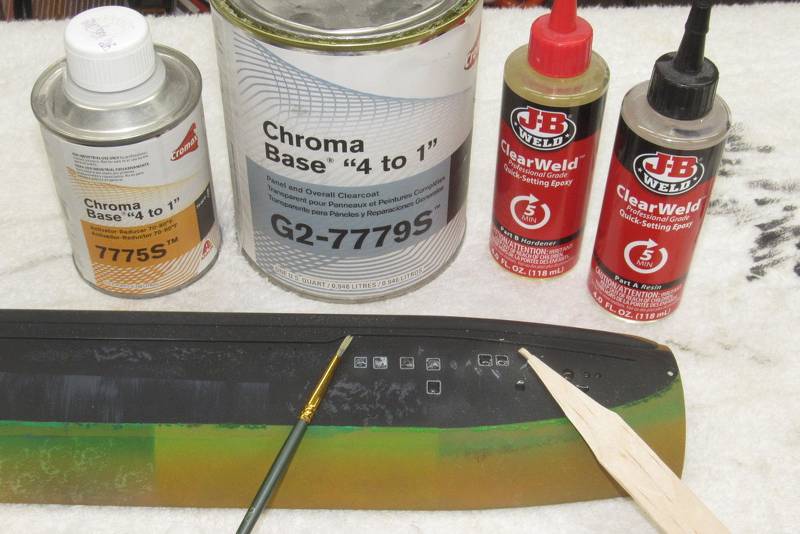
Unfortunately, when I pulled away the radially running length of masking tape it pulled away about a quarter-inch square portion of the carefully applied weathering – what was left was a virgin anti-foul red undercoat which stood in very sharp contrast to the weathered finish.
Here you see the ingredients for a quick, almost perfect touch-up repair of the damage area. Using the lid of the water container as a palette I kept mixing water soluble acrylic paint colors till I got the basic orange of the weathered surface, then stippled in slight variations of that color to replicate the mottled finish of the surrounding below-waterline portions of hull.
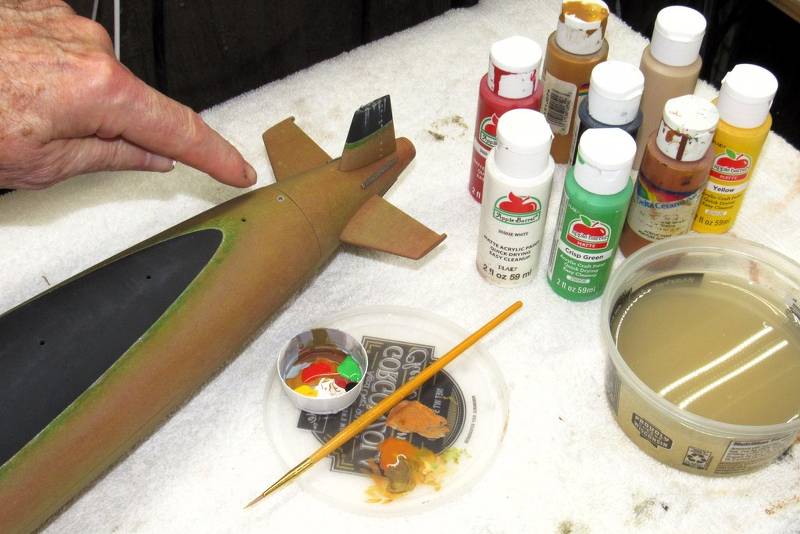
As each pass of paint went down I quickly dried it with the heat-gun, then moved on to a slightly different shade – playing around till the repaired paint-work was almost indistinguishable from the surrounding undamaged finish.
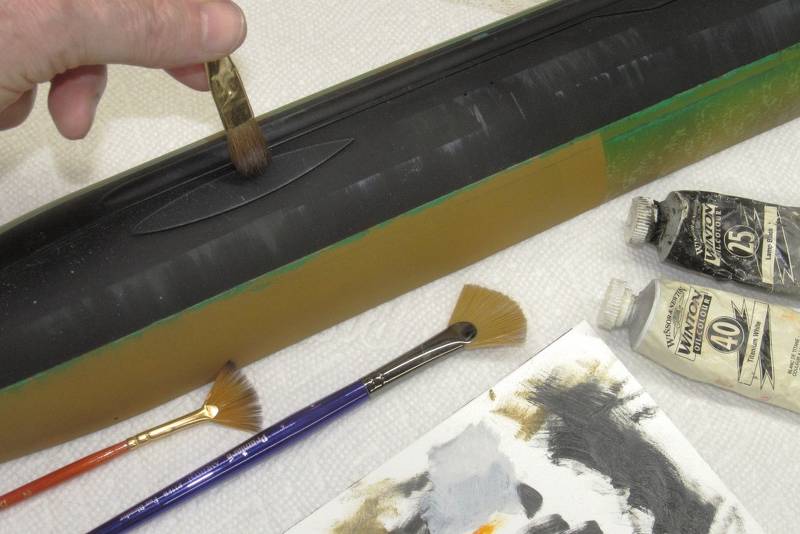
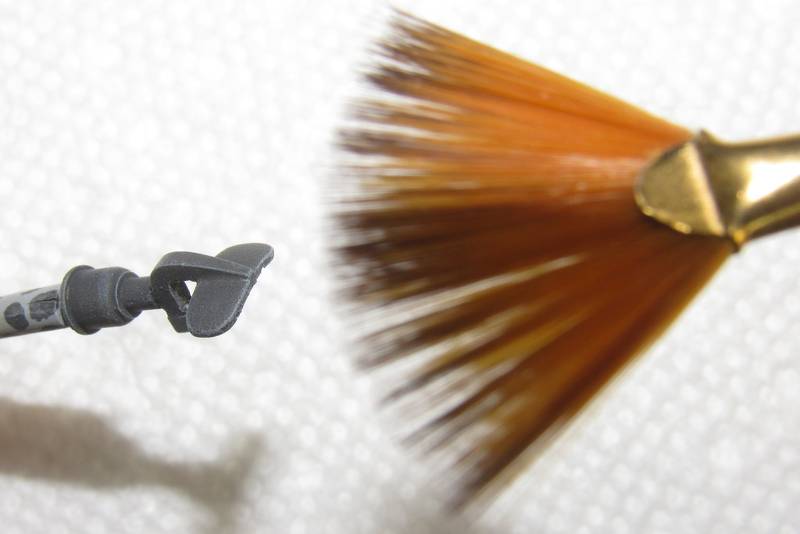
To highlight raised portions of the model I dry-brushed on a light shade of gray artist's oil. This medium takes days to dry and blends well, so is the paint of choice for this work. Typically, a very soft fan-brush is used. The trick is to lightly load the tip bristles of the brush with the paint and to then vigorously wipe all the paint you can from the brush. What little remains is transferred, every so lightly to only the raised portions of the model.
The brush is quickly swept back-and-forth over the models surface, the bristles barely making contact with the models raised surfaces. Only the projecting, sharp edges of the model pick up the paint. The light colored paint that is transferred to the model gives the illusion of sunlight impinging on those surfaces.
Here I'm practicing on the test-article before committing to the SKIPJACK model.
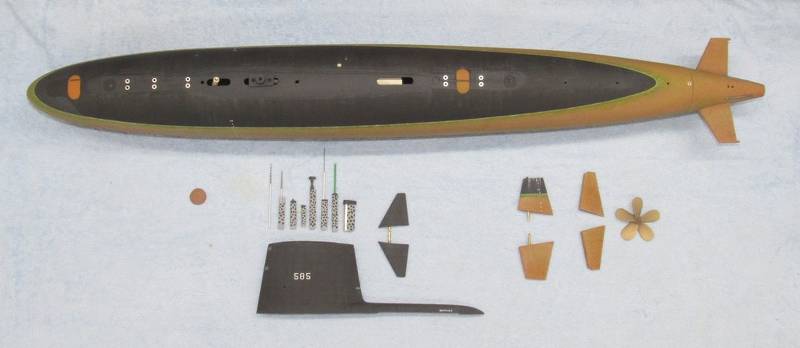
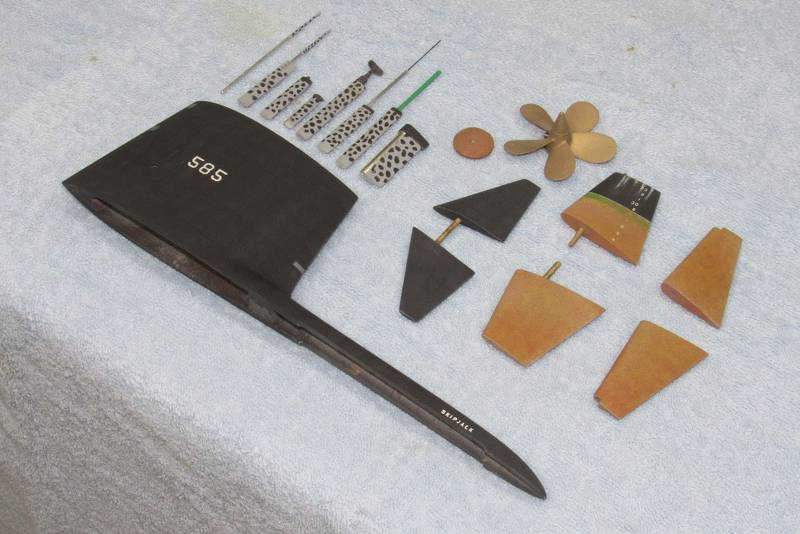
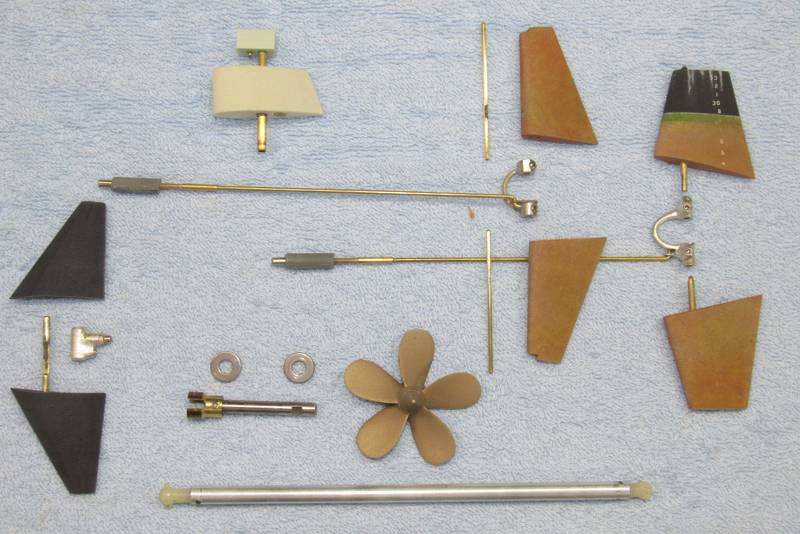
Time to assemble everything into a good looking, workable r/c model submarine.
Here, less the fairwater planes pushrod and SubDriver (SD), are the control surfaces and linkages; running gear; and SD ballast sub-system induction snorkel.
Who is John Galt?Comment
-
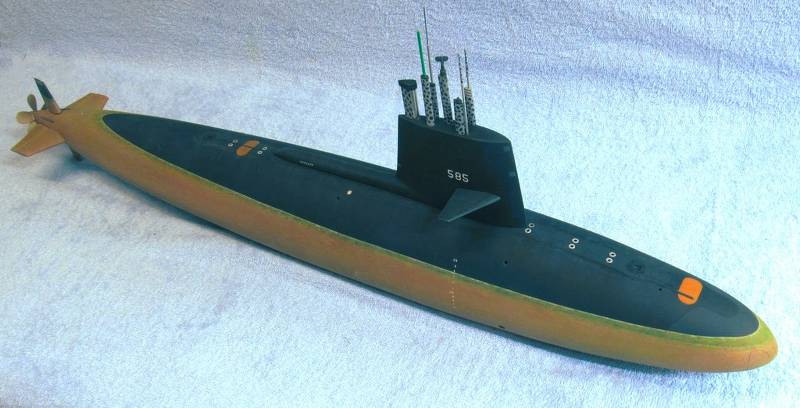
Well, I finally completed my 1/96 SKIPJACK.
Again!
I've built so many of these things – for friends, customers, and a few institutions – I've lost track. Each time I build one of these beasts with the intent of making it my own eventually someone makes me an offer I can't refuse, and it's gone.
This one stays with me, no matter what!
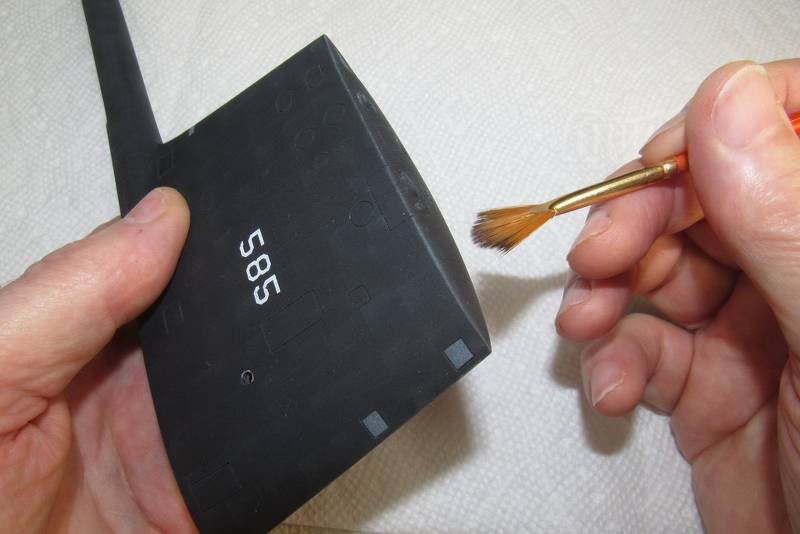
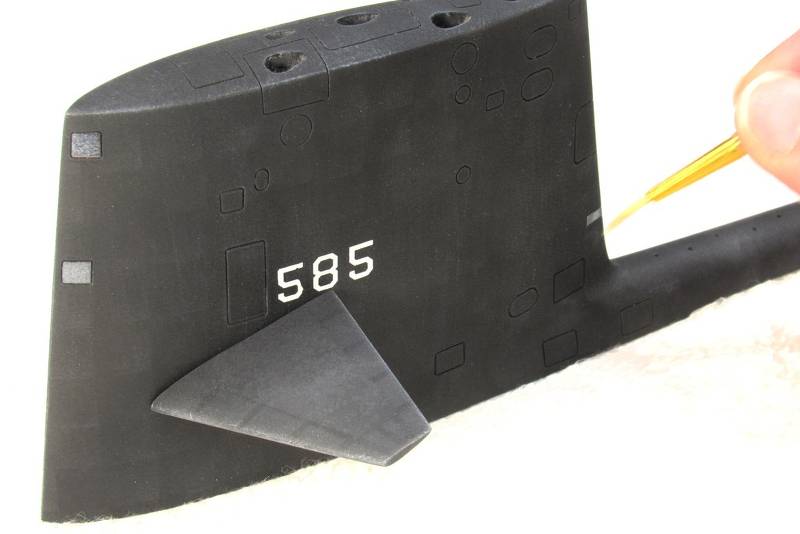
Three were two final detailing tasks before I considered the model done. The first was to represent 'scuff marks' on the non-skid portions of deck and atop the two fairwater planes. The non-skid itself is represented by a slightly lighter shade of the dark, dark gray of the upper hull, fairwater planes, and sail. Scuffing would be represented by a slightly darker color of that gray applied with a small stiff brush employing a stippling action done with a very light touch.
Here I'm working out the shad of gray and technique on the test article. The medium of choice here was the old reliable Walmart acrylic, water soluble paints, well thinned with water.
Once happy with the results on the test article I moved on to the model itself.
Most scuffing is owing to foot traffic, so most of the scuffing was done adjacent to the two escape trunk access hatches and retractable cleats.
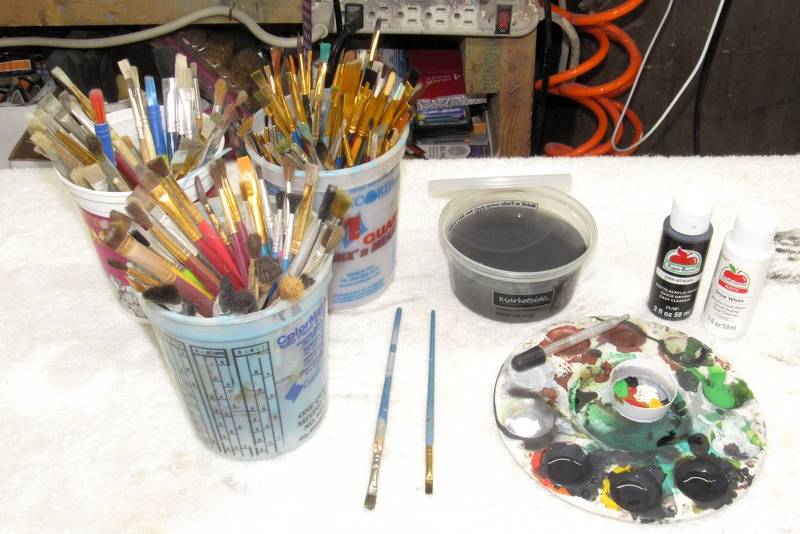
The hardest part of the scuffing job was finding just the right brush to do the job right. This illustrates the selection process – all worked out on the test article.
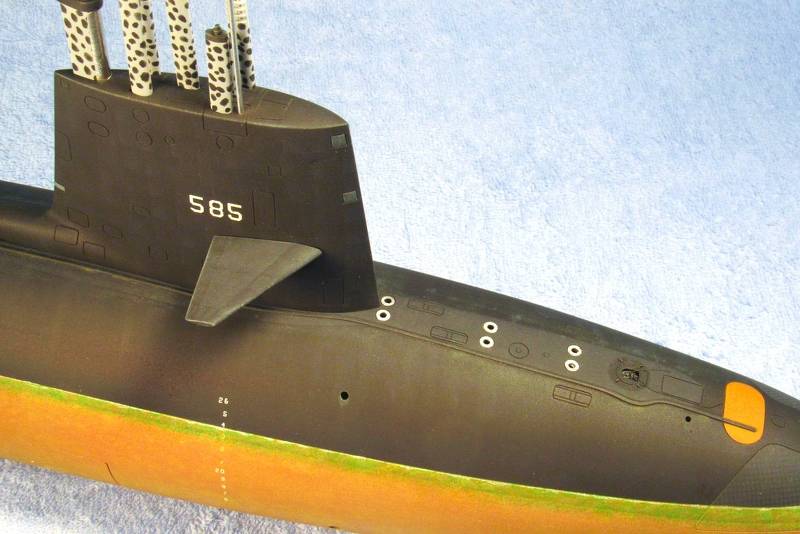
The scuff marks on the 'international orange' marker buoys was the same gray but watered down even more so as to reduce the pigment content – I only wanted the suggestion of foot traffic over these bright and contrasting surfaces.
An access door either side of the sail permitted people to stand atop the fairwater planes (watch-standers, shark-watch, semi-naked go-go dancers... that sort of thing). So, the non-skid portions atop those planes also got some scuffing.
The second job was to give the deadlights (the four supposedly clear 'windows' at the leading edge of the sail); the wrap-around lens of the emergency stern light, at the trailing edge of the sail; and the lens over the stern light mounted atop the upper rudder a clear gloss finish.
I engraved some deadlight outlines onto the test article and tried both epoxy adhesive and two-part polyurethane 'clear-coat'. The clear-coat won being easier to apply with a brush than the glue.
Here I'm brushing on some of the glossy clear-coat to the sails emergency stern light lens.
The hemispherical lens over the rudders stern light got the clear gloss treatment as well.
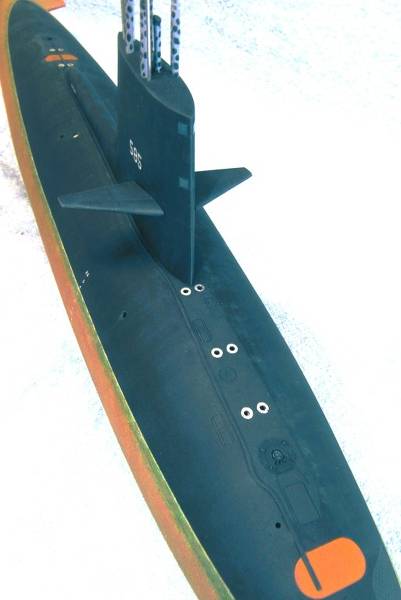
You can just make out the non-skid from the rest of the hull and fairwater planes, there being a slight variance in shade between the two.
Also note the simulation of 'oil-canning' to the sides of the sail. Represented only with slight variations in color density, the effect is to produce the suggestion of metal distortion between stringers and frames.
It's easy to over-state such things. Always keep in mind with weathering and paint detailing: Less is More!
Who is John Galt?
Who is John Galt?Comment
-
Make it simple, make strong, make it work!Comment
-
Jessie represents your typical art critique -- someone who has no idea what art is but espouses on the topic professionally. Give Jessie a haircut, dress him smartly, put a wine glass in his hand, and give him an Oxford accent and plunk him into a rich-man's cocktail party and you have today's art critique; a smooth talking, varnished, unaccomplished, grifter; an empty vessel; a con-man.
Heisenberg, on the other hand, knows the difference between art and Craft. I know the difference between art and Craft!
The word Art, in today's world, has been so mis-applied as to have been stripped of meaning -- in a world where **** smeared on a canvas; a jar full of **** and a Cross; and the universal acceptance of Expressionism is deemed as art by elitest art critiques -- a world I abhor and deny.
David
CraftsmanWho is John Galt?Comment
-
Okey, Takumi or master artisan in Japanese would be a better term for you.Make it simple, make strong, make it work!Comment
-
Masterpiece.Of the approximately 40,000 men who served on U-boats in WWII, it is estimated that around 28,000 to 30,000 lost their lives.Comment
-
Ageless model. Looks as good today as it did back in the 90s, when I saw and drove yours at Lake Trashmore. Fantastic finish on this one,David.Comment
-
Merriman's D & E 1/96 scale Skipjack is a excellent model submarine. Still have mine! I did a basswood hull master for the model. I turned two. One for a 1/96 static model of USS Scamp for the Vallejo Naval and Historial Museum Still there proudly on display with USS Permit - & another sent to Dave to just in his tooling. My modest contribution got me a turn key boat as payment. Thanks again Dave.
So many happy times running this model. It won first place at the San Francisco Model Yacht Club military regatta in....was it 1997? I did test in the pool having just received it in the mail. Trained 'the crew' familiarizing myself and the next day was at that Regatta and won first in the submarine course. Thats how well designed she is, a land lubber can get his Model Dolphins. Hell...not a 40 day wonder but a 40 minute wonder! lol. Merriman's work made me look good, probably more than I deserved. Operating in that murky pond. Merrimans designs build's confidence in the drivers too. Like a classic great fighter plane, it not only looks good, it flies right instilling confidence in the pilot.
I first balked when Dave said over the phone 1/96 scale? But Dave, that's too small isnt it? Nope! The tear drop hull, was perfect for the wtc-3 (3 inch diameter).. Funn how big these models are in the shop, but get them in the water, 1/96 or 1/32 makes no difference. They all become tiny in the vast 'ocean'.
The Woke culture everywhere, still have to .persuade parks and recreation no we are not disturbing the ducks. LOL... Experience and video's on you tube concistanly show the ducks are fasinated with those peric cope feathers a the humans are and follow them. Disturbing the ducks? More like entertaining them!...lol F**king woke heads. We all will lead then gently! LOL. Never mind...lol.
Just saying education and demonstrating the hobby is as important now as it was 2 decades ago. Now if we can get more radios in the lower frequencies to deal with the water in this digitized age, Its great for aircraft and rabid kids with 4 by 4 s, but... However I think Bob Martin in his resourcefulness an innovation has the frequency issues licked. But same time we need to make pals withhtes rbid kids too because they are flying drones. Getting a few helicopter dolly shots of our models in close diving and surfacing / beautiful bridal shots of that new boat.
SteveLast edited by Albacore 569; 07-17-2023, 10:48 AM.Comment
-
Last year, just in time for the big George SubFest r/c submarine regatta at the Red Clay resort, I brought along my newly assembled 1/35 Bronco Type-23 model submarine. Pictured here as I was trimming it prior to the event. This was a unique boat that featured a 'first person view' (FPV) video camera on board.
FPV permits the guy at the transmitter, outfitted with a set of video goggles to view via radio link what the on-board camera sees. All this technology – thanks to the wildly popular FPV systems used aboard drones and fixed winged model aircraft in recent years – is now commercially available as plug-and-play systems for surprisingly little money.
Here's some video from the use of FPV aboard that model submarine at the SubFest 2022 event:

The camera-transmitter unit and battery had to be housed in a watertight container, equipped with a clear window through which the camera lens could peep out. So, I developed a little Lexan cylinder capped with cast resin bulkheads.

I extended, through the use of small gauge coaxial cable, the antenna up from the watertight cylinder within the models sail and into the periscope. This was necessary as the very short, full-wave, 5.8gHz antennas signal would not punch through water – to work the transmitting antenna had to be in the air, and in line-of-sight to the base station (the FPV goggles) as the model ran along at periscope depth. The higher the frequency, the more opaque water becomes to the radio signal.

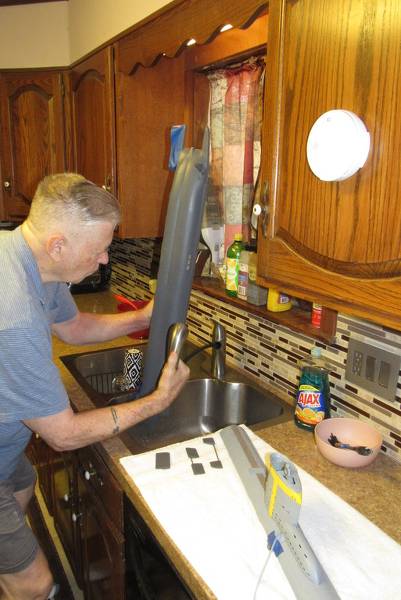
Since this model has already been operated in open (read: dirty) water, and has been in stowage for nearly a year, collecting further crud on its surfaces, I took the precaution of scrubbing everything – hull halves as well as the sail and control surfaces – with soapy water, scrubbing everything with a medium-stiff, paint brush. This in preparation of applying weathering agents to make this a much more attractive display, and to attenuate the 'toy' look of a pristine finish.

When operating this model at last years SubFest I had only the time beforehand to put down the basic colors: a very dark gray for all below waterline areas, haze gray for the above waterline areas, and the 'yellow' identification bands on the sail, denoting this boat as one being worked up by a green crew.
Green crew, new boat, little marine growth.
Since the Type-23 submarine I'm representing is a relatively new boat that has not been in the water too long I elected to show very moderate marine growth below its waterline.
A good example of a 'fresh' boat is this drydock shot of a post war, salvaged and made operational, Type-23 serving in the Federal German Navy. So, looking at the mottling on this boat, I was guided as to the 'look' of the below waterline marine growth that would be replicated on my model. Note that on that photo I have placed the mottled stern planes demonstrating the achieved effect – not done with the weathering, but this was the vital first step.

Mottling starts by applying a water soluble liquid mask over the below waterline portions of hull – those surfaces already a very dark gray, the typical anti-foul paint applied to German ships and submarines at the time. Once the sponge applied masking had dried hard the below waterline portions of the model submarine received a spray coating of a very medium heavy tan color.
To the left is the liquid masking fluid, 'tooth paste mask'. To the right is the severally reduced tan acrylic paint, labeled, 'bleach mung'.
When reducing the opacity of paint its not enough to cut it with thinner/solvent alone (water, since I'm working with water soluble acrylics here) – instead, the paint is cut with acrylic clear 'medium'. This way there remains enough resin to the paint to insure a strong polymerization as the film transitions from liquid to solid during the drying process.

The water soluble liquid mask I prefer is made with water, tooth paste, and food coloring. You cut the tooth paste with enough water to make it easily transported by stiff brush, sponge or rag. The food coloring lets you see where you've laid down the mask.

Mixing in the food coloring – black in this case – to make the dried masking visible.

To get straight the method of mask application I turned to my poor test article and experimented with a stippling brush, a 'flick' brush (an old tooth-brush), and sponge.

Once the masking had dried hard – that process speeded up with the use of a heat-gun – I lightly sprayed the 'bleach mung' to the three areas where I applied the mask.

The thing I love about water soluble acrylic paints and masking is that you can drive the liquid to a solid state quickly with the judicious use of the heat-gun. An important property of acrylic paint is that though it is reduced/thinned by water, it becomes insoluble once dry. The masking, on the other hand, when hardened remains water soluble.

I took advantage of the properties of the two coatings when it came time to remove the masking. Scrubbing with water removed the masking, but didn't touch the paint.

The bleached mung remains, the masking gone, revealing a mottled, bleached surface over the base color.
Pictured is the mottling pattern produced by applying the masking with a stipple brush. For a big-scale model like this 1/35 Type-23 this just looked wrong – would be fine for 1/96 or smaller, but not this project.

Unfortunately, the flick-brush applied masking produced an awful freckle look. Ugh!
However, masking applied with the sponge gave the desired mottled pattern and density for the Type-23.
Of the three methods of applying the masking, I found the sponge to be the best tool for this large-scale model submarine. So, armed with an easy to use, water soluble masking agent, and means of applying it, I proceeded with the below waterline weathering of the Type-23's hull and control surfaces.


Mottling completed, now it's time to address the 'grass' and other discoloration observed just below the hulls waterline.

Who is John Galt?Comment
-
David, love these postings. I have used Elmer’s white glue as a masking, it will wash/scrub off with water.If you can cut, drill, saw, hit things and swear a lot, you're well on the way to building a working model sub.Comment
-
Fresh off of doing the waterline 'weathering' on my little 1/96 SKIPJACK one would think that all I have to do, with that experience under my belt, is repeat the process on the 1/35 Type-23. Nope. Two different scales. That in mind I gave more thought on how the larger representations of accumulated bleached mung, sub-waterline, and 'sea grass' would be rendered; and what mediums, tools and techniques would best lend themselves to representing the below waterline portions of the submarine.
So, back to my weathering notebook for a refresher on how the real boats present themselves out of and in the water. That study guiding me as I worked to attain the 'look' I was going for.
Below are two examples that struck my fancy.

What I call a sub-waterline is a rather distinctive, well defined, band of color difference above and below the sub-waterline. I attribute this variance principally to what I've coined the parfait Sunday effect: a consequence of a gradient difference of temperature and particulate content near the waters surface that deposits varied forms of marine fauna, animals, and filth onto the boat as it sits tied up to the pier.
This sub-waterline can also be caused by a variance of the boats pier-side displacement – if the boat sits lower or higher than the designed waterline, a new scum line will form, becoming a sub-waterline. You see this a lot on cargo and oil freighters which change their displacement radically and for extended periods of time. A submarine that undergoes a massive weapons load/offload, re-fueling, or stores load without immediate compensation will see such changes of displacement creating a sub-waterline.
All combatant submarines spend some time idle at the pier, so none of them escape this form of weathering. It's just a matter of degree. America and Japan are anal about hull preservation and employ frequent hull-scrubbing. The other countries... not so much. Russia's the worst (Russian client nations coming in a miserable second-place) – making representation of Commie boats such a fun task for weathering nuts such as myself.

Whatever the cause of the sub-waterline, it has to be faithfully represented on the model. Here is the initial stage: the pristine sub-waterline has been laid down; from this point I work down from the boats designed waterline to represent sea-grass and other nasties that cling to the hull just below the waters surface.

One or more bands of sub-waterline will be found only near the designed waterline, down only a couple of feet from that. The first step in creating that sub-waterline is to pencil mark – VERY LIGHT pencil mark – where the edge of the sub-waterline will girdle the hull. That done with a waterline marking tool, a variant of a Machinist's surface-gauge.


When you study for form of a boat with one or more bands of sub-waterline you first note that the demarcation line that defines the sub-waterline is not a straight-and-narrow one, but rather a ragged and sometimes disjointed line extending around the hull.
To capture ragged, wavy look at the sub-waterline demarcation line I took long pieces of medium-tack masking tape and tore them in half, using the torn edge of the tape to follow the very lightly placed pencil marks previously laid down on the hull (and rudder).


The only other item getting the sub-waterline treatment was the big rudder between the upper and lower skegs. This photo is useful in that it shows how the bleached mung – a semi-opaque mixture of acrylic tan cut heavily with water and refortified with clear acrylic medium – is applied to the edge of the sub-waterline mask and feathered gradually downwards. A process that can only be done with an air-brush/gun when putting down paints that can't be blended (like artist oils). My paint of choice for broad work like this is the cheap water soluble acrylic paints you get at Walmart or Hobby Lobby type box stores.

Peeling away the sub-waterline masking reveals the jagged edge between the established lighter bleach mung colored lower portion of the sub-waterline and the rest of the below waterline portions of the hull.

Note the hard-edge of the above waterline masking, there to protect the upper surfaces of the hull from over-spray as I laid down the bleach mung onto the ragged edge of the sub-waterline masking. As the upper and lower halves of the model separate on the same plane as the waterline all I had to do was remove the upper hull, and set it aside, and mask off the bow and stern sections of the lower hull before painting.

The sub-waterline laid down, now comes the tricky part of representing the grass and other stinky nasties that girdle the submarine on and just below the designed waterline. Stay tuned, sports-fans!
Who is John Galt?Comment


Comment