Converting the Bronco type XXIII to RC

Collapse
X
 
  • Time
  • Show
Clear All
new posts
  • MFR1964
    Detail Nut of the First Order
    • Sep 2010
    • 1304

    David,

    Good to hear that you've hit the water, turningradius twice the lenght, hmm, not bad, must be the direct driven rudder, as for the CG, i'm aiming at direct under the conningtower, as with most of my boats.


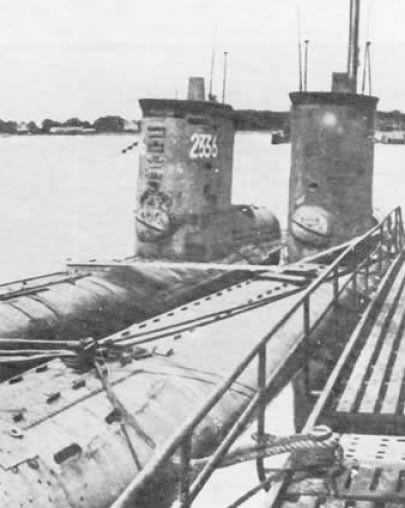
    Those two XXIII's at the meeting, one is mine, the other from a fellowbuilder nickname GJB at our dutch forum, which gave me the link to get my hands on the type XXIII, lucky me, he even drove the boat that day, as expected the conningtower gives a bit of a problem, much to heavy, he still has to strip down all internal stuff inside the conningtower to get the weight as low as possible when at the surface.


    Manfred.
    Last edited by MFR1964; 05-21-2013, 02:38 PM.
    I went underground

    Comment

    • MFR1964
      Detail Nut of the First Order
      • Sep 2010
      • 1304

      Slowly i'm getting there, before i started cutting into the exhaustcover and tower, i've studied as much pictures as i could, it took me some evenings to determen which holes i liked the most.


      The holes profided by Bronco are modified into this, complete with the bars inside.


      As for the tower, i took a gamble, and decided not to place the railings, and went for the later version, they placed more floodholes and added bars inside to offer the crew more grip around the tower, i was inspired by a picture of the U 2322.


      Even the front needed some modification, those two diagonal floodholes above the dingy holder, main motivation to add all those floodholes is, there will be a lot of type XXIII's being build, i will try to give mine a different look.
      Right now i'm working at the "wooden" deckplanks, i've discovered some nice things on the pics which i've not noticed before, looking at the right pics the puzzle came together, and it made sense why they did that in such way, be patient.


      Manfred.
      I went underground

      Comment

      • MFR1964
        Detail Nut of the First Order
        • Sep 2010
        • 1304

        There was something odd about the plancked modules they used on this boat during maintenance on the shipyard, accourding to the drawings i have, the wooden deck has to be longer,
        But with this kind of info, a picture of the real thing will have to back up this theory.


        When hunting down my little archive about the type XXIII i found this one, the front boat has a wooden plancking beyond the bollards, proving to me that it was indeed longer, this was my first clue.


        Second clue was, those strange rails on top of the deck, they go all the way, from the tower beyond the bollards, only be seperated by the batteryhatch.


        They apperently made some modifications during the builds, at the background the railtype and in front some kind of lips, i personally think those lips where used due to having less metal at the end of the war, by saving material, this matches with the higher U number of the front boat.
        As a matter of fact, they did two things at one time, designed a way to fasten those wooden modules and a kind of barrier to prevent those guys from slipping from the wet deck, clever move.


        I still had some styrene in stock to do the job, used the "wooden" deck planking as a mold for getting the styrene straight onto the deck.


        The styrene itself has a H shape, allowing me to "click" in the wooden deck modules, the only drawside is, i have to replicate such a module myself, Bronco delevered four of those modules, and i need to have five, so it's back to the shop to fix me one.


        Manfred.
        I went underground

        Comment

        • greenman407
          Admiral
          • Feb 2009
          • 7530

          I found these color pictures in one of my Books, Manfred knows the one. They clearly show a Yellow stripe. Taking a picture of a picture doesnt usually produce good results but I think that you can make it out.
          Click image for larger version

Name:	Transfer 401.jpg
Views:	1
Size:	93.3 KB
ID:	81415Click image for larger version

Name:	Transfer 403.jpg
Views:	1
Size:	97.8 KB
ID:	81416Click image for larger version

Name:	Transfer 404.jpg
Views:	1
Size:	95.1 KB
ID:	81417
          IT TAKES GREAT INTELLIGENCE TO FAKE SUCH STUPIDITY!

          Comment

          • trout
            Admiral
            • Jul 2011
            • 3547

            Mark,
            Great photos. Something I see also is a white stripe across the deck towards the bow, any idea why?
            If you can cut, drill, saw, hit things and swear a lot, you're well on the way to building a working model sub.

            Comment

            • greenman407
              Admiral
              • Feb 2009
              • 7530

              Yes, I see that. I dont know. Unfortunately this book is in German. A English one was not available. Ill bet Manfred knows. HEY MANFRED!!! OLI OLI OPTENFREE!!! Or Something like that. Or Von Hilde.
              IT TAKES GREAT INTELLIGENCE TO FAKE SUCH STUPIDITY!

              Comment

              • MFR1964
                Detail Nut of the First Order
                • Sep 2010
                • 1304

                Nice pics Mark, there are not that much full colourpics about WW2 uboats

                That stripe is used in combination with the yellow one on the tower, found some pics from a XXIII with a simular stripe on the exhaustcover, it was also yellow like the stripe on the tower.
                Probably used to show the guys in the air that the boat was still used at the UAK.


                Manfred.
                I went underground

                Comment

                • MFR1964
                  Detail Nut of the First Order
                  • Sep 2010
                  • 1304

                  Made the missing planking module and pimped her up with the stanchions and antenna wire, pictures


                  Not as good as the Bronco one, but after painting and weathering you won't see the difference at a distance.


                  All three parts can be lifted from the deck when needed.


                  Next step was to make the stanchions, since Bronco included the plastick one's, i could take some measurements and make a copper replacement, most tricky part was, drilling the 1 mm holes into the 1,5 mm rod.


                  Made a connection at the tower for hooking up.


                  Dryfitting the elastick cord to see at which place the connection will be placed at the deck.


                  This little thing gave me some grey hairs, only after the second attempt it worked out fine, the difficult thing about this is, you have to get your wires at both sides of the insulators, just like the real thing.


                  I've seen pics with three and four insulators, first i made the four insulator modification, to my taste there wasn't much antennawire left, so i broke it up and made the three insulator modification, giving me more lenght of antennawire.
                  For now im modifing the dingy hatch, got myself some good pics to make it more accurate, to be continued.


                  Manfred.
                  I went underground

                  Comment

                  • goshawk823
                    Lieutenant Commander
                    • Oct 2010
                    • 212

                    great work Manfred. Nicely done.

                    Comment

                    • alad61
                      Commander
                      • Jan 2012
                      • 476

                      That is amazing Manfred. I love the attention to detail your doing. And David calls me a detail nut... :biggrin:
                      Cheers,
                      Alec.


                      Reality is but a dream...
                      But to dream is a reality

                      Comment

                      • trout
                        Admiral
                        • Jul 2011
                        • 3547

                        Excellent work!
                        If you can cut, drill, saw, hit things and swear a lot, you're well on the way to building a working model sub.

                        Comment

                        • MFR1964
                          Detail Nut of the First Order
                          • Sep 2010
                          • 1304

                          Thanks Guys, slow as a snail, but i will get her to run.

                          Steve,

                          With this boat i jumped in, normally i do a lot of research, now this info is pouring in, i have to alter my plans time after time.

                          Alec,

                          Yep, just like me, he even gave me the title King of Complexity, we both have to carry our burden, those details will make my boat stand out in the coming fleet of type XXIII"s, at least i know which one is mine when driving in the midst of that fleet.

                          Tom,

                          Yeah, work, sometimes i hate myself, at the beginning i speed ahead, only being stopped by those lovely details, i need a slave!!!!


                          Right now i'm working on the hatch, glad this has to be made on scale 1/35, at the end of the week i expect to have it finished, the list with other details is growing like a mad man, (name of the lord), you got to love this hobby!!!!


                          Manfred.
                          I went underground

                          Comment

                          • roedj
                            Captain
                            • Sep 2008
                            • 563

                            Manfred,

                            I really love your work on this boat. I just realized that you may have the answer to a problem I've been struggling with on another boat - German Type 202 - namely how to move the rudder and rear dive planes without those ugly external push rods. Attached is a picture from page #2 of this thread showing your rudder/dive planes fixture.
                            ...Click image for larger version

Name:	steering 002 question for Manfred copy.jpg
Views:	1
Size:	39.1 KB
ID:	81635

                            My question is this - what is the dimension between the two arrows - between the two attachment points for the fore and aft control rods? Do you have any idea how small that dimension could be and still function reliably? I just may steal... I mean borrow your design.

                            Dan - Commander Klepto
                            Born in Detroit - where the weak are killed and eaten.

                            Comment

                            • MFR1964
                              Detail Nut of the First Order
                              • Sep 2010
                              • 1304

                              Which mortal dares to disturb the eternal rest at the Olympic Mountain!!!!!, oh, it's you, wait and stand still so i can start up the lightning generator.

                              It's 10 mm, it's near the limit, now get rid of those awfull arrows on my picture, and run for your life to build the same and dodge the lightningbolts


                              Manfred.
                              Last edited by MFR1964; 06-12-2013, 02:23 PM. Reason: too many kind words
                              I went underground

                              Comment

                              • trout
                                Admiral
                                • Jul 2011
                                • 3547

                                Puny god......
                                If you can cut, drill, saw, hit things and swear a lot, you're well on the way to building a working model sub.

                                Comment

                                Working...