Converting the Bronco type XXIII to RC

Collapse
X
 
  • Time
  • Show
Clear All
new posts

  • MFR1964
    replied
    David,

    I took a swift look at the SD, to me it seems that it can be deployed without making it shorter, took one of my launchers in the build, and did some measurements, it can be done, the extra room inside the ballasttank will be usefull since i have a tendency to throw in some extra weight due to the gizmo's.

    Talking about the launchtubes, for now i'm busy building them, i'll show you guys the progress sofar.


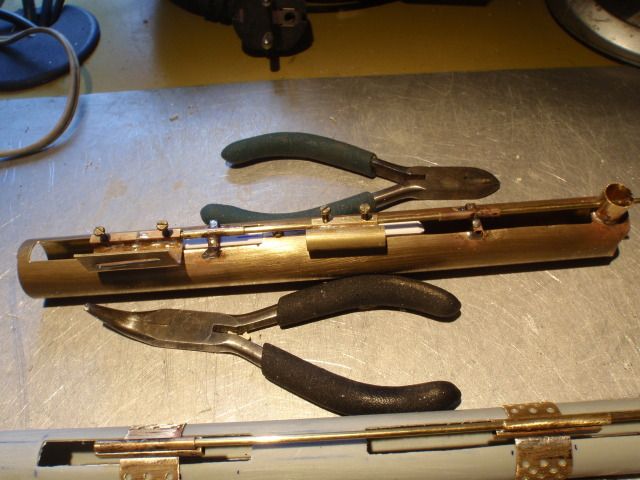
    This is my next generation launchtube for firing electric torpedo's, major difference is, stole the lockingball device from David, and added the magnet on the triggerbar, the launchtubes from my type VII are spring assisted, they push the torpedo out, away from the static magnet which is located underneath the launchtube, now the magnet will slide away, which will trigger the reedswitch inside the torpedo, it's on itself will run under power out of the launchtube.
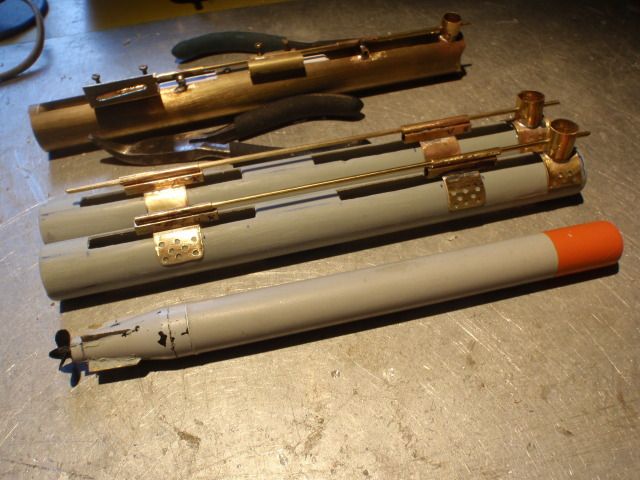
    Did numerous tests to see it it will work flawless, time after time i could launch the torpedo, so that's a winner, the copper tube is designed for my type XVIIb, using this design for the XXIII is a lucky bonus.


    Problem with those styrene tubes is, you cannot build up your parts from styrene, they will fail after some time, i decided to build up some components of copper, this tube is ready to be glued.


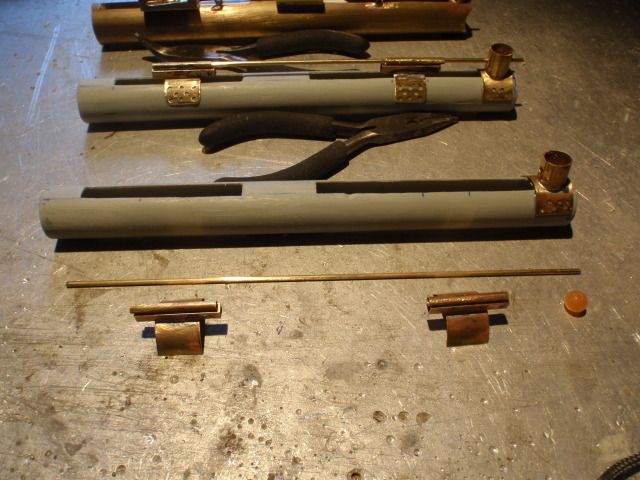
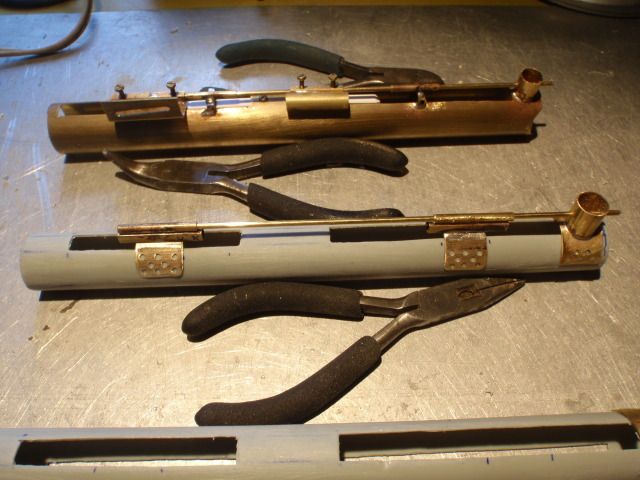
    The second tube is still under construction, at the foreground you can see all components needed.


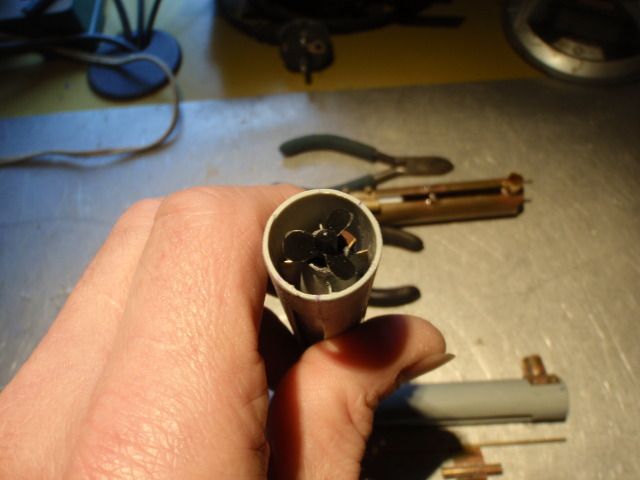
    Inserted one of my electric torpedo's, it's a nice fitt, still have to close the end of the launchtube, preventing the torpedo to be shuffed in too deep.


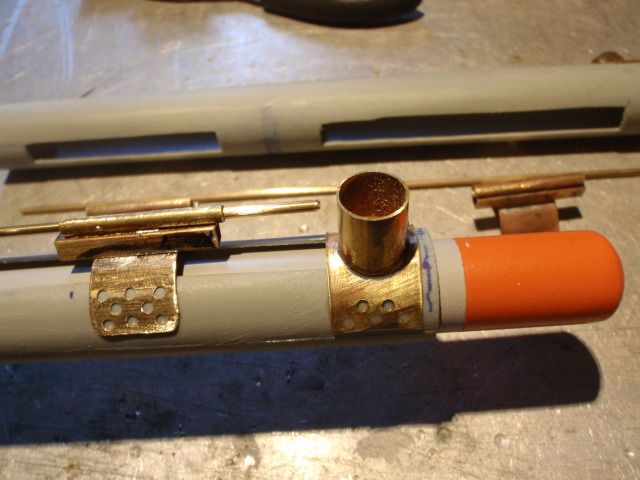
    The tube from the lockingball is a bit to high, that can be easely solved with the dremel, i will follow the same way like David did, will use the length to bent it inwards for preventing that the locking ball will fal out of the tube.


    All work in progress, still lots of work to do, have to design the levers which will control the triggerbars, now that i've got the SD, i can make a dryfitt to see how this can be done.


    Manfred.

    Leave a comment:


  • goshawk823
    replied
    Originally posted by He Who Shall Not Be Named
    Excellent! Get to it!

    [ATTACH=CONFIG]19275[/ATTACH][ATTACH=CONFIG]19276[/ATTACH][ATTACH=CONFIG]19277[/ATTACH][ATTACH=CONFIG]19278[/ATTACH]


    Note that I've produced two SD's for the Type-23. The longer one is our 'standard' single-motor 2.5 SAS SD that is recommended for most of the modern 1/96 model submarine hulls -- and it's a perfect fit for the Bronco 1/35 Type-23 if you don't want to install practical torpedoes. Though that ballast tank is about five more ounces of water weight than required, that would be compensated for by installing the appropriate amount of foam under the deck, above waterline.

    The smaller SD is purpose built for this kit -- it's length short enough to permit installation of two weapons ... sorry, no re-loads!
    Heh. Just like the real boat.

    David- If I may ask.... I'm used to the old WTC3, 3.5, mod2, etc. I'm looking at the photo of the smaller purpose built SD specifically, but I see two extra hoses on both, which I'm assuming are the for the SAS variant? Also, with these systems, how do the forward and rear dive planes interact (front fixed, rear on some angle keeper, front on servo, or vice versa?). Also front area of system is for air? How does one drive a torpedo fire mechanism from this type of system? Sorry, lots of questions; my knowledge is so stale...
    Thanks!
    Sam

    Leave a comment:


  • He Who Shall Not Be Named
    replied
    Originally posted by MFR1964
    Scope up, It has arrived!!!!!!, scope down.

    Manfred.
    Excellent! Get to it!

    Click image for larger version

Name:	DSCF4288.jpg
Views:	1
Size:	90.6 KB
ID:	76581Click image for larger version

Name:	DSCF4291.jpg
Views:	1
Size:	87.1 KB
ID:	76582Click image for larger version

Name:	DSCF4298.jpg
Views:	1
Size:	88.8 KB
ID:	76583Click image for larger version

Name:	DSCF4301.jpg
Views:	1
Size:	90.9 KB
ID:	76584


    Note that I've produced two SD's for the Type-23. The longer one is our 'standard' single-motor 2.5 SAS SD that is recommended for most of the modern 1/96 model submarine hulls -- and it's a perfect fit for the Bronco 1/35 Type-23 if you don't want to install practical torpedoes. Though that ballast tank is about five more ounces of water weight than required, that would be compensated for by installing the appropriate amount of foam under the deck, above waterline.

    The smaller SD is purpose built for this kit -- it's length short enough to permit installation of two weapons ... sorry, no re-loads!

    Leave a comment:


  • MFR1964
    replied
    Scope up, It has arrived!!!!!!, scope down.

    Manfred.

    Leave a comment:


  • He Who Shall Not Be Named
    replied
    Originally posted by MFR1964
    David,

    Cutting her open at the waterline is my plan B, first i want to try it the hard way, you know me, allways rowing into the stream, have to make Rube Goldberg proud, must resist.......


    Manfred.
    OK, I won't get in the path of a trail-blazer. But remember: Pioneers are the ones who catch the arrows!

    Leave a comment:


  • MFR1964
    replied
    David,

    Cutting her open at the waterline is my plan B, first i want to try it the hard way, you know me, allways rowing into the stream, have to make Rube Goldberg proud, must resist.......


    Manfred.

    Leave a comment:


  • He Who Shall Not Be Named
    replied
    Originally posted by MFR1964
    Steve,

    I'll probably will end up with filling the modelparts with resin like you mentioned, when the resin is still liquid i can push through the rods, using vaseline on the rods wil give me the change to get them out after hardening, i'll have to see about that.

    For opening up the hull i've got a more evil plan, i'll use the allready excisting split from the front and back parts, Skunkworks is running hard on this one to solve.


    Manfred.
    Don't do it!

    Sure, it looks great to take advantage of the radial split between forward half and after half of the hull, but it is actually fraught with problems: access for weight and foam placement; hidden linkages; the need to upset every interface connection for the simplest of observations or adjustments. The only time you want to do this is if the boat is operated dry.

    Me? I'm cutting off the top of the hull at the waterline. KISS!

    David

    Leave a comment:


  • MFR1964
    replied
    Steve,

    Using the allready excisting split will be the best option for me, don't want to cut her open at the waterline, the split itself is well hided away by a weldingline, during my dryfitts you can't see the split of both halves, it's going to be tricky, but it can be done.

    Allready have some plans on paper for sliding in the SD, and locking it ferm to the backpart, the front part will only contain the launchtubes which also will use magnetic couplers to activade the launchtubes with the doors, more or less the same story for connecting the rudders/diveplanes and propellor shaft.

    Manfred.

    Leave a comment:


  • Warpatroller
    replied
    Originally posted by MFR1964
    Steve,

    For opening up the hull i've got a more evil plan, i'll use the allready excisting split from the front and back parts, Skunkworks is running hard on this one to solve.

    Manfred.
    I was thinking about that front to back split as well.. With the magnetic "klik-on" couplers, the WTC could slide into place, with the propshaft and pushrods "click" connecting to the outputs of the WTC.

    Cutting the hull, especially along the entire length, would be nice to avoid..

    Leave a comment:


  • MFR1964
    replied
    Steve,

    I'll probably will end up with filling the modelparts with resin like you mentioned, when the resin is still liquid i can push through the rods, using vaseline on the rods wil give me the change to get them out after hardening, i'll have to see about that.

    For opening up the hull i've got a more evil plan, i'll use the allready excisting split from the front and back parts, Skunkworks is running hard on this one to solve.


    Manfred.

    Leave a comment:


  • Warpatroller
    replied
    Very nice rig you built Manfred! And authentic to the real boat on the rudder mechanism!

    Can the kit's planes and rudder be filled inside with resin, or something that would harden to get the air out of them? You need the shaft opening through them though.. I suppose it is easier to cast replacements in resin like David does..

    I like your set screw idea. That way two of the planes, on each side of the hull, can be removed and installed. It would then be possible to use the kit's existing vertical hull split (along the two halves), for opening and closing the hull.

    Leave a comment:


  • goshawk823
    replied
    Originally posted by MFR1964
    Romel,

    For now they are secured by using 1 mm pins, did this to proper line them out on the shafts, they will be replaced by 2mm hubscrews to give me more grip, adding some glue before attaching can be also a option, still have to think about a proper way to vent these hollow parts from the kit.


    Sam,

    The entire unit has a weight of 79 grams, or 2.79 ounce, i wanted to keep it light, and used lightweight circuitboard for constructing the main frame.


    Manfred.
    Thanks, Manfred. I was trying to understand what material you were using for the frame.

    Leave a comment:


  • MFR1964
    replied
    Romel,

    For now they are secured by using 1 mm pins, did this to proper line them out on the shafts, they will be replaced by 2mm hubscrews to give me more grip, adding some glue before attaching can be also a option, still have to think about a proper way to vent these hollow parts from the kit.


    Sam,

    The entire unit has a weight of 79 grams, or 2.79 ounce, i wanted to keep it light, and used lightweight circuitboard for constructing the main frame.


    Manfred.

    Leave a comment:


  • goshawk823
    replied
    beautiful work Manfred. how's the weight of the entire unit?

    Leave a comment:


  • redboat219
    replied
    How did you secure the kit's rudder and planes to their control shafts?

    Leave a comment:

Working...