1/96 Project 1710 Beluga

Collapse
X
 
  • Time
  • Show
Clear All
new posts

  • trout
    replied
    If I was t pick on one area of your finished sub (which is gorgeous), it would be the space between the aft planes and the stern stabilizer. You have weathered the sub, but in-between this space is the original paint.

    Leave a comment:


  • He Who Shall Not Be Named
    replied
    Glad to see you take on the very challenging tooling chore of producing a stern cone with all four stabilizers integrated into the eventual casting. Good stuff!

    Strands of carbon fiber placed into the tips of the stabilizer tool cavities will greatly reduce the likelihood of breakage to the eventual cast resin tail-cone appendages.

    More bird-****!... more bird-****!

    (with apologies to Christopher Walken, the 'more cow-bells' guy).

    David

    Leave a comment:


  • HardRock
    replied
    Is it safe to come out now? This is the upper half of the mould for the complete tail end. The brass rods are connected to the trailing edges of the thing to channel air bubbles away from the edges. I'm going to add a 10" tube at the top to provide a bit of pressure when the resin goes into the mould.


    Click image for larger version

Name:	P4040231.jpg
Views:	163
Size:	566.6 KB
ID:	125853


    This is the finished boat. Add SD and some weight/foam for balance and off she goes.

    Click image for larger version

Name:	P4040232 (1).jpg
Views:	150
Size:	125.9 KB
ID:	125854


    Click image for larger version

Name:	P4040234.jpg
Views:	111
Size:	568.4 KB
ID:	125855

    Leave a comment:


  • He Who Shall Not Be Named
    replied
    Originally posted by trout
    David, You paint bird poop on and Scott can't have some large limpets? You hypocrite! Maybe if he would paint it with legs it could be starfish! Or an octopus.
    ah .... err... ah .... (slinking back under my bridge).

    David

    Leave a comment:


  • trout
    replied
    David, You paint bird poop on and Scott can't have some large limpets? You hypocrite! Maybe if he would paint it with legs it could be starfish! Or an octopus.

    Leave a comment:


  • He Who Shall Not Be Named
    replied
    Originally posted by HardRock
    Ha ha. I actually cast a full set of control surfaces to send you because I knew you'd go ape-**** over the 3D items. I usually do sand them off but I like the look of them on this model. Lots of texture.
    Don't hand me that crap - a turd festooned with corn has 'texture' as well. But I don't want that hanging off the ass-end of my model submarine!

    What's wrong with you people!

    David

    Leave a comment:


  • HardRock
    replied
    Ha ha. I actually cast a full set of control surfaces to send you because I knew you'd go ape-**** over the 3D items. I usually do sand them off but I like the look of them on this model. Lots of texture.

    Leave a comment:


  • He Who Shall Not Be Named
    replied
    You lazy ****! sand off those 3D artifacts off the control surfaces!

    You people: I buy you books, send you to school, and what do you do? .... you eat the teacher!

    David
    The Horrible

    Leave a comment:


  • HardRock
    replied
    The lower mould has finally set hard. Thus:

    Meanwhile the painting goes on.

    Click image for larger version

Name:	P3300233.jpg
Views:	132
Size:	402.9 KB
ID:	125766

    Click image for larger version

Name:	P3300234.jpg
Views:	116
Size:	647.3 KB
ID:	125767

    Leave a comment:


  • HardRock
    replied
    This rubber mould is taking forever to dry. In the mean time I amusing myself with with an airbrush.

    Click image for larger version

Name:	P3290233.jpg
Views:	134
Size:	612.5 KB
ID:	125758

    Click image for larger version

Name:	P3290235.jpg
Views:	124
Size:	110.9 KB
ID:	125759


    Click image for larger version

Name:	P3290234.jpg
Views:	130
Size:	501.1 KB
ID:	125760

    Leave a comment:


  • HardRock
    replied
    The lower mould for the tail section is drying today so I decided to get on with painting my own boat.

    Click image for larger version

Name:	P3270236.jpg
Views:	133
Size:	468.2 KB
ID:	125744


    Click image for larger version

Name:	P3270231.jpg
Views:	140
Size:	637.7 KB
ID:	125745

    Click image for larger version

Name:	P3270233.jpg
Views:	168
Size:	541.3 KB
ID:	125746

    The tail on this one won't be as good as the new, all in one job but its OK.

    Leave a comment:


  • He Who Shall Not Be Named
    replied
    Originally posted by HardRock
    They are actually a bit smaller than that. 1.5 mm. Its a pretty small tail. I've made up some brass inserts to go in the stabiliser tips. They have a hole for the operating shalf and should end up fully enclosed in resin.
    Very well.

    David

    Leave a comment:


  • HardRock
    replied
    They are actually a bit smaller than that. 1.5 mm. Its a pretty small tail. I've made up some brass inserts to go in the stabiliser tips. They have a hole for the operating shalf and should end up fully enclosed in resin.

    Leave a comment:


  • He Who Shall Not Be Named
    replied
    Originally posted by HardRock
    I just realised that the photograph didn't appear for some reason. Here it is. Click image for larger version  Name:	P3250232.jpg Views:	1 Size:	447.8 KB ID:	125733
    No need for the stern control surface operating shafts to be so big in diameter. As the rudders and stern planes are protected by the fixed stabilizers, you can get away with control surface operating shafts of .062" or so.


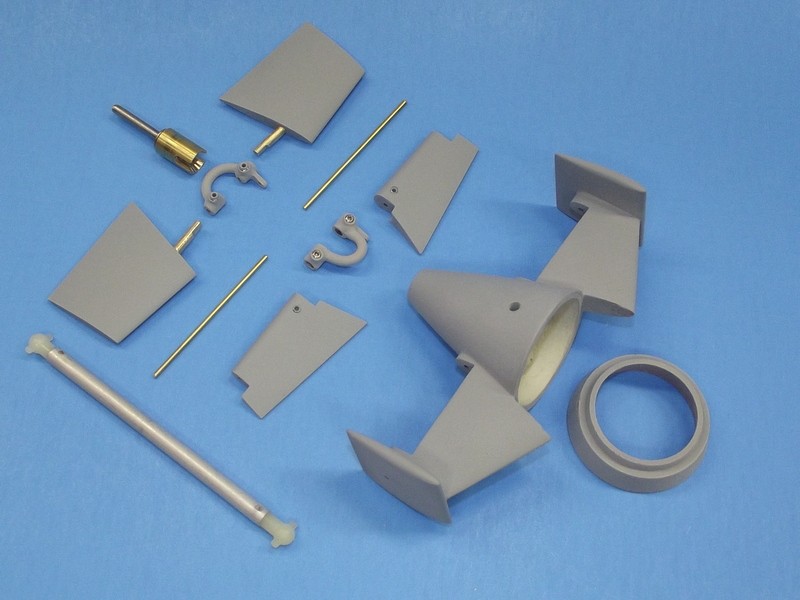
    The bigger diameter operating shafts weaken the tips of the stabilizers.

    Leave a comment:


  • HardRock
    replied
    I just realised that the photograph didn't appear for some reason. Here it is.

    Click image for larger version

Name:	P3250232.jpg
Views:	146
Size:	447.8 KB
ID:	125733

    Leave a comment:

Working...