Converting the Bronco type XXIII to RC

Collapse
X
 
  • Time
  • Show
Clear All
new posts
  • Warpatroller
    Lieutenant
    • Dec 2012
    • 90

    #16
    That photo you posted of 2326, in Cherbourg, is lighter (exposure wise) than the same photo in my book. That photo in my book is much darker and the detail is all lost in the shadows back there. You can see the prop much better in the copy you posted. I agree, those slats ahead of the stern plane guard do look to be vertical. I have not come across any photos that actually show the ones in the bottom center area of the hull.

    The German magazine, "U-Boot im Focus" has some good XXIII photos and info about the boats in them. Including info on the UAK runic recognition marks used on XXI and XXIII boats in 44/45. My friend should have all 8 of the existing magazines.. I'll have to give him a call and I might be able to take some photos and post some on the board here regarding the ole XXIII.

    Steve
    "Wir kommen ihnen unbekannt."

    Comment

    • MFR1964
      Detail Nut of the First Order
      • Sep 2010
      • 1304

      #17
      Steve,

      That would be great if your friend could take more pics about the XXIII, i'll try to hunt down those books, they look promising.

      As for the ventholes in the middle part, we only need a stroke of luck, i can't imagen that there is not a picture of that somewhere present in a archive or personal album, sooner or later it will pop up.
      This part i like the most, hunting down all the info, now people will understand you have to do your research first before jumping in, my boat has to wait for details untill i've found enough.

      Manfred.
      I went underground

      Comment

      • Warpatroller
        Lieutenant
        • Dec 2012
        • 90

        #18
        Manfred, here is a group from a forum gallery. There are several Type 23 photos starting near the middle of the page:

        Page 22- Your U-boat pictures Sub & Naval Discussions: World Naval News, Books, & Films
        "Wir kommen ihnen unbekannt."

        Comment

        • MFR1964
          Detail Nut of the First Order
          • Sep 2010
          • 1304

          #19
          Thanks Steve,

          I allready knew about this site, but you saved me a lot of time searching the pictures by giving me the direct link, thanks again, they are now stored into the archives and will be usefull with building my sub.

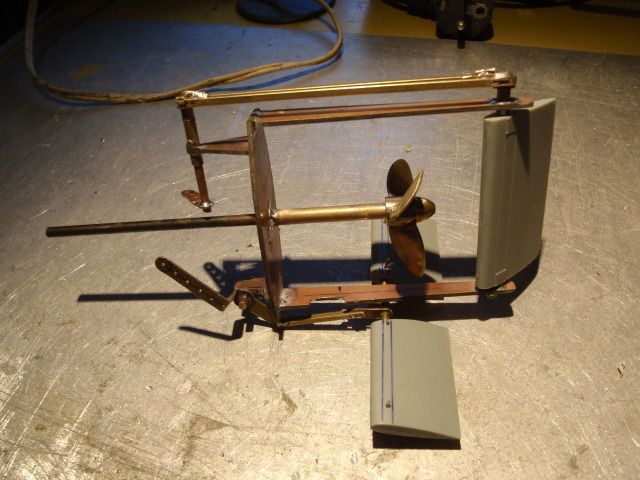
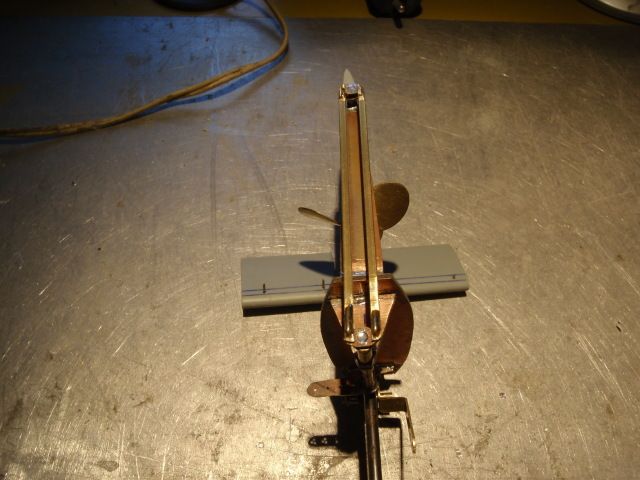
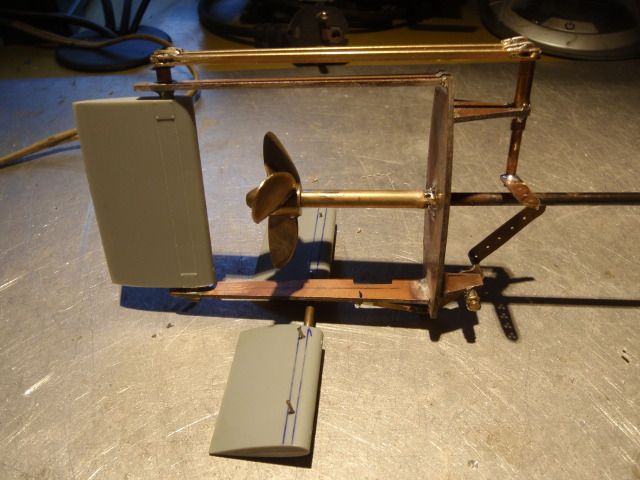
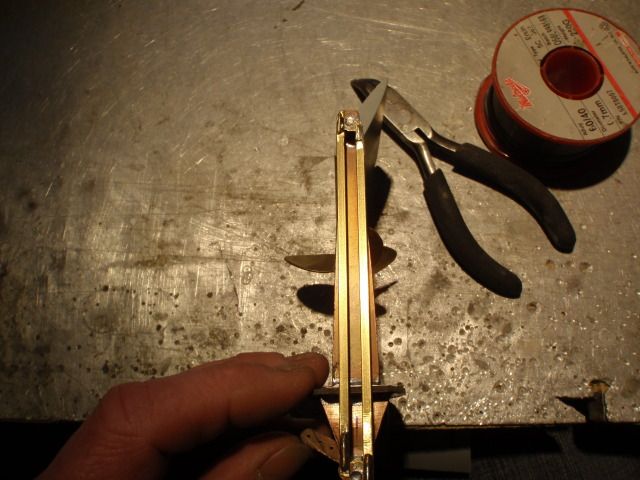
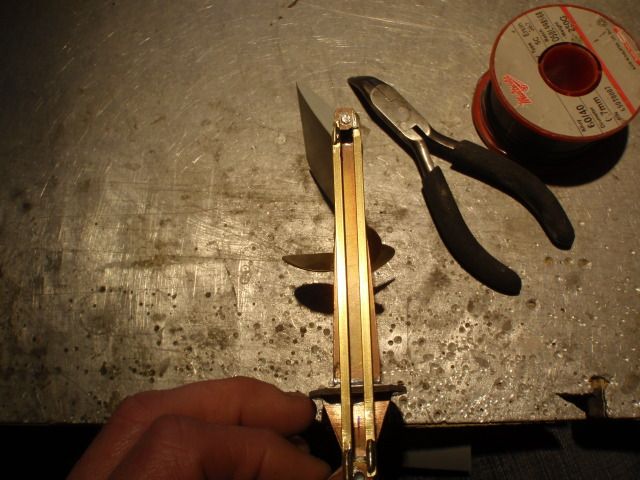
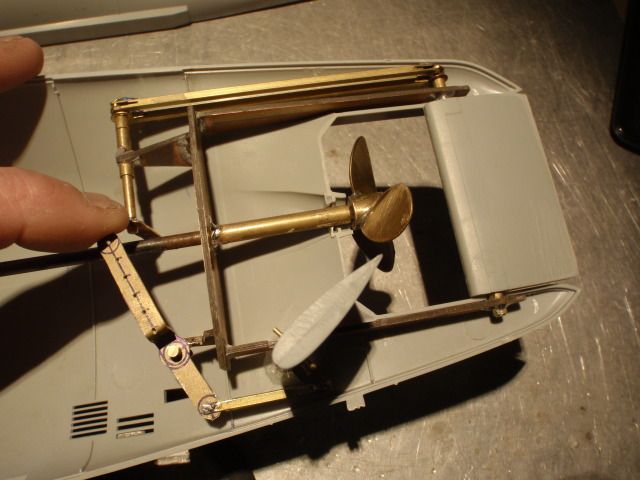
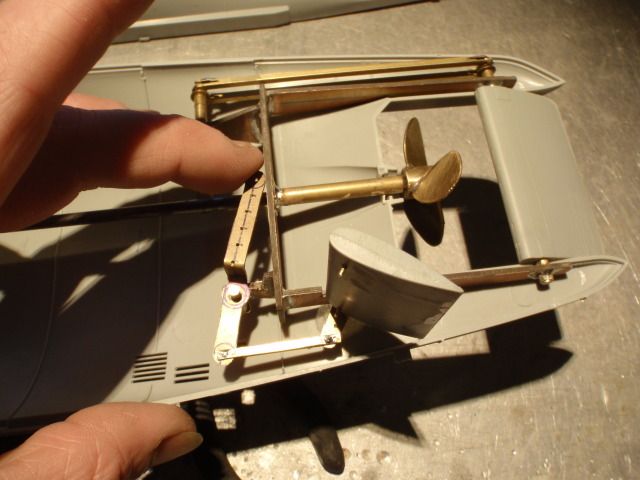
          And some news from my Skunkworks, last few weeks i couldn't resist to solve the rudder and diveplane steering, at first i tried the wire system, it worked, but there were some issue's, i went back to the drawingboard and copied the original system, pictures.


          A three side view of my rudder/diveplane arrangement, used the same system pull/pull for steering the rudder, there is not that much room inside but it's enough for me to make it work.


          Deflection of the rudder is about 25 degrees both ways, just like the orignal, this is due to the narrow space you have.


          The entire structure can be placed at the back in one piece, once glued tight there will be no maintenance needed, all joints are soldered to maintain this.
          Now i have to design a way of connecting the SD magnetic couplers in one move, have to make guides for the propellor shaft and rudder/diveplane connections.


          Manfred.
          I went underground

          Comment

          • redboat219
            Admiral
            • Dec 2008
            • 2759

            #20
            How did you secure the kit's rudder and planes to their control shafts?
            Make it simple, make strong, make it work!

            Comment

            • goshawk823
              Lieutenant Commander
              • Oct 2010
              • 211

              #21
              beautiful work Manfred. how's the weight of the entire unit?

              Comment

              • MFR1964
                Detail Nut of the First Order
                • Sep 2010
                • 1304

                #22
                Romel,

                For now they are secured by using 1 mm pins, did this to proper line them out on the shafts, they will be replaced by 2mm hubscrews to give me more grip, adding some glue before attaching can be also a option, still have to think about a proper way to vent these hollow parts from the kit.


                Sam,

                The entire unit has a weight of 79 grams, or 2.79 ounce, i wanted to keep it light, and used lightweight circuitboard for constructing the main frame.


                Manfred.
                I went underground

                Comment

                • goshawk823
                  Lieutenant Commander
                  • Oct 2010
                  • 211

                  #23
                  Originally posted by MFR1964
                  Romel,

                  For now they are secured by using 1 mm pins, did this to proper line them out on the shafts, they will be replaced by 2mm hubscrews to give me more grip, adding some glue before attaching can be also a option, still have to think about a proper way to vent these hollow parts from the kit.


                  Sam,

                  The entire unit has a weight of 79 grams, or 2.79 ounce, i wanted to keep it light, and used lightweight circuitboard for constructing the main frame.


                  Manfred.
                  Thanks, Manfred. I was trying to understand what material you were using for the frame.

                  Comment

                  • Warpatroller
                    Lieutenant
                    • Dec 2012
                    • 90

                    #24
                    Very nice rig you built Manfred! And authentic to the real boat on the rudder mechanism!

                    Can the kit's planes and rudder be filled inside with resin, or something that would harden to get the air out of them? You need the shaft opening through them though.. I suppose it is easier to cast replacements in resin like David does..

                    I like your set screw idea. That way two of the planes, on each side of the hull, can be removed and installed. It would then be possible to use the kit's existing vertical hull split (along the two halves), for opening and closing the hull.
                    "Wir kommen ihnen unbekannt."

                    Comment

                    • MFR1964
                      Detail Nut of the First Order
                      • Sep 2010
                      • 1304

                      #25
                      Steve,

                      I'll probably will end up with filling the modelparts with resin like you mentioned, when the resin is still liquid i can push through the rods, using vaseline on the rods wil give me the change to get them out after hardening, i'll have to see about that.

                      For opening up the hull i've got a more evil plan, i'll use the allready excisting split from the front and back parts, Skunkworks is running hard on this one to solve.


                      Manfred.
                      I went underground

                      Comment

                      • Warpatroller
                        Lieutenant
                        • Dec 2012
                        • 90

                        #26
                        Originally posted by MFR1964
                        Steve,

                        For opening up the hull i've got a more evil plan, i'll use the allready excisting split from the front and back parts, Skunkworks is running hard on this one to solve.

                        Manfred.
                        I was thinking about that front to back split as well.. With the magnetic "klik-on" couplers, the WTC could slide into place, with the propshaft and pushrods "click" connecting to the outputs of the WTC.

                        Cutting the hull, especially along the entire length, would be nice to avoid..
                        "Wir kommen ihnen unbekannt."

                        Comment

                        • MFR1964
                          Detail Nut of the First Order
                          • Sep 2010
                          • 1304

                          #27
                          Steve,

                          Using the allready excisting split will be the best option for me, don't want to cut her open at the waterline, the split itself is well hided away by a weldingline, during my dryfitts you can't see the split of both halves, it's going to be tricky, but it can be done.

                          Allready have some plans on paper for sliding in the SD, and locking it ferm to the backpart, the front part will only contain the launchtubes which also will use magnetic couplers to activade the launchtubes with the doors, more or less the same story for connecting the rudders/diveplanes and propellor shaft.

                          Manfred.
                          I went underground

                          Comment

                          • He Who Shall Not Be Named
                            Moderator
                            • Aug 2008
                            • 12317

                            #28
                            Originally posted by MFR1964
                            Steve,

                            I'll probably will end up with filling the modelparts with resin like you mentioned, when the resin is still liquid i can push through the rods, using vaseline on the rods wil give me the change to get them out after hardening, i'll have to see about that.

                            For opening up the hull i've got a more evil plan, i'll use the allready excisting split from the front and back parts, Skunkworks is running hard on this one to solve.


                            Manfred.
                            Don't do it!

                            Sure, it looks great to take advantage of the radial split between forward half and after half of the hull, but it is actually fraught with problems: access for weight and foam placement; hidden linkages; the need to upset every interface connection for the simplest of observations or adjustments. The only time you want to do this is if the boat is operated dry.

                            Me? I'm cutting off the top of the hull at the waterline. KISS!

                            David
                            Who is John Galt?

                            Comment

                            • MFR1964
                              Detail Nut of the First Order
                              • Sep 2010
                              • 1304

                              #29
                              David,

                              Cutting her open at the waterline is my plan B, first i want to try it the hard way, you know me, allways rowing into the stream, have to make Rube Goldberg proud, must resist.......


                              Manfred.
                              I went underground

                              Comment

                              • He Who Shall Not Be Named
                                Moderator
                                • Aug 2008
                                • 12317

                                #30
                                Originally posted by MFR1964
                                David,

                                Cutting her open at the waterline is my plan B, first i want to try it the hard way, you know me, allways rowing into the stream, have to make Rube Goldberg proud, must resist.......


                                Manfred.
                                OK, I won't get in the path of a trail-blazer. But remember: Pioneers are the ones who catch the arrows!
                                Who is John Galt?

                                Comment

                                Working...