Russian Rocketboat OSA II

Collapse
X
 
  • Time
  • Show
Clear All
new posts
  • He Who Shall Not Be Named
    Moderator
    • Aug 2008
    • 12343

    #46
    Yeah, Mike's been all over me with PO's. No time on hand yet, but I'm close to securing 'play time' in the Cave so I can catch up. One of the things is to test out your idea about water squirting out those limber holes and flood-drain holes.

    Can't wait till you get your 23 into the wet -- want to see if you encounter the same devils I have with this thing. God! ... it's such a lovely kit; and I'm sure it's me and not the design that is making this thing act like an underwater lawn-dart.

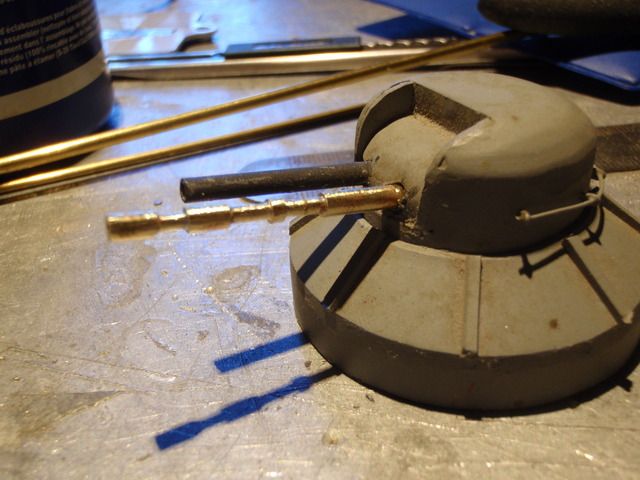
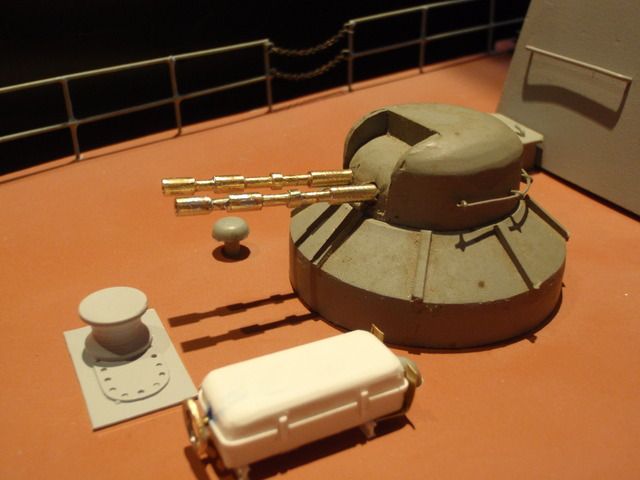
    Love the intricacy of your brass work -- simply wonderful stuff to look at. Techno-porn of the highest order, sir!

    M
    Who is John Galt?

    Comment

    • MFR1964
      Detail Nut of the First Order
      • Sep 2010
      • 1304

      #47
      As you know time is on my side, so skinning the 23 is eminent, i've build enough strangely shaped subs to know she will drive like the devil on her heels, within certain speedlimits offcourse, i've re-read your thread building the 23 to find the bugg.

      Yeah, building things from brass is most rewarding, i've got no idea why i delayed building the mast so long, must have been builders fear, once you get over that, things are starting to roll.

      Manfred.
      Last edited by MFR1964; 09-09-2013, 01:30 AM.
      I went underground

      Comment

      • herrmill
        Commander
        • Dec 2008
        • 360

        #48
        Have you seen Merit International's 1/72 OSA-1 that is slated for imminent release? Shame its not larger scale as it would make a good RC conversion.

        Our shop retails 1/72 Russian Navy OSA Class Missile Boat OSA-1 (Plastic model) Merit International 67201 Military Model on the Web. - Author class missile boat is one of the missile boats of the world's most famous, author of NATO and (Osa) It is a code name, it means [wasp] in Russian. - Injection Kits Reproduce - precisely detail - Big size of a strong force (overall length 542mm) - Two parts included etching - Missile detachable - Metal parts are include

        Comment

        • NavyICman
          Lieutenant
          • Jun 2010
          • 60

          #49
          Manfred,

          You are the master of brasswork!! I Finally got to catch-up on this thread and the work is amazing! I can't wait till next year to see what you do next.

          Tim

          Comment

          • MFR1964
            Detail Nut of the First Order
            • Sep 2010
            • 1304

            #50
            Now i do Chuck, thanks, looks nice but a lot of money for such a small kit, making this kit rc can be done, did the same trick with a Tamiya battleship scale 1/350 in the past.
            Now these days we are blessed with those micro servo's and ESC's, so if there are volenteers, be my guest and surprice us, i'll stick to the bigger version.

            Thanks Tim,

            The antenna stuff turned out better as expected, next year, or maybe sooner, i'll tackle the gun turrets, she deserves to be finished.


            Manfred.
            I went underground

            Comment

            • MFR1964
              Detail Nut of the First Order
              • Sep 2010
              • 1304

              #51
              Gunturret time!!, after stuffing up David with the V80 i started up my lathe and made some new barrels.


              Compared with the old one, what was i thinking !!!, rubbish the old barrels !!!, on the other hand, now i have much more documentation passed by a russian modelbuilder.


              Stage two, both barrels on the turret, still have to modify the inner part which holds the barrels, it has to be square instead of rounded, nitpicking as usual.


              The same treadment for the rear gunturret, added also those tube like things at the barrels, not sure what they are, but what the heck!!!, if they are there i duplicate them.


              Same story for the front turret, now i have to break down both turrets, sand them, and add some more stuff.


              Manfred.
              I went underground

              Comment

              • MFR1964
                Detail Nut of the First Order
                • Sep 2010
                • 1304

                #52
                Ripped open the OSA for some re-wiring, i wanted to have a seperate battery pack for my receiver, those hatch servo's are pulling too much for the BEC when operating them all at once.


                Had to take out the cables to make some new provisions for the new battery-pac, such as, taking out the + lead from the BEC, and rewiring to the powerswitch.

                Click image for larger version

Name:	P6240100_zpsrc1gcxtl.jpg
Views:	94
Size:	48.6 KB
ID:	109418

                Made a new pack 6 volts 2,4 Ah, should be enough to give me some playtime.

                Click image for larger version

Name:	P6240104_zps7pcfdwhy.jpg
Views:	91
Size:	52.4 KB
ID:	109419

                Since i'm going to use a seperate battery pack i have to add a voltmeter for monitoring the receiverpack, found me a nice little LED version, it has two differend settings 4,8 volt or 6 volt.

                Click image for larger version

Name:	P6240103_zpskwwc1m6m.jpg
Views:	95
Size:	86.2 KB
ID:	109420

                Click image for larger version

Name:	P6240102_zpsa2npatbj.jpg
Views:	108
Size:	81.5 KB
ID:	109421

                Progress on the gunturrets is slow, but i'm getting there, added some stuff and finished up the barrels on the front turret, still have to close the part under the barrels with some evergreen plating.


                Manfred.


                I went underground

                Comment

                • MFR1964
                  Detail Nut of the First Order
                  • Sep 2010
                  • 1304

                  #53
                  Summer has ended, so building on the OSA is finished, managed to get me some lights and finished up both turrets, had to build both base-parts from scratch, it turned out that the old one's where useless, rebuilding them was not a option, first the lights.

                  Click image for larger version

Name:	P6250104_zpsf43bryhj.jpg
Views:	93
Size:	79.5 KB
ID:	110121

                  This was the old situation, had made some working bulb-lights, which didn't work that well.

                  Click image for larger version

Name:	P6250105_zpsa4hi3r24.jpg
Views:	103
Size:	76.5 KB
ID:	110122

                  Started with some protection for the new lights, used some 0.8 mm rod and some tubing.

                  Click image for larger version

Name:	P6250107_zpsv2mlumns.jpg
Views:	98
Size:	86.4 KB
ID:	110123

                  Pushed in a large diameter cool white led, made it frosted by sanding it.

                  Click image for larger version

Name:	P6250106_zpsibdxnuou.jpg
Views:	93
Size:	76.1 KB
ID:	110124

                  Even lighted by a torch you still can see the led is on, this one is located near the bow.

                  Click image for larger version

Name:	P6250109_zpsejegpa1m.jpg
Views:	100
Size:	85.3 KB
ID:	110125

                  As you can see there is enough light to navigate during the dark, still have to make some pics with the upperpart placed, to be continued.

                  Manfred.


                  I went underground

                  Comment

                  • bwi 971
                    Captain
                    • Jan 2015
                    • 906

                    #54
                    Great work Manfred.

                    Grtz,
                    Bart
                    Practical wisdom is only to be learned in the school of experience.
                    "Samuel Smiles"

                    Comment

                    • trout
                      Admiral
                      • Jul 2011
                      • 3547

                      #55
                      Good to see you are still active and Manfredizing again!
                      If you can cut, drill, saw, hit things and swear a lot, you're well on the way to building a working model sub.

                      Comment

                      • MFR1964
                        Detail Nut of the First Order
                        • Sep 2010
                        • 1304

                        #56
                        Thanks Guys, i'm Always goofing around inside the Cave, and yes Tom, the magic still works, it was a bit of a setback with the turrets but i'm finalising them now, as promised i took some pics of all the lights onboard the OSA,
                        Click image for larger version

Name:	P9190233_zpsrhol2znh.jpg
Views:	88
Size:	77.3 KB
ID:	110146
                        Click image for larger version

Name:	P9190232_zpstunh5lzo.jpg
Views:	106
Size:	70.6 KB
ID:	110147


                        The upperstructure placed with working navlights, i wonder if it's possible to add a toplight, have to think about that
                        Click image for larger version

Name:	P9060188_zpsoebv0f4x.jpg
Views:	91
Size:	47.2 KB
ID:	110148


                        And also some turret stuff, here i've made a new conical shaped base with the right angle, used 0,3 mm copper sheeting, it is placed down the grit for placing those reinforcement rods at the background, this fun took me most of the time, but on the end it's worth it.


                        Manfred.
                        I went underground

                        Comment

                        • MFR1964
                          Detail Nut of the First Order
                          • Sep 2010
                          • 1304

                          #57
                          Click image for larger version

Name:	P9060187_zpsxqvqd4c4.jpg
Views:	76
Size:	53.9 KB
ID:	110326


                          Placed those reinforcement rods onto the conical part, secured them with CA glue. Click image for larger version

Name:	P9060190_zpsha1afyf2.jpg
Views:	86
Size:	51.9 KB
ID:	110327


                          According to my real life pics the rods where way too high, cutted them down with the cuttingdisk on my dremel. Click image for larger version

Name:	P9060191_zpscxfxe0ee.jpg
Views:	92
Size:	90.2 KB
ID:	110328


                          Dryfitting on the bow, also added a pvc ring underneath for the next step. Click image for larger version

Name:	P9060192_zpshxpnvvh5.jpg
Views:	98
Size:	89.4 KB
ID:	110329


                          This is why i added the pvc ring, more reinforcement plates at the base. Click image for larger version

Name:	P9060193_zpsvrfqks49.jpg
Views:	97
Size:	67.5 KB
ID:	110330


                          The front of the conical base is different, this is the start of another contraption at the front. Click image for larger version

Name:	P9060195_zps9bdsamga.jpg
Views:	101
Size:	52.0 KB
ID:	110331


                          Since i was building two turrets i could start with the second one while the other one was drying, this one has a higher base, yet again used pvc tubing.


                          Manfred.
                          Last edited by MFR1964; 09-25-2015, 10:58 AM.
                          I went underground

                          Comment

                          • MFR1964
                            Detail Nut of the First Order
                            • Sep 2010
                            • 1304

                            #58
                            Click image for larger version

Name:	P9080197_zpsuytckmrr.jpg
Views:	78
Size:	54.0 KB
ID:	110378

                            The basic form of the front turret is ready, on the background number two in the making.

                            Click image for larger version

Name:	P9080196_zpskbdwpjz8.jpg
Views:	121
Size:	51.2 KB
ID:	110379

                            All reinforcement strips are placed, also the different strips at the front.

                            Click image for larger version

Name:	P9090199_zps6jjetd43.jpg
Views:	111
Size:	49.8 KB
ID:	110380

                            Cutting styrene for the next stage on the second turret.

                            Click image for larger version

Name:	P9090200_zpskupqdugn.jpg
Views:	94
Size:	96.6 KB
ID:	110381

                            Glued down the pvc ring and started with building up the reinforcement ribs, those small cutted pieces of styrene are made into their final shape before glueing them onto the ribs, still had to make the lower row.

                            Click image for larger version

Name:	P9090201_zps583hoqnw.jpg
Views:	93
Size:	50.7 KB
ID:	110382

                            Clipped down the ribs and shaped the little plates, ready for another session of glueing.


                            Manfred.
                            I went underground

                            Comment

                            • MFR1964
                              Detail Nut of the First Order
                              • Sep 2010
                              • 1304

                              #59
                              It was a well spent summer, i still needed to make more parts.

                              Click image for larger version

Name:	P9080198_zpsjxuzznsy.jpg
Views:	89
Size:	50.3 KB
ID:	110972

                              Heaps of base plates.

                              Click image for larger version

Name:	P9100204_zpsytkiyehl.jpg
Views:	79
Size:	50.2 KB
ID:	110973

                              Inserting 1 mm copper rods.

                              Click image for larger version

Name:	P9100203_zpsx0zrf0xg.jpg
Views:	75
Size:	52.5 KB
ID:	110974

                              The second mount finished with reinforcement plates.

                              Click image for larger version

Name:	P9100205_zpswullsmm1.jpg
Views:	97
Size:	87.1 KB
ID:	110971

                              Dryfitting the front turret, it was a good decision to start from scratch, much more scale as the old one.

                              Click image for larger version

Name:	P9100202_zpswenld8ql.jpg
Views:	87
Size:	52.3 KB
ID:	110975

                              Those parts are needed for this, at the back of the turrets there are railings, those are the mounts from the upper railing, still had to add the mounts for the lower railing.


                              Manfred.
                              Last edited by MFR1964; 10-27-2015, 03:16 PM.
                              I went underground

                              Comment

                              • MFR1964
                                Detail Nut of the First Order
                                • Sep 2010
                                • 1304

                                #60


                                First i fixed my last post, the pics went gone, next batch
                                Click image for larger version

Name:	P9120207_zpsikd5zsfu.jpg
Views:	76
Size:	49.7 KB
ID:	110991


                                Made all four railings, ready to be placed.
                                Click image for larger version

Name:	P9120208_zpsowxj0srv.jpg
Views:	100
Size:	95.2 KB
ID:	110992


                                Also made this pic to show their size, not that big, but big enough to add a lot of details.
                                Click image for larger version

Name:	P9130209_zpsuitghenh.jpg
Views:	64
Size:	52.4 KB
ID:	110993


                                Soldered both railings, a bit tricky with those glued rods.
                                Click image for larger version

Name:	P9130210_zpsj6ovh6sk.jpg
Views:	64
Size:	52.8 KB
ID:	110994


                                And finally some primer, now they look totally different.

                                Manfred.
                                Last edited by MFR1964; 10-27-2015, 03:36 PM.
                                I went underground

                                Comment

                                Working...