Russian Rocketboat OSA II

Collapse
X
 
  • Time
  • Show
Clear All
new posts

  • MFR1964
    replied
    It has been a while, but due to the sitiation with the wife, i had some spare time, decided to start up the OSA 2, yeah sure, all batteries dead
    Ordered some new batteries and started to replace them, a pretty much forward procedure, everything is build modular with connectors, also had to replace one of the servo's which steer the hatch of the launchtubes.
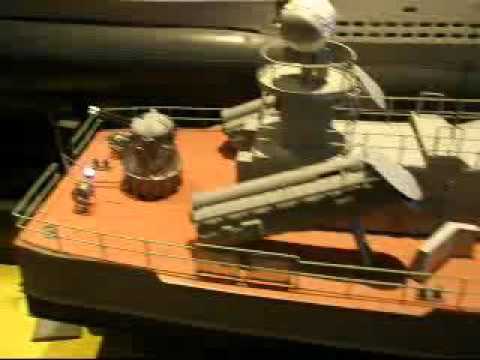
    Technically she is ready for a maidentrip, just have to wait for some better weather


    Made a short vid to show in what state she is now, and yes Bart, the rear radar is working this time

    Manfred.

    Leave a comment:


  • MFR1964
    replied
    Nice vid Bart,

    I noticed that the fire radar also turns, nice item to make it turn also, going to fetch some geared e-motor for that.

    Manfred.

    Leave a comment:


  • bwi 971
    replied
    Your AK230 in action


    Grtz,
    Bart

    Leave a comment:


  • MFR1964
    replied
    As Always took some more effort this time David, the mast was not intended for having lights, this will be a brainer for the future, allways prepare your stuff for, what if.

    Tom,

    Those larger 3 mm leds don't have that issue, playing with resistors to get the lights down even is the best solution, green will be more bright as red by nature, white was not a problem, i noticed that my white at the stern and bow are different in colour, those are cool white and the one's at the mast warm white, changing that will be a job for the future, still have a Japanese sub on the waitinglist.

    Manfred.
    Last edited by MFR1964; 11-22-2015, 01:16 PM.

    Leave a comment:


  • trout
    replied
    Manfred,
    As always I love the work you do!
    I ran into problems with my smd red green LEDs, the green one was significantly brighter, I would have to play with resistors until I could make them even looking, do those larger LEDs have that issue? Yours looked really good.
    Peace,
    Tom

    Leave a comment:


  • He Who Shall Not Be Named
    replied
    Beautiful work, Manfred. As always.

    M

    Leave a comment:


  • MFR1964
    replied
    Restringing those wires into the mast?, hell no!!!, i got lazy, had a tolerance of about 10 mm in the cables, so one light has a nice loop and the other less loop, i usually use 3K resistors, they work fine, i guess by using the soldering-iron so close at a led's base it received too much heat, thus shortening the lifespan of my led.

    And the final vid i made about the progress this year.

    Manfred.

    Leave a comment:


  • He Who Shall Not Be Named
    replied
    Oh, man! You had to re-string that armature wire all the way down the mast, and into the hull. Ouch! Maybe you should increase the value of your current limiting resister(s)? Damned LED's are supposed to be good for 60 some years if run at the right current (how the egg-heads came up with number, I can't imagine).

    Looking good, pal.

    M

    Leave a comment:


  • MFR1964
    replied
    I'll show you what went sour David, i replaced the mast, checked if the leds where in working order and made the wiring inside the upperstructure tidy, everything ready for again a victory of Manfredizing. Click image for larger version

Name:	P9260253_zpszaohs3ka.jpg
Views:	165
Size:	77.3 KB
ID:	111411


    Victory!!!!!, at last. Click image for larger version

Name:	P9260252_zpsh4slwp0k.jpg
Views:	131
Size:	68.0 KB
ID:	111412


    F**K!!!!!, the white led was down, re-checked the wiring, nothing wrong, the led went dead. Click image for larger version

Name:	P9280254_zps0grxiihe.jpg
Views:	189
Size:	57.5 KB
ID:	111413


    It took me a few days before i got the gutts for breaking it open, luckely i used epoxy-glue and not styrene-glue. Click image for larger version

Name:	P9290257_zpsd6nvqx9e.jpg
Views:	148
Size:	57.4 KB
ID:	111414


    Managed to get a new led inside, only drawback was, those wires where getting shorter, twice the connections on the led broke loose, and the story had to begin from the start, anybody says modelbuilding is a relaxt hobby has got a wire loose inside his own brains. Click image for larger version

Name:	P9290256_zpsauruhbqs.jpg
Views:	177
Size:	56.5 KB
ID:	111415


    And finally there was light, still had to rebuild the armature and do a paintshop. Click image for larger version

Name:	PA010258_zpski1b9lca.jpg
Views:	155
Size:	70.6 KB
ID:	111416


    Once you stated this was a boat of terror, yes she is, in this chase, for me!!!!, for now i have to wait for the spring, she will be covered in foil against the dust, also made a vid which i will download, be patient.

    PS, shortly after this picture the green nav-light on the upperstructure went dead, arghhhh, such pleasures of the hobby!!!!!

    Manfred.
    Last edited by MFR1964; 11-22-2015, 10:07 AM.

    Leave a comment:


  • He Who Shall Not Be Named
    replied
    Originally posted by MFR1964
    Be patient, you bum!!, first build up the suspence, then enjoy the failures, don't you have to start with the V80, it has to be cured by now.


    Manfred

    LOL. You did everything right, even the shaffing heat-shrink at the base. What went sour?

    Your V80 hull halves are in the over-head looking down at me. As soon as I can get out from under all this other stuff Manfred. I'm loving this rocket-boat thread of yours. Again, you're taking me back to school.

    M

    Leave a comment:


  • MFR1964
    replied
    Be patient, you bum!!, first build up the suspence, then enjoy the failures, don't you have to start with the V80, it has to be cured by now.


    Manfred
    Last edited by MFR1964; 11-21-2015, 09:17 AM.

    Leave a comment:


  • He Who Shall Not Be Named
    replied
    Originally posted by MFR1964
    Thanks for the support guys, next time i'll try breakdancing.

    With my leg resting on a chair i can continue my posting, first i drilled a 1 mm hole at both sides into the mast, and managed to get some wires in, pictures

    [ATTACH=CONFIG]n111389[/ATTACH]

    This was a bit tricky, by using a mini-drill i managed to make those holes, allready got one pulling-wire inside.

    [ATTACH=CONFIG]n111390[/ATTACH]

    By repeating this on the other side i managed to get in both pulling-wires.

    [ATTACH=CONFIG]n111391[/ATTACH]

    Getting all four wires in took some efforts, used some other small gauge wire to bind it to the mast, i must say, after each step i tested the leds if they still where in working order.

    [ATTACH=CONFIG]n111392[/ATTACH]

    Slapped some paint on the wires and glued down the drilled hole inside the mast.

    [ATTACH=CONFIG]n111393[/ATTACH]

    Last thing todo was, adding some shrinkhose at the base against shaving, my only insulation on those tiny wires is varnish, don't like a shortcircuit at the base of my mast.
    Tested again all leds, at that point everything was in working order, untill Murphy came around the corner, to be continued.


    Manfred.

    Using (what we call) armature wire for this application is pure genius -- and its practical use as wire bundles, as it's seen on the prototype, is both functional and a near perfect to scale representation.

    What's this about Mr. Murphy (Oh, No!......).

    M

    Leave a comment:


  • MFR1964
    replied
    Thanks for the support guys, next time i'll try breakdancing.

    With my leg resting on a chair i can continue my posting, first i drilled a 1 mm hole at both sides into the mast, and managed to get some wires in, pictures

    Click image for larger version

Name:	P9240242_zpssh83oyn9.jpg
Views:	144
Size:	95.1 KB
ID:	111389

    This was a bit tricky, by using a mini-drill i managed to make those holes, allready got one pulling-wire inside.

    Click image for larger version

Name:	P9240243_zpsnoda7c64.jpg
Views:	145
Size:	93.0 KB
ID:	111390

    By repeating this on the other side i managed to get in both pulling-wires.

    Click image for larger version

Name:	P9240245_zps70t2pf4k.jpg
Views:	110
Size:	94.4 KB
ID:	111391

    Getting all four wires in took some efforts, used some other small gauge wire to bind it to the mast, i must say, after each step i tested the leds if they still where in working order.

    Click image for larger version

Name:	P9250248_zpstrh4gwkf.jpg
Views:	106
Size:	90.0 KB
ID:	111392

    Slapped some paint on the wires and glued down the drilled hole inside the mast.

    Click image for larger version

Name:	P9250249_zpsqiaygeda.jpg
Views:	77
Size:	82.4 KB
ID:	111393

    Last thing todo was, adding some shrinkhose at the base against shaving, my only insulation on those tiny wires is varnish, don't like a shortcircuit at the base of my mast.
    Tested again all leds, at that point everything was in working order, untill Murphy came around the corner, to be continued.


    Manfred.

    Leave a comment:


  • bwi 971
    replied
    Originally posted by MFR1964


    I Always try to make my components in such way that they can be taken apart, same story for my radarmast, i studied the inside, the smaller tube inside the mast could be used for my wires, first drill some holes inside the mast.


    Manfred.
    This is wonderful stuff Manfred…….......take care of that ballarine leg man.

    Grtz,
    Bart

    Leave a comment:


  • He Who Shall Not Be Named
    replied
    Originally posted by MFR1964
    Thanks David, they do look nice, at that moment i was full of optimism i could pull this off, i did not know Mr Murphy was looking around the corner, this will be shown at a later moment.

    Ahhh, the leg!!!!
    I was at a mission far below the surface of the earth, had to save some lifes, crawled through different caves and found the poor souls, while evacuating them i was attacked by a cave frog, a monster!!!!!!, tried to protect them and fell into a dark pitt, made the frog a little bit flat and survived.
    So, back to reality, missed a step in the dark and fell into a drainage pitt, my right leg was locked by some tubing, so my knee twisted in a way which every ballarina can make, since i'm not a ballarina, my knee hurted like hell!!, sprained my knee-bands on the inside, if you like pain i can recommend it, it has to heal by resting, sorry, no blood involved.
    For now a old man with sticks!!!!, i hate youngsters jumping around with their unhurt flexable bodies!!!!

    Manfred.

    I'm with you: 'youth is wasted on the young'. Hey, idiot dance moves are not for us old farts, pal. Rest up, use those sticks! And get well, you bum. Loving this current project -- and I'm not even a Dr. Who fan!

    M

    Leave a comment:

Working...