-
Make it simple, make strong, make it work! -
Thank you very much Ramel!
And a very "Merry Christmas" to you and your family.
Rob
"Firemen can stand the heat"Comment
-
I have the top hull section all glued up, and now ready to start on the bottom section.
I spent some time cutting 1/8" brass rods to use as locking pins between the bottom and top hull sections. These pins will help make a good tight and straight seam between the hulls. This boat is printed using PLA filament, and as you are all aware PLA does not like the heat and is prone to warpage, so these pins will also help to hold the hull in place and reduce the chance of a warp.
Rob
"Firemen can stand the heat"Comment
-
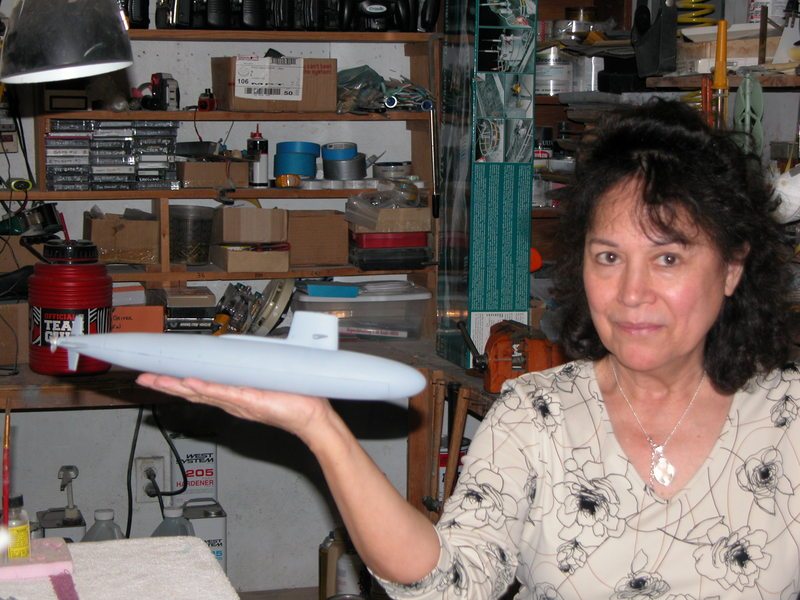
Today, besides ordering my new Arkmodel 1:48 scale submarine kit with an 80mm WTC from Nautilus Drydocks, I did find time to finish up the main hull sections on my Alfa boat.
Sorry my photos are a little dark! Still screwing around with my old camera! None the less I got both the top and bottom hull sections glued up.
My next step will be to install the brass guide pins to bring the two sections together as close as possible.
Also, my 3D printer will be at work finishing the remaining hull sections to my German Type XXl U-2540 submarine.
Rob
"FiremenComment
-
I am now working on the stern section of my 1:96 scale 3D printed Russian Alfa.
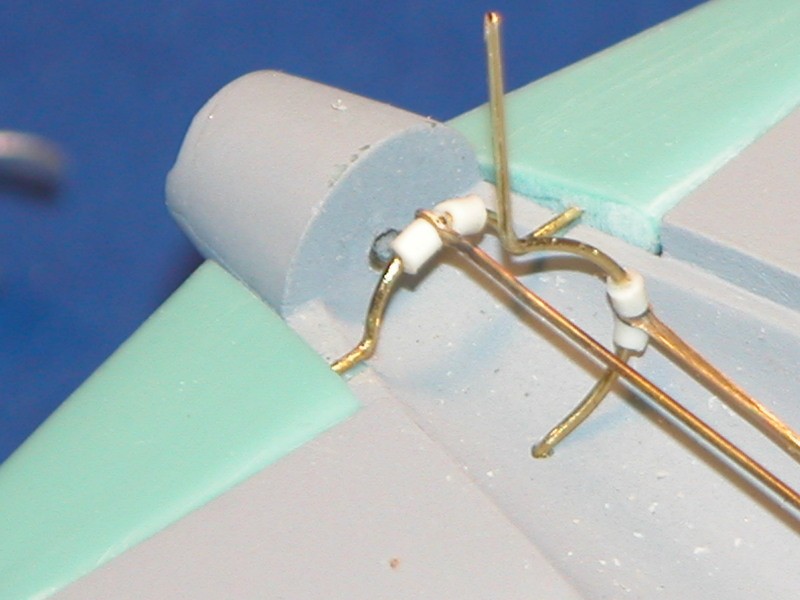
David M posted up as to possible method of installing the stern dive planes and rudder system on this boat.
I have only 5/8" clearance to install two yokes! It did not work!
My solution, as per photos from David. Cut the stern section as per the photo above so that I can install the dive plane and the rudder yokes, (Photo shows possible yoke designs) and then glue the stern section back together. There just was not anyway to install the linkage in that space and get good solid operation of the dive planes or rudder.
I am doing all this on this 1:96 scale Alfa in hopes of using the 70 mm WTC that is coming with my 1:96 scale Russian Kilo kit.
Rob
"Firemen can stand the heat"
RComment
-
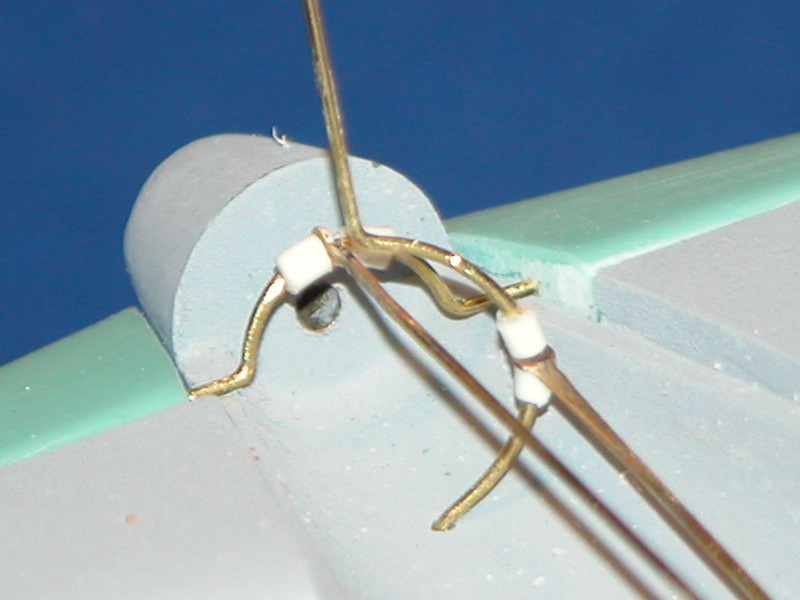
I have made some changes as to how the stern linkages will be fabricated.
I may have to do the dive plains the same way to clear the drive shaft. Both rudder and dive plains intersect dead center on each other, and with only 5/8" to work with, not sure how it will work out. May be my Alfa can be a Kilo, No top side rudder!!! Just kidding!! More to come!
Rob
"Firemen can stand the heat"Comment
-
Well thinking's have changed a little on my 1:96 scale Alfa build. A some of you that have been following this up and down 1:96 scale Alfa and the 1:72 scale Alfa know, I did finish up a 1:96 scale Alfa, slapped on some paint just to get it done.
I am very sure that when David M. and possibly some of you other guys see this photo, your going to say what in the hell did he do that boat! I am going to resurrect this boat! The reason being I have a 70 mm WTC (from Nautilus Drydocks) that will fit and work great on this 1:96 scale Alfa! This 70mm WTC was purchase for my new 1:96 scale Kilo kit, which I also purchased from Nautilus drydocks.
I have all the control surfaces operational (rudder top & bottom, and stern dive plains) I am going to add an additional servo to the forward end cap of the WTC to make the forward dive plains operational also.
After all the mechanical work has been completed, I will sand this boat down and give it a proper finish. WEATHERING!?
Rob
"Firemen can stand the heat"Comment
-
I am re-opening the 3D printed 1:96 Russian Alfa build. As you can see by the below photo, my new 70 mm WTC fits perfectly in this sub!
I am going to cut the existing stern section form the already printed surface runner/static 1:96 scale Alfa and install a new stern section with all the linkage controls.
I still have some filing to do on the linkages for the dive plains and the rudder. The dive plains will use a yoke that I fabricated from brass and copper, the two rudder linkages are also fabricated from brass and copper. It's going to be a tight fit. I am also going to fabricate a fastening system so that the two-part stern section can come apart if needed so repairs could be made to the linkages if ever required.
Rob
"Firemen can stand the heat"Last edited by rwtdiver; 01-30-2022, 01:41 PM.Comment
-
Very good Rob. Keep the updates coming.Comment
-
Hi Steve,
I am doing a lot of bouncing around with my building right now. Still searching for that Nitch in this hobby, and 3D printing still seems to be the best place for me. I am working with Bob right now to possibly purchase and build the Arkmodel 1:48 scale Vll. Styrene plastics and the adhesives used for that material is no problem at all for me. I almost jumped on Arkmodel boat, but I went with the Kilo kit. WOW! Lesson
learned there!
I am hoping to get my new 70 mm WTC working on the 1:96 scale Alfa! Just got to keep plugging away!
Rob
"Firemen can stand the heat"Comment
-
I think I got it!!
I have the linkage on my Alfa stern mechanically moving! All functions operate together. I have a little more filing to do so the rudder and dive plains do not rub together. I soldered a copper plate on to the upper and lower rudder linkage to bring them together to tie into the rudder servo link up from the WTC.
Rob
"Firemen can stand the heat"Comment
-
-
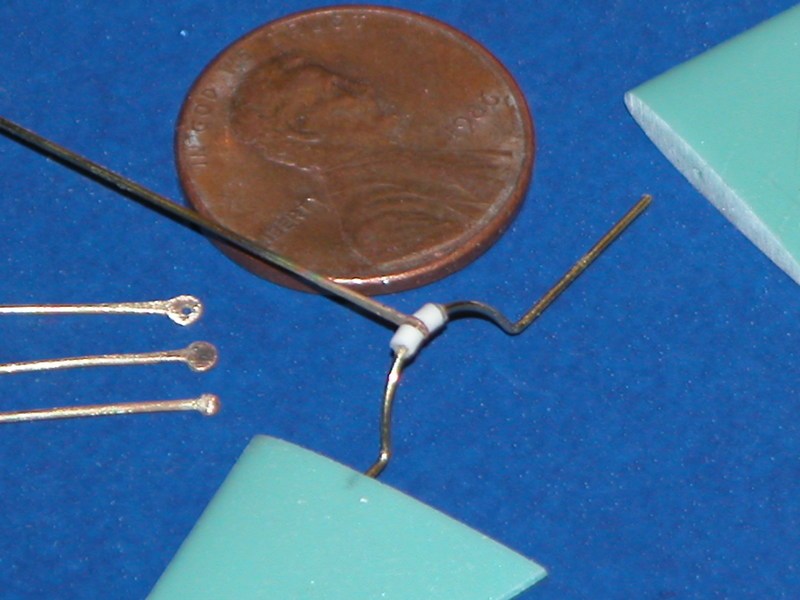
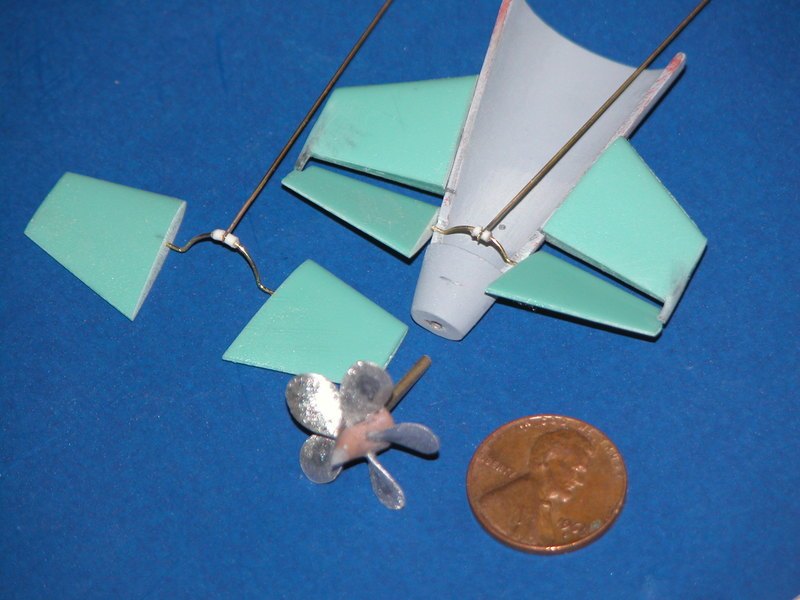
I started to do the control surface installation.
I cut and installed and finished out the control surfaces brass bushings. The bushing are 3/32" ID brass tubing, and the control linkages are 1/16" solid brass rod.
Rob
"Firemen can stand the heat"
Comment


Comment