Akula 1/144 Scratch built

Collapse
X
 
  • Time
  • Show
Clear All
new posts
  • He Who Shall Not Be Named
    Moderator
    • Aug 2008
    • 12332

    #91


    I needed a bunch of ladder-rungs for a spiral staircase. These were best cast using the vacuum assisted method.


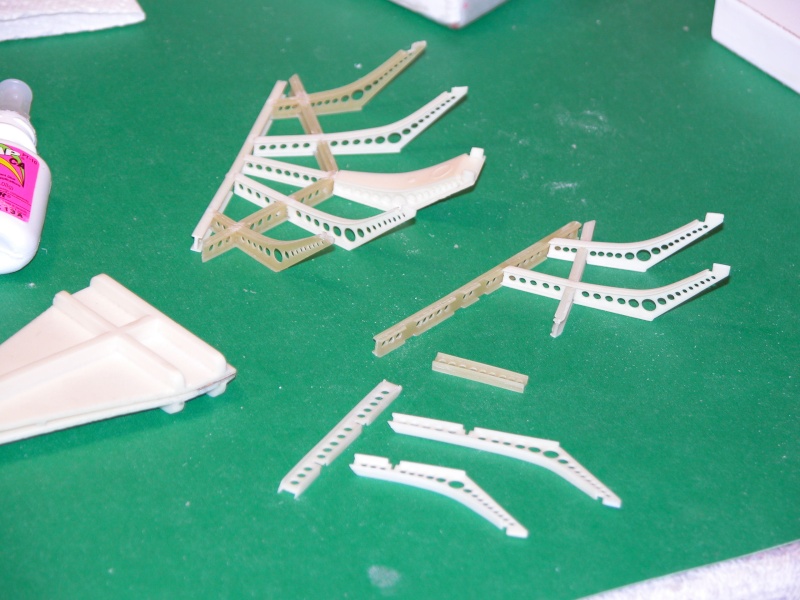
    Vacuum assisted resin casting made these girder parts possible with the least amount of hassle and clean-up chores post de-molding.


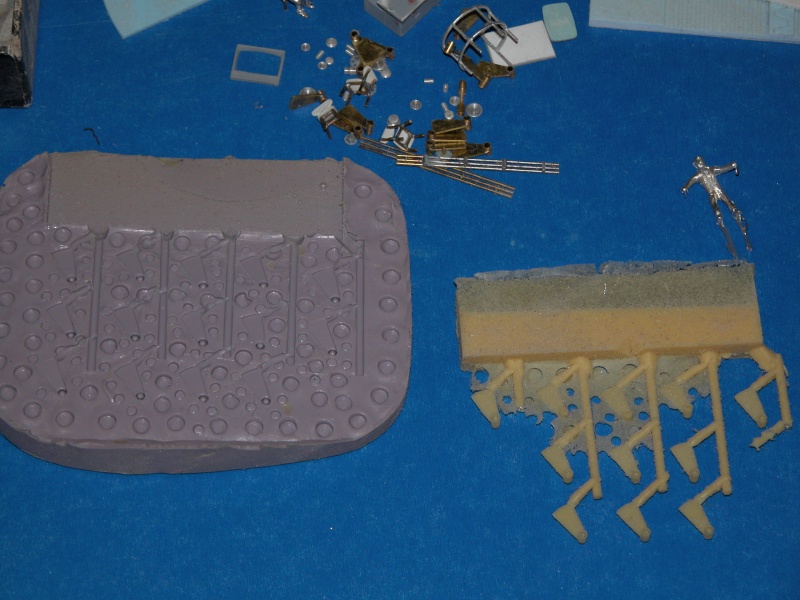
    Making the 1/72 figure masters for the defunct FOXTROT project


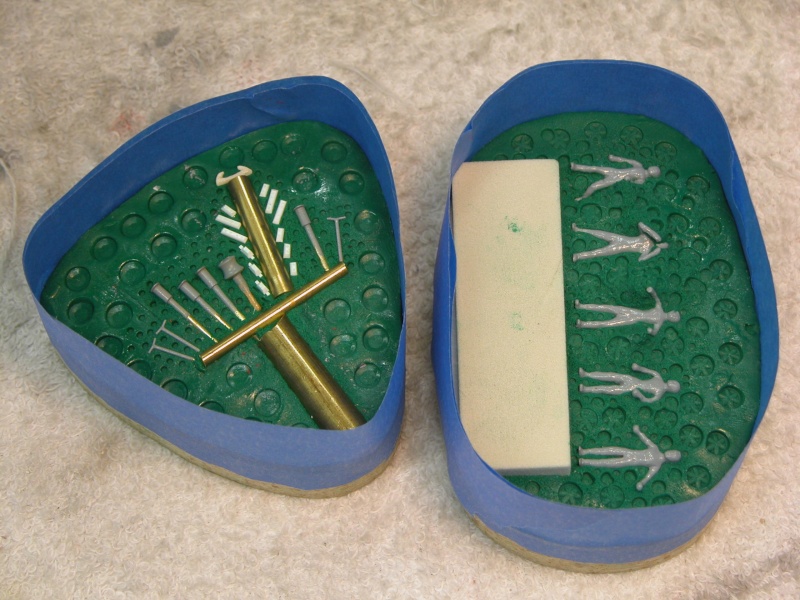
    To the right I'm working up another vacuum assisted tool, this one for 1/72 figure blanks.The figure masters embeded in the backing clay along with the block that will give form to the tools resin trough.

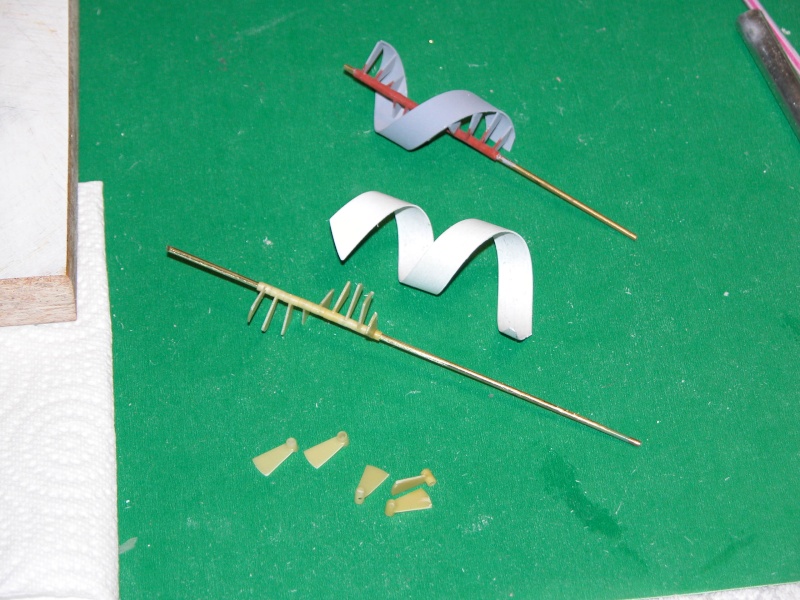
    To the right is a gravity-pour metal casting tool set of masters under their tall sprue. In metal casting you need at least a five-inch tall sprue to provide the pressure-head needed to insure a complete fill of the tools cavities.


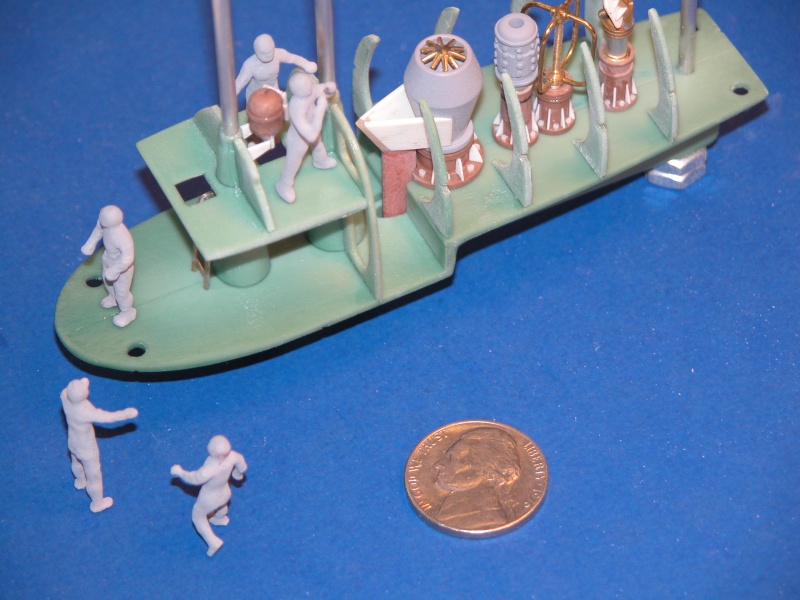
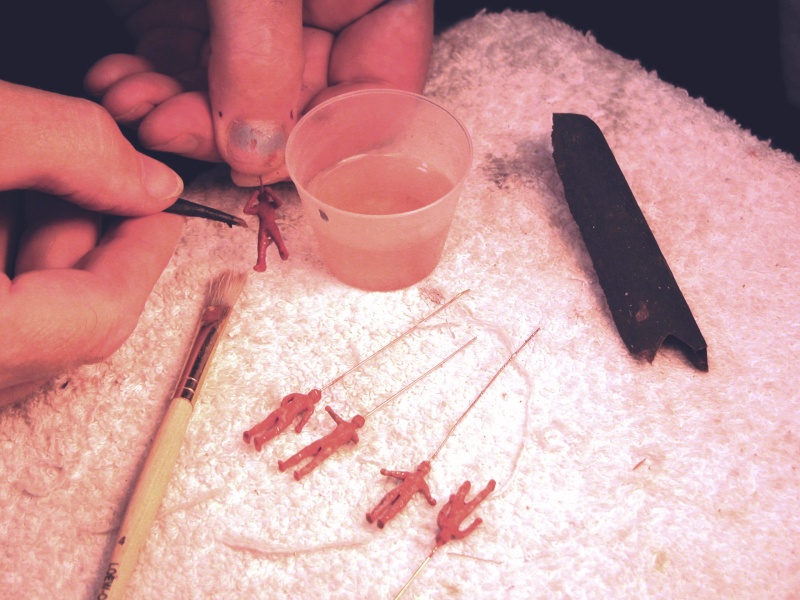
    Cast resin 1/72 crew figure blanks posed upon and around the 1/72 FOXTROT sail components.
    Who is John Galt?

    Comment

    • bwi 971
      Captain
      • Jan 2015
      • 905

      #92
      What else can I say then THANK YOU SIR......now I know how to cast those SOKS and other stuff.
      One source of a headache less now. (I still hate you though).

      Grtz,
      Bart
      Practical wisdom is only to be learned in the school of experience.
      "Samuel Smiles"

      Comment

      • bwi 971
        Captain
        • Jan 2015
        • 905

        #93
        About the challenge of the hinge slot and flood sleeves:

        Challenge 1: Make a hinge with a slot

        COMPLETED

        Dimendions of the hinge 5.5 x 0.75 x 1mm (0.22” x 0.03” x 0.04”) slot 0.25mm (0.01”) wide. Click image for larger version

Name:	Akula (343)b02.jpg
Views:	82
Size:	65.7 KB
ID:	111299
        Click image for larger version

Name:	Akula (359)15.jpg
Views:	75
Size:	82.5 KB
ID:	111289
        Click image for larger version

Name:	Akula (358)14.jpg
Views:	77
Size:	55.0 KB
ID:	111290


        Tree pieces of 0.25 (0.01”) thick brass sheet , cut, file and sand into shape, one is shorter than the other two, pile them up the shortest one in the middle, glue everything together.

        Click image for larger version

Name:	Akula (347)03.jpg
Views:	75
Size:	63.2 KB
ID:	111295
        Click image for larger version

Name:	Akula (348)04.jpg
Views:	77
Size:	30.6 KB
ID:	111298
        Click image for larger version

Name:	Akula (354)10.jpg
Views:	76
Size:	46.5 KB
ID:	111294
        Click image for larger version

Name:	Akula (349)05.jpg
Views:	75
Size:	45.3 KB
ID:	111297
        Click image for larger version

Name:	Akula (353)09.jpg
Views:	76
Size:	41.5 KB
ID:	111293
        Click image for larger version

Name:	Akula (350)06.jpg
Views:	79
Size:	49.8 KB
ID:	111292


        Challenge 2: make floot sleeves in main body

        Still in progress


        Grtz,
        Bart
        Last edited by bwi 971; 11-16-2015, 04:54 PM.
        Practical wisdom is only to be learned in the school of experience.
        "Samuel Smiles"

        Comment

        • He Who Shall Not Be Named
          Moderator
          • Aug 2008
          • 12332

          #94
          Originally posted by bwi 971
          What else can I say then THANK YOU SIR......now I know how to cast those SOKS and other stuff.
          One source of a headache less now. (I still hate you though).

          Grtz,
          Bart

          Just when I assumed king-of-the-hill status with my magnificent presentation, you kick me to the curb with that practical hinged bail. *******!

          M
          Who is John Galt?

          Comment

          • bwi 971
            Captain
            • Jan 2015
            • 905

            #95
            Still looking at your pictures David.....drooling all over the keyboard…. that’s wonderful stuff sir.

            That FOXTROT is tempting for a next project, there is one on display 100 km (80mi) from where I live.

            Grtz,
            Bart


            Just saw your post above.....YOU'RE WELCOME.
            Last edited by bwi 971; 11-16-2015, 05:25 PM.
            Practical wisdom is only to be learned in the school of experience.
            "Samuel Smiles"

            Comment

            • He Who Shall Not Be Named
              Moderator
              • Aug 2008
              • 12332

              #96
              Originally posted by bwi 971
              Still looking at your pictures David.....drooling all over the keyboard…. that’s wonderful stuff sir.

              That FOXTROT is tempting for a next project, there is one on display 100 km (80mi) from where I live.

              Grtz,
              Bart

              Just saw your post above.....YOU'RE WELCOME.
              Here's an in-depth article I did on the SEAVIEW assembly:

              http://culttvman.com/main/david-merrimans-building-the-57-seaview-introduction/
              Who is John Galt?

              Comment

              • bwi 971
                Captain
                • Jan 2015
                • 905

                #97
                Originally posted by He Who Shall Not Be Named

                Here's an in-depth article I did on the SEAVIEW assembly:

                http://culttvman.com/main/david-merrimans-building-the-57-seaview-introduction/

                Just read the article……Damn you David…..stop ****ing with my self-esteem it’s acting like a AC Waveform.
                Grtz,
                Bart
                Practical wisdom is only to be learned in the school of experience.
                "Samuel Smiles"

                Comment

                • bwi 971
                  Captain
                  • Jan 2015
                  • 905

                  #98
                  I decided not to scribe the air intakes in the sail they are too small to get the necessary detail into it.
                  Click image for larger version

Name:	Akula (368)b.jpg
Views:	83
Size:	52.0 KB
ID:	111366


                  So I decided to make them.

                  Could I squeeze 92 holes divided over 4 columns and 25 rows in a 11 x 6.5 x 2mm (0.43 x 0.26 x 0.079”) piece of acrylic sheet……NO I COULDN’T……I calculated that I only could squeeze in 88.
                  Distance between the holes is 0.25mm (0.01”).
                  Click image for larger version

Name:	Akula (372).jpg
Views:	80
Size:	41.6 KB
ID:	111367
                  Click image for larger version

Name:	Akula (370).jpg
Views:	70
Size:	50.5 KB
ID:	111368


                  And NOOOOO…… that’s not 3D printed.

                  Mile 1mm sheet of acrilic down to 0.5mm, mile it into shape (1mm mile).......do not try to shorten your index finger in the process.....you need it for sanding.
                  Click image for larger version

Name:	Akula (379).jpg
Views:	75
Size:	48.4 KB
ID:	111372
                  Click image for larger version

Name:	Akula (377).jpg
Views:	78
Size:	37.4 KB
ID:	111373


                  Wet sand them to get them all the same thickness…….you have two index fingers if one starts bleeding use the other one......see above miling process

                  Click image for larger version

Name:	Akula (374).jpg
Views:	77
Size:	55.6 KB
ID:	111371


                  pile them up
                  Click image for larger version

Name:	Akula (376).jpg
Views:	79
Size:	77.1 KB
ID:	111370


                  Squeeze them togeter and CA glue them......make shure that the CA isn't getting into the slots.
                  Click image for larger version

Name:	Akula (373).jpg
Views:	75
Size:	67.0 KB
ID:	111369


                  You need 22 pieces and one endplate and your done.

                  1 done 1 to go

                  Grtz,
                  Bart


                  Practical wisdom is only to be learned in the school of experience.
                  "Samuel Smiles"

                  Comment

                  • He Who Shall Not Be Named
                    Moderator
                    • Aug 2008
                    • 12332

                    #99
                    Originally posted by bwi 971


                    Just read the article……Damn you David…..stop ****ing with my self-esteem it’s acting like a AC Waveform.
                    Grtz,
                    Bart

                    I declare truce! We're killing each other!@!!!
                    Who is John Galt?

                    Comment

                    • bwi 971
                      Captain
                      • Jan 2015
                      • 905

                      Previous I made “in-between” masters of the rudders, diving planes so I could cut out the surfaces without any risk, if it went wrong I could cast other ones.

                      At that time I made separate tools for each part.

                      For some parts I only crafted one piece although I need two pieces. Of those items I need to cast an additional piece, this time I wanted to try multi part casting.

                      Pre development I AGAIN had a look at the pictures and explanation from David.

                      My preference goes to making reusable box for the tooling, this works best for me and it’s supports the silicone very well so I can keep it’s thickness to a minimum (it’s expensive stuff).

                      I made a tool to create the alinement wholes with ease. This was also a good test to work with cores so this was again a very nice learning process.

                      Picture below show the process from the creation of the tooling till the actual casting result. Parts involved:
                      • Aft dive plane
                      • Fwd dive plane
                      • Shark fin scoop (not going to use it, but it ad’s quantity)
                      Grtz,
                      Bart

                      Click image for larger version

Name:	Akula (387).jpg
Views:	80
Size:	76.1 KB
ID:	111966

                      Click image for larger version

Name:	Akula (388).jpg
Views:	74
Size:	69.1 KB
ID:	111968

                      Click image for larger version

Name:	Akula (386).jpg
Views:	73
Size:	57.8 KB
ID:	111970

                      Click image for larger version

Name:	Akula (380).jpg
Views:	75
Size:	48.0 KB
ID:	111967

                      Click image for larger version

Name:	Akula (381).jpg
Views:	71
Size:	51.5 KB
ID:	111969


                      Practical wisdom is only to be learned in the school of experience.
                      "Samuel Smiles"

                      Comment

                      • bwi 971
                        Captain
                        • Jan 2015
                        • 905

                        As I have decided to make an earlier type AKULA, which carried a circular cross section scoop, had to remake them.
                        Pictures below show the process of creating the new scoops.

                        The old shark fin and the new with circular cross section

                        Click image for larger version

Name:	Akula (331).jpg
Views:	79
Size:	66.5 KB
ID:	111978

                        Scoop Root adapted to hull shape

                        Click image for larger version

Name:	Akula (406).jpg
Views:	77
Size:	61.6 KB
ID:	111979

                        The inlet was opened up with a handheld grinder.

                        Click image for larger version

Name:	Akula (405).jpg
Views:	72
Size:	51.5 KB
ID:	111980

                        Grating test fitted (to small on next two pictures)

                        Click image for larger version

Name:	Akula (402).jpg
Views:	71
Size:	59.8 KB
ID:	111981

                        All seems smoothed out with filler (grey on top of scoop)

                        Click image for larger version

Name:	Akula (400).jpg
Views:	68
Size:	64.7 KB
ID:	111982

                        Finished scoops, painted and with new grating

                        Click image for larger version

Name:	Akula (395).jpg
Views:	67
Size:	51.6 KB
ID:	111983

                        Click image for larger version

Name:	Akula (393).jpg
Views:	67
Size:	64.6 KB
ID:	111985

                        Click image for larger version

Name:	Akula (391).jpg
Views:	65
Size:	61.0 KB
ID:	111984


                        Practical wisdom is only to be learned in the school of experience.
                        "Samuel Smiles"

                        Comment

                        • HardRock
                          Vice Admiral
                          • Mar 2013
                          • 1609

                          This is fantastic Bart. I can't see the photographs of the brass and GRP stensils for some reason.

                          Comment

                          • bwi 971
                            Captain
                            • Jan 2015
                            • 905

                            Originally posted by HardRock
                            This is fantastic Bart. I can't see the photographs of the brass and GRP stensils for some reason.
                            Thks Scott...Repost below

                            Someone on this forum suggested that I spend the last few months looking at the letterbox waiting for the SD to arrive, leaving a trail of drool throughout the house.
                            So it’s time for a WIP to prove the contrary ( he was right about the drooling though).

                            Marking out the hull for scribing
                            I tried several ways to see what was suiting me the most (yes I’m crazy).

                            Lofted the info from the drawing and foto’s and
                            • directly transferred them onto the hull
                            • transferred them to GRP made laid-up stencils from the hull
                            • Transferred them to brass sheet 0.010 x 4 x 10”
                            The last option I liked a lot so I cut out the transferred shapes. The disadvantage is that it takes ages to do it right and You have to bent them into shape after you are done.

                            The GRP made stencils...will not be used

                            Click image for larger version

Name:	Akula (418).jpg
Views:	71
Size:	47.5 KB
ID:	112283

                            Click image for larger version

Name:	Akula (415).jpg
Views:	68
Size:	45.5 KB
ID:	112286


                            The brass sheet stencils, one is shaped to the hull, trimming still to be carried out.

                            Click image for larger version

Name:	Akula (419).jpg
Views:	67
Size:	59.1 KB
ID:	112287

                            Click image for larger version

Name:	Akula (421).jpg
Views:	67
Size:	50.4 KB
ID:	112284

                            Click image for larger version

Name:	Akula (422).jpg
Views:	67
Size:	59.0 KB
ID:	112288


                            I now have all the parts that need casting, so I’m in the process to create the tools for them.
                            I will have tree tools
                            one for the tow array pod (the pod has to be hollow) so I will try a sort of lost wax method with the use of a core. Did some test concerning the melting point of the wax and the behavior of casted resin when heated up. Should work, will keep you informed.
                            One for the little parts on witch I will use David’s vacuum casting technique
                            And then the last one, the “normal tool for all the other parts (still have to complete)

                            Tool for vacuum casting technique

                            Click image for larger version

Name:	Akula (410).jpg
Views:	72
Size:	57.1 KB
ID:	112292

                            Click image for larger version

Name:	Akula (413).jpg
Views:	69
Size:	50.8 KB
ID:	112285

                            Click image for larger version

Name:	Akula (414).jpg
Views:	67
Size:	67.8 KB
ID:	112289


                            Tool for lost wax method, wax caliber just below the master of the pod

                            Click image for larger version

Name:	Akula (408).jpg
Views:	66
Size:	49.7 KB
ID:	112291

                            Click image for larger version

Name:	Akula (411).jpg
Views:	70
Size:	51.4 KB
ID:	112290

                            Grtz,
                            Bart
                            Practical wisdom is only to be learned in the school of experience.
                            "Samuel Smiles"

                            Comment

                            • HardRock
                              Vice Admiral
                              • Mar 2013
                              • 1609

                              Man alive. How long did it take to make those brass stensils? You better be careful - there may be a conspiracy afoot to never deliver your SD so that we can all sit back and watch the wonderful things that you create whilst you are waiting for it to arrive!

                              Comment

                              • bwi 971
                                Captain
                                • Jan 2015
                                • 905

                                Originally posted by HardRock
                                You better be careful - there may be a conspiracy afoot to never deliver your SD
                                I was......I received the shipping confirmation before I posted the WIP, Now I'm concerned about the water soluble glue he might have used to assemble the SD.

                                Originally posted by HardRock
                                How long did it take to make those brass stencils?
                                It took between two and tree months....compared to your speed Scott....I'm captain slow.

                                Grtz,
                                Bart


                                Practical wisdom is only to be learned in the school of experience.
                                "Samuel Smiles"

                                Comment

                                Working...