Continuing/finishing (?) a Revell 1/72 type VIIC from another user

Collapse
X
 
  • Time
  • Show
Clear All
new posts
  • Reckless
    Lieutenant Commander
    • Jan 2012
    • 183

    Continuing/finishing (?) a Revell 1/72 type VIIC from another user

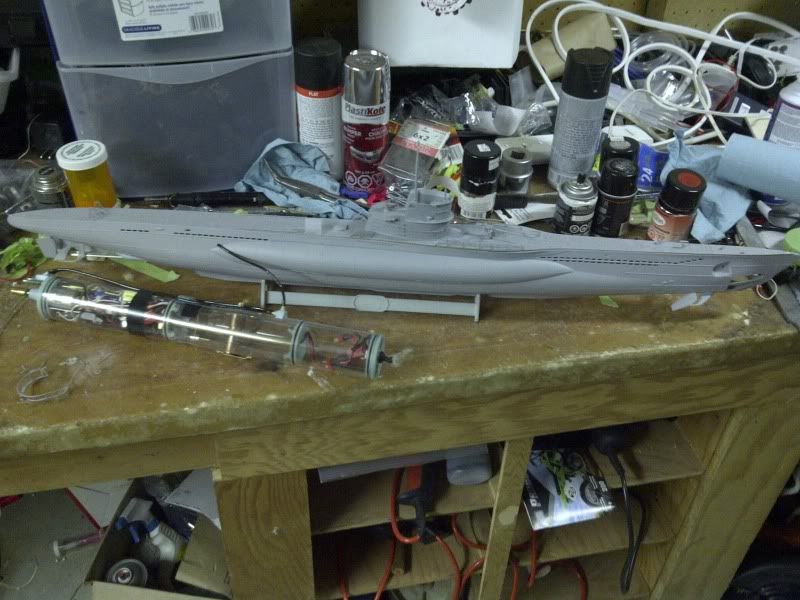
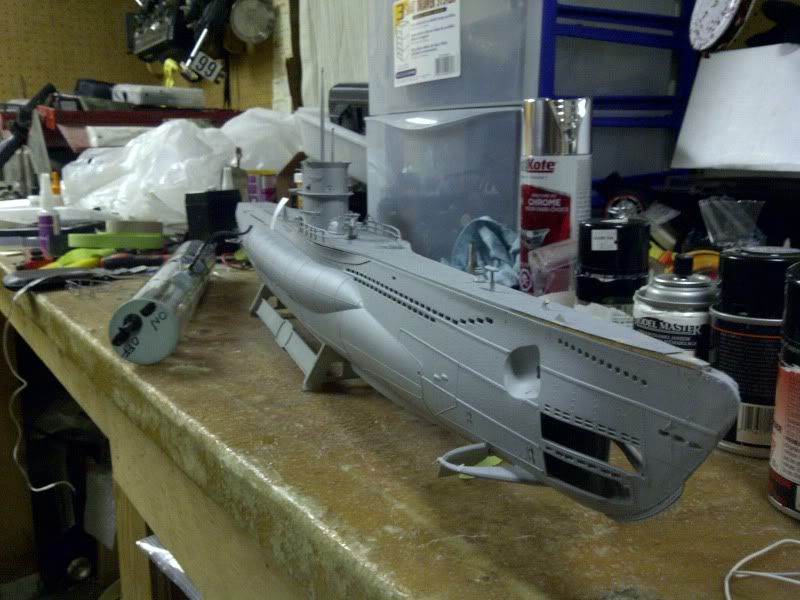
    alright... credit and accolades for where this sub is in the pictures goes soley to Iran .. I purchased the sub in this state from him. the postal employees from the US, customs, and Canada did their best to ruin Irans Work .. but it came through with very little damage to the details. the net cutter on the top of the bow and the railing around the gun on the back of the conning tower were casualties but I beleive I found all the little pieces and can make them whole again.


    the enemies size each other in Dry dock


    I hope your ready for the noob incomming Dave! :wink:
  • He Who Shall Not Be Named
    Moderator
    • Aug 2008
    • 12254

    #2
    Bring it on, Kiddo. Let's dance!

    David
    Who is John Galt?

    Comment

    • redboat219
      Admiral
      • Dec 2008
      • 2735

      #3
      As the hull has already been glued together are the rudder and dive plane control linkages of David's fittings kit or did the previous builder used scratchbuilt pieces?
      Make it simple, make strong, make it work!

      Comment

      • Reckless
        Lieutenant Commander
        • Jan 2012
        • 183

        #4
        the hull is built, the control surfaces are all in via a fittings kit.

        I have to build the pushrods from the SD to the control surfaces (have all the mag bits) ... fix some shipping damage to detail parts, paint, I believe index the SD to the sub, balast, and set a couple elec pieces (the SL8 and the auto pitch dealy)

        I don't have a DVD of daves knowledge ... I was gonna bug him for one shortly before asking a bunch of silly questions which I'm pretty sure are covered on that DVD. I'm in no rush on completing this .. I wanna do it right once instead of trying to reverse and redo things.

        except the paint and detail fixing part... president of the my boating club told me it better be ready for display for the public show in march or he'd hurt me.. (lol good friend of mine ;) )

        after all the detail on this and my "snowberry" .. I'm gonna do a tug and a nuke sub next .. my eyes need a break.. HA..

        Comment

        • He Who Shall Not Be Named
          Moderator
          • Aug 2008
          • 12254

          #5
          No DVD, like what I did for the GATO. Lot of the dope you need is available at this site in the form of old forum threads and downloads. But, what you can't dig up there, me, Myron, Kerry, and a few other Type-7 vet's here will help out.

          That makes this thread, as of this milli-second, an OFFICIAL WIP THREAD (insert: sound of crashing thunder and Damion movie music).

          Ball's in your court, sport.

          David
          Who is John Galt?

          Comment

          • vital.spark
            Commander
            • May 2010
            • 274

            #6
            Hello Reckless,

            I suggest you look up the 2 part thread David did on the seaview subdriver as it will give you all the information you will require regardind the builing and serviceing of the subdriver. http://support.caswellplating.com/in...r-instructions

            Regards,

            Myron

            Comment

            • Reckless
              Lieutenant Commander
              • Jan 2012
              • 183

              #7
              thanks... the SD itself is fine and built etc... it's the pushrods, arrangement.. etc .. but I found pictures I needed to figure it out.


              the detail work on the Snowberry has made my brain hurt.. so I decided to take a small break and see what I could figure out/acheive ..or figure out what new and noobie questions to ask Dave ... so I hauled out the Type 7.. the sub driver and dove into it.

              I got the SD indexed .. this was actually the only part that "scared" me before proceding

              I dug into small modifications here and there to fit the snort manifold and tube under the deck and through the conning tower... .. because ..well .. in the configuration it arrived the snort tube wanted to come up between the deck gun, and the front of the tower...

              I shortened the brass tube for the manifold (a slight amount.. like 2mm) .. and ever to gently and slightly gave it a cant towards the stern .. thus allowing the rubber tube to make the direction change withough kinking and putting a ton of pressure on the bottom of the deck...

              the Tower didn't have the fittings magnets in it yet... nor did it have any air pocket venting (save for the micro scopic mesh of the PE decking) so with a grimace and a tear I got a small drill bit and poked some holes in the decking . I also put another hole in the deck as "hidden" as I could for the snort hose to come up. scale beautification was lightly effected .. but my goals are function on the water not accolaides from rivet counters

              anways... very very small things.. nothing worth taking pictures over... once some glue dries I'll set the SD back in the hull and get to work on making the rods for the control surfaces.

              I have a question about ballasting .... as I will be there relatively soon

              Dave... why can't foam be higher then waterline? as floatation trimming is more for while submerged, wouldn't you want it as high as possible for stability, same as added weight as low as possible? ... if it's for possible water retention during surfacing, would drainage troughs and holes in the foam sufice?

              your welcome to just call me a stupid noob and do as instructed (like you need permission.. HA) .. just thoughts going through my brain.

              Comment

              • He Who Shall Not Be Named
                Moderator
                • Aug 2008
                • 12254

                #8
                Naw. You're doing fine. No call for name-calling .... yet.

                The vertical relationship of the fixed lead ballast weight and buoyant foam (center of gravity low, center of buoyancy high) produces the vertical forces that when displaced longitudinally or laterally (pitch and/or roll off-set from zero), translates to a torque in the appropriate direction and amplitude to force the boat back to a state of static stability (zero pitch and zero roll angle).

                When the vertical weight line is shared by the vertical buoyancy line, the boat is statically stable. When these two lines are off-set longitudinally or laterally, or a combination of the two, then the boat is unstable and the two forces will work to right the boat, thus placing themselves once again along the same vertical path -- the state of static stability.

                One job of the buoyant foam is to produce the additional buoyant force needed to cancel out the weight of the boat when the ballast tank is flooded. Neutral (an ideal, never achieved in the real world) buoyancy -- submerged trim -- is achieved when the boats overall weight is equal to the weight of the water it displaces.

                Displacement of water (buoyant force) occurs only when an object is in the water. If foam is placed above the surfaced waterline (where it will no longer displace water), then that foam will no longer contribute its share of buoyancy to the boat. If you do put a lot of your foam above the waterline, then the ballast tank has to be increased in floodible capacity, that additional amount equal to the displacement of water lost when the foam is pushed up into the air. The more foam you keep below the surfaced waterline, the smaller your ballast tank can be and still do the job of getting the boats structure high enough so that the waterline falls at the scale location for the type model you're representing.

                (R/C Models representing WW-2 submarines have notoriously high freeboards -- that's a lot of stuff to push up into the wild-blue! A big ass ballast tank is required, or you build all above waterline portions of the submarine as light as possible. Nothing looks more toy-like than a GATO sitting in surface trim, with decks nearly awash, because of an undersized ballast tank that is more hardware than floodible volume! That's the big reason I favor the gas or semi-aspirated ballast sub-system -- you get a great deal of floodible volume without giving up valuable real-estate to bags, solenoids, exotic pumps, jacking screws, pistons, Klystron relays, flux-capacitors, spin-dizzies, limit switches, speed controllers, water sensors, and other ballast sub-system support gizmo's).

                Static stability about the pitch and roll axis is the job of the keel weight and foam. You play with the foam -- its amount, longitudinal and lateral placement -- to establish submerged near neutral buoyancy as well as the boats zero pitch and roll angle when at rest.

                Always trim the boat first for submerged 'near neutral' trim. Once that's done, you then trim the boat for surfaced trim. You'll find the waterline too low initially (that's a good thing), and you start relocating some of the foam vertically, to a position above the submarines designed waterline. I'll yank you through the process when you get to it, non-Qual.

                Click image for larger version

Name:	DSCN0183.jpg
Views:	1
Size:	93.3 KB
ID:	66305Click image for larger version

Name:	DSCN0185.jpg
Views:	1
Size:	93.3 KB
ID:	66306Click image for larger version

Name:	DSCN0186.jpg
Views:	1
Size:	94.4 KB
ID:	66307Click image for larger version

Name:	DSCN0199.jpg
Views:	1
Size:	102.8 KB
ID:	66308Click image for larger version

Name:	DSCN0191.jpg
Views:	1
Size:	94.9 KB
ID:	66309
                Who is John Galt?

                Comment

                • Reckless
                  Lieutenant Commander
                  • Jan 2012
                  • 183

                  #9
                  hey.. I understood all that ! ...


                  ... okay now that you've picked yourself off your floor and back into your chair...

                  I don't have the wonderful formed weight and foam bits ... I am getting my hands on some closed cell pink foam.. and the sub came with a bottle of those lil lead balls

                  is it wise to fill.. or half fill? the keel with said lead and RTV or epoxy... and then foam from there? ... I did download and read the ballasting/trimming the type7 that those pictures are from ... I just don't have the pre formed bits to start with..

                  with any luck I'll be taking my first swing at ballasting/trimming next week..

                  Comment

                  • redboat219
                    Admiral
                    • Dec 2008
                    • 2735

                    #10
                    David,
                    Can one just wall off certain sections of the hull like the saddle tanks with sheet styrene and inject expanding foam into them and then trim off the excess?
                    Last edited by redboat219; 01-28-2012, 02:11 AM.
                    Make it simple, make strong, make it work!

                    Comment

                    • He Who Shall Not Be Named
                      Moderator
                      • Aug 2008
                      • 12254

                      #11
                      Originally posted by Reckless
                      hey.. I understood all that ! ...


                      ... okay now that you've picked yourself off your floor and back into your chair...

                      I don't have the wonderful formed weight and foam bits ... I am getting my hands on some closed cell pink foam.. and the sub came with a bottle of those lil lead balls

                      is it wise to fill.. or half fill? the keel with said lead and RTV or epoxy... and then foam from there? ... I did download and read the ballasting/trimming the type7 that those pictures are from ... I just don't have the pre formed bits to start with..

                      with any luck I'll be taking my first swing at ballasting/trimming next week..
                      Fine.

                      Fill all the keel area, but the forward 1/4, with shot, then work out the foam from there.

                      David,
                      Who is John Galt?

                      Comment

                      • He Who Shall Not Be Named
                        Moderator
                        • Aug 2008
                        • 12254

                        #12
                        Originally posted by redboat219
                        David,
                        Can one just wall off certain sections of the hull like the saddle tanks with sheet styrene and inject expanding foam into them and then trim off the excess?
                        No. Expanding foam never stops 'expanding'.

                        David
                        Who is John Galt?

                        Comment

                        • ADDINGTON
                          Lieutenant
                          • Sep 2008
                          • 80

                          #13
                          Great to see a Type7 build thread as we welcome the Revell reissue of the kit!
                          I will post some pics soon, but would like to throw in some recent experience. I used damaged hull halves from a "spares" kit as molds for making the saddletank foam sections. Material used per Mike Caswell was Alumilite SuperFoam 320.
                          As David mentioned, placing expanding foam in an already assembled hull is a bit dicey.
                          An alternative I considered before making the foamies is Dapron foam sheet. You can find it at any R/C aircraft store in a variety of thicknesses. I have used the 3mm in many complex curve areas in other hulls, and am using it in the 7. You could cut strips and "laminate" them longitudinally into the saddletank area. An advantage of this method,which I now appreciate, is that you can perfectly position your uppermost strip even with your desired surfaced waterline. Silicone in this situation is massy and messy. I have had troublefree experience bonding this sheet to both styrene and fiberglass with Dupont Super 77 spray adhesive.
                          Hope this helps and thanks for starting this thread,
                          -Kerry
                          Last edited by ADDINGTON; 01-28-2012, 11:32 AM.

                          Comment

                          • vital.spark
                            Commander
                            • May 2010
                            • 274

                            #14
                            I have found that it is so easy just to use the pink foam cut to a bit oversize than take a course sanding block and reduce to the final shape and then go over with some fine to give a smooth finish. Both sides of my type VII were done in less then an hour! I just finished using the pink foam in my Gato which took a bit longer about 4 hours! Hey it's a lot bigger andneeds quit a bit of foat to bring it up to the qater line.

                            Comment

                            • Reckless
                              Lieutenant Commander
                              • Jan 2012
                              • 183

                              #15
                              okay... lead shot is in and setting... layer of epoxy in the bottom.. fill with shot, and sealed over/through/around with epoxy


                              SD index'd nicely... once everything is set I'll get the control surface rods built.. and then move on to foam ...

                              hopefully start new job this week... good for finances .. bad for building time.. LOL

                              and another "stupid" question... are any of the moulded lines on the hull the water line? or is it between the two moulded lines nearly level with the saddles and the top of the torpedo door?

                              and what colors should this thing be? I'm researching the colors but I've seen a few different possible options .. I've even seen some simple camo patterns LOL ..

                              Comment

                              Working...