Welcome to our forums. For the best in R/C submarine kits, components and accessories, be sure to visit the Nautilus Drydocks
If this is your first visit, be sure to
check out the FAQ by clicking the
link above. You may have to register
before you can post: click the register link above to proceed. To start viewing messages,
select the forum that you want to visit from the selection below.
The number of layers (laminates) of resin saturated fiberglass cloth is dictated by the desired wall thickness of the completed GRP part and the complexity of the tools geometry.
For my submarine hulls I prefer a mean wall thickness of 3/32-inch. Over the years I�ve settled on three layers of six-ounce, standard weave fiberglass cloth. That, in addition to the initial gel-coat.
The ability to negotiate small radius curves within the tool is a function of the fiberglass cloths weight, measured in ounces. The unit of measurement is the weight per square yard � how much does one square yard of the material weight.
The very light weight cloth, two-ounces and under, is used in a tool which poses simple and/or compound tight radius curves. However, the light weight fiberglass cloth does not significantly increase the parts wall thickness, so high number of laminates (as many as ten) have to be piled on to get to the desired 3/32-inch wall thickness of the part. And the flimsy stuff is very hard to handle and lay down correctly.
The heavy stuff is easy to maneuver and won�t creep around and bunch up as you brush on the resin. But if pushed into tight radius curves it will no longer conform to the tools shape and will lift and the open weave will suck air forming an air bubble between the saturated cloth and the surface of the substrate. Too stiff a cloth and you get air-voids between laminates.
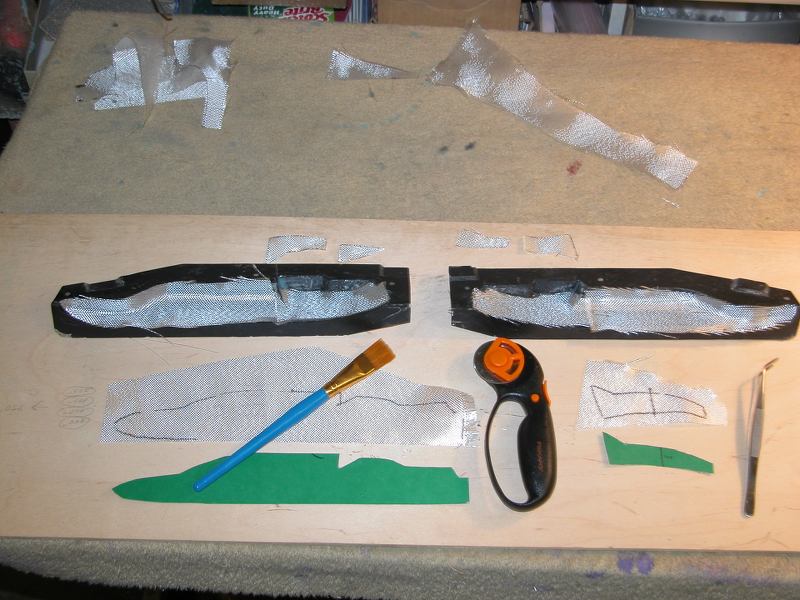
This relatively small, but extreme of form (tight radius) 1/72 M-1 sail tool demonstrates how paper templates are used to guide the knife as the 2 two-ounce and 1 six-ounce fiberglass cloth pieces are cut out. Those fiberglass pieces becoming the plies of the eventual GRP laminate.
Note the use of a very soft horse-hair brush -- needed for brushing in the resin to light weight cloth. Otherwise a stiff brush would push the glass all over the place as the catalyzed resin is brushed into the weave of the glass cloth.
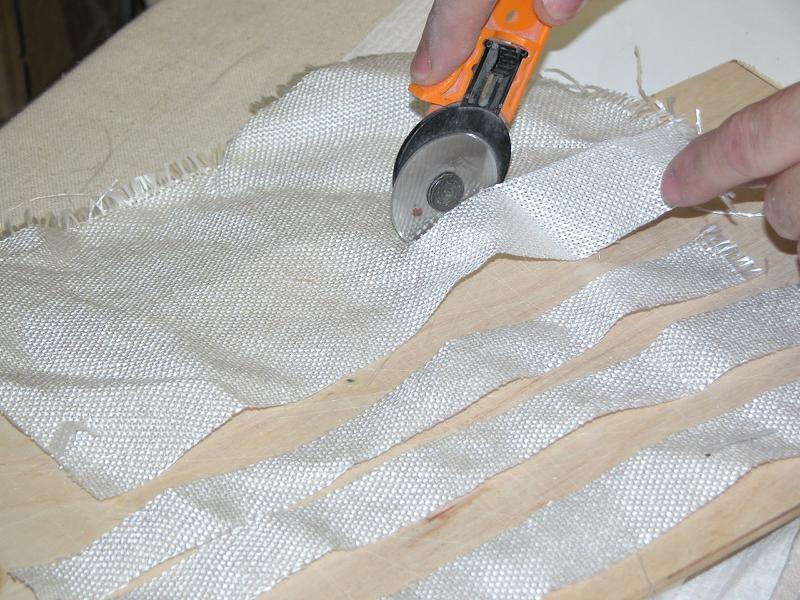
Note the use of a roller-blade knife, the perfect tool for this work as it will not pull out of shape the glass cloth as its cut away from the bulk roll. The cutting surface is a board of interior grade (no knots or pitch) plywood � this enhances the cutting ability of the knife and prevents excessive wear of the knife blade.
Planning and preparation is everything in the process of laying up fiberglass parts. Though the actual build up of laminates is messy, sticky work, the methodology IS NOT! And an important step in that careful methodology is cutting the cloth to a shape is only a bit oversized for the cavity to is pushed into.
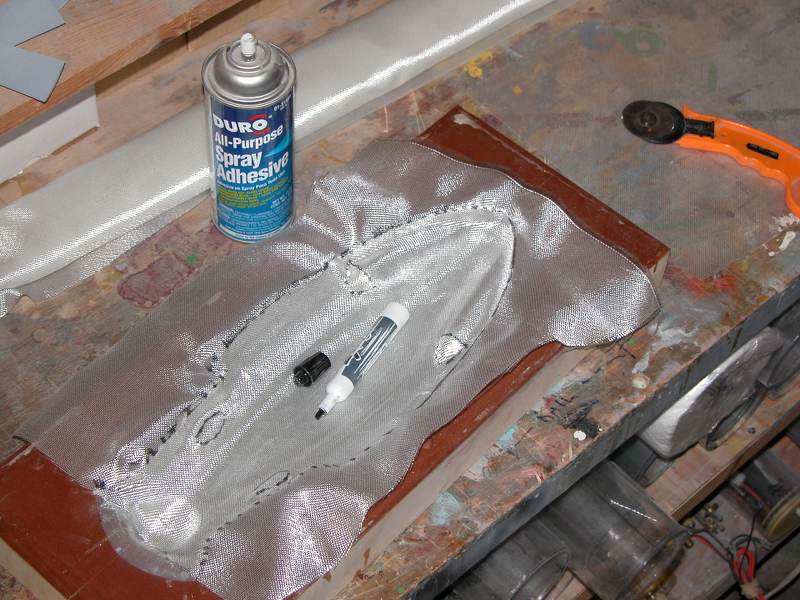
To help the dry glass cloth to cling to deep draft and tight radius portions of the tool it�s a good practice to first mist on some contact-cement, such as you see above. The low strength bond is enough to hold the glass down tight within the tools cavity -- even on vertical surfaces. Yet, the adhesive is weak enough to pull and reposition the glass cloth as required.
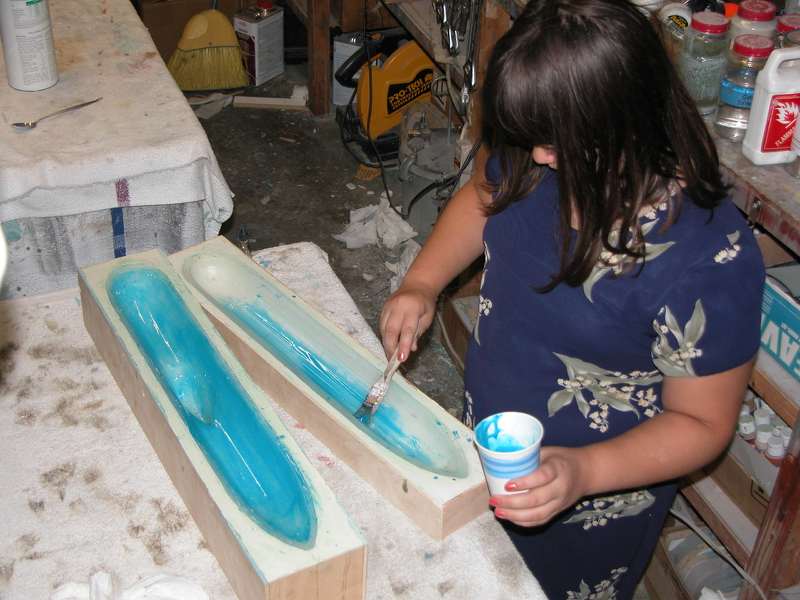
This, the first layer of cloth for this STINGRAY model, is marked where its edges make contact with the flange face of the tool. This first play is pulled and used to mark out the cutting template which in turn will be used to cut out all the required pieces of cloth needed to complete the GRP part.
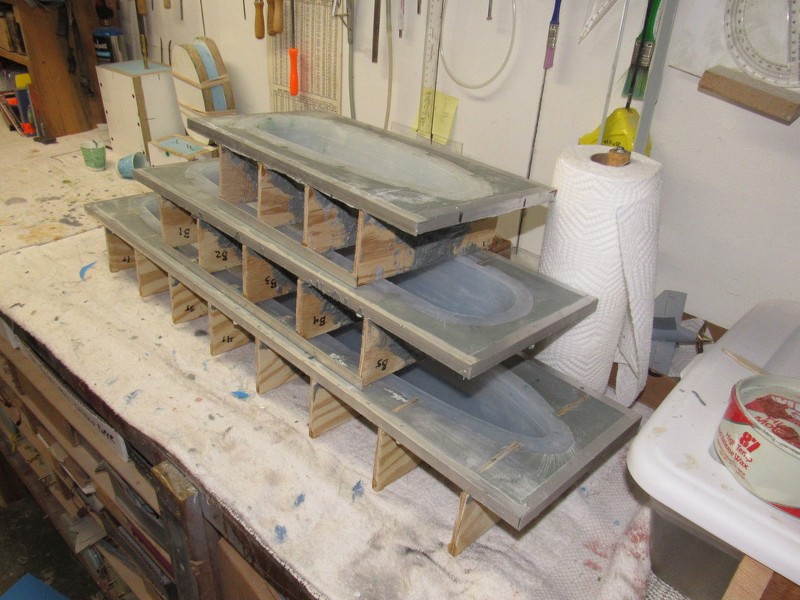
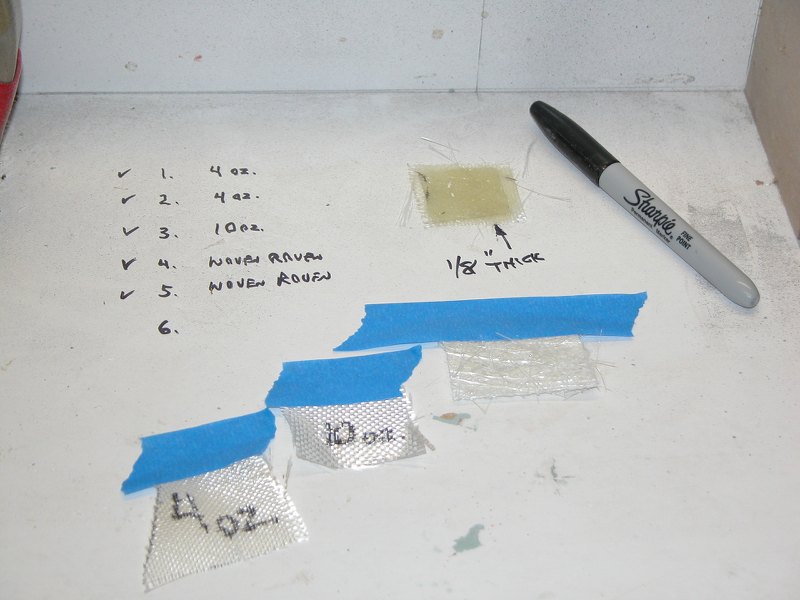
Part of the planning required for a successful outcome is a survey of the tool geometry and determination of how much fillet forming gel-coat will be required; the weight and number of fiberglass cloth elements; and the order of lamination. The above shot shows initial tests to determine the type cloth, order, and weight of each needed to achieve the desired 1/8-inch wall thickness of the completed GRP parts (this study in support of a job for the MIT School of Engineering).
As the geometry of the tools for this job had relatively large radiuses and very little draft I could jump right in with the four and ten-ounce cloth without fear of air entrapment between the laminates.
As a practical matter -- as far as handling and ability to lay down in moderate radius areas -- I find the four and six-ounce fiberglass cloth to be pretty much the same animal� I leave it to the anal-retentive, vacuum bagging airplane community to sweat the small performance differences between the two weights.
In this case I settled on a laminate consisting of 2 four-ounce cloth; 1 ten-ounce cloth and 2 laminates of a moderately heavy glass weave commonly referred to as, �woven roven�. These resin saturated laminates of cloth produced the desired wall thickness.
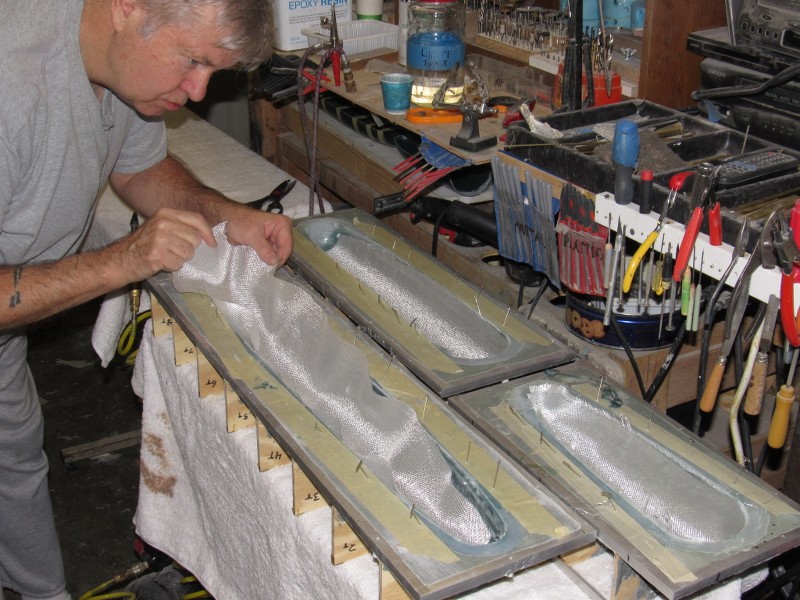
Cutting out fiberglass cloth to the correct shapes, weights and numbers to produce the GRP parts for Kevin�s 1/96 THRESHER/PERMIT kit.
Much as a big-city operating room all the scalpels, hemostats, monitoring equipment and nursing staff are on station, and ready for immediate use by the Doctor�s. Such is the care and preparation given to my work-station before the first ounce of goo is catalyzed. (OK, I exaggerate a bit, but you get my drift).
The outcome of glass work is dependent on how well you planned and organized. Some of the steps are even dry rehearsed to make sure all will be performed in a timely and exacting way. Two things you don�t screw around with: metal casting, and GRP part production.
Here you see the virtue of using the lighter weight fiberglass cloth: its ability to conform to moderate simple and compound curve radiuses within the tool.
It�s my normal methodology to place the glass into the tool dry, and to only wet it down with catalyzed resin after the cloth has been coaxed into position. Also, I permit each laminate (including the gel-coat) to harden before laying on the next lamination. Of course, I lightly sand the surface of each layer to insure a sure-fire bonding between it and the next laminate.
A trick Mike Caswell taught me is to thin down the catalyzed resin with a very small amount of quality lacquer thinner � makes it much easier to work into the weave of the fiberglass cloth.
Right... what do you use for a gel coat with epoxy?
The gel-coat -- usually the first layer of goo to be applied over the part-release system (that prevents adhesion between the eventual GRP part and the tool that gives it form) -- becomes the �surface� of the eventual GRP part. That surface you will later prim, putty, and glue other stuff to. The gel-coat becomes the model hulls substrate � so get it right or suffer pealing, air bubbles, discoloration and a permanent distortion of the space-time continuum!
To be useful the gel-coat (often not even considered by the inexperienced glass guy) should have the following attributes:
1. To create reasonably large radius fillets within the tools cavity to lessen the likelihood of the following fiberglass cloth laminates of lifting after resin saturation -- creating voids (bubbles) within the eventual GRP part. Also, the thickened resin (the definition of a gel-coat) works to capture all the high-relieve detail present in the tool. It does a much better job of capturing that detail without entrapping air bubbles than the first laminate of fiberglass cloth, where the weave gets into the way.
2. As the binding resin of the gel-coat and laminates under it -- be it epoxy, polyester, or polyurethane � continues to harden over the weeks, even months, after removal from the tool, the gel-coat layer will hide the weave of the first fiberglass cloth layer, which would otherwise be evidenced on the surface of the GRP part. The gel-coat mitigates this phenomenon to a high degree.
3. As there is no fiberglass cloth near the surface of the part the substrate is amiable to scribing; an important consideration of post lay-up chores. Specifically, scribing. Heavily filled resin (gel-coat) is the perfect substrate for such work.
4. The gel-coat mix can be doped with non-reactive coloring agents. It�s hard to identify flaws (bubbles and flash) when examining a semi-transparent GRP part. So its wise to color the binding resin if for no other reason than that. I like blue. Kevin likes red. What�s wrong with him!
I make my own gel-coat, and I always make sure that the resin constituent of the mix is of the same chemistry as the following layers binding resin used to saturate the fiberglass cloth.
The M-1 sail tool with laid up left and right GRP parts ready for extraction. Behind are the cardboard cutting templates. With this difficult glass job I found it necessary to fillet build not only the gel-coat but also between the first two layers of two-ounce cloth. That cloth (sometimes referred to as �angel hair�) is so hard to handle I find myself using tweezers to lay it in place.
Before extraction, the GRP raw edges are sanded flush with the two flange faces of the tool halves.
As you can see this M-1 tool features tight radius curves � simple and complex � as well as deep draft portions -- seen in the bridge area where the conning station projects above the fairwater; a right-angle cliff face, if you will.
Substantial fillets were built up from a very thick gel-coat before the first layer of glass cloth goes down. You can see the resulting fillets on the lower GRP part, ready for removal from the tool. The removed half of the sail is seen above. Short of vacuum bagging and my displacing plug process I don�t see any other way to lay-up GRP into such a mold without increasing the radius of the curves with gel-coat.
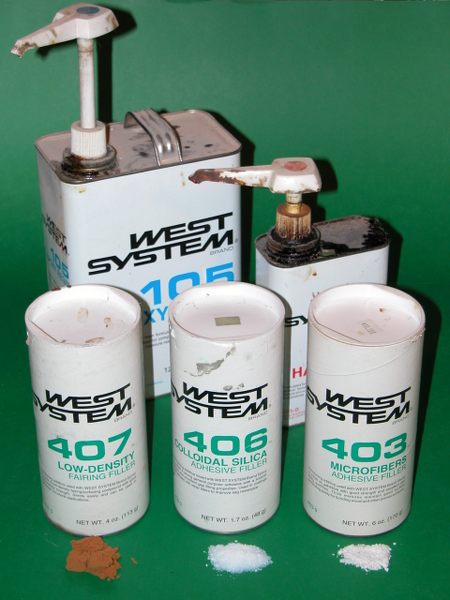
Gel-coat is nothing more than thickened laminating resin. I do all my fiberglass layup work these days with the West System laminating resin line. They also offer several types of filling material, each with its own mechanical properties.
The 407 low-density micro-balloons are of very light weight (of no concern to submarine drivers), but these microscopic beads tend to be a bit clumpy even when mixed well with the resin. But I�ll use this stuff if nothing else is at hand.
The 403 microfibers makes a god-awful mess and no matter how careful I am the fibers float around in the air getting into everything. This stuff sucks the big one! Not recommended.
The 406 Colloidal Silica is the best I�ve found as it can be mixed at high ratio with the resin and can be built up to significantly thick fillets without fear of bubble entrapment or sagging off vertical surfaces.
Making the gel-coat goo is simple: catalyze the resin and mix in the filler. Thick for fillet building. Not so thick for overall surface coating. The mess is usually applied with a brush. This stuff also makes a great glue for porous and/or poorly fitted parts.
The first coat of gel-coat is mixed thick and applied to all tight radius and high draft portions of the tools surfaces. Once that goo has hardened enough so the second coat won�t pull the first out of shape, a thinner mix of filler and resin is prepared and brushed over all surfaces of the tools cavity, as seen here. The fillet and overall gel-coat becomes the substrate of the finished GRP part.
Just like to add a couple of extras in here based on my own limited experience working with epoxy resins ( usually work with polyester). I'm very impressed with the properties of the epoxy composites, paper thin laminates are very strong. Some may say why worry about weight in a sub- I'm not, I'm concerned with surfaced displacement. Thin wall hull above water equals small(er) ballast tanks.
1. Be extra scrupulous when applying your release agents. Epoxy sticks much more tenaciously than polyester, and the resin doens't shrink anywhere near as much when cured and thus is far less forgiving. I like using carnuba wax and I use hairspray in place of PVA, as it comes in aerosol form, and thus is easy to apply without separating. I apply four to five applications of wax polishing in between coats and a couple of coats of hairspray. You can get these wipe on wipe off type release agents, I've tried them, and they work, but I still favour the older methods.
2. I use a twill weave cloth for laying up anything with compound curves. These cloths are designed to drape well and are easily to manipulate into the shape of your tooling. You can also use chopped matt for reinforcement, which is quite a bit cheaper so probably useful for tooling, but make sure you get powder bound rather than styrene bound matt (harder to find). CSM will use more resin though, and the laminate won't be as strong or thin.
3. I personally found mixing colloidal silica and epoxy resin does not give me the same properties as polyester gelcoat. It certainly thickens the resin, but it never seems to have the same nice paintable qualities of polyester gelcoat. I've since found a company that supplies ready mixed epoxy gelcoat, and also a polyester gelcoat designed for use with epoxy backing resins. easycomposites.co.uk
4. Be very patient before releasing your tools. I'd recommend a full 24 hours minimum, and preferably 48 hours. Polyester tools are a lot quicker in this respect.
When using the silicone glove method are you also applying a release agent or just relying on the silicone? Also, if using a polyester gell coat are you allowing it to completely harden befor applying cloth and epoxy of laying down cloth on tacky gell coat?
When using the silicone glove method are you also applying a release agent or just relying on the silicone?
I would only rely on the silicone. Please correct me if I'm wrong , you need to get the good RTV that is epoxy resistent else you have to use a wax to protect the silicone.
Originally posted by HardRock
if using a polyester gell coat are you allowing it to completely harden befor applying cloth and epoxy of laying down cloth on tacky gell coat?
See below
Originally posted by MFR1964
using two components, the polyester resin itself and the hardener, the trick will be to add the glass layer when the gel coat is still sticky, this way it will stick well against the epoxy resin, wait too long and the gel coat will rip itself loose from the epoxy.
Manfred.
Grtz,
Bart
Practical wisdom is only to be learned in the school of experience. "Samuel Smiles"
West Systems don't sell an epoxy gelcoat. You use the one type of resin and mix it with colloidal silica, which is a thixotropic additive. West Systems are difficult to find outside of the US. I use locally sourced epoxy resin, and it's perfect. You can various hardener types for fast to slow cure time, depending on your desired pot life. I find the faster ones work for me, but bearing in mind your climate, you may want to go for something a bit slower
Something like their R246 and some colloidal silica should work for you. Along with cloth and normal fillers like chopped strands and micro balloons for fairing etc.

 Tweet
Tweet


Comment