Victor III

Collapse
X
 
  • Time
  • Show
Clear All
new posts
  • bwi 971
    Captain
    • Jan 2015
    • 922

    Inserts in place, motor attached.


    Servo link bushing glued in place shaft seal fitted.


    Servo rack attached to endcap (3 servo's)


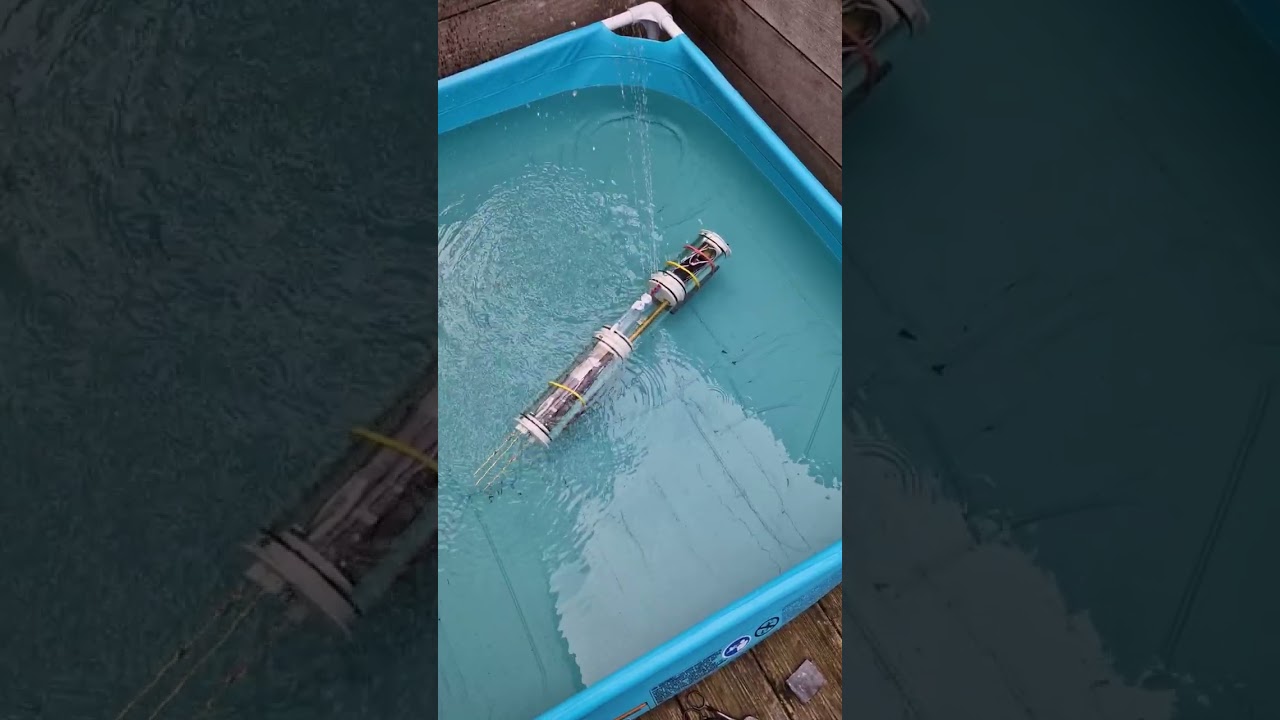
    test fitting ballast tank and aft compartment

    Click image for larger version

Name:	Victor_III_76.jpg
Views:	164
Size:	71.9 KB
ID:	180254
    ESC for propulsion and pump will also live in the aft compartment, space is available.

    Click image for larger version

Name:	Victor_III_78.jpg
Views:	165
Size:	69.1 KB
ID:	180253

    Click image for larger version

Name:	Victor_III_77.jpg
Views:	164
Size:	64.8 KB
ID:	180255

    Ballast tank layout.

    Click image for larger version

Name:	Victor_III_79.jpg
Views:	169
Size:	62.4 KB
ID:	180252

    Grtz,
    Bart
    Practical wisdom is only to be learned in the school of experience.
    "Samuel Smiles"

    Comment

    • bwi 971
      Captain
      • Jan 2015
      • 922

      I had a new insight regarding 3D resin.

      The pump was left with water inside, and a few days later, I tried to turn it, but it was seized. After opening it up, I noticed the gears had become soft and were squeezable. I directly linked this to a message on a Dutch forum where a fellow modeler had experienced the same issue with water-washable resin on a 3D printed shroud. Since I don't use that kind of resin, I thought I would be okay. The parts were unpainted.

      I did some research on the web and found out that depending on the brand and type, some printed resins can expand significantly and become quite soft when submerged. The good thing is that they will return to their hard state once they dry out.

      I did not find the critical submersion time before the effect takes place, but my pump is a critical part and will contain water for a longer period of time. I'm reprinting the pump with a different resin and will run some more tests.

      Meanwhile, I traced all embedded lines to make them more pronounced and working on the fwd dive planes.
      I was very happy that I managed to position on of the frames right on top of the rods of the bow planes, so I needed to partly crop the frame.

      Click image for larger version

Name:	Victor_III_80.jpg
Views:	126
Size:	51.7 KB
ID:	180345

      Click image for larger version

Name:	Victor_III_81.jpg
Views:	126
Size:	52.9 KB
ID:	180339

      Click image for larger version

Name:	Victor_III_82.jpg
Views:	126
Size:	58.8 KB
ID:	180341

      Click image for larger version

Name:	Victor_III_83.jpg
Views:	125
Size:	50.5 KB
ID:	180342
      Click image for larger version

Name:	Victor_III_84.jpg
Views:	122
Size:	51.9 KB
ID:	180344

      Click image for larger version

Name:	Victor_III_85.jpg
Views:	124
Size:	53.2 KB
ID:	180343


      Click image for larger version

Name:	Victor_III_86.jpg
Views:	125
Size:	52.7 KB
ID:	180340

      Click image for larger version

Name:	Victor_III_87.jpg
Views:	124
Size:	53.9 KB
ID:	180347

      Click image for larger version

Name:	Victor_III_88.jpg
Views:	123
Size:	38.5 KB
ID:	180346

      Click image for larger version

Name:	Victor_III_89.jpg
Views:	130
Size:	42.1 KB
ID:	180338

      Click image for larger version

Name:	Victor_III_90.jpg
Views:	123
Size:	45.6 KB
ID:	180348

      Click image for larger version

Name:	Victor_III_91.jpg
Views:	123
Size:	46.4 KB
ID:	180349

      Grtz,
      Bart
      Practical wisdom is only to be learned in the school of experience.
      "Samuel Smiles"

      Comment

      • Subculture
        Admiral
        • Feb 2009
        • 2161

        Never had much luck with geared pumps using plastic gears. Sadly not a lot of choice for smaller metal geared pumps now. Kavan make a nice geared pump, but it's fairly large, could fit a smaller motor to the pump head of course.

        Also seen pumps from China which are pitched for use with hydraulics (oil) so not sure if the parts will be compatible with water, but small and brushless. e.g. https://tinyurl.com/5yx35pm5

        Comment

        • bwi 971
          Captain
          • Jan 2015
          • 922

          Various Progress

          I reprinted all parts with the new resin as it withstands water.
          Click image for larger version

Name:	Victor_III (136).jpg
Views:	101
Size:	71.9 KB
ID:	180466

          Click image for larger version

Name:	Victor_III (137).jpg
Views:	107
Size:	65.7 KB
ID:	180465

          Servo Linkages
          I don't like the Z bends to connect the rods to the servo horns. Especially in combination with brass horns, I find it a PITA. I opted for a 90° sharp bend by grinding a corner out of the rod. After bending, I applied some soft solder to give it back some strength. I designed a snap-on retainer to prevent the rod from working its way out of the connection. To prevent the rod from bending when the servo horn turns, I provided a hinged setup. The O-rings for the link bulkhead penetration came in. The bulkhead penetrations were fixed in place with blue Loctite sealant, which was also used to seal the holding bolts of the motor.

          Click image for larger version

Name:	Victor_III (139).jpg
Views:	101
Size:	59.1 KB
ID:	180468

          Click image for larger version

Name:	Victor_III (140).jpg
Views:	101
Size:	60.9 KB
ID:	180471

          Click image for larger version

Name:	Victor_III (141).jpg
Views:	97
Size:	48.6 KB
ID:	180470

          Click image for larger version

Name:	Victor_III (142).jpg
Views:	102
Size:	51.8 KB
ID:	180474

          Click image for larger version

Name:	Victor_III (138).jpg
Views:	97
Size:	68.6 KB
ID:	180473

          Click image for larger version

Name:	Victor_III (143).jpg
Views:	98
Size:	43.2 KB
ID:	180467

          Click image for larger version

Name:	Victor_III (144).jpg
Views:	99
Size:	50.9 KB
ID:	180469

          Click image for larger version

Name:	Victor_III (145).jpg
Views:	96
Size:	50.8 KB
ID:	180472

          The oilite bushings for the prop shaft were pressed in place, and the collar of the outer bushing was turned down to fit into the provided recess.

          Click image for larger version

Name:	Victor_III (146).jpg
Views:	101
Size:	63.9 KB
ID:	180477

          Click image for larger version

Name:	Victor_III (147).jpg
Views:	99
Size:	43.7 KB
ID:	180476

          Click image for larger version

Name:	Victor_III (148).jpg
Views:	99
Size:	70.9 KB
ID:	180475

          All the new ballast tank appendages were glued in place using the Loctite blue sealant.

          Click image for larger version

Name:	Victor_III (149).jpg
Views:	99
Size:	49.8 KB
ID:	180481

          Click image for larger version

Name:	Victor_III (150).jpg
Views:	100
Size:	52.2 KB
ID:	180480

          Click image for larger version

Name:	Victor_III (151).jpg
Views:	100
Size:	54.9 KB
ID:	180479

          Click image for larger version

Name:	Victor_III (152).jpg
Views:	99
Size:	50.8 KB
ID:	180478

          The forward endcap was prepared with a connection for the pressure sensor and a recess for the WT toggle switch.

          Click image for larger version

Name:	Victor_III (155).jpg
Views:	98
Size:	50.0 KB
ID:	180485

          Click image for larger version

Name:	Victor_III (156).jpg
Views:	100
Size:	49.9 KB
ID:	180483

          Click image for larger version

Name:	Victor_III (153).jpg
Views:	101
Size:	56.0 KB
ID:	180484

          Click image for larger version

Name:	Victor_III (157).jpg
Views:	99
Size:	58.3 KB
ID:	180482

          Grtz,
          Bart


          Practical wisdom is only to be learned in the school of experience.
          "Samuel Smiles"

          Comment

          • Tom Spettel
            Lieutenant, Junior Grade
            • Dec 2009
            • 49

            Wow this is looking good.

            Comment

            • redboat219
              Admiral
              • Dec 2008
              • 2852

              Click image for larger version

Name:	20240621_132331.jpg
Views:	66
Size:	54.4 KB
ID:	180915 Would it matter if you placed th anti-siphon tube inside the ballast tank instead of outside?
              Make it simple, make strong, make it work!

              Comment

              • bwi 971
                Captain
                • Jan 2015
                • 922

                Originally posted by redboat219
                Click image for larger version

Name:	20240621_132331.jpg
Views:	66
Size:	54.4 KB
ID:	180915 Would it matter if you placed th anti-siphon tube inside the ballast tank instead of outside?
                as long as its position is higher than the watersurface when the boat is sufaced it will be ok, but I like to have some additional head so I maximised the distance by bringing it out of the WTC into the sufaced dryspace of the boat.
                Practical wisdom is only to be learned in the school of experience.
                "Samuel Smiles"

                Comment

                • bwi 971
                  Captain
                  • Jan 2015
                  • 922

                  I had to add the footholds at the bottom. First, they were scribed with an old stencil of the Akula.

                  Click image for larger version

Name:	Victor_III (251) - kopie.jpg
Views:	37
Size:	50.4 KB
ID:	180987

                  Click image for larger version

Name:	Victor_III (250) - kopie.jpg
Views:	36
Size:	47.0 KB
ID:	180988

                  Click image for larger version

Name:	Victor_III (249) - kopie.jpg
Views:	36
Size:	44.6 KB
ID:	180990

                  Click image for larger version

Name:	Victor_III (248) - kopie.jpg
Views:	35
Size:	49.7 KB
ID:	180989

                  The little propellers of the creeper motors were also designed and printed. I designed a four-bladed propeller and then cut off two of the blades.

                  Click image for larger version

Name:	Victor_III (247) - kopie.jpg
Views:	35
Size:	50.6 KB
ID:	180991


                  Before decanting the paint, I want to finish everything that needs to be painted. I will have two sails: one for operating the sub and one for presenting the sub on dry land; the latter will have all the masts. I printed all the mast parts. I put a lot of effort and time into designing them to be as close as possible to the real thing by using pictures. I even incorporated the bolts. Below are pictures of the more complicated ones.

                  Click image for larger version

Name:	Victor_III (224) - kopie.jpg
Views:	35
Size:	57.6 KB
ID:	180992

                  Click image for larger version

Name:	Victor_III (223) - kopie.jpg
Views:	36
Size:	64.6 KB
ID:	180994

                  Click image for larger version

Name:	Victor_III (222) - kopie.jpg
Views:	36
Size:	41.5 KB
ID:	180993

                  Click image for larger version

Name:	Victor_III (230) - kopie.jpg
Views:	35
Size:	35.6 KB
ID:	181009

                  Click image for larger version

Name:	Victor_III (220) - kopie.jpg
Views:	35
Size:	60.1 KB
ID:	180995

                  Click image for larger version

Name:	Victor_III (221) - kopie.jpg
Views:	36
Size:	62.2 KB
ID:	180999

                  Click image for larger version

Name:	Victor_III (231) - kopie.jpg
Views:	36
Size:	34.8 KB
ID:	181007

                  Click image for larger version

Name:	Victor_III (219) - kopie.jpg
Views:	36
Size:	61.1 KB
ID:	180998

                  Click image for larger version

Name:	Victor_III (217) - kopie.jpg
Views:	35
Size:	94.6 KB
ID:	180997

                  Click image for larger version

Name:	Victor_III (212) - kopie.jpg
Views:	36
Size:	52.6 KB
ID:	180996

                  Click image for larger version

Name:	Victor_III (211) - kopie.jpg
Views:	36
Size:	55.1 KB
ID:	181000

                  Click image for larger version

Name:	Victor_III (210) - kopie.jpg
Views:	36
Size:	55.5 KB
ID:	181001

                  Click image for larger version

Name:	Victor_III (229) - kopie.jpg
Views:	36
Size:	92.6 KB
ID:	181006

                  The hatches on the display sail have been cut out. I did the same with the doors because I wanted to reveal the reinforcements that I have integrated.

                  Click image for larger version

Name:	Victor_III (238) - kopie.jpg
Views:	36
Size:	76.2 KB
ID:	181004

                  Click image for larger version

Name:	Victor_III (237) - kopie.jpg
Views:	36
Size:	44.4 KB
ID:	181002

                  Click image for larger version

Name:	Victor_III (236) - kopie.jpg
Views:	36
Size:	60.5 KB
ID:	181003

                  Click image for larger version

Name:	Victor_III (234) - kopie.jpg
Views:	36
Size:	57.9 KB
ID:	181005

                  Click image for larger version

Name:	Victor_III (213) - kopie.jpg
Views:	36
Size:	74.4 KB
ID:	181008

                  The hatches were thinned at the edges, but I left the base as it is to provide a sufficient surface for gluing them in place.

                  Click image for larger version

Name:	Victor_III (254).jpg
Views:	36
Size:	43.1 KB
ID:	181010

                  Click image for larger version

Name:	Victor_III (255).jpg
Views:	36
Size:	38.9 KB
ID:	181011

                  Click image for larger version

Name:	Victor_III (256).jpg
Views:	36
Size:	46.9 KB
ID:	181013

                  Click image for larger version

Name:	Victor_III (253).jpg
Views:	36
Size:	49.3 KB
ID:	181012

                  I'm waiting on several ordered parts, such as the 3.5mm aluminum tube for the thicker masts and the overpressure valve for the ballast tank.

                  I think the next step will be applying some paint.

                  Grtz,
                  Bart
                  Practical wisdom is only to be learned in the school of experience.
                  "Samuel Smiles"

                  Comment

                  Working...