OH MY ***! How many times have I seen 3D prints like that! And in most cases it happens when you are not around to catch it. Sometimes these printers just seem to have minds of there own! That looks like a pretty complicated file to begin with. We are all looking forward to seeing that Sub printed out. Love the artistic features on the hull! Love the photo! (Total chaos)
Rob
"firemen can stand the heat"
-
More shipments yesterday AM. Waiting on a big box of cylinders from His Majesty, electronics from the UK, brass props from Germany, brass from CZ, kits from California. COVID has screwed up delivery times and put a strain on delivery times, for sure, but we're keeping our heads above water!
Most of yesterday spent finalizing the mods to the MSD for the 48th Type VII and getting her dialed in perfectly for trim. This boat will forego the full static dive ability in favor of a dynamic setup for simplicity, reliability and safety. It is ballasted slightly positive. The pump circuit is a closed loop with no internal access to the dry compartments, unlike the full static version which draws air from the electronics compartment to blow ballast.
Batsub got a brand new battery due to Logan leaving the electronic switch plugged in for a couple of days. It draws a bit of juice to stay "awake", enough that it depleted the already low battery enough that my smart charger declared it DOA when we tried to charge it up. Final pool operation and video above and below water will take place this morning with a night run tonight or tomorrow.
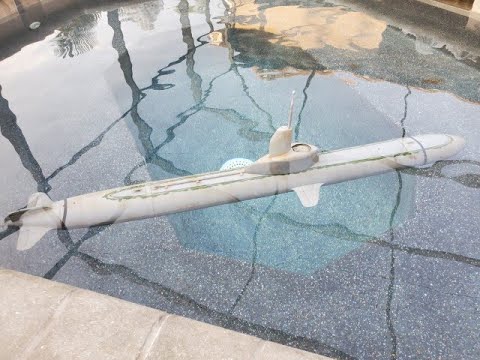
Nearing completion of printing of the 1/250 LXG sub. Assembly is going well and there is sufficient room in the stern for electronics and drive components if I get creative. One of the first printing flubs on my Dremel printer in a loooong time. It wasn't the printer's fault, but an error in the file that I discovered post-mortem. I elected to continue the print despite the failure of the upper hull. Lost some filament, but saved about 10hrs of print time doing so. Final stern hull section is on the printer now, then it's just control surfaces and conning tower and she'll be ready for final assembly.
Leave a comment:
-
YES! There is just nothing in life that can take the place of a father and son (or stepson) doing a special hobby together! You MUST cherish these times, because to quickly they can be gone!! Love what you and Logan have going!!!
Rob
"Firemen can stand the heat"Leave a comment:
-
Ellie and I are so pleased to see Logan working up the BATSUB. New blood, working on old stuff. You made our day. Looking forward to that video.
DavidLeave a comment:
-
For those of you who joined us for my LIVE discussion on my Youtube channel last night, I let you know that I'm getting slammed with customer inquiries, emails, requests for quote and (mostly) requests for help with projects. Yesterday alone I sent out over 50 messages via email, text and my site's IM board. That took up over 2 hours in the morning alone.
I love it, but, man.. it's cutting deep into shop time.
That said, I did get work done, I assure you. Most of it revolved around beginning the trimming process for the 1/48 DK Type VII. What I discovered was that the 12" tank was WAY too large. I determined that I needed about half of that to float this boat, owing to the exceptionally light layup of the upper hull and detail pieces mounted to it. The beauty of the MSD is that adjusting the size of ballast tank, motor and battery compartments is exceptionally easy. The whole process of cutting it down took less than 10 minutes.
I also performed a linkage update to the ballast servo. I've found from time to time in the past that the linkage comes off the slotted servo horn, requiring surgery to re-attach. The new MSD design allows ample room to put a full clevis on there, eliminating the possibility of it ever coming off.
Logan and I completed final trimming of the Batsub and did a quick weathering job on the hull. We also added a bright yellow strip along the centerline, which really helps with visibility and also helps to mimic the "Batman" colors of gray, black and yellow.
The true maiden voyage will be this afternoon with a night run this evening. I should be able to have the video up by the end of the weekend.
The LXG Nautilus is coming along well, too. The files that I'm using were not, in any way, optimized for RC. The entire interior is full of plastic channels and blocks. I've had to manually hog everything out as I go, but it's turning out well. The detail is really good. The 6th hull section is on the printer right now, and the upper hull part of it has failed, but I'm going to let it run to finish out the bottom and just re-print the top next.
Attached FilesLeave a comment:
-
-
-
NAUTILUS. From, The League Of Extraordinary Gentlemen. I love the ginger-bread work at the bow, sail, and stern.
A great, underrated movie.
DavidLeave a comment:
-
The DK Type VII is getting into the test tank (aka "pool") today.
Note to everyone building their cylinders. Check, check and double-check everything before you put it in the boat. Submerge and leak-check with the unit out of the boat. Case in point, I was checking the cylinder yesterday and when I blew into the antenna / pressure hose, I had an eruption of air coming from the rear bulkhead. Turns out that I neglected to plug an unused linkage seal opening during construction. Fortunately, blowing into the hose pressures up the cylinder and no water got in. It would have been a tragedy if I'd have stuffed that in the boat and went about trimming. It would have gradually got more and more stern-heavy as water filled the aft compartment, and I'd have been left scratching my head at why I couldn't get the damned trim right.
Aside from leak-testing the cylinder, I also spent some time assembling the prototype pieces for the 571 Nautilus in 72nd scale. Man.. it's bigger than I'd envisioned in my brain.
I also started working on a personal project. Can anyone guess what it will be?:
Attached FilesLeave a comment:
-
-
Bob,
Your 3D Printed "571" is looking really GOOD! Don't come down to hard on the PLA printing on your submarines. With a little extra care in the construction (Like sealing the hull,(I did mine inside using ZAP Z-POXY) and using a good primer base coat and with a good quality final finish you have a doable boat. I am in Arizona and today we will be in the 90's, and you just have to allow for that heat and do NOT leave your boat sitting in the direct sun or heat for any length of time. This is not perfect by any means that's for sure, but it has worked for me!! My Astute and Redoutable are holding up great!
I really like what you guys are doing, and it is really inspiring to see your work in progress blogs!
Rob
"Firemen can stand the heat"
Leave a comment:
-
Work paused on the XXI while I clear out some quick-turnaround builds.
The Kairyu was finished up last week, packed up and shipped to the new owner in the UK. Gawd, what a fun boat. I did a video tour of that one with some running footage. Check it out below:
.
I managed to come across a superb DK Models (that's Dan Kachur's work up in BC, Canada) German Type VII in 48th scale. This came to me as an (almost) functional boat with an old D&E cylinder. I tore that out and am in the process of completely overhauling the sub with our new MSD brushless cylinder, new and improved linkages for better turning and diving performance, and I'll be weathering her up nicely at the end of the journey as well.
Only one more part left to print for the prototype 571 Nautilus. I'm pretty excited to start putting it together! This is all ABS plastic, so should be WAY more durable than the PLA prints I've done previously. ABS also takes to smoothing more easily with sanding and an acetone bath. Should net a nicely finished hull!
Batsub is nearly ready for final test and trim. We caught a big leak in the main drive seal and are in the process of replacing that.Leave a comment:
-
Wow you guys are having lots of fun. Good stuff Bob. I have been drafted with a customer build which has cut me down to about an hour a day to work on a personal projects like subs. Building a plastic star trek model is no as much fun.Leave a comment:
-
Lots of wiring battles yesterday getting the XXI modules talking to one another. With so many functions, I have some that are mated to one another, such as the torpedo shutters and bow retracts and the rudder and bow thrusters. Others are operating independently. It makes it challenging to keep it all straight, but I did manage to get it all working on the bench yesterday for the most part. Still some work to do, but I'm nearly ready for installation in the model!
Got the Kaiyru trimmed out nearly perfectly. I discovered that the stock SubDriver has WAY too much buoyancy for this model. The surfaced waterline is really high in this boat, making it very challenging for trimming, though I have to say it went fairly smoothly for some strange reason. Without the internal space above surfaced waterline, there is nowhere to put flotation foam that comes into play during diving operations. That means that I need to trim her out using only foam below the waterline. Tricky, tricky...
What I did to address the too-large ballast tank was trim the boat for perfect submerged trim, blow ballast to bring it up to surfaced waterline, then break into the boat and note the amount of water still in the tank. In this case, it was exactly 50% of the stock tank's capacity. I brought it into the shop and drilled two holes in the side of the tank at the halfway point. The beauty of this is that one can still use the cylinder in other models, simply by taping over the drilled holes.
In theory, you could have multiple holes for different models, each offering the perfect amount of reserve buoyancy for that specific boat.
Logan continues work on the BatSub. New foam sections installed permanently along with some extra ballast weights in the stern. We identified the issue with the vent, corrected it and re-adhered it to the ballast tank. Final testing on that today now that the silicone is cured. In theory, we have final trimming to do today, then we're on to her maiden voyage!
Attached FilesLeave a comment:
-
-
So, Easter weekend didn't see a ton of progress on much of anything other than my sanity and a slough of house projects. For the most part, all three of us (well, four if you count our dog, Gracie) relaxed and enjoyed the Easter break. I will say, however, that I was surprised at the number of emails, texts and phone calls from customers on Easter Sunday.
Yesterday, however, was back in the shop!
Lots of orders shipped out in the AM. That took up the entire morning, most of which was spend boxing up that beautiful 72nd scale Alfa for its journey to its new home.
More progress on the XXI control boxes. Originally, I'd hoped to run a single 5V power/ground combo to the forward box, meaning that I only needed to run 4 signal wires from the aft box that houses the receiver to the forward one. I tested this prior to trying it in implementation on the control system and I could not get the servo to work supplying it power from a standalone 5V source and running signal from my servo tester. Can anyone who knows more about this shed light for future projects? It would be great to run only 6 wires for 4 remote servos than 12...
In the meantime, for this project I will simply run servo extensions "out of the box".
571 Nautilus is coming along nicely! 4 more parts at around 15hrs per part and I'll be ready for prototype assembly and video instructions!
Batsub saw her first dunk in the test facility yesterday. Logan is handling the entire process and I'll be putting up a video of the process shortly. It went exceptionally well and we had her dialed in within 20 minutes. Permanently mounting foam and weight this morning, and we need to address a leaky vent valve, but we're getting close!! With luck, she'll be ready for a maiden voyage in a few days, then it's final paint and she'll be done!
Last, but not least, I'm getting that beautiful Japanese Kaiyru set up with a new cylinder. So far it's gone flawlessly, and the 2.5 SubDriver is a perfect fit. I'm running a pitch controller and failsafe, and she'll have "bow"planes and stern plane individual control. Those forward planes are really close to center, so should offer depth control, but not a spit's worth of pitch control. I think this one will be a real blast to drive. I'm hoping it will be knocked out within the next couple of days...
Attached FilesLeave a comment:
-
-
More picky work with the electronic guts of the XXI. I also ran the linkages to the rear planes and rudder, and cut the internal bulkheads to allow pass-through of the twin drive shafts and linkage rods.
The Batsub is coming along great! Logan is doing very good work. He's a very good student, and a patient worker. LED lights installed, cylinder outfitted with lighting output and a remote on/off switch.
I'm a couple of parts into the prototype print of the USS Nautilus 571. They're turning out really well so far. ABS plastic in 72nd scale.
Attached FilesLeave a comment:
-
Leave a comment: