-
-
-


Who is John Galt?
Who is John Galt?Comment
-
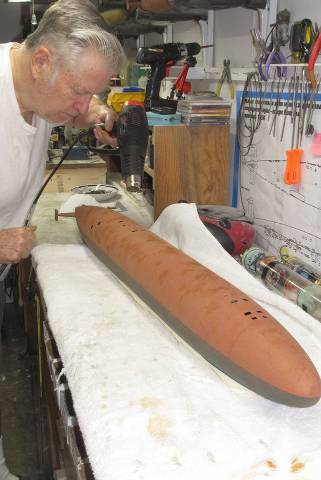
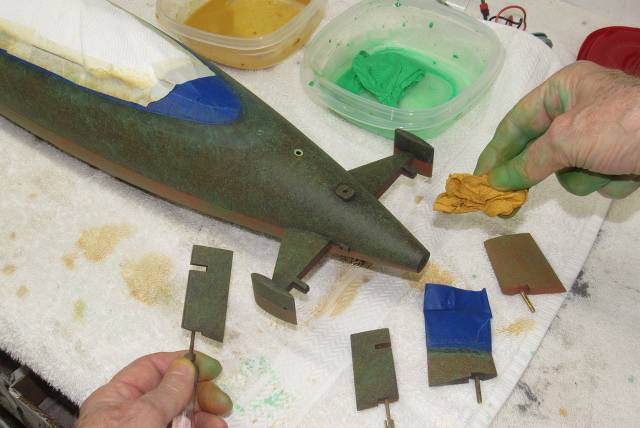
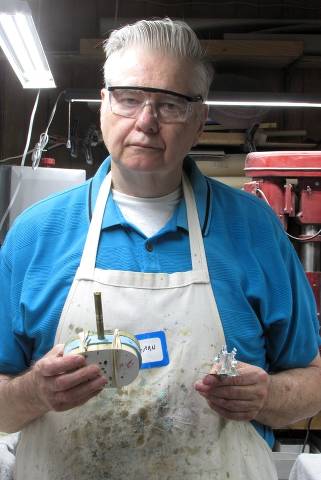
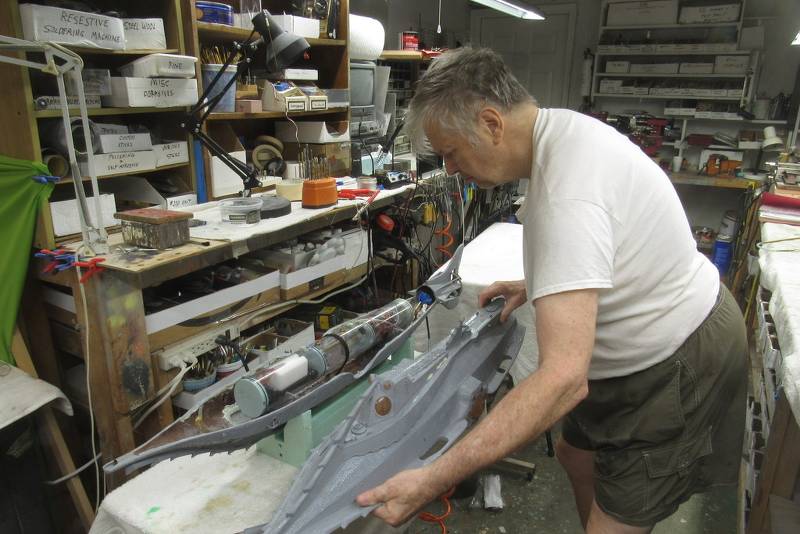
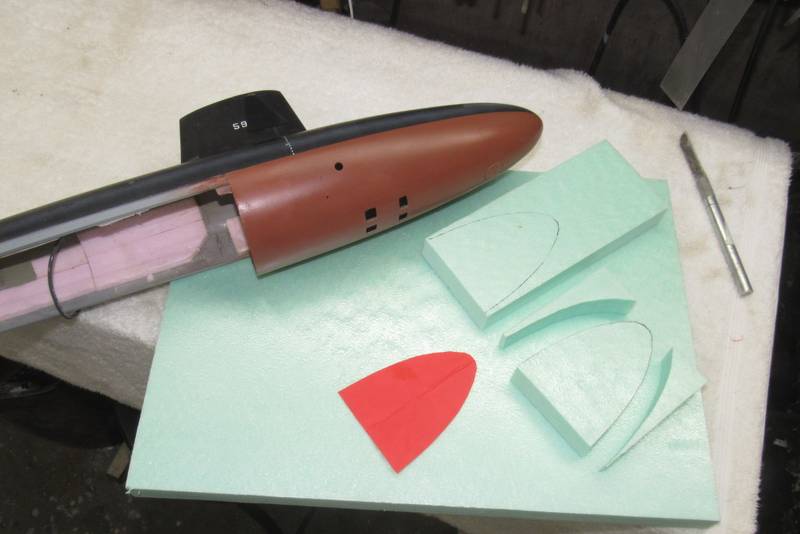
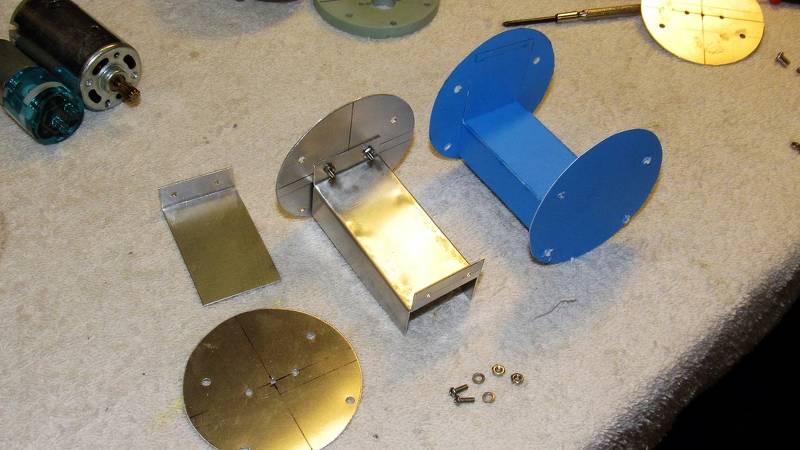
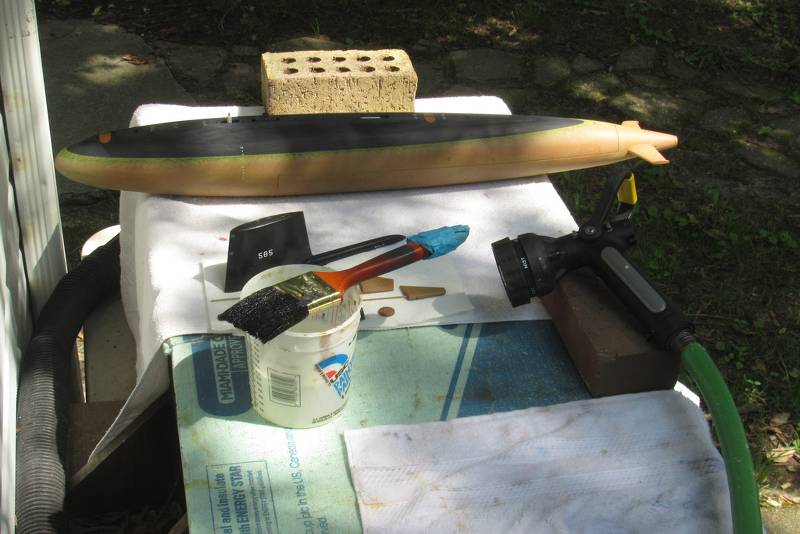
David Jakobs (Jake) is all but done with the assembly of one of those very rare and beautiful Ray Mason Disney NAUTILUS'. Here it is in primer gray. This weekend we trim it out in my test tank and get it operational, then finally a proper paintjob. But first... a few missing details.
.
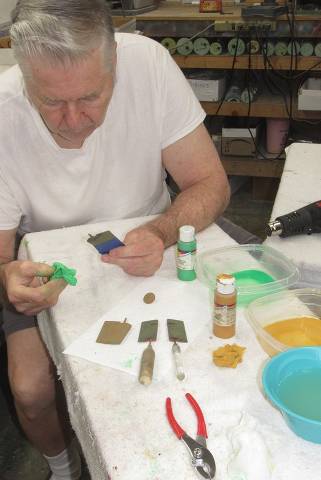
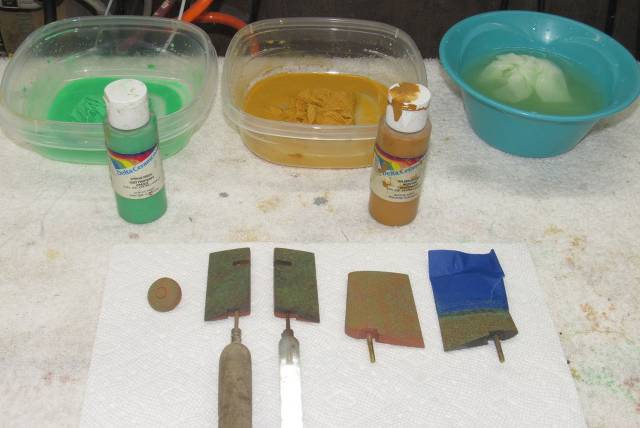
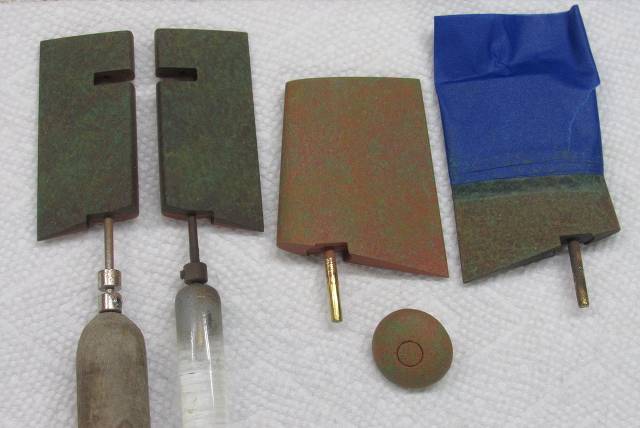
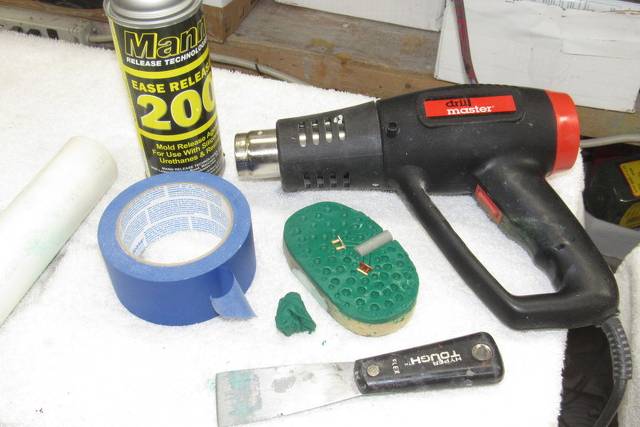
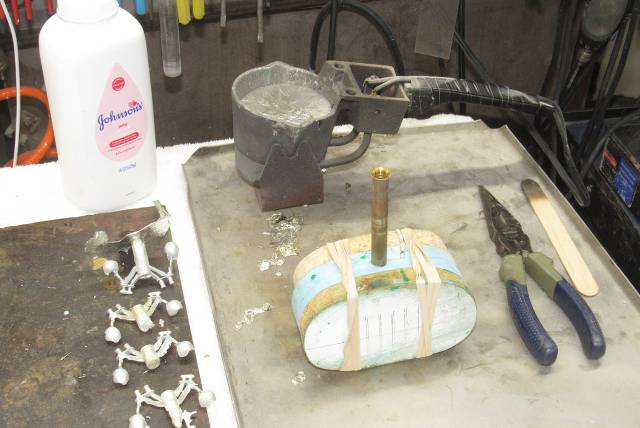
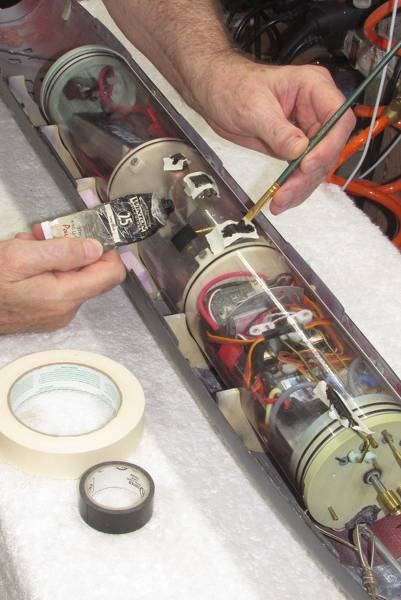
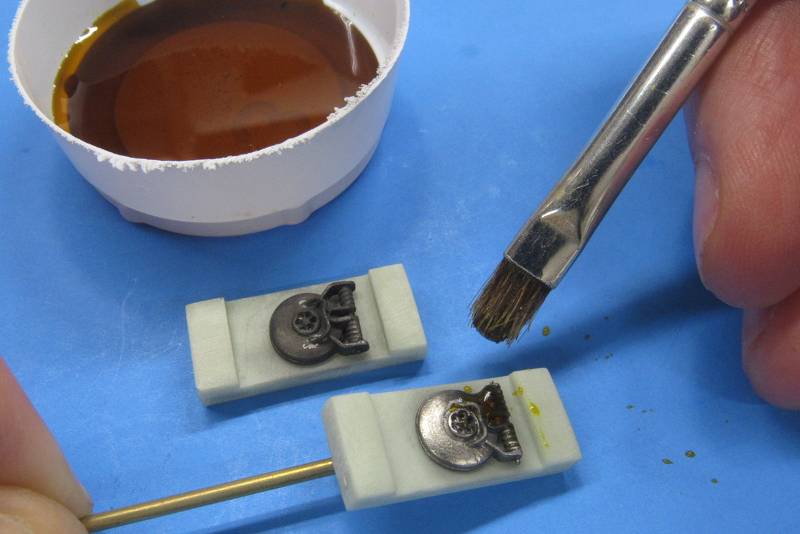
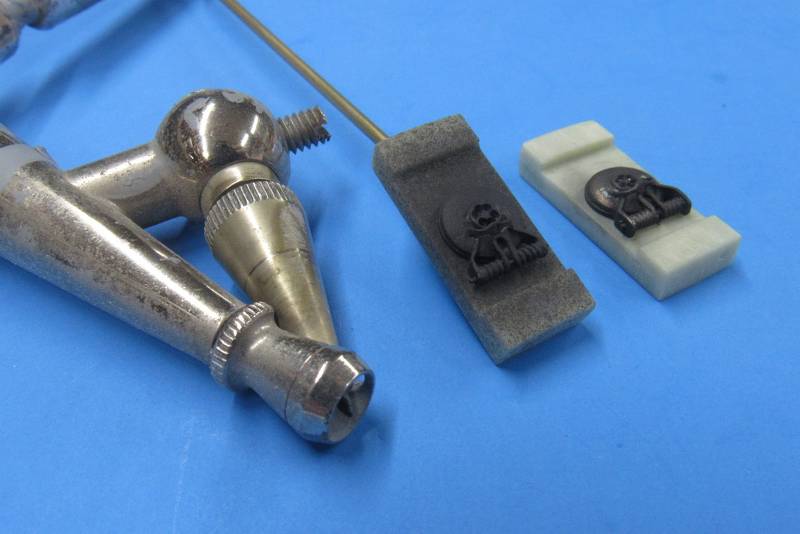
Missing were several closed-chocks and bollard pairs; deck items used to fairlead and tie up to a pier or to make fast small boats and fenders alongside. Since these were needed in some quantity Jake enlisted my aid: I would make a rubber casting tool from his little brass bollard and closed-chock masters, then cast up the required quantity of each from white metal.
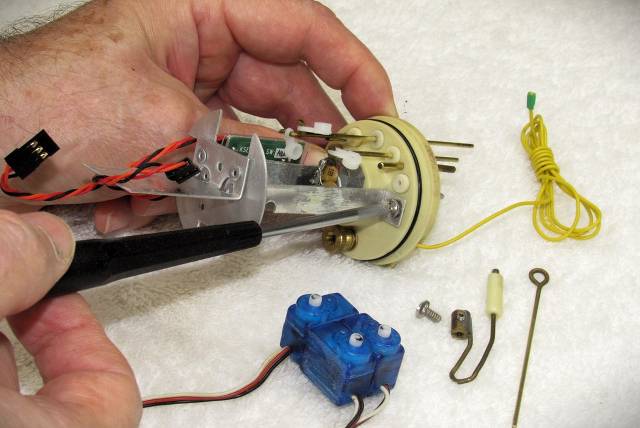
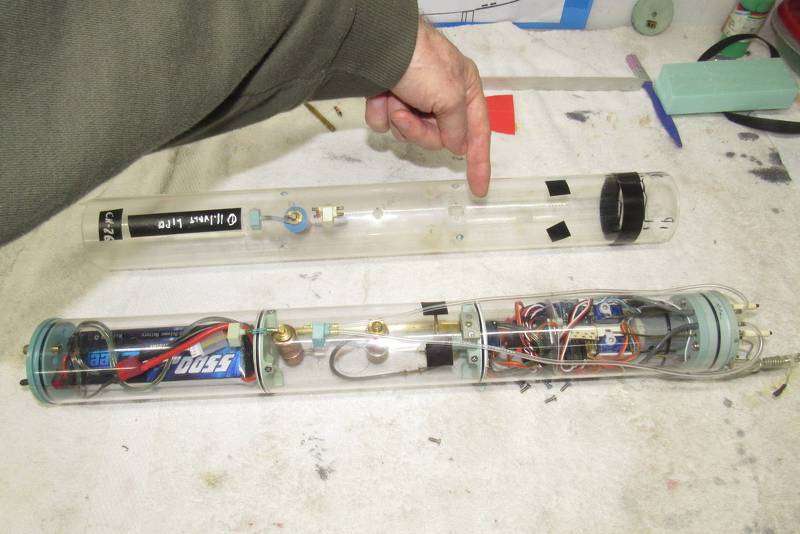
From the last Groton SUBEX 23 regatta I took back a friends two old WTC's we produced years back -- one had a cracked Lexan cylinder that was leaking water into a dry space; and another WTC that had servo, ballast, and motor problems. Just fixed them both up and working to get them back to their owner in time for upcoming summer boat runs. The 2.5" diameter WTC runs his 1/144 SEAWOLF, and the smaller 2" diameter WTC works his 1/144 KILO. Both fixed and ready to be shipped.


One of the three ganged-together micro servos had gone sour, so that compelled me to break the three servos apart (I glued them together) and install a new servo to replace the broken one. That one task required removing all the devices and linkage elements. What a chore! While I was at it I replaced the original pushrod seals with the 'new-and-improved' pushrod seals I developed recently. I also replaced the bum Lipo-Guard battery protection device; and re-set the ESC. And the low pressure blower electronic switch had burned out, that was replaced as well.

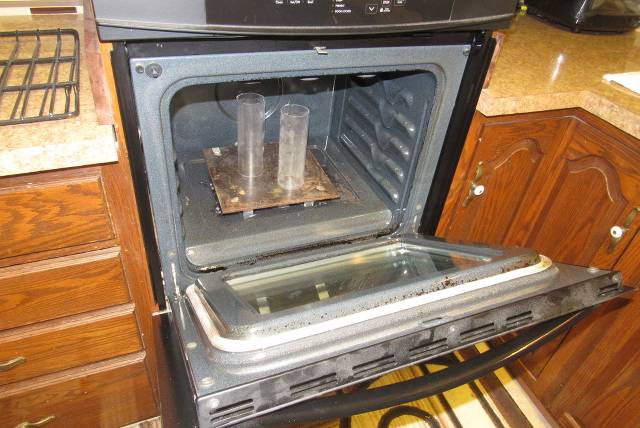
The 2.5" diameter WTC got a replacement clear Lexan cylinder to replace the original, which had cracks in it. Here I've finished a 24-hour annealing in the kitchen oven.
I populated the new, annealed cylinder with all the original goodies from the old cylinder. Leak checked it, and it's good to go.

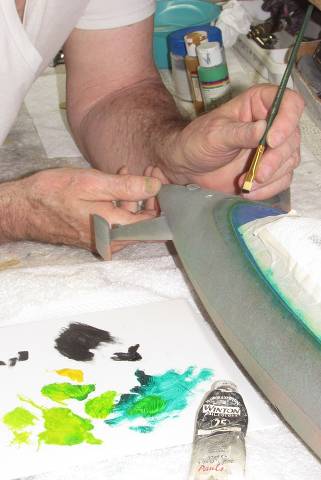
Did some more work on the below waterline weathering of my long suffering 1/72 THRESHER. Will this beast ever be done?!???!!!!....
Who is John Galt?Comment
-
Great work David. It's keeping you young and fit! You look great!Comment
-
David,
Did Ellie ever mentioned to you the myth or urban legend in the Philippines regarding the special ingredient used in "shu pow"?Make it simple, make strong, make it work!Comment
-
When I was a kid you attended school; after-which you did your homework, then sat down in your room or Dad's work-shop and assembled model kits or actually built models, and only broke away when Mom called you to dinner. Fed and the dishes done, you hustled back to the model work, and maybe – just before bed-time, if it was a Friday night – you caught an episode of Sea-Hunt, Twilight Zone, or The Jackie Gleason Show. And when you slept, you dreamed of machines, girls, shop-class, and... girls.
But soon, at the doorstep of manhood, things around you started to jump the rails, as a few of the 'more enlightened' adults who guided my generation began to celebrate failure by looking at our past through the lens of 'today' and promoted socialism as the cure.
And hand-in-hand with this new-think, it became 'acceptable' for young men to either Serve or run off to Canada.
Those same 'enlightened' types eventually came back to the States to remind us of what horrible people we are for believing in, 'the American way'. And... here we are.
Oh, yeah. I remember!
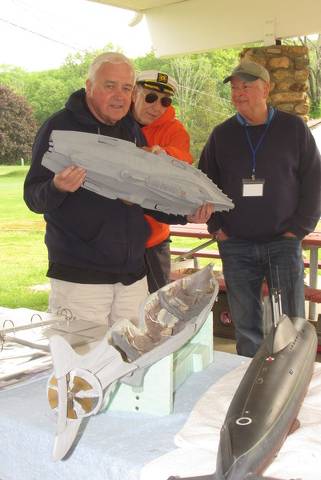
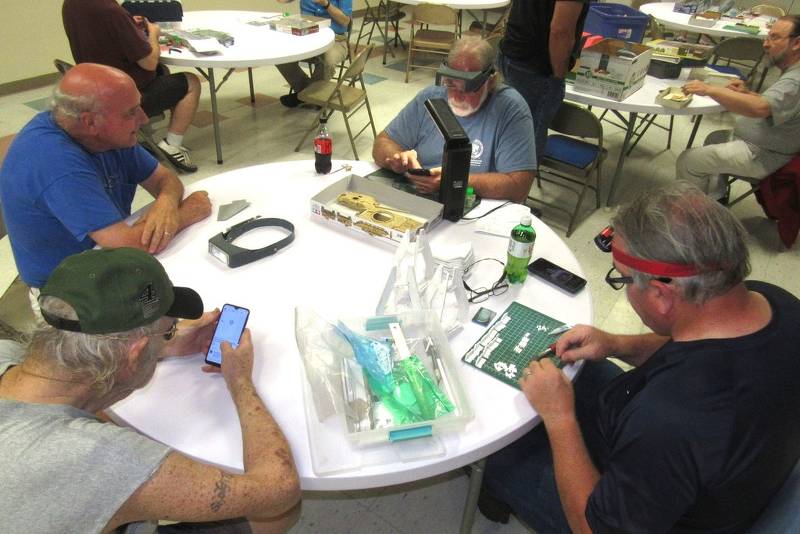
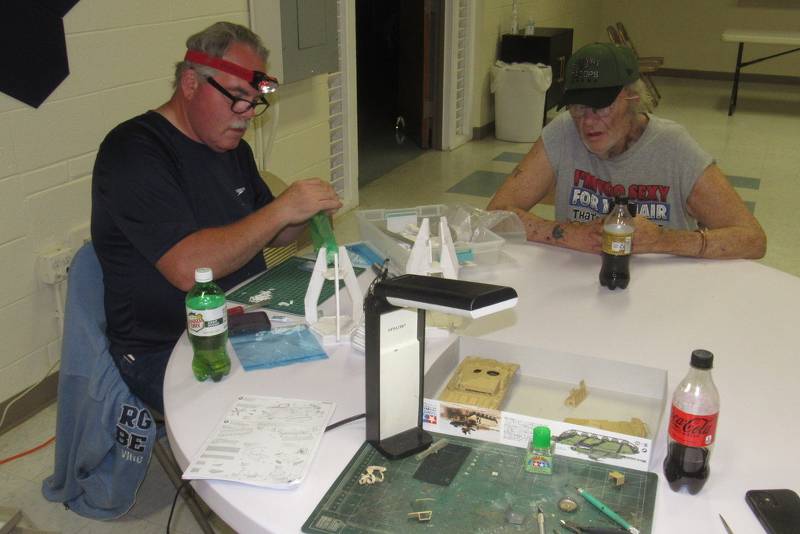
And here's a look at some of the guy's who attended our Virginia Beach Chapter of the International Plastic Model Society (IPMS) monthly meeting last week. Though most retired now, they once held useful jobs. Some former military.
Though most of these bums are in the Twilight of life, we still glue pieces of polystyrene together – it's in their blood. Like the plastic model kits of old, we all are eventually going to go into the same sized box once we assume room-temperature.
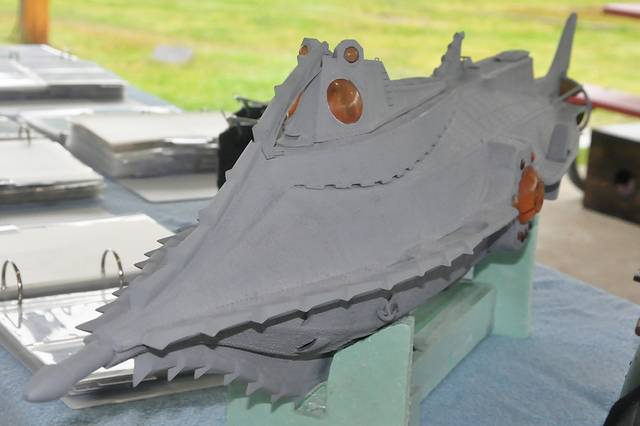
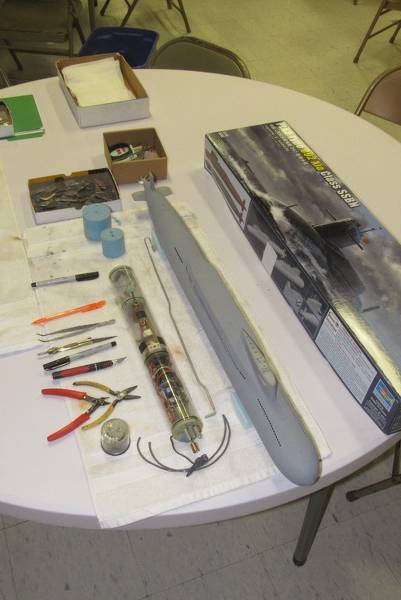
For the local clubs 'build-night' I brought along the Trumpeter 1/144 model kit of the Chinese PLAN's Type-092 (XIA class) ballistic missile submarine. I'm in the process of converting this static display piece to run as a proper r/c model submarine.
This early Chinese SSBN featured many round vent holes along the surfaces of the fair-water planes and missile hatch fairings. I spent most of the meeting time working to deepen those holes so they would cast realistic looking shadows within. Simple, but tedious work that required the minimum of tools and set-up. Perfect for a build-night away from the well equipped confines of my home shop.
For those who showed an interest in the project I also brought along the SubDriver (SD) used to power, control, and move the model along, the actual hull of the model being of the free-flooding type, serving only as an attractive fairing – all the stuff that needs to be kept dry is within the watertight Lexan cylinder of the SD.
My generation was the last to live, work, fight, and grow under the old standards of American culture. In my time, as a youngster, one's sex was fixed at birth; you were subject to the Draft; public schools steered male students towards 'shop-class'; nearly every boy was assembling static or flying model kits and/or fixing and souping up junked cars; and fist-fights in the school-yard and competitive contact sports were an accepted means of establishing ones 'place' in the group.
Strong, prevailing cultures are built of such foundation blocks.
And back then local hobby shops (remember those?), business break-rooms, churches, and retail stores were most willing to host model club meetings. At no cost.
Today, now that the activity of model kit assembly and model building is on the wain, our now much diminished IPMS membership has secured a once-a-month 'meeting room' at this Unitarian church – for a fee! If the sleeping vagrants don't block the doors.

When I was a boy model-builder clubs were everywhere and each had a huge members list. Model building was encouraged and sponsored by corporate America (Plymouth, Fisher Body, etc.) as well as the local and Federal governments (use of National Guard Armories and Naval Air Stations come to mind).
Yet, today you will see few if any youngsters attending at the few model-building clubs that exist. Just us old farts still living the dream.
These are some of my local peers. See any kids in this group photo?
… and the Craft dies with us.
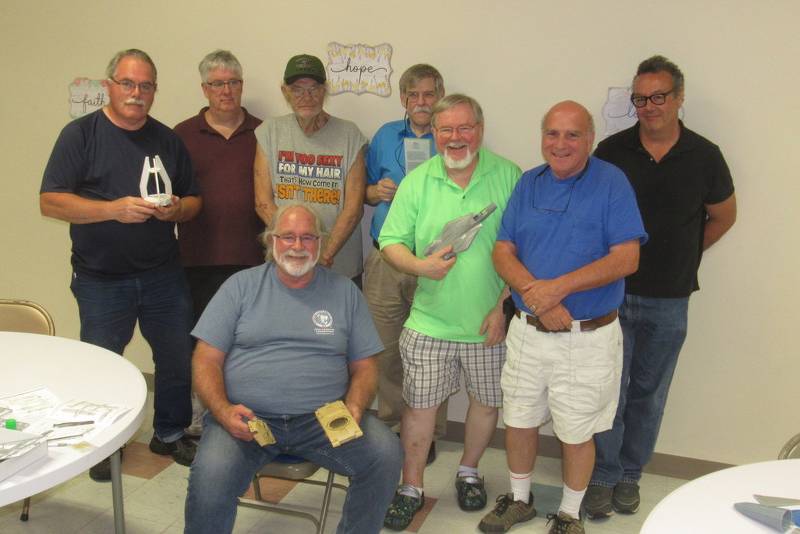
By time I, and my peers (seen here) had reached mid-life, many of our fellow American's dropped the ball; they changed what we are as a people – transitioning from intelligent, aggressive warriors, and machine-makers into uninformed, sexually confused, entitled, self-hating degenerate slackers wanting nothing more of life than to do as they pleased as their lips suckled on the Government tit.
I've known most of the above guys for nearly a half-century!
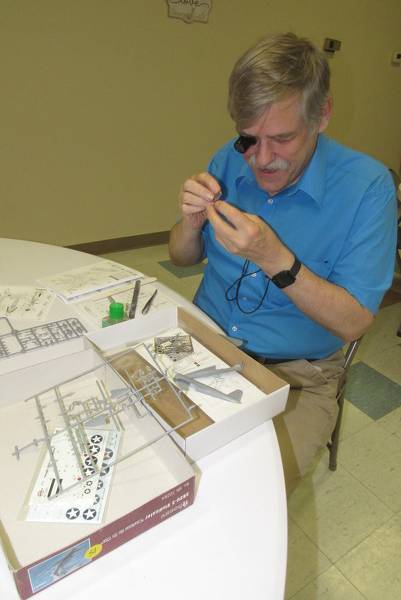
This particular meeting was a, 'build-night'. For some odd reason, long ago, it was decided to do, at a meeting, what could be better done in the comfort and easy reach of tools within the home work-space. But, I kinda get the point: it's nice to tinker away at a project while spouting the same old stories among ourselves we've been spouting for decades. Nice to get out of the house once in a while I suppose.
You know you're old when you need a loupe to see what you're doing!
Back home.
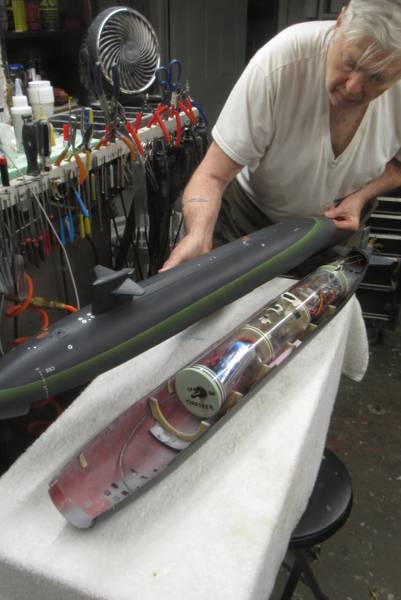
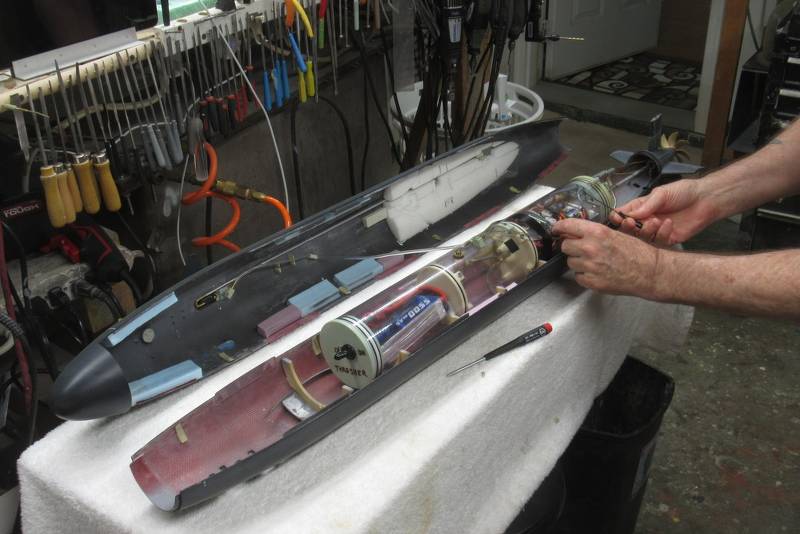
My long time modeling buddy, Fred Freketic, needed some work done on his 1/72 THRESHER models SubDriver. Specifically, replacement of the severely cracked clear Lexan cylinder, it had started to leak water. Bad ju-ju!
This involved a lot of work, as I not only had to transfer devices between the bad and good cylinders, I also had to cast new internal bulkheads as there was a significant difference in diameters. Though the old and new cylinders both are listed as 3.5” o.d., and both had internal diameters within industry tolerance, the variance between them forced me to cast up two new internal bulkheads.
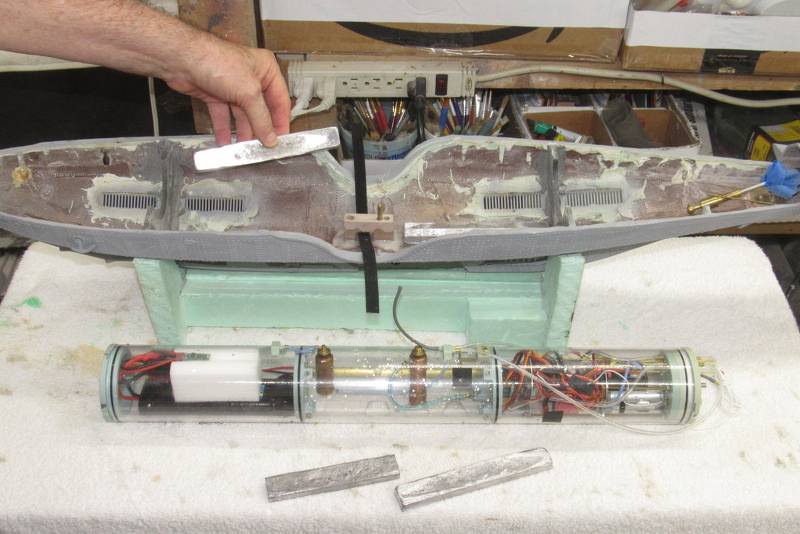
Here I'm accessing the free flooding hull to fit the replacement, fully populated and tested SubDriver.
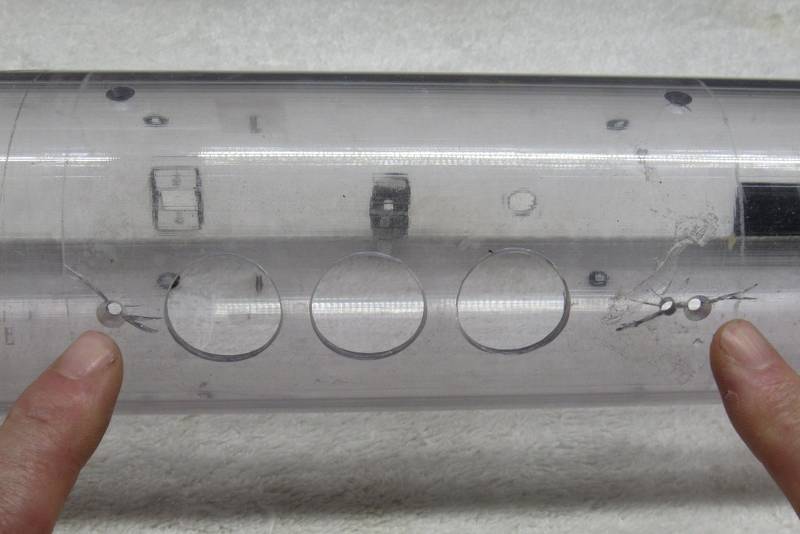
This is the original Lexan cylinder, showing off the massive cracking radiating from the holes that pass machine screws that secured the two internal watertight bulkheads.
Seems the manufacturers of Lexan tube are either skipping or abbreviating the vital annealing process that (should) follow extrusion of the Lexan tube. The consequence is sale of stressed extrusions of tube, which makes them susceptible to cracking after machining. They (the producers of this product) save some pennies. I get hosed by having to work with sub-standard product. Cracks lead to flooding of the SubDriver.
I now anneal each and every SubDriver cylinder I cut to length. Just another pain-in-the-ass courtesy of the Bean-Counters. Be they Chinese or American bean-counters.
The new cylinder, now equipped with all the transferred devices from the old, cracked cylinder, was placed in the lower hull. However, as I attempted to secure the upper hull in place, something atop the new cylinder was hitting the flotation foam in the upper hull. To find where I first placed masking tape over every projection (manifolds, tire-valve stems, etc.) and slathered atop that tape black artist' oil paint.
Lightly placing the upper hull over the lower hull, the SD's high-spots were indicated on the upper hull foam by black smears. It was a simple and very localized process of slightly digging out the foam so I could once again secure the two hull halves together without any problems.
The black smeared masking tape was pull off the cylinder and discarded.
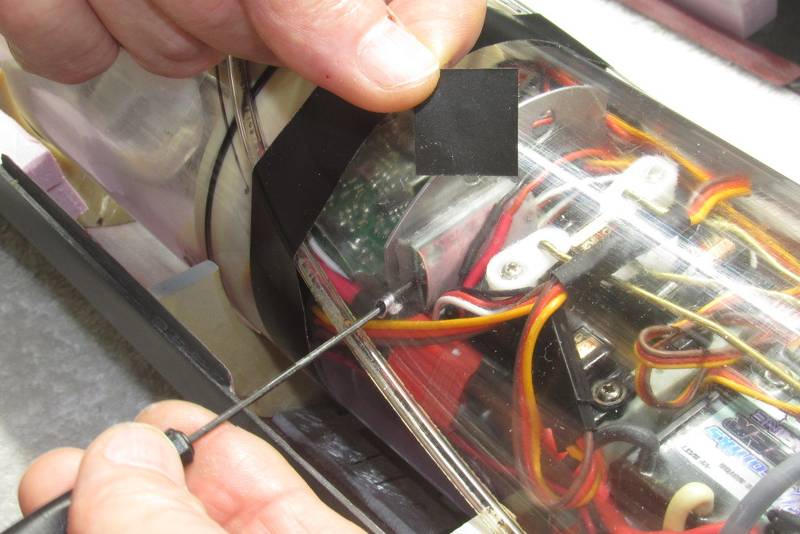
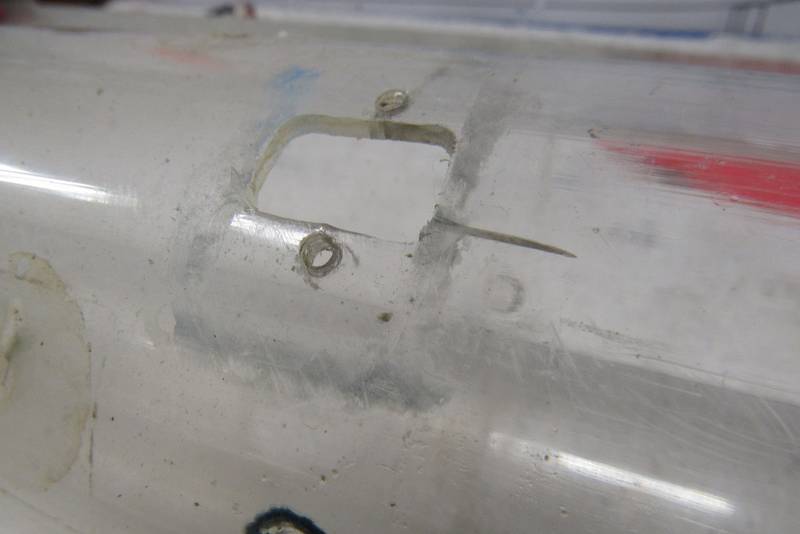
A hole drilled into the side of the Lexan cylinder permits quick adjustment of the angle-keeping device within. That hole is also the Achilles-heel of the SubDriver: should one forget to replace the Electrician's tape closure after making the adjustments, flooding results.
Guess how I know that!?...
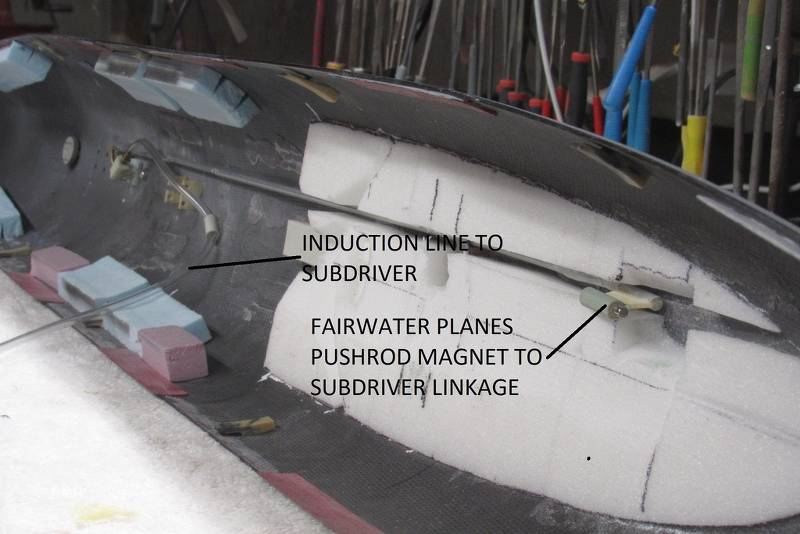
As this 1/72 THRESHER model is kinda 'mid-sized', it experiences higher control surface resistance when traveling at speed through the water. I've found that the smaller sized magnets I typically use to make fast the hull and SD linkages were subject to unseating in tight turns and rapid, large deflection movement of fair-water planes and stern planes. So, I elected to go to bigger magnets. Problems solved!

The magnets make installation and removal of the SD to the hull an easy task with no tools required to make/break the linkage interface points.
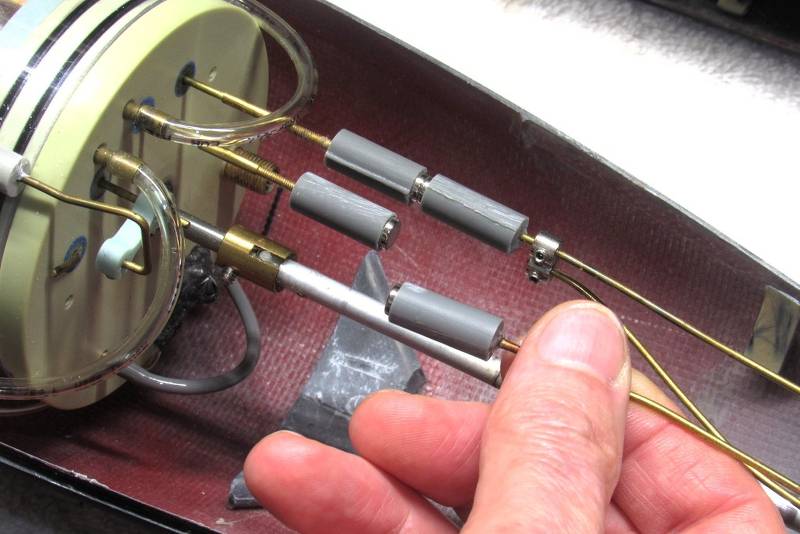
A device that I'm developing a real liking to is a Depth Cruiser. This gadget measures the water pressure and in so doing determines actual depth of the model submarine. The device works in parallel with your commands from the transmitter – you always have authority over the planes. But, if you keep your fat thumb off the stick, the device will work the planes to maintain the boat at the last commanded depth. And it works to keep the boat at that depth until you override it with a new command, where, once again, the DC works to maintain that depth without any input from you.
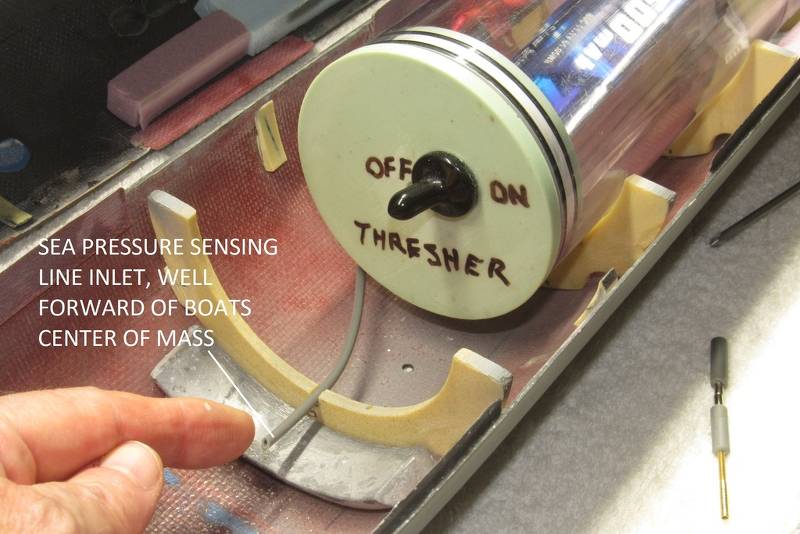
All that is required is a length of hose to provide the DC with ambient pressure so it can work its magic. The DC, mounted on the after dry space device tray, within the Lexan cylinder, gets the pressure input through an internal hose that makes up to the pass-through nipple you see projecting from the after face of the motor-bulkhead. That nipple making up to the external sensing line that runs under the SD where it terminates near the bow of the model submarine.
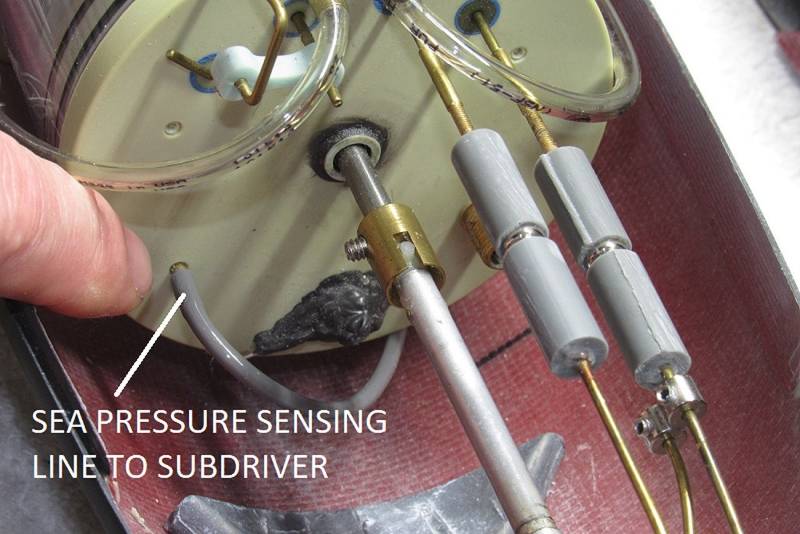
To insure that any up or down angle the boat takes does not send a false reading to the Depth Cruiser, the inlet side of the sensing hose/line is placed well forward of the model submarines center of rotation. This sensing line runs the entire length of the SD and terminates near the models bow.
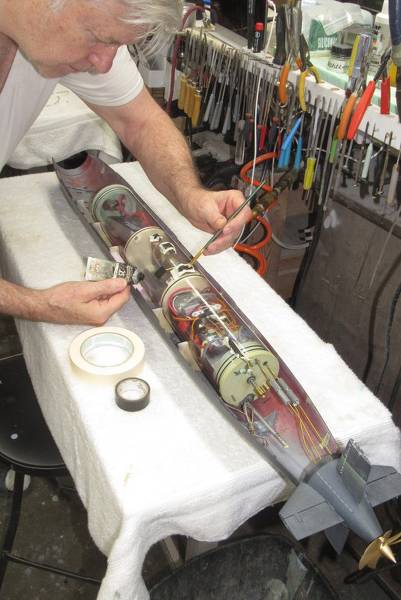
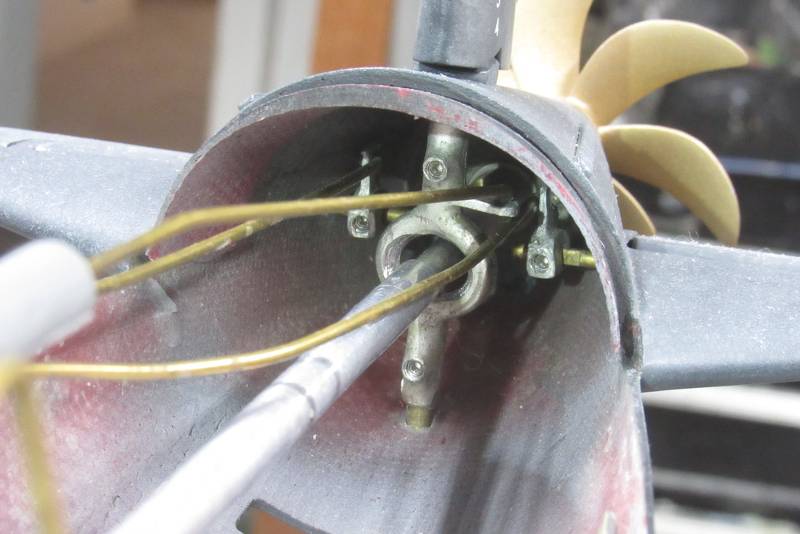
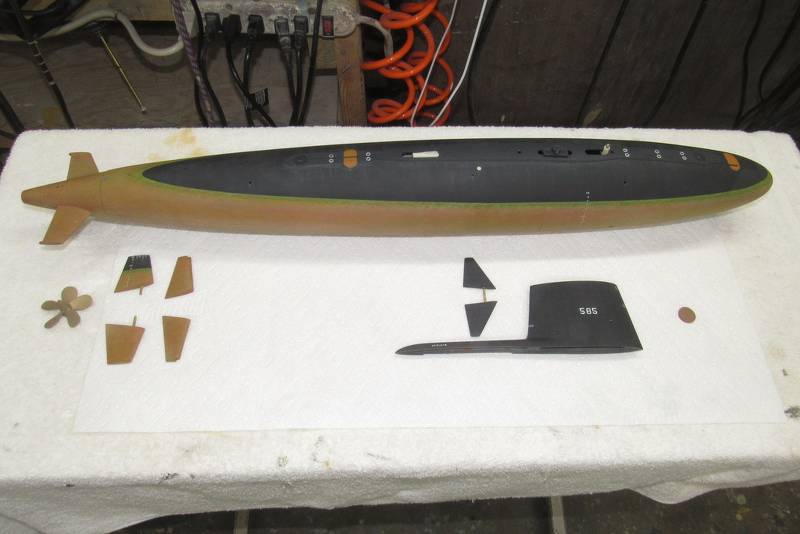
A peek at the white metal rudder yoke and two stern plane horns. All this Tom-foolery needed to make a clear path for the centrally running intermediate drive shaft that interfaces between the SD motor output shaft and propeller shaft.
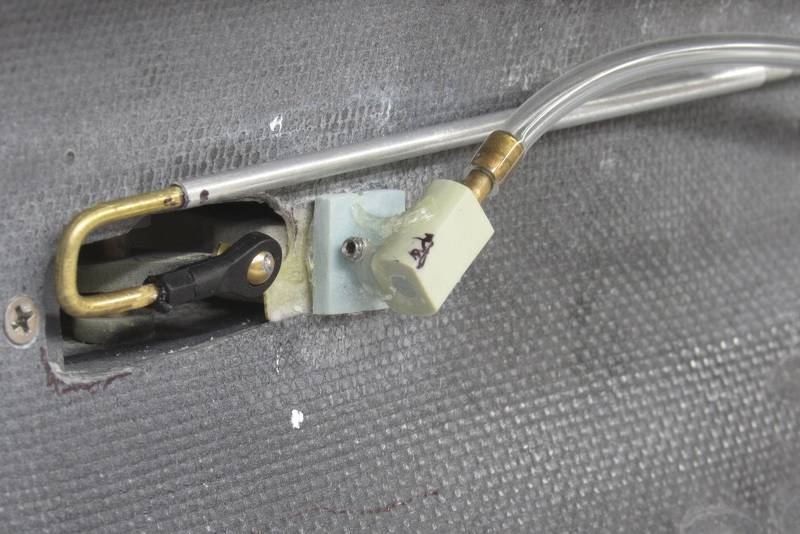
The first boats of the THRESHER class had extremely small sails (which grew in height and length on the later boats). That equated to very little room within the THRESHER models sail in which to place the SAS ballast sub-system snorkel valve, bow plane operating shaft, and associated linkage.
Originally, I employed a magnet at the forward end of the fair-water planes pushrod, but found that the magnet would unseat sometimes, requiring return of the model to the boat stand for re-attachment.
Nuts to that!
Here is the 'new, improved' make-up between fair-water pushrod and fair-water linkage, a helicopter ball-link. No slop. No disconnect. No problems!
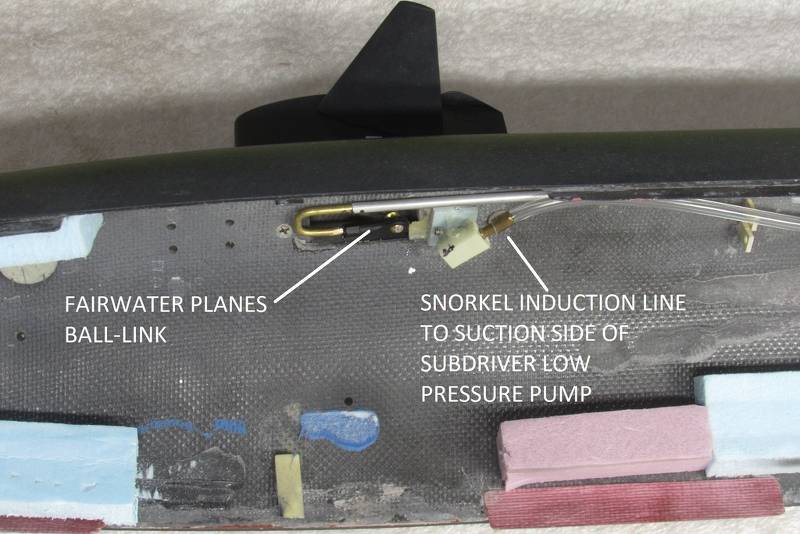
Yup. Things are tight in this tiny sail structure.
Who is John Galt?Comment
-
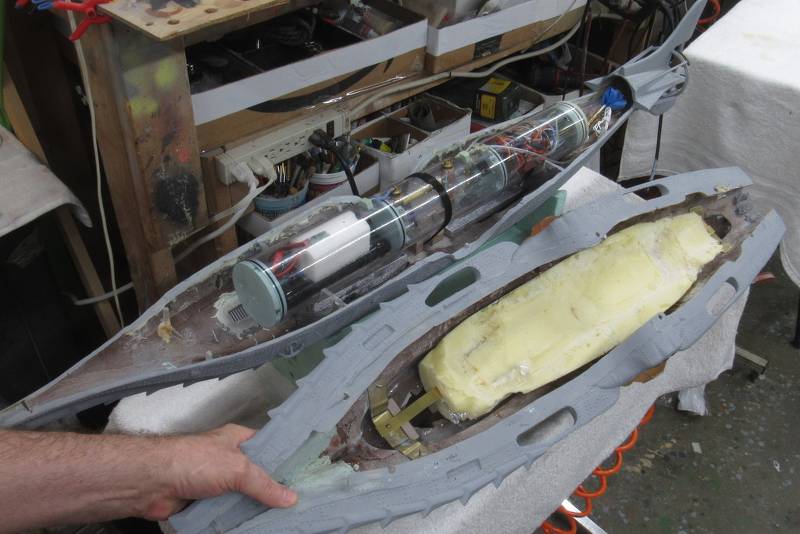
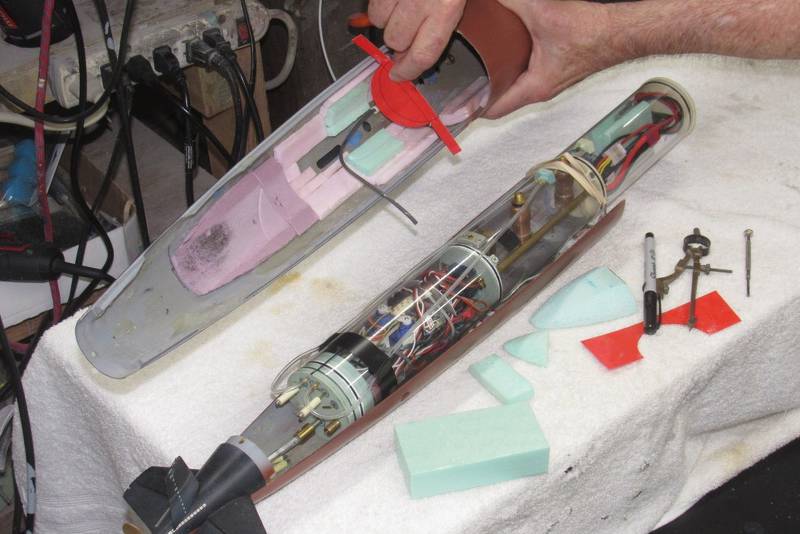
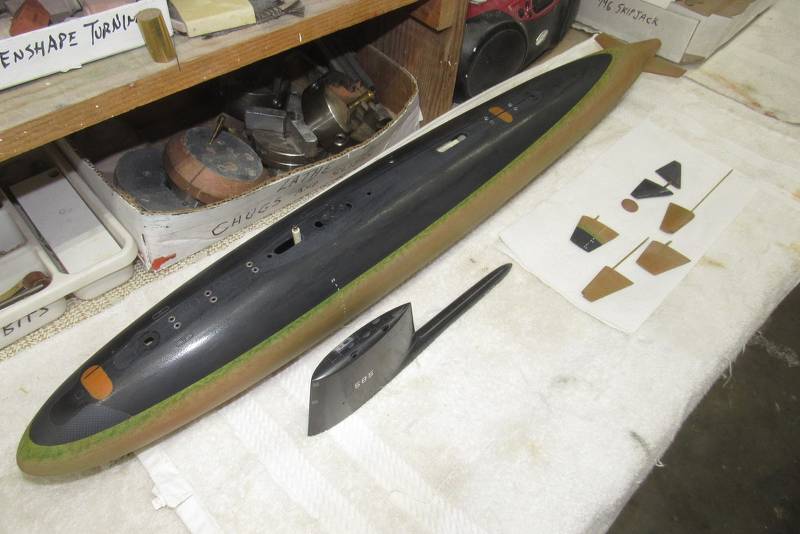
Finally, Jake has completed assembly of the big Disney NAUTILUS model. Time to plunk this monster-of-the-deep into the test-tank. First, I added fixed ballast weight low in the hull to lower its center of mass; then placed buoyant foam up high in the hull to raise its center of buoyancy. The greater the vertical distance between these two points of force, i.e. the CG to the CB, the greater the boats static stability about the roll and pitch axis.
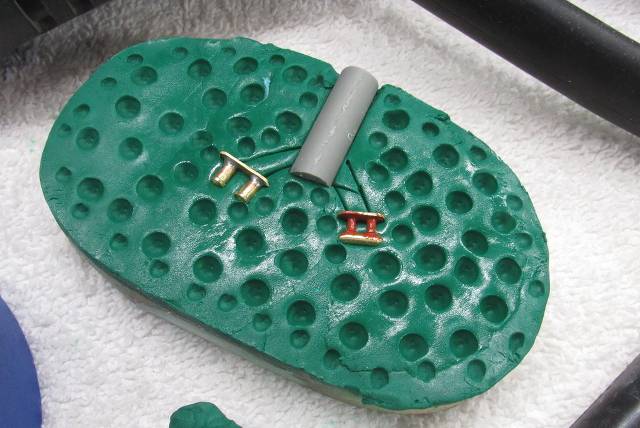
Here I'm placing lead bars down low in the lower hull half. About three-pounds of fixed ballast weight. That was found to be enough (along with the eventual buoyant foam needed to offset all that weight) to stabilize the boat so it doesn't roll too much in a turn or as a consequence of propeller torque.
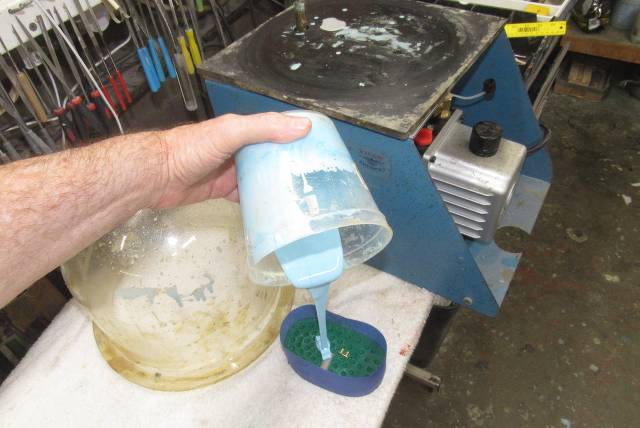
Jake and I produced a single, large hunk of closed-cell polyurethane foam. The goal was to have this buoyant foam up as high in the upper hull as possible, and to conform as tightly as possible to the geometry of the hulls insides. Also, we wanted the ability to make this one big piece of foam removable to ease the task of trimming it down to size so that its upward buoyant force would counter the downward force of the fixed ballast.
Before catalyzing and pouring in the expanding foam liquid, the upper surfaces within the upper hull were protected with aluminum foil to keep the eventual mass of expanded and hardened foam from sticking.
This is what the foam looked like before trimming it to afford clearance between it and the top of the SubDriver (SD). Note the use of brass brackets to hold the foam in place.
Ballast weights and foam in place, the SD was installed, switched on, and the NAUTILUS' hull buttoned up for the first trial in the test-tank to work out how much – and where – foam had to be cut away and re-positioned to achieve proper submerged and surfaced trim. After a few hours of fiddling with that the boat was pretty much trimmed out.
Initially, commanding a flood of the SD's ballast tank resulted in the models upper surfaces projecting significantly above the waters surface. Too much foam! Repeated testing in the tank guided me as I cut away portions of the buoyant foam until, with a flooded ballast tank, only the tips of the 'alligator eyes' projected above the surface in submerged trim with the boats pitch-angle very close to zero. Perfect!
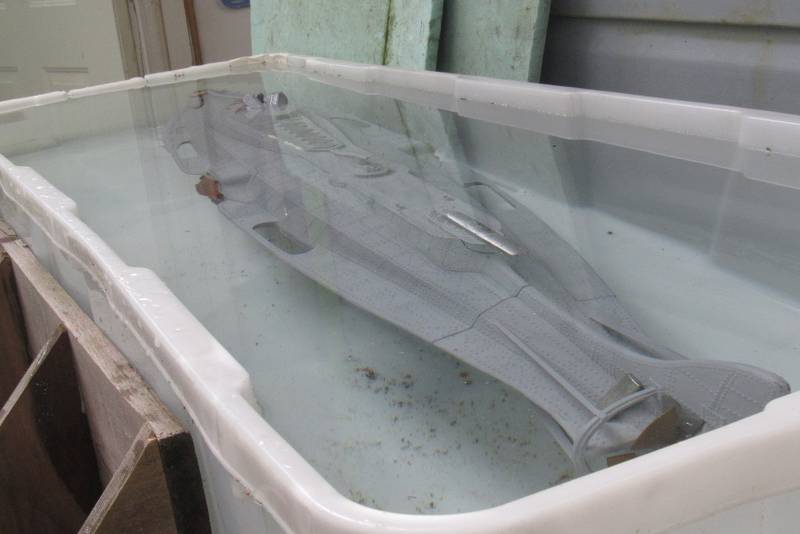
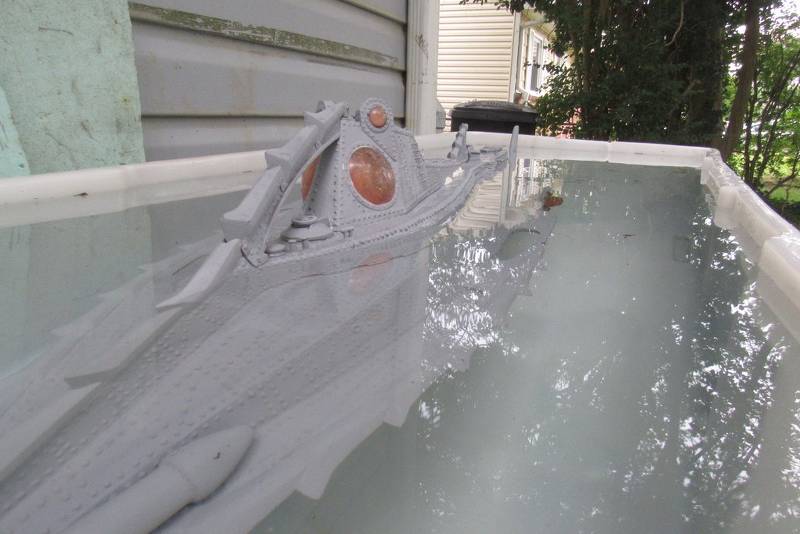
Blowing the SD's ballast tank dry got the boats upper works this high out of the water. Pretty close, all that was needed at that point was to relocate some of the foam forward – raising the bow up a bit, and lowering the stern to the height of the housed skiffs waterline. That done, the NAUTILUS model was in proper trim for submerged and surfaced operation.
Almost ready for sea-trials!
Years ago I made a 1/96 SKIPJACK class model for my good buddy, Fred Freketic. This year Fred will accompany me to the big all r/c submarine regatta at the Red Clay Resort outdoor 'swimming hole'. In support of that venture I just finished getting his big 1/72 THRESHER model ready, and now it's his little SKIPJACK's turn in the barrel.
Fred reported two problems with this model at the recent Groton SUBEX 23: It was way too bow heavy. As I learned seen enough, Fred had switched to a higher capacity (read: heavier) Lithium-polymer battery, which demanded a re-trimming of the model. The major hang-up was water leaking into the SD's after dry spaces – I found that cracks had formed in the SD's Lexan cylinder permitting the ingress of water from ballast tank to dry spaces. Ouch!
First things first. Re-trimming the boat.
Since the boats trim was thrown way off by the added weight forward, that meant additional buoyant foam had to be jammed into the tight confines of the free-flooding hulls bow. To get an idea of how to shape the eventual gum-drop shaped foam piece I scissored out this cardboard template, and kept chopping away at it until it fit within the bow with little wasted space.

Additional foam was needed up high in the upper hull. To insure non-interference with this additional foam and the SD I made this 'clearance template' out of cardboard, using it as a go/no-go tool as to the thickness of foam I could add without it contacting the top of the SD once the two hull halves were joined.
A basic sheet-metal workers cheat is the use of cardboard mock-ups to verify function and fit of the eventual metal (or other material) assembly. First, a plan is worked out on paper, then a cardboard shape is scissored into life and folded (if required) to shape. The resulting cardboard analog is then fit into place to verify fit. It's an easy matter to make a new cardboard mock-up or simply hack away with scissors on the original until it's right.
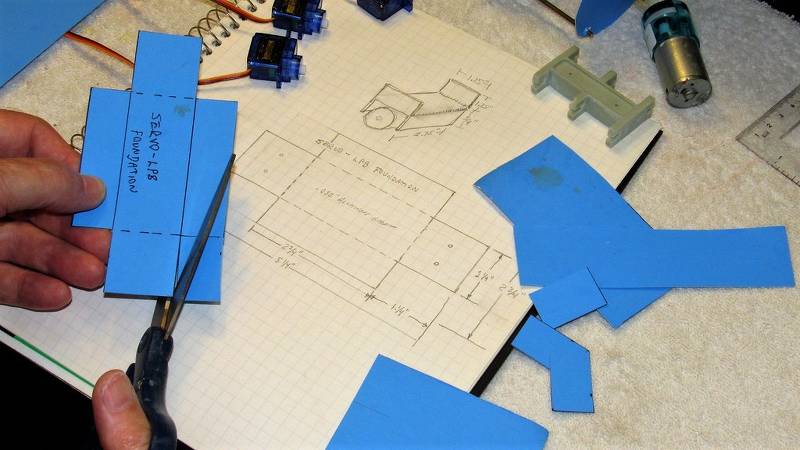
With all the cardboard analogs in place things are checked for function and fit.

Once happy with the arrangement the cardboard analogs are removed, unfolded, and used as templates to mark off the actual metal (or GRP, foam, wood, Renshape... whatever!) parts.
The cardboard mock-up saves you wasting time and materials. Paper is cheap, quick, and easy to form. Metal ain't!
The leaking SD was servicable enough for use as I re-trimmed Fred's little SKIPJACK model.
Once I had the boat working properly in both submerged and surfaced trim, I began the process of tearing out all the gear from the original leaking Lexan cylinder and transferring it to a properly annealed Lexan cylinder.
Here the new, annealed, cylinder has been marked off for machining before transferring the bulkheads and devices from old to new cylinder.

It seems that some ten years ago some (if not all) of the manufacturers of extruded Lexan tube either abbreviated or stopped annealing the stressed tube as it squirted out of the die. Lexan cylinder cracking on 'new' Lexan cylinders points to tobservation of mine. I have since made it a practice to perform in-house annealing in the kitchen oven after cutting a Lexan cylinder to length. Fun times!
I'm pointing to the old, cracked Lexan cylinder. I've already populated the new, annealed Lexan cylinder.
Here's the major crack in the original cylinder – this was the worst of the several cracks found on this cylinder; that bad-boy ran right over the after dry space ballast bulkhead O-ring and became the major conduit of water from ballast tank to inside of the after dry space.
Bad ju-ju!!
Industry standard allows for a significant variance between stated and actual cylinder external and internal diameters (the polite term is, 'tolerance'). What that means in the real-world is that one lot of cylinders will differ in dimensions from others. And this situation bit me in the ass on this job, as some of the original bulkheads – sized to fit the old cylinder – were found to be too small in diameter to permit a proper seal of their O-rings within the new cylinder.
****!
I had to cast up more bulkhead blanks and machine them to make ever-so-slight interference fits to the new cylinder, after which I cut in the O-rings grooves.
(I can almost see Bob Martin's smile of recognition as he reads the above).

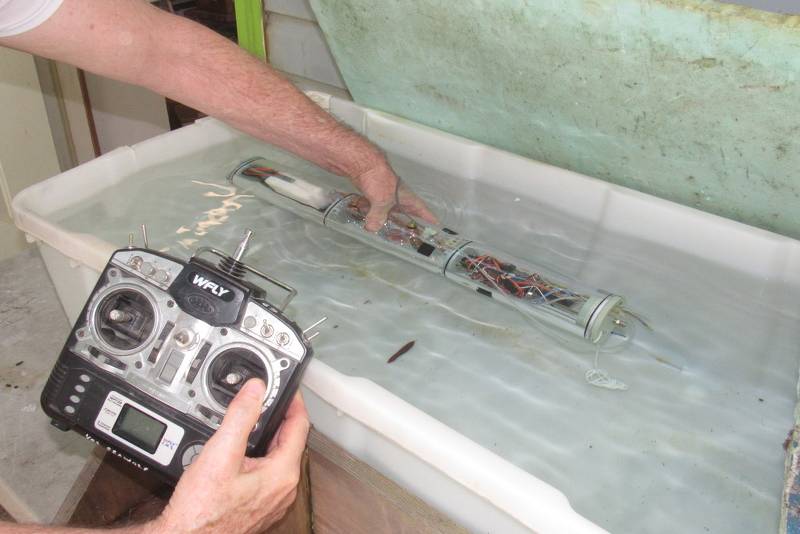
With all the goodies transferred from bad to good Lexan cylinder, time had come to do a thorough leak test and function validation. Into the drive-way test-tank it went.
Gee... worked first time! I must be getting good at this ****!
OK. The boat trimmed for the new, heavy battery. Check!
The cracked and leaking Lexan cylinder replaced with a tight, annealed one. Check!
Time to box Fred's boats up and await September's SubFest event in far-off Georgia.
Now. To address the boats I want to brings to the event.
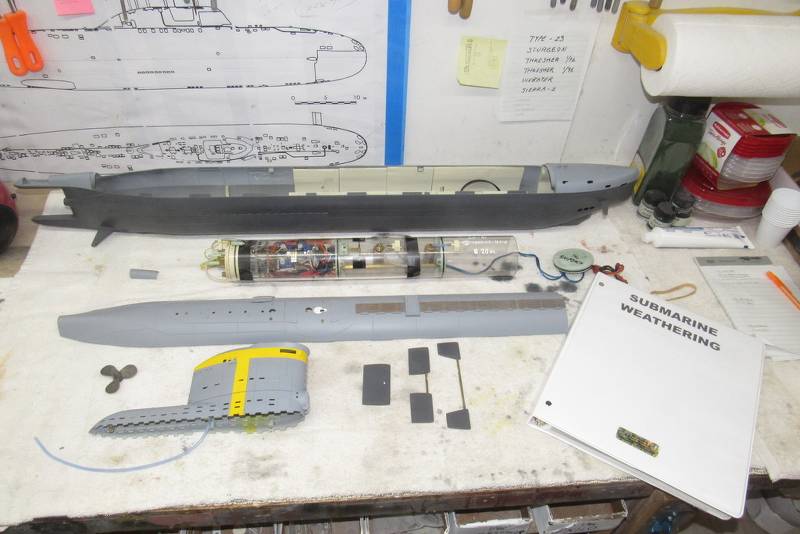
A few months back I had gotten my own, new 1/96 SKIPJACK, 1/72 THRESHER, and 1/96 STURGEON models all done with the exception of detailing, flat clear-coat, and final trim and system check-out. Time to re-join those battles. SubFest is just over the horizon.
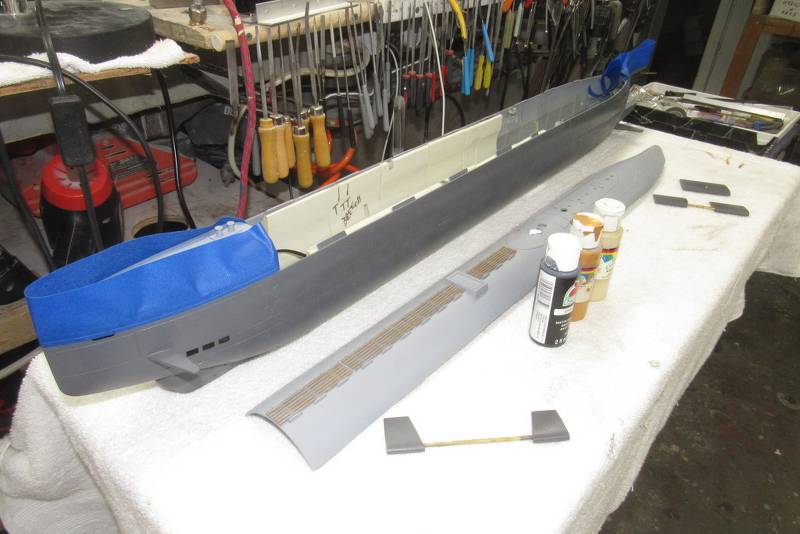
On deck, the 1/96 SKIPJACK. It and its sisters had been sitting on the wall supports for several months, collecting dust, oily mist, and who knows what other crap floats around in this God-awful chamber of horrors I call a shop. Before proceeding with further weathering and touch-up painting those models had to get a complete scrubbing with soap-and-water.
Once scrubbed and rinsed, the SKIPJACK hull and appendages were toweled off and blow-dried with low-pressure air. I let it all sit overnight on a work-table to completely dry out. Time had come to address the two escape-trunk deck hatches, McCann rescue chamber hold-down pad-eyes, and prep those metal items for painting and installation.
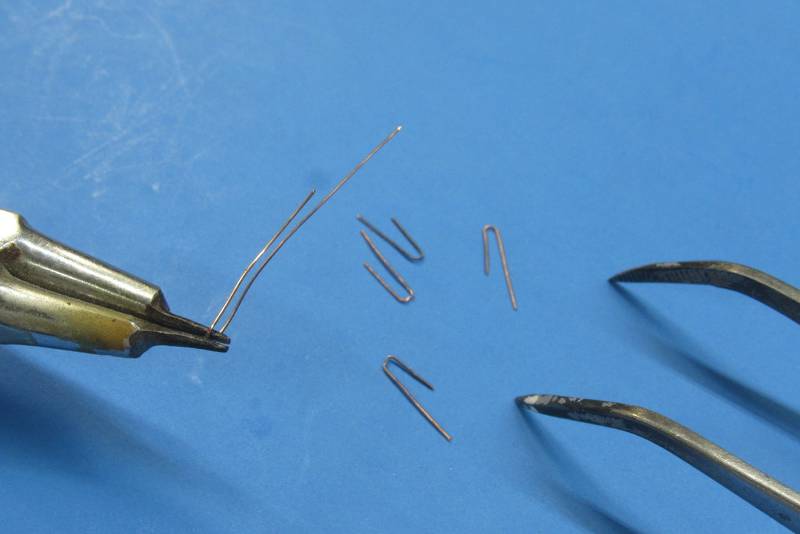
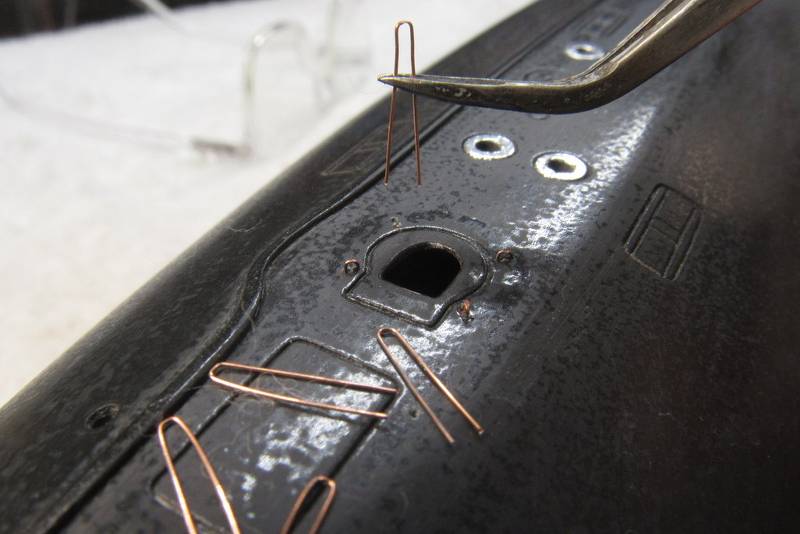
The four pad-eyes, each formed from a strand of .013” diameter copper conductor were bent to shape. .013” holes previously drilled about the circumference of an escape-trunk McCann rescue chamber seat.
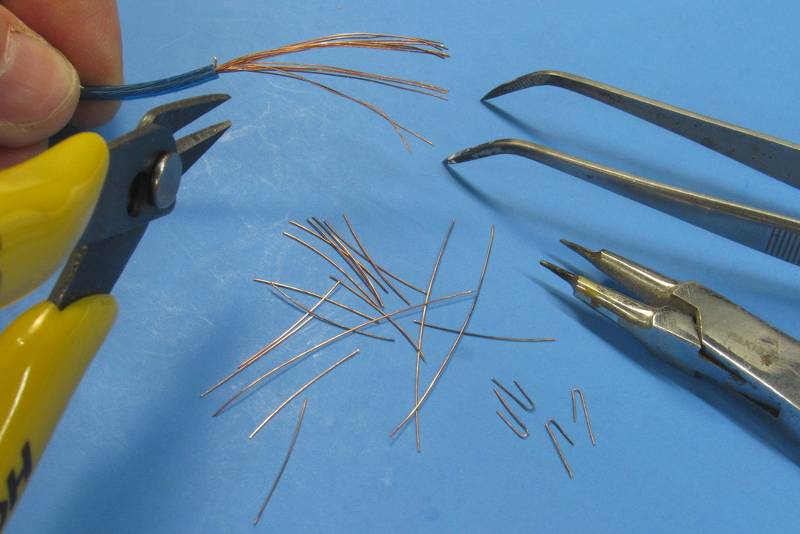
One set of pad-eyes forward of the sail, and the other way back aft over the engineering spaces. (That's eight pad-eyes for those of you keeping score at home).
However, after all the priming, painting and protective clear-coating those little holes I initially drilled got fouled up, so I had to bore them out again, with a .013” bit.
In addition to the eight pad-eye holes I also had to bore out the two holes in the deck that would pass a length of wire representing the McCann rescue chamber down-haul cable that ran from an on-board cable reel and escape marker buoy … more on that later.
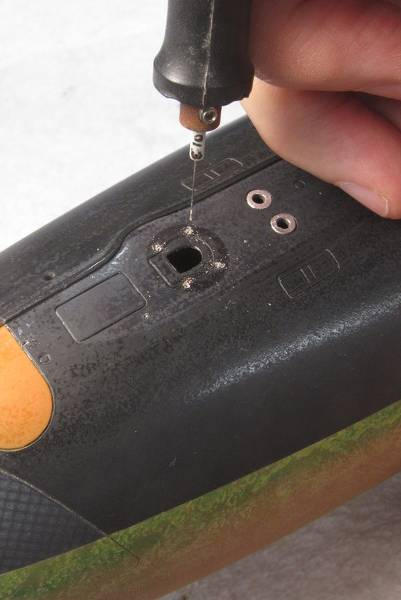
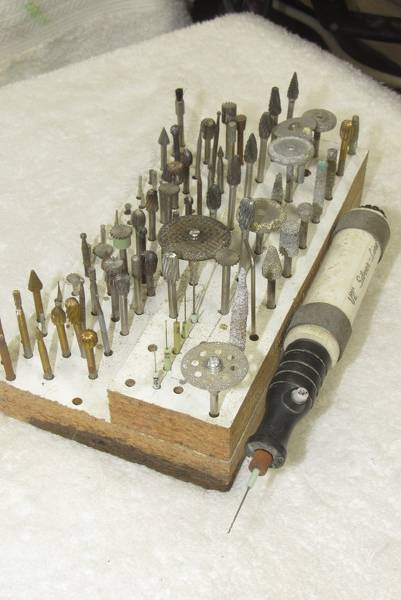
A common hand-drill is too slow and bulky (and its chuck likely too gross to hold and center a small bit); and the typical moto-tool is too massive and produces too much torque to give you a 'feel' for the job as you bore into the work.
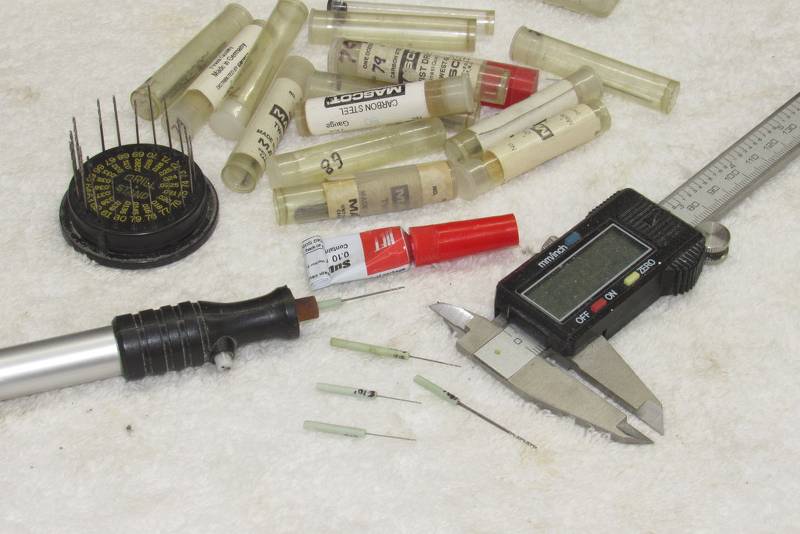
What is needed is a drill motor that is high-speed, low-torque, and so light in your hand that you can 'feel' the drilling as it progresses. So, in pursuit of such a tool, I converted these cheap-ass Harbor Freight 'Micro Engraver' tools to serve as small drill bit drivers.
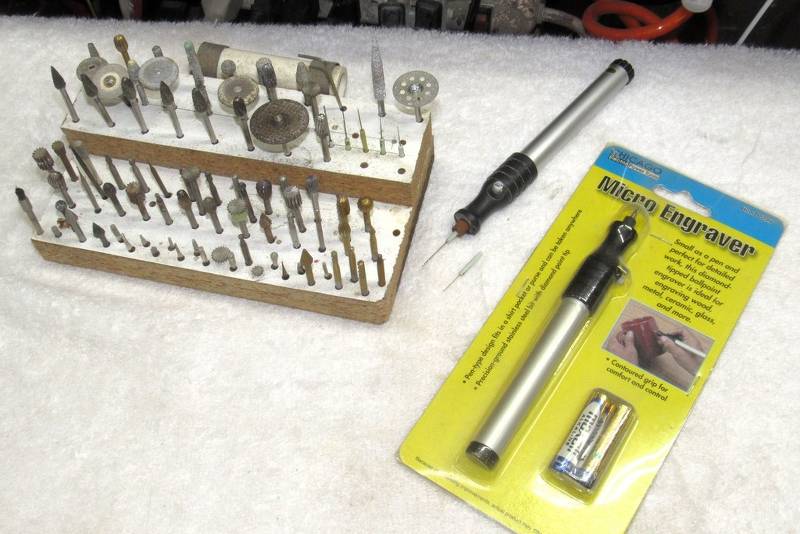
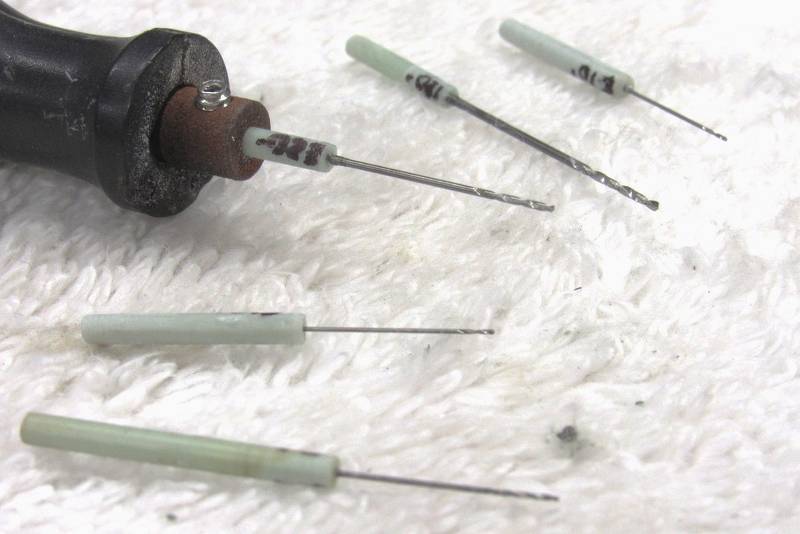
Fortunately the chuck of these little drills is just a collar with a .092” bore, that collar equipped with a set-screw to lock the bits shank in place. So, all I had to do was take a selection of small drill bits, ranging in sizes from .030” to .013” and secure each in a .092” shank (formed from some polyurethane discarded sprue stock) and Presto-Blamo... a mini-drill motor and a fair selection of small bits to fit it.
The smaller the drill-bit the faster it has to be spun, but the feed pressure has to be minimized and the bit driven into the bore with quick, light jabs to clear the bits flutes of kerf. Otherwise the bit will overheat and... SNAP!... the bit is broken, its tip buried deep where you're likely never to extract it, ruining the work. Dumb Ass!
Small bits demand high speed, very light feed pressure, and constant jabbing to keep the flutes unclogged.
Increasing the utility of this little drill-motor I turned a brass extension collar that permits me to mount any of the many types of .125” diameter shanked rotary bits I have at hand. Here you see both the drill-motor and a selection of bits all efficiently packaged together on this handy caddie.
Who is John Galt?Comment
-
Each pad-eye was tweezered into place, running each down into the little holes previously drilled about the circular escape trunk McCann rescue chamber seating surface. To insure that all pad-eyes sat the same height I placed one leg of an unused pad-eye blank into the space between the two legs of an inserted pad-eye and pressed it down till it sat atop the temporary length of .013” wire.
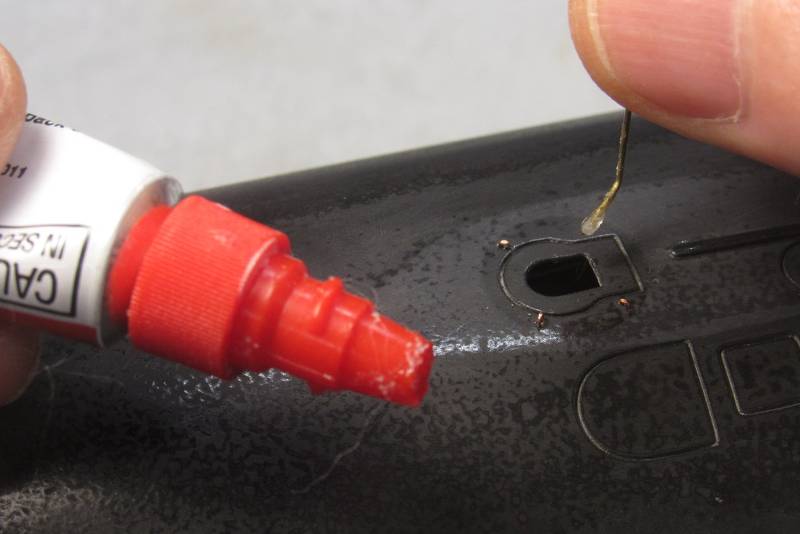
A dab of thick formula CA adhesive was applied within the hull to glue each pad-eye permanently in place. This 'L' bent length of wire served as the ideal application tool. Gluing the pad-eyes from within the upper hull negated any possibility of glue smears spoiling the finish atop the models surface.
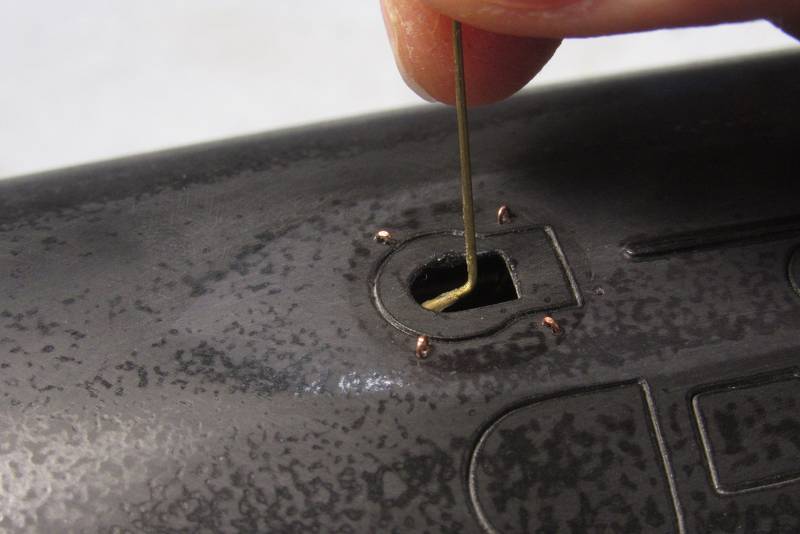
Once the glue had set hard I reaching into the upper hull and snipped off the excess lengths of pad-eye wire with wire-cutters.
Now came time to install the two escape trunk deck hatches. As these sat a bit below deck level within wells under the hatch fairings, each hatch piece was glued to a cast resin foundations. The foundation itself would be glued within the upper hull at the forward and after raised flange portions of each foundation.
To make these white-metal parts receptive to paint I pickled each with Ferric Chloride acid quickly followed by a fresh-water scrub and rinse.
Though the pickling oxidized the surface of the metal to a very dark gray already I wanted both the metal hatch and resin foundation to be a total black. So, after pickling the two hatch assemblies were were spray painted black with water-soluble acrylic paint.
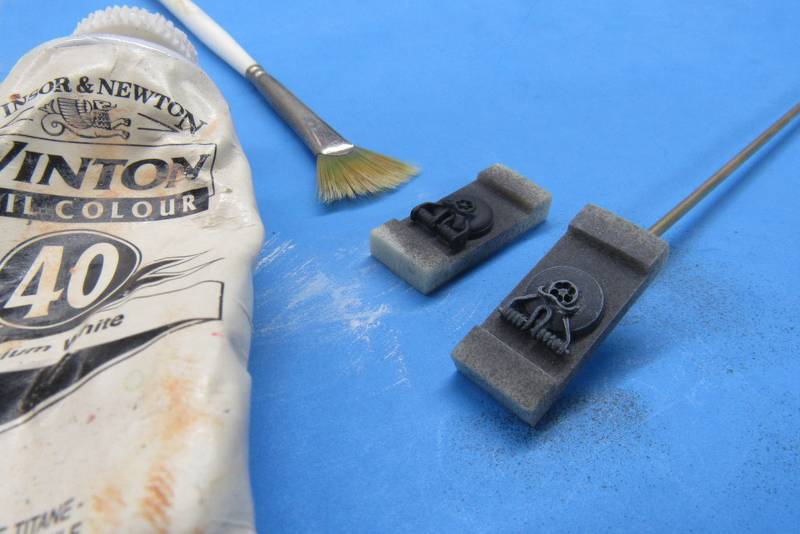
To give some 'life' to each hatch I dry-brushed all raised portions with white oil-based 'artist' paint. This gunk takes ages to dry so is the perfect medium for dry-brushing, streaking, and blending tasks. A soft 'fan' brush is the best tool for dry-brushing. The trick is to wipe most of the paint from the brush after loading it and to make multiple passes over the subjects with quick, light passes till just a small amount of the paint sticks to only the raised portions of the subject. What was once a black-hole then becomes a complicated structure of sharp contrasts – pleasing to the eye.
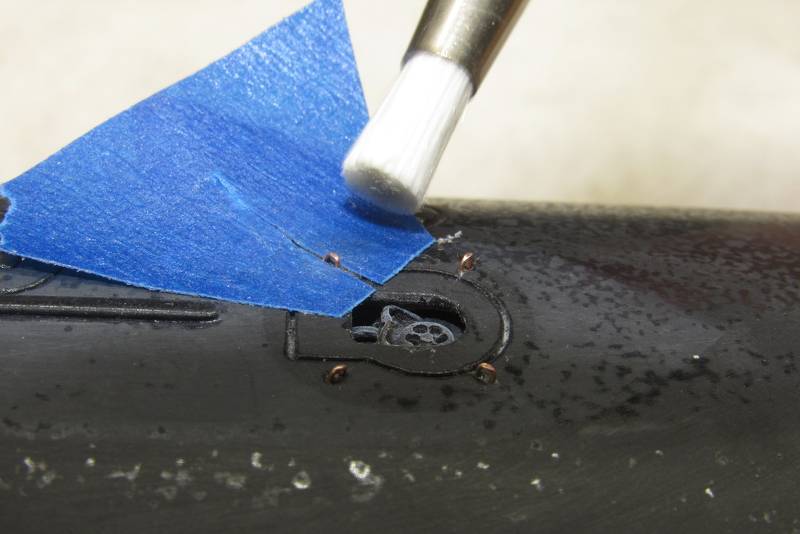
The eight hold-down pad-eyes needed to be painted. But, before that they had to be pickled like the hatch pieces. First task was to remove all contaminates from the little brass wire surfaces. This was done by scrubbing each projecting pad-eye with a fiberglass abrasive brush – this brought each to a state of shiny cleanliness. I took care to mask the surface of the hull as I did not want to damage the paint work under each pad-eye.
Each hatch assembly received a big gob of CA at its raised flanges, then I carefully positioned each under an open hatch fairing opening and pressed the assembly onto the hulls inner surface till the glue took hold.
Pickling the pad-eyes. Note how dark the upper pickled pad-eyes are to the lower ones which have yet to be scrubbed with acid.
Here you can see how the white dry-brushing of the hatch brings out its details – details that would otherwise be lost within the dark confines of the hatch well.

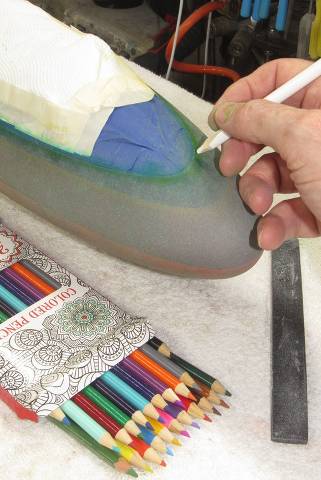
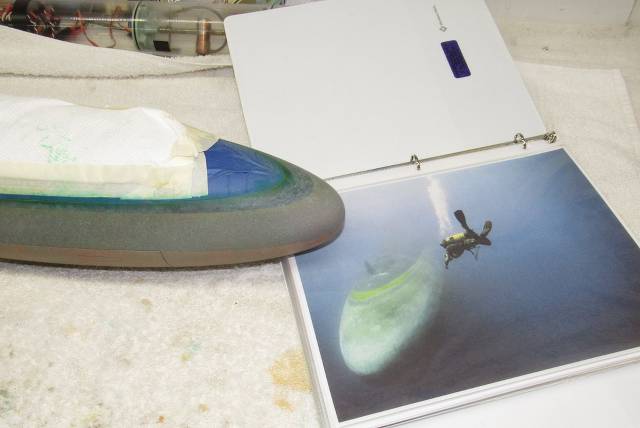
Time had come to weather the little 1/96 SKIPJACK hull. I had already represented the mung and other nasties that clink to the below-waterline portions of hull. Now was time to capture the real-world streaking and filth that collects on the deck and sides of the above waterline portions of hull.
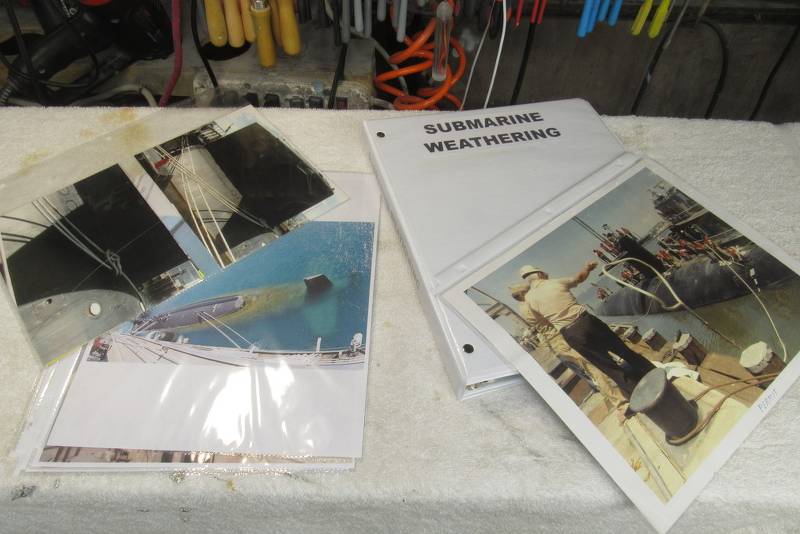
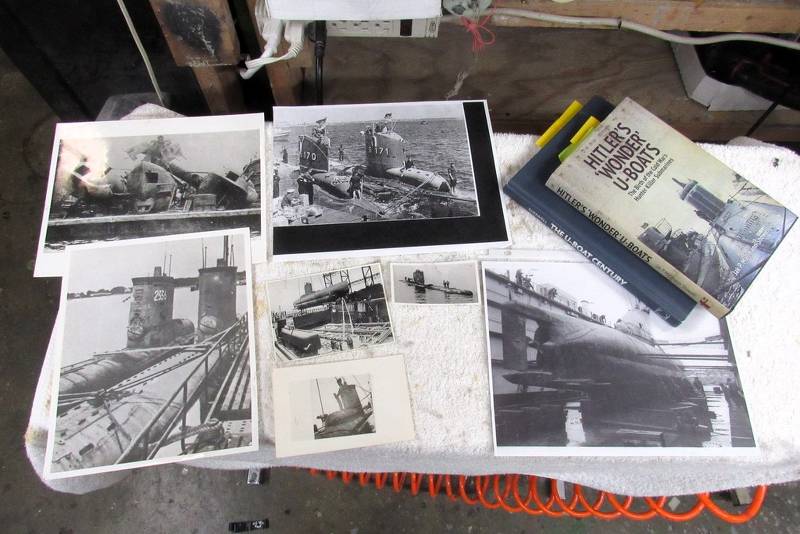
Over the decades I've gathered a substantial file of real-world examples of submarine 'weathering' effects. Here, pages from my binder relevant to the job have been pulled so they would be at hand as I got to work.
Rule of thumb when weathering: Less is more.
Before screwing up... er... applying the weathering on the SKIPJACK, I first practiced a bit on an old test-article. Practice makes perfect as they say. Practice is where you determine the best medium, technique and application tools that will achieve the effect desired.
Screw up your test-article... not your precious model!
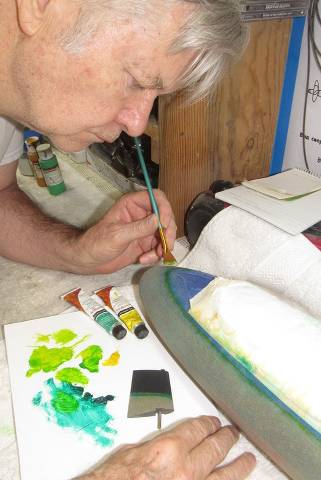
For small models I favor slow drying artists' oil paints when representing hull streaking and that's the type paint you see smeared all over this white plastic palette. I transfer a small dab of color up high on the side of the hull, then use a wad of cotton or old T-shirt to streak the color downward.
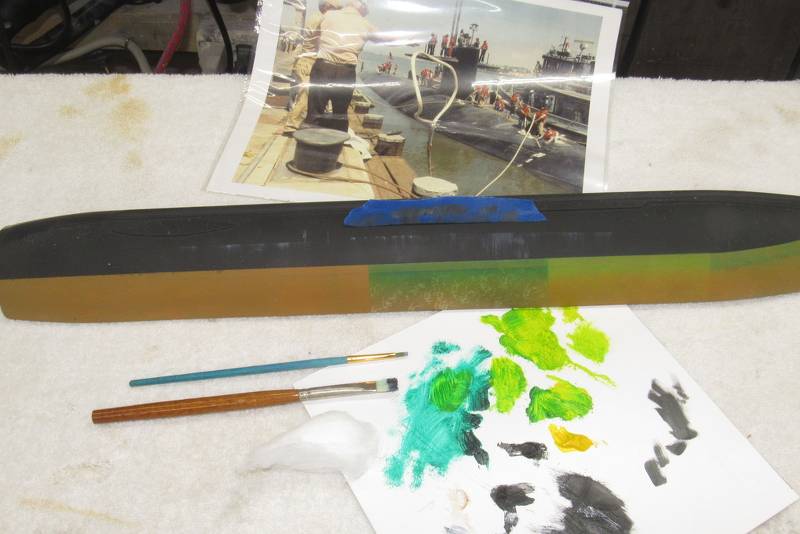
Once confidence had been regained on the test-article, I switched over to the SKIPJACK itself and commenced hostilities. Work was done in minutes. I also applied some very light streaking to the sides of the boats very tall sail.
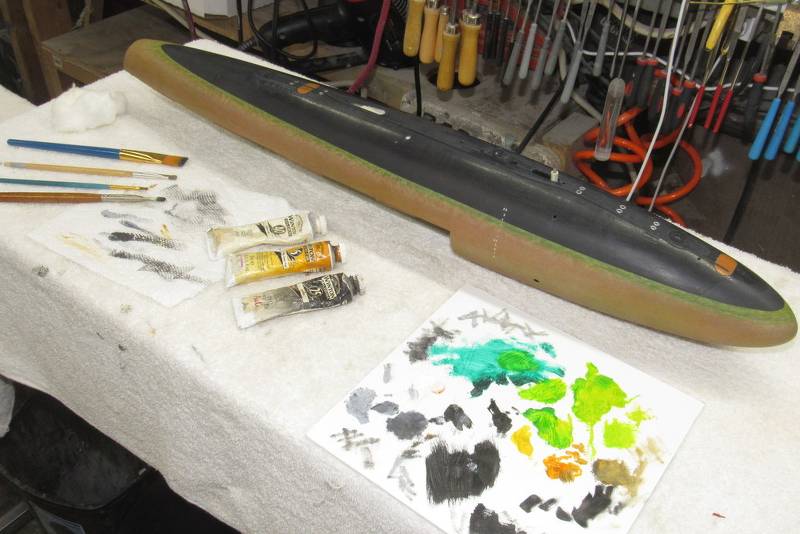
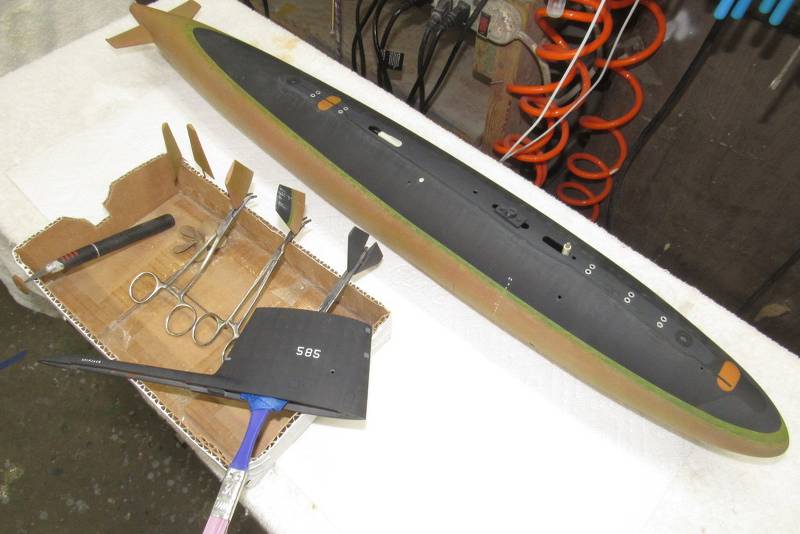
And what would be a modern submarines upper rudder without bird-**** running down from its top!?...
(Guys who worked deck-department (TM's MT's, FT's and NQP's) would truly appreciate this little detail!).

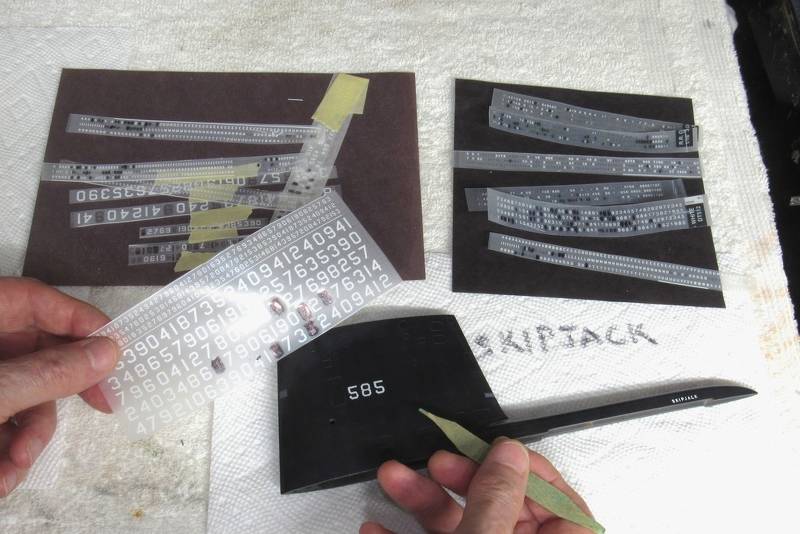
I had already rubbed on the Woodland Scenics dry-transfers for the '585' sail sides, draft-numbers on the hulls bow and upper rudder, and 'SKIPJACK' either side of the diesel exhaust line fairing. However, some of those unprotected markings did suffer some damage during the below waterline weathering and general handling.
Here I'm replacing some of the '585' numbers. It takes only a piece of masking tape over the marking needing to be pulled, and it's outta there! I then rub down a new number.
Not to worry, once everything gets a heavy clear-coat the markings will be effectively locked down and won't rub off unless subjected to very harsh abrasion action from collision or careless handling.
Up to this point the primer has been an air-dry acrylic lacquer, followed by the very durable two-part (2K in today's parlance) polyurethane black and red base colors – DuPont's automotive ChromaColor, which are no longer available (thanks, California!).
All of the below waterline weathering was done with water-soluble acrylic, air-dry paints – not terribly durable to abrasion or chemistry, but quick to mix, apply and clean.
No matter what type coats applied, its the final, clear-coat that becomes the shield against UV, chemicals, and abrasion. DuPont's ChromaClear system is the best I've found – and when it's cut with a proper flattening agent, it can be mixed either as a gloss or the deepest flat anyone on this planet can imagine! It's a ***** to mix; will tear up your lungs if you don't use a proper fitting charcoal mask; and demands quick and thorough cleaning of gun, mixing containers, and hands arms and face once the job is done. But the results are well worth the expense and effort.
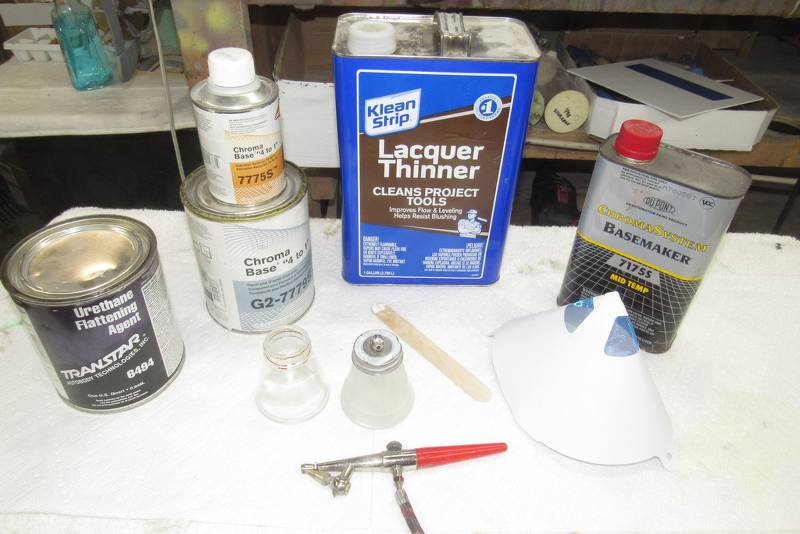
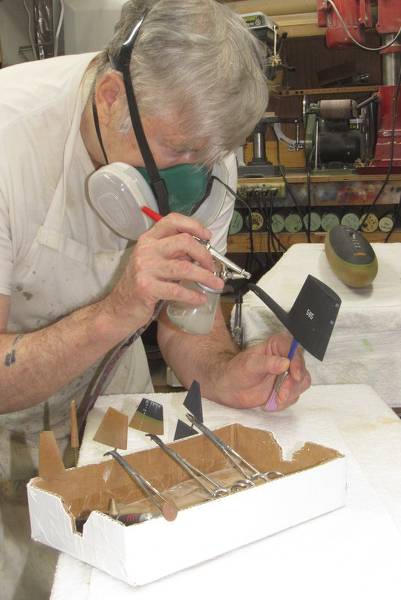
One of my old, trusty Paasche H-Model nuclear powered laser-blasters, set to kill... er... I mean 45psi, and equipped with the big tip. I use this tool on relatively small model submarines. The trick to achieving a uniform sheen to a clear coat is to put it down very wet – almost piled on to the point of running... but not quite. An acquired skill.
Before committing to the hull and appendages, I first blasted the test-article to get the pressure, stand-off distance, sweep-rate, and nozzle setting right before blasting the SKIPJACK model.
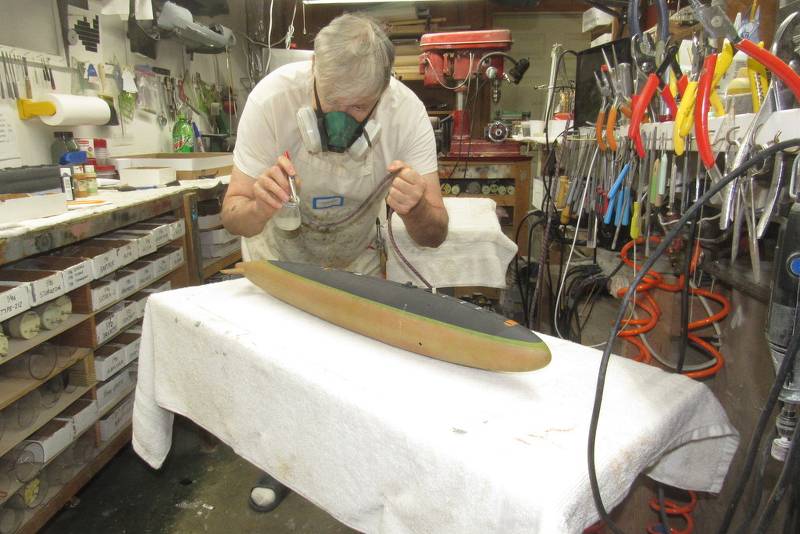
Note the various means of holding the appendages as they are given the clear-coat.
Damn!... time for a hair-cut.
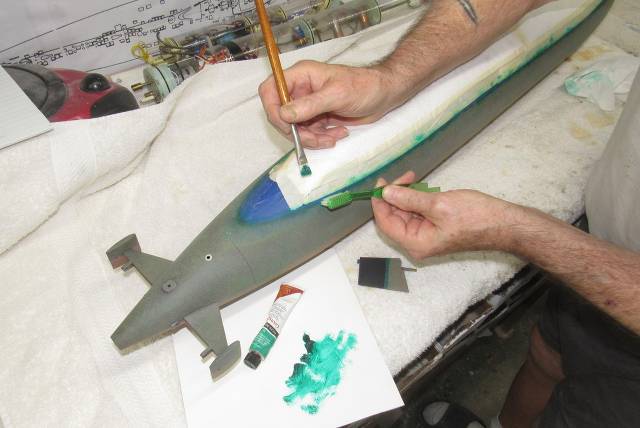
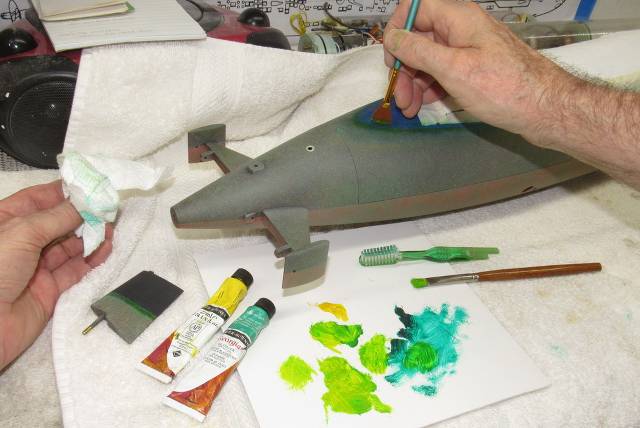
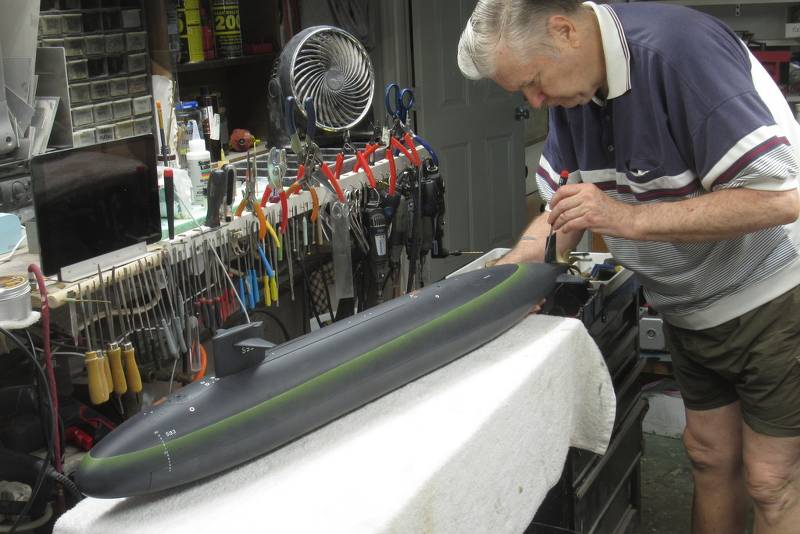
I operated this 1/35 Bronco Type-23 at last years SubFest. It served as a platform for a FPV camera system contained within the models rather large sale. The model, though structurally completed and given the appropriate paint scheme and markings, had yet to get a proper weathering job. Now's the time! SubFest is only two months away.
The yellow markings on the sail denote this as a relatively new boat still being worked up by its crew prior to being deployed for actual coastal war patrols (which, for these little coastal submarines lasted days, not months).
So, supposing this boat represents a unit with little in-water time under its belt, I resolved to go easy on the above and below waterline weathering.
Here's some of the documentation I gathered to help guide me as I mung up this r/c model submarine representing a short-lived combatant.
I'll start with the below waterline crud – that task an easy one on this model as the parting line between upper and lower hull falls across that plane – the only masking required is at the bow and stern, where upper and lower portions are permanently joined.
Who is John Galt?Comment
-
Have you tried these guys for polyurethanes. Well regarded on your side of the puddle.
Comment


Comment