-
Andy, the 50 thou is used on many of the grub screws, the prop is a 1/16th. The Dumas coupler might be .050", I did not check that. -
Very interesting tool, Subculture!! Looks like a "must have"!
May I ask where you stumbled across such a neat item?Leave a comment:
-
Wouldn't it be 50 thou?
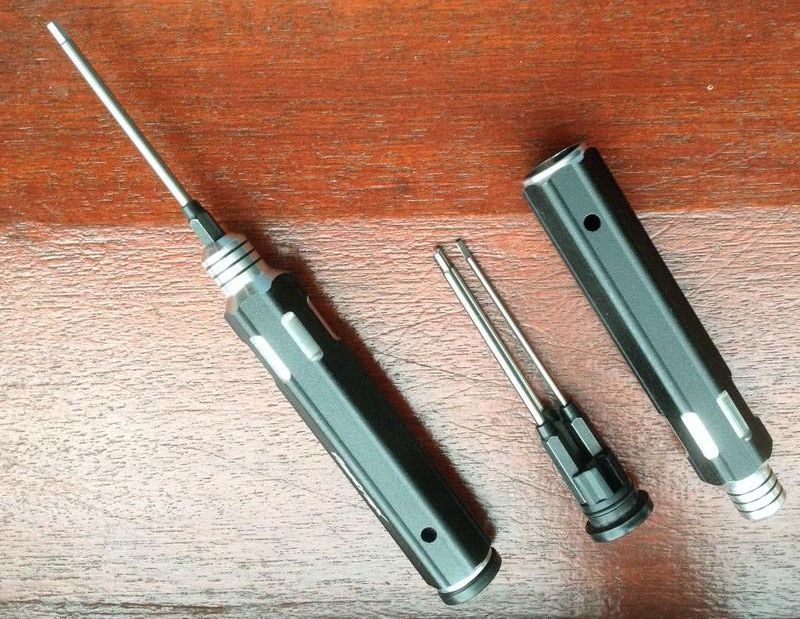
I use these type of interchangeable hex key spanners. I have two sets, one for imperial and the other for metric. I find this covers the majority of all my hexagon cranking needs in model form, and the screw driver style makes it easy to crank grub screws in tight places e.g. the stern area of subs. The hex keys store away neatly inside the handle, so you can't lose them.
Leave a comment:
-
quick question for all what size is the grub screw on the prop?? havin trouble getting a small enuff Allen key to fit....
The mods are looking good mate.Leave a comment:
-
It was a time to replace seal. The leak was coming from a seal in use and I am going to replace the un-used seal with a blank.
Push the seals out. Usually relatively easy. These two were.
Clean up the holes and remove the old silicon.
The blank is installed.
The un-used seal is now going to be replacing the leaky one. I guess I should have documented the steps for the plug being put in. So here are the steps.
A bead of silicon around the seal and a layer inside the hole.
Slide the seal in with a twist. this will help ensure a could seal (but not always possible sometimes it just slides in and you cannot get a grip to give it that twist)
Clean up the area and let the silicon set.
Leave a comment:
-
Its all good mate, got it back Monday afternoon....and 1400bucks later.
I haven't made it out of the house today got side tracked working on a mates 1/72 USS Harold Holt Knox class FF doing boat davits and some railings (and I went out to the shed to get CGN9 ready for a run! like I said "sidetracked"!)
No good pics yet just copying your build mate! Spent some time cleaning up the white metal prop too its been soaking in white vinegar for 3 or 4 days....how long is enuff for good paint adhesion??
Cheers BruceLeave a comment:
-
Bruce,
Sorry about the van being down, hope it is not a long or expensive fix.
Fishing or running USS Long Beach sounds like a great way to have a relaxing day whichever you choose enjoy. Today will be a crazy day until 4pm for me. Then it will quiet down and I might be able to break out the Type XXIII and get her ready for trimming and maybe squeeze in a seal repair on the Scamp.
If you get a chance post a few pictures. Would love to see your Skipjack.
Peace,
TomLeave a comment:
-
yes mine is the Revell version ( a different hobby store had the Moebius version for about $20 more!) I was thinking it could be due to excess heat during part extraction in the molding process.....
I was shown a fellow TF72 members assembled Moebius hull and his had some bowing upward of the upper hull section giving a gap along the side joins. I suggested Dave's heat gun solution (strap it down on flat surface gently heat the leave to cool) which I think would solve his hull problem.
I am having a quiet Christmas this year (due to unexpected work van repairs) ....might go fishing after lunch!! Or take USS Long Beach for a run...
Merry Beermas from Oz!
BruceLeave a comment:
-
Bruce,
Been on a sprint assembling the Type XXIII, so I shelved the Skipjack momentarily (Thinking it is a minor fix).
I identified a pushrod seal that leaks, but now that you mention it, need to take care of that (with guests coming over building has stopped today and tomorrow - but I will see what I can do to finish that!).
Is you kit the Revell version? I am wondering if warping is an issue with their production.
Cheers and Merry Christmas to you.Leave a comment:
-
Have you sorted your leak out mate?
I finally have started my sub ...cutting out bottom holes and drilling top holes. Found that my hull sections have very little of the warping seen by others and they test fit together nicely.
Cheers N Beers N Merry Xmas to all,
BruceLeave a comment:
-
Tested the sub-driver again. This time the battery compartment was bone dry! Now to the front.
I could not see with suction where the water was coming in from. But it was getting in somehow.
Switched to blowing air in through the vinyl tube. Holding on to the end caps to make sure they do not pop off and blowing in air, I found a stream of bubbles coming out of the leveling pushrod seal. That will be replaced, David included a pushrod seal in the care package - pretty smart, me thinks.
You can see how much water was in the engine room in the photo. After that we will retest.Leave a comment:
-
Great eye! Yes it was very tight to get on, but once I trimmed the excess teflon tape, it goes on with just the right amount of pressure. I believe the tape was giving resistance to the o-ring, preventing it from setting all the way down in the channel. I will post more later, got to fight the crowds and get some Melamine board to make the hull cutting rig (Type XXIII).Leave a comment:
-


Leave a comment: