I knew it would be a good idea to slip more than one of those rotors in the package. I make them like pop-corn. No sweat. You're sneaking up on this beast. Keep swinging!
David
-
In lieu of poking it with a tool, I rattled it around. Kind of like those apes in the beginning of 2001: A Space Odyssey. But I got it out, made the necessary modifications, and got it put back together. All before breakfast!
On another note, propulsion is back online. I am so thankful you sent me a multiple of rotors. These new ones have a larger diameter shaft hole in them (3/16, I believe) compared to the first one I got which had a 1/8 hole. I got a brilliant idea to use an extra oilite bearing as a sleeve. Of course I failed to notice that the bearing was a 3/16 ID. At least not until I was halfway through mangling one of my new props with a drill like the proverbial monkey with a football. D�oh.
Long story short - found the right size sleeve, paired it with a new rotor, placed that on the shaft, secured all three place, stuck the aft half of the shroud on with RTV and we are in business.
This is fun. Insane, but fun.
-BradyLeave a comment:
-
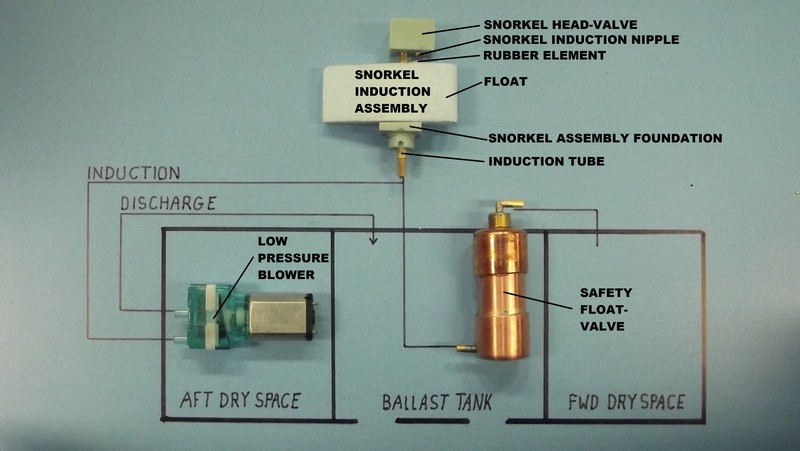
Fair question. The safety float-valve is secured within the SD cylinder by a threaded 'washer' nut atop the cylinder. Remove the flexible tube between the unit and the internal nipple of the four-point manifold; remove the units securing nut; drop the unit into the ballast tank and poke at it with a tool till one end is over a flood-drain hole where it is extracted.
Easy-peazy.
DavidLeave a comment:
-
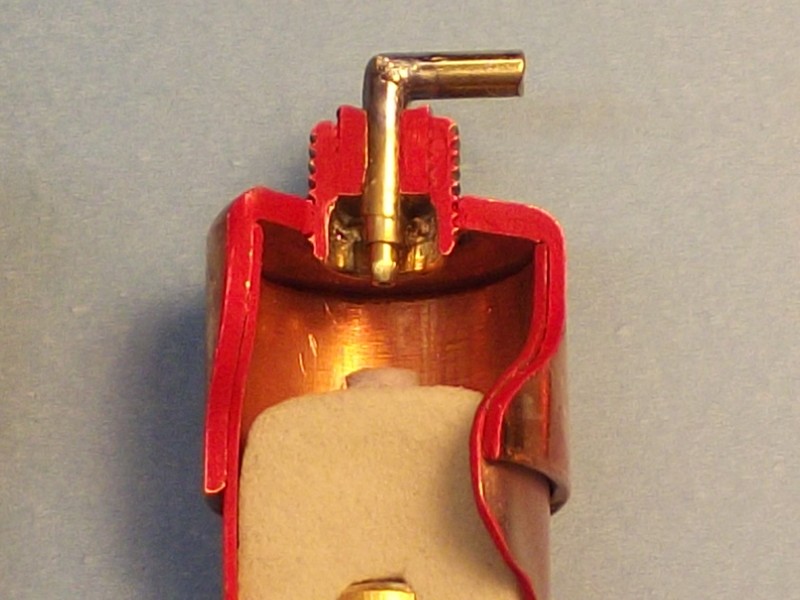
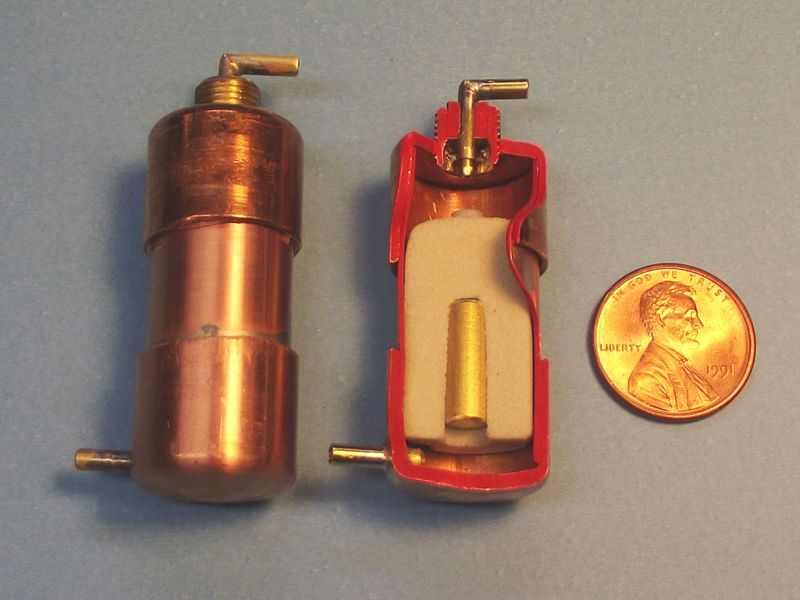
You found the problem. The float is hanging up within the body of the safety float-valve.
Take it out of the SD, pop off the top of the unit (it's only secured with RTV, permitting easy access) and shave down the float till it moves within the unit without hanging up. Place a dab of silicon grease atop the rubber element, reassemble, reinstall, and test.
Go forth and sin no more my Son.
DavidLeave a comment:
-
Keep cuing the triumphant music, but the safety float valve in my SD is giving me cause to wonder.
Invert the unit & whack it on the table, as prescribed, and all is well.
Let it sit for the day and then go run it again and it puddles up a bit of water in the forward space.
I wonder - should a good thump on the head be added into every pre-mission checkout?Leave a comment:
-
-
Well I took your advice, and...
I'll just let the tone of the music speak for itself:

We are on our way, gentlemen.Leave a comment:
-
I love that you jumped in with your own fix. Good, aggressive problem solving.
As a young torpedoman, working the forward torpedo room in the TRUTTA, I learned all about lapping tight the seats of brass torpedo tube valves.
Those lessons have since been applied to the seating issue between the brass intake nipple and rubber element of the SAS snorkel valve:
Bevel the opening of the nipple to reduce the seating surface area, then slide a piece of #400 sandpaper between the rubber disc and nipple -- grit side facing the nipple. Slide the sandpaper back and forth as you apply a very light pressure holding the rubber-sandpaper-nipple sandwich together. This will lap-fit the tip of the nipple to the surface of the rubber. Test. Sing my praises. Recommend me for sainthood. Mow my lawn.
Also, as water is getting into the forward dry space of your SD, this points to a failed safety float-valve. Likely the float within that assembly has hung up. Invert the SD and slam it on the table with terrible, ruthless force a few times to shake the float loose. If the safety float-valve is doing it's job, no water should get by because of a flooded induction line.
DavidLeave a comment:
-
I had an idea and began to tinker...
David, I know you've sent another care package my way, but my mind is restless. I feel like this is a better effort than my first design, but it still isn't cutting it. There remains just the tiniest pinhole leak of air between the induction tube and the rubber gasket. I'm positive it's coming from that one spot, and I'm not sure how to stamp it out. I know I can make it worse with ham-handed attempts at trying to file the end of the tube, and I can bring it back to "almost there", but I can't make it go away completely.
I went for an all-up test in the bathtub again, and while it did better than the old setup, it's still drinking a few CC's of water into the battery compartment after a handful of successive flood/blow evolutions.
Other thoughts I've had regarding water ingestion - I wonder if part of it might also come from when the sail and the float are just broaching the surface. It would seem like a good practice would be to blow ballast for about a few seconds to achieve positive buoyancy, then let the boat rise until the sail is out of the water before trying to fully blow the remainder of the ballast tank.
Hmm.Leave a comment:
-
-
Careful what you ask for, pal! One day of me and you'll be screaming for a restraining order from the local authorities.
Visited Seattle while stationed at the Keyport Naval Torpedo Station. Got my first case of clap in that wonderful city by the sea. Only neat thing there was that short-legged monorail left over from the Worlds Fair.
Missed today's post. Will get it out of here tomorrow, along with some of those magnetic coupler clips we talked about yesterday.
DavidLeave a comment:
-
Oh my god. Unless you fancy boxing yourself up and taking a trip to Seattle...
Thank you, David.Leave a comment:
-
-
The only bit that�s hanging me up is the resin piece at the top of the induction tube. I need to think about how I�m going to replicate that.
Back to work...Leave a comment:
Leave a comment: