Jimmy Carter - 1/144

Collapse
X
 
  • Time
  • Show
Clear All
new posts
  • He Who Shall Not Be Named
    Moderator
    • Aug 2008
    • 12253

    Originally posted by DMTNT
    I think I solved it.

    Using all of your suggestions.... 1/16” bit to bore out the shaft opening, plenty of silicone grease, I fabricated a new servo pushrod, and per the recommendation from Scott, I shined it up to a high polish.

    Aaaaaaannnnnnnnd it still bubbled. So I took the next step and smeared some RTV around the end of the seal body and the aft cap of the WTC and voila! No more bubbles. I will let it really dry before putting it back in the water, but I am definitely encouraged.

    Switching gears - Mister M, could you please enlighten the class once more on your preferred media for sealing a paint job? I know you love automotive paints. How about matte clear-coats?


    -Brady
    Not much I can add other than take care not to mix brands and/or paint chemistries unless you have tested on a discarded hull and KNOW what works and what does not.

    Rule of thumb: you can overcoat lacquer with enamel, but never overcoat enamel with lacquer. The more volatile solvents in lacquer (MEK, and other powerful hydrocarbons) will eat into, react, and spoil the surface texture of the underlying enamel. The water based paints don't suffer as much as enamel when over coated with paints/clear-coats of different chemistry. If you don't know the chemistry of the underlying paint, then overcoat it with clear water soluble clear-coat to act as a neutral barrier between the different chemistries.

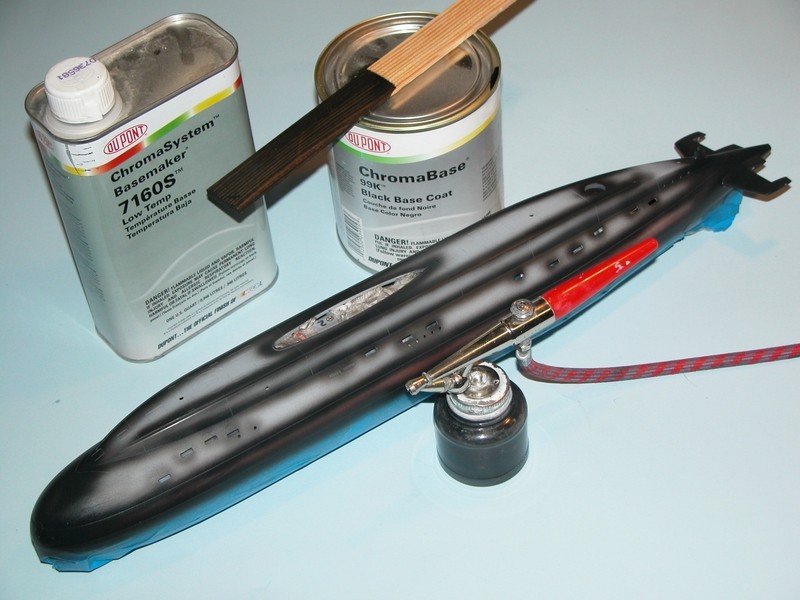
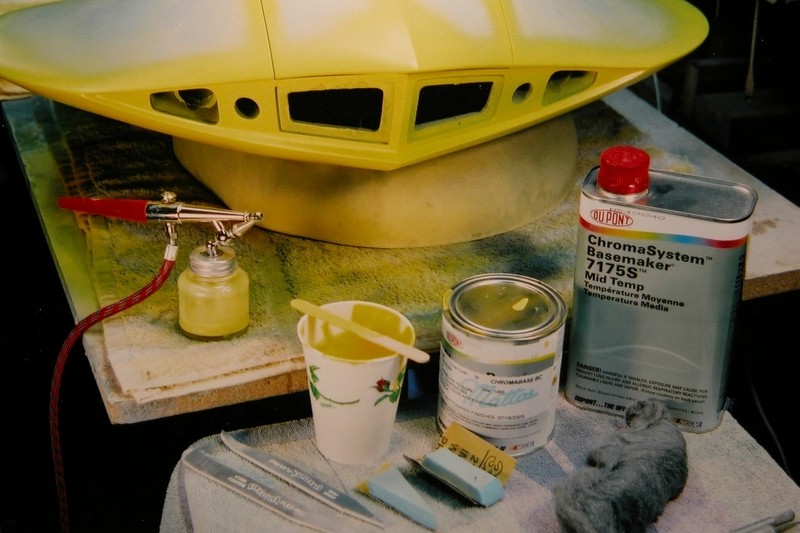
    Decades ago I went with the DuPont acrylic automotive lacquer primers and paints (Lucite brand), but the paint a decade ago went away because of that ass-hole California and their snowflake environmental laws. Then I had to go to the DuPont two-part polyurethane paints and clear coat (Chroma Color and Chroma Clear brands) -- but again the ass-holes in California nixed that system because it was a planet-killer. I'm currently investigating the 'now approved' water soluble automotive paints currently offered by the automotive finishing fraternity.


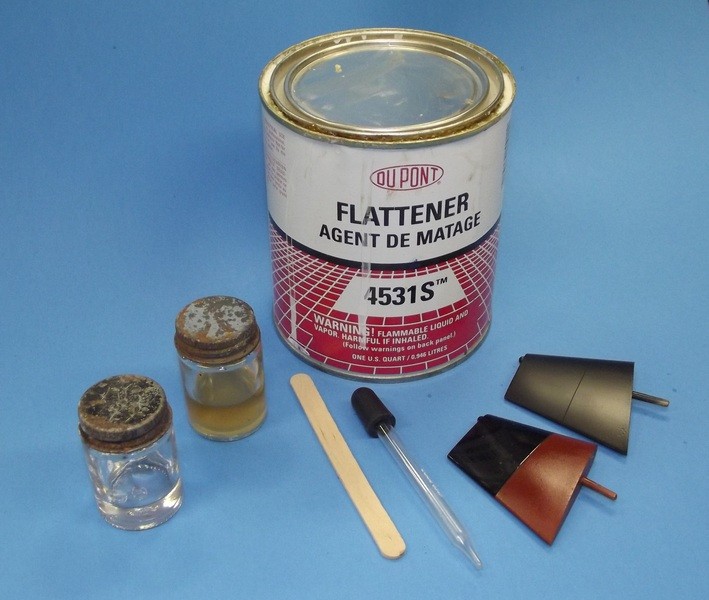
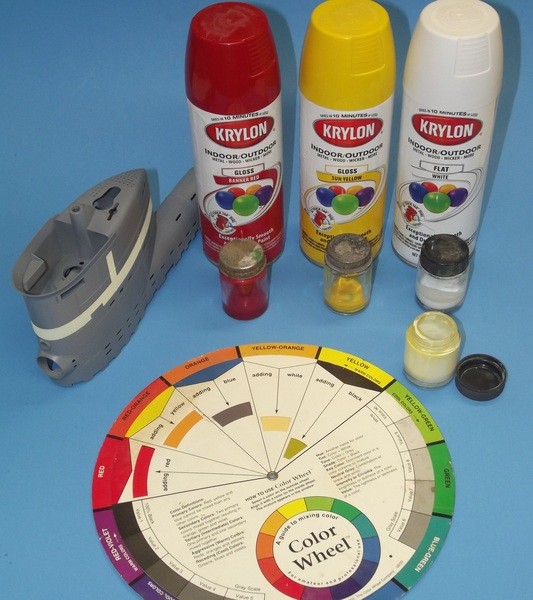
    You all get your nuts in a bunch about how to get a gloss, semi-gloss, or satin clear coat down. The only way to wrest control away from the packager and put it in your hands where it belongs is to add your own 'flattening agent'. Again, an automotive refinishing house product.


    I would rather die than use hobby paints. That sludge is only good for static models and bird-houses. Remember: if the paint chemistry ain't dangerous, then its no good!

    I select my paints and clear-coats because they have dense pigments, strong bonding agents, low break-down under UV light, don't care if they're immersed in water or not, and are abrasion resistant. Auto paints (not that touch-up crap you get at Wal-Mart) for touch-up and hobby paints are formulated to be safe, not effective for the job intended.


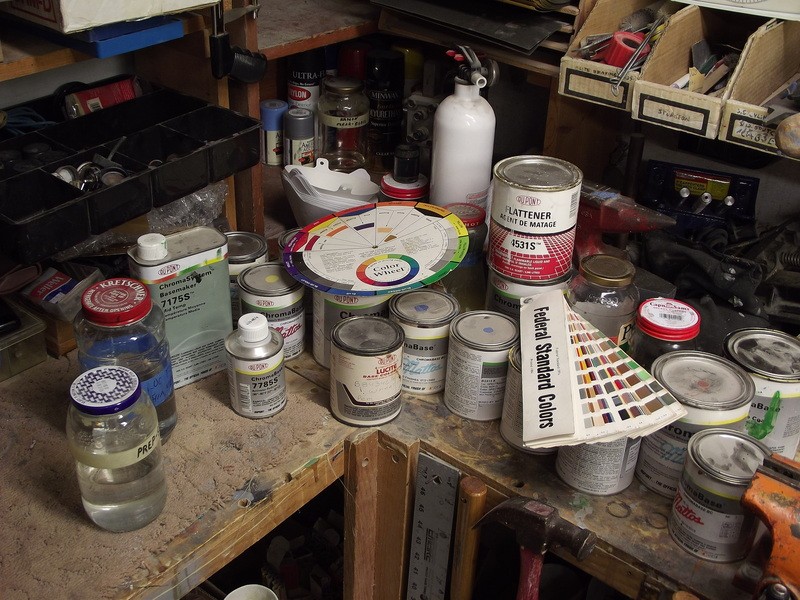
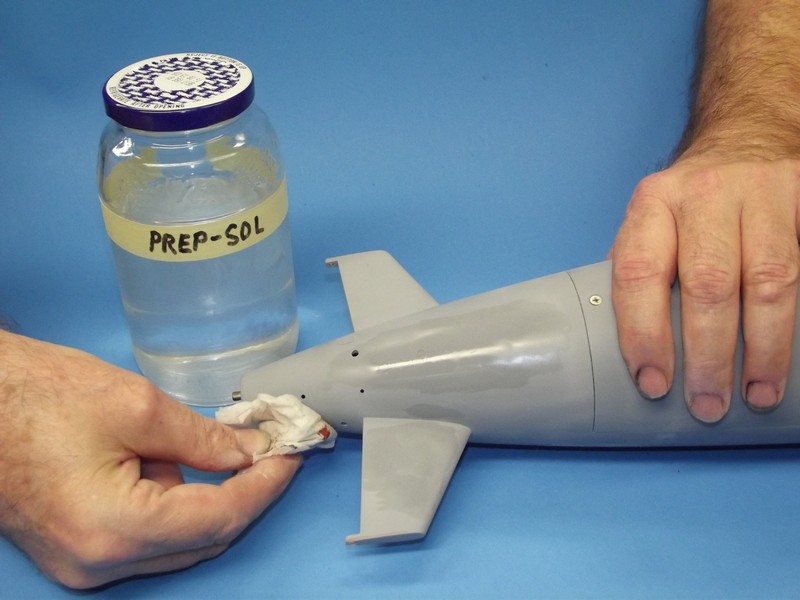
    Oh, something most of you miss: Before laying down any primer, paint, or clear-coat, clean the surface of the model with a low-volatile cleaner like Prep-Sol.


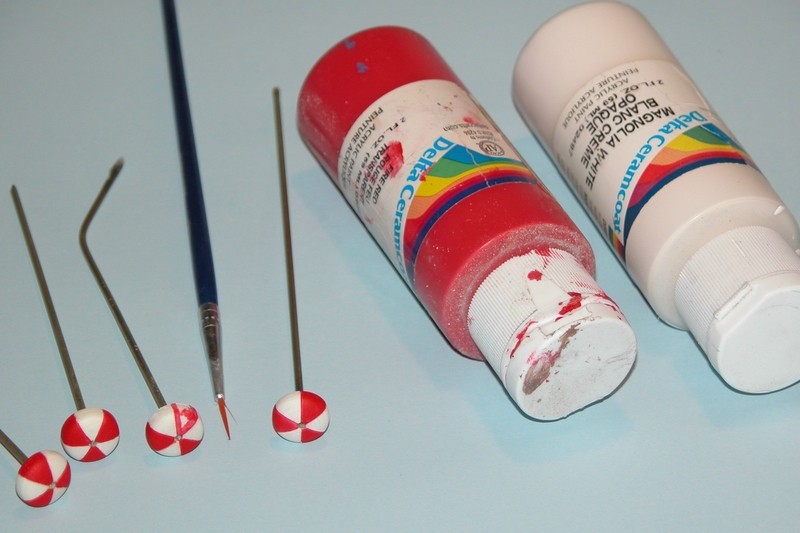
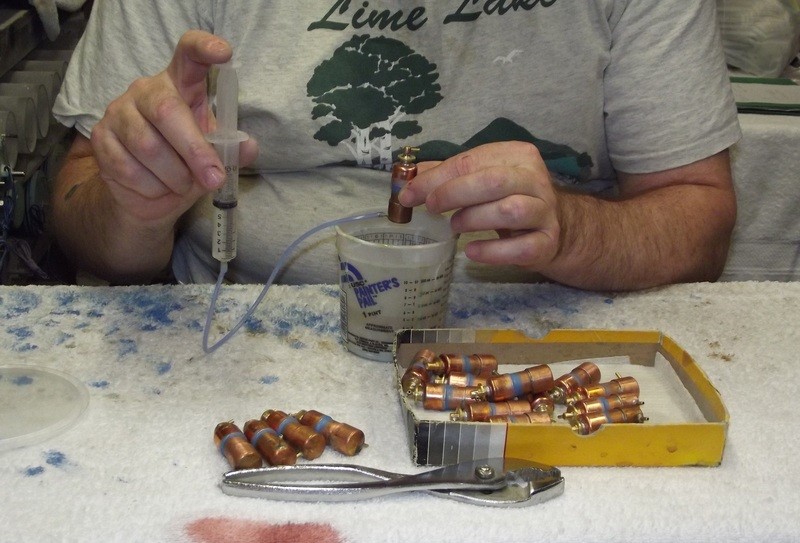
    I will, on occasion, use the cheap Wal-Mart water soluble acrylic paints for touch up and detail work. Like so:


    David


    Who is John Galt?

    Comment

    • DMTNT
      Commander
      • Jun 2018
      • 297

      Originally posted by He Who Shall Not Be Named
      Remember: if the paint chemistry ain't dangerous, then its no good!
      That is all I needed to hear, lol.

      I went and got some Rustoleum matte clear acrylic. I will test it and report back.
      Dead men tell no tales...

      Comment

      • He Who Shall Not Be Named
        Moderator
        • Aug 2008
        • 12253

        Originally posted by DMTNT

        That is all I needed to hear, lol.

        I went and got some Rustoleum matte clear acrylic. I will test it and report back.
        The trouble with the box-store rattle-can paints (Rustolium, Krylon, etc.) is that the ass-holes keep changing the chemistry and even sell 'variants' ('for plastic', 'for ceramic', etc.) of the name-brand. Which means you don't know what you have till you lay it down. A five year old can of Krylon ain't the same as the can of Krylon you bought yesterday.

        I used to love the Krylon, but they changed things, and I just don't have the time to put up with a failed paint or clear-coat. But, for ****s-and-giggles, here's how to decant from the spray-can and apply with a proper spray-brush:


        David
        Who is John Galt?

        Comment

        • DMTNT
          Commander
          • Jun 2018
          • 297

          I know you hate hobby paints, but try to remember that static applications have literally been all I have ever done. That said, one thing I have always appreciated about Testors Dulcote is I know what I am getting. I have applied it over a wide array of paints with almost universal success. Not to mention it dries relatively fast, relatively stable, and generally provides the effect I am after.

          No great reward comes without risk, so that is why tonight I am going to try this latest can of Rustoleum Acrylic Enamel on CARTERs lower rudder. Detached, of course. If that checks out, I will spray the entire boat. Either way, I will report back to the class.

          Stay tuned.

          Dead men tell no tales...

          Comment

          • trout
            Admiral
            • Jul 2011
            • 3545

            I can only agree with David. I just recently tried Rustoleum gloss black (a new can because my old one was empty - that was what I used over the summer). I sanded and cleaned and sprayed a light coat and it immediately began to crinkle. I used Rustoleum Matte clear and no issue. Plus many paint cans do not say if they are lacquer or whatever. I am reluctant to buy Automotive paints, but I may have to sell my kidney and some bone marrow to start buying the stuff he keeps yelling at me to use (with a few explicative thrown in). Click image for larger version

Name:	
Views:	0
Size:	336.3 KB
ID:	130629
            Last edited by trout; 03-01-2019, 11:06 PM.
            If you can cut, drill, saw, hit things and swear a lot, you're well on the way to building a working model sub.

            Comment

            • DMTNT
              Commander
              • Jun 2018
              • 297

              Well, I think I can breathe again...
              Click image for larger version  Name:	EACAD6E8-FDD7-48FE-870C-75A6D9300C10.jpeg Views:	1 Size:	27.5 KB ID:	130631


              That bit of texture was already there, and is exaggerated by the light, but this is what the boat looks like overall. God that was nerve-wracking. The overcoat is now dry to the touch, but I will give it at least until tomorrow night before I touch any of it. It still looks glossier than I would like, but we will see how things shape up as it gasses off and cures through.

              Tom, I know what you mean. The can really does not tell you **** about what you are getting. The guy at Home Depot was very helpful though. I may try the automotive route on this little 212 that David gave me. We shall see how this goes.


              *Edit to Add*

              I know a lot changes over time and as a boat goes through it’s service life, but I have always gotten the impression that the paint on our subs isn not really a dead-flat anyway, so maybe a bit of sheen is acceptable...

              Click image for larger version

Name:	E1F65807-7D80-4BB6-9F76-B77C1A5DE688.jpeg
Views:	211
Size:	68.9 KB
ID:	130632
              Last edited by DMTNT; 03-02-2019, 12:43 AM.
              Dead men tell no tales...

              Comment

              • DMTNT
                Commander
                • Jun 2018
                • 297

                You thought we were done here? HA!

                This is is the result of about 6 successive flood / blow evolutions:

                Click image for larger version

Name:	C1D3E05B-EAAA-4175-8465-DFCCF1CF0E2D.jpeg
Views:	215
Size:	77.5 KB
ID:	130766

                The green circled area is where I know the issue lies (see the water at the bottom of the forward dry space.) I had the safety float valve out and disassembled, the float itself lightly sanded down so it slides neatly in the housing, and it still doesn’t seem to be enough. I was wondering, is there any way I could obstruct that opening to the nipple above the forward dry space and still retain full, normal functionality on the SD?
                Dead men tell no tales...

                Comment

                • trout
                  Admiral
                  • Jul 2011
                  • 3545

                  Your leak test (blowing into the tube) should produce bubbles.

                  Just throwing this out there, the tube that your wires go through to traverse the ballast tank, I had a small leak in one of my cylinders. It took a bit to find it, but small bubbles were appearing in my ballast tank and I sealed the tube with silicon. That stopped the leak. I found it by putting some paper towels in my battery area and checking it with every surface command given. The paper was wet not on the top, but by that tube. Then the leak test helped me find where the bubbles were coming in from. I was so focused on the outside of the cylinder, it did not occur to look in the ballast tank.

                  A small amount of water can get in, but not that amount, by just the shear rush of air coming in as a mist. By design the copper cylinder catches liquid and it gets expelled when the pump is turned on to surface. Still a small amount can come in. It can also have condensation, again not like what you are showing.

                  Put a bead of silicon around the outside of the circled piece, get a suction started and give the silicon a chance to dry (do this with the tube mentioned above). With a good seal there should be a vacuum still after a bit of time.
                  Last edited by trout; 03-04-2019, 10:10 AM.
                  If you can cut, drill, saw, hit things and swear a lot, you're well on the way to building a working model sub.

                  Comment

                  • DMTNT
                    Commander
                    • Jun 2018
                    • 297

                    Originally posted by trout
                    Your leak test (blowing into the tube) should produce bubbles.

                    Just throwing this out there, the tube that your wires go through to traverse the ballast tank, I had a small leak in one of my cylinders. It took a bit to find it, but small bubbles were appearing in my ballast tank and I sealed the tube with silicon. That stopped the leak. I found it by putting some paper towels in my battery area and checking it with every surface command given. The paper was wet not on the top, but by that tube. Then the leak test helped me find where the bubbles were coming in from. I was so focused on the outside of the cylinder, it did not occur to look in the ballast tank.

                    A small amount of water can get in, but not that amount, by just the shear rush of air coming in as a mist. By design the copper cylinder catches liquid and it gets expelled when the pump is turned on to surface. Still a small amount can come in. It can also have condensation, again not like what you are showing.

                    Put a bead of silicon around the outside of the circled piece, get a suction started and give the silicon a chance to dry (do this with the tube mentioned above). With a good seal there should be a vacuum still after a bit of time.
                    That is a good suggestion, Tom. Thank you and I appreciate it! The only reason why I am not immediately convinced it is that connecting tube is I had a flexible rubber line inserted into the shrader valve opening at the back end just recently and when I put positive pressure into the dry spaces by blowing into the tube, the only leak I could find was coming from the servo pushrod seal bodies.

                    This leak is almost identical to the first one I had that was solved by tweaking a stuck safety float in the copper cylinder . I think the nipple inside the copper tube is not getting an adequate seal on the rubber nub on top of the float, but I do not know how to lap it as it’s attached to the upper “cap” of the copper cylinder. Otherwise I would try the method suggested by David a few pages back.

                    Click image for larger version

Name:	53272713-A0C3-452D-96CA-8BAA6CC5DCA1.jpeg
Views:	250
Size:	205.6 KB
ID:	130778

                    Last edited by DMTNT; 03-04-2019, 12:33 PM.
                    Dead men tell no tales...

                    Comment

                    • He Who Shall Not Be Named
                      Moderator
                      • Aug 2008
                      • 12253

                      Originally posted by DMTNT

                      That is a good suggestion, Tom. Thank you and I appreciate it! The only reason why I am not immediately convinced it is that connecting tube is I had a flexible rubber line inserted into the shrader valve opening at the back end just recently and when I put positive pressure into the dry spaces by blowing into the tube, the only leak I could find was coming from the servo pushrod seal bodies.

                      This leak is almost identical to the first one I had that was solved by tweaking a stuck safety float in the copper cylinder . I think the nipple inside the copper tube is not getting an adequate seal on the rubber nub on top of the float, but I do not know how to lap it as it’s attached to the upper “cap” of the copper cylinder. Otherwise I would try the method suggested by David a few pages back.

                      Click image for larger version

Name:	53272713-A0C3-452D-96CA-8BAA6CC5DCA1.jpeg
Views:	250
Size:	205.6 KB
ID:	130778
                      The upper cap is simply pulled off as it's secured with RTV adhesive. Take the float out, mount it in a lathe (or big drill chuck) and as it's spinning, shave the surface of the rubber element with some clean #220 sandpaper. Check that the nipple within the cap is clean and free of obstructions. Coat the surface of the rubber element with some silicon grease, and re-assemble. Curse at the safety float-valve mightily, wave a 3 lbs. hammer at it, and threaten its family. Install and test.


                      David
                      Who is John Galt?

                      Comment

                      • DMTNT
                        Commander
                        • Jun 2018
                        • 297

                        David, is there any consequence to there being a gap between the float and the walls of the copper cylinder? Say, a total of ~.5mm ?
                        Dead men tell no tales...

                        Comment

                        • He Who Shall Not Be Named
                          Moderator
                          • Aug 2008
                          • 12253

                          Originally posted by DMTNT
                          David, is there any consequence to there being a gap between the float and the walls of the copper cylinder? Say, a total of ~.5mm ?
                          No sweat.

                          David
                          Who is John Galt?

                          Comment

                          • DMTNT
                            Commander
                            • Jun 2018
                            • 297

                            Thanks. God dam*ed infernal, brilliant thing that it is.....

                            I see your testing with a syringe. I'm guessing that a successful test, pushing water in from the bottom, will result in no flow through the top nipple? I tried it a different way by attaching a tube to the top nipple and sucking both air and water through it. With the air, I heard just a tiny hiss, which is what started me on my current hypothesis.

                            Thank you, as always, o' great keeper of knowledge. Stay tuned.
                            Last edited by DMTNT; 03-04-2019, 03:33 PM.
                            Dead men tell no tales...

                            Comment

                            • He Who Shall Not Be Named
                              Moderator
                              • Aug 2008
                              • 12253

                              Originally posted by DMTNT
                              Thanks. God dam*ed infernal, brilliant thing that it is.....

                              I see your testing with a syringe. I'm guessing that a successful test, pushing water in from the bottom, will result in no flow through the top nipple? I tried it a different way by attaching a tube to the top nipple and sucking both air and water through it. With the air, I heard just a tiny hiss, which is what started me on my current hypothesis.

                              Thank you, as always, o' great keeper of knowledge. Stay tuned.
                              Your protocol is also a valid test of operation. Carry on sir. (got your goodie-box off this morning).

                              David
                              Who is John Galt?

                              Comment

                              • DMTNT
                                Commander
                                • Jun 2018
                                • 297

                                Originally posted by He Who Shall Not Be Named

                                Your protocol is also a valid test of operation. Carry on sir. (got your goodie-box off this morning).

                                David
                                They don't call it DEVRON 5 for nothing! Will do.

                                Click image for larger version

Name:	DEVRON5.jpg
Views:	208
Size:	44.4 KB
ID:	130788


                                Dead men tell no tales...

                                Comment

                                Working...