-
Who is John Galt? -
On it, boss. A trip to the hobby shop yielded some 1mm and .020 brass wire, and some .032 rosin core solder. The thing is, on my best day, I feel like I'm "okay" at soldering. Silver or otherwise. Your photos are helpful, and have given me a few things to think about. It'll also be fun scraping the CA and the poor little sailors off the top and making it look clean, but that's all part of the experience, right?
I was recently having a conversation with a good friend of mine. Closer to your age than mine, former AFI grad who did photography on films for a number of years. A craftsman in his own right, Mark appreciates the value in doing it old school. I was telling him about some of the things you and company do on here, and it reminded him of some folks you're probably familiar with in that business. What stuck out though was his appreciation in recalling how the truly talented ones would approach impossible challenges with a mindset of, "Why not give it a try and see what we can do?"
Bunch of damn cowboys, the lot of you.
Let's see how I can burn myself with the soldering iron again tonight!Dead men tell no tales...Comment
-
Include yourself in the fraternity of hands-on types -- you take my shots with humor and attentiveness. Traits need by any guy who WANTS to learn. And you come in with some good basic skills. We'll work you over as long as you can take it.
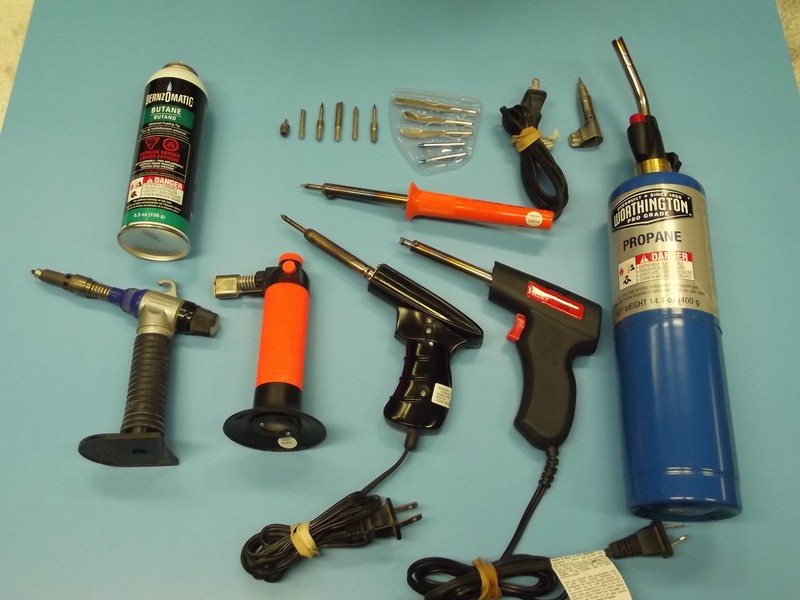
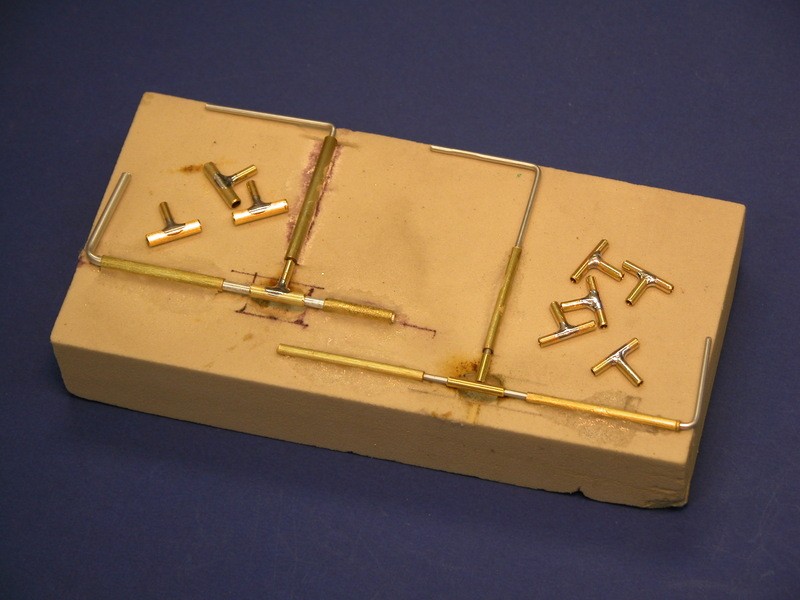
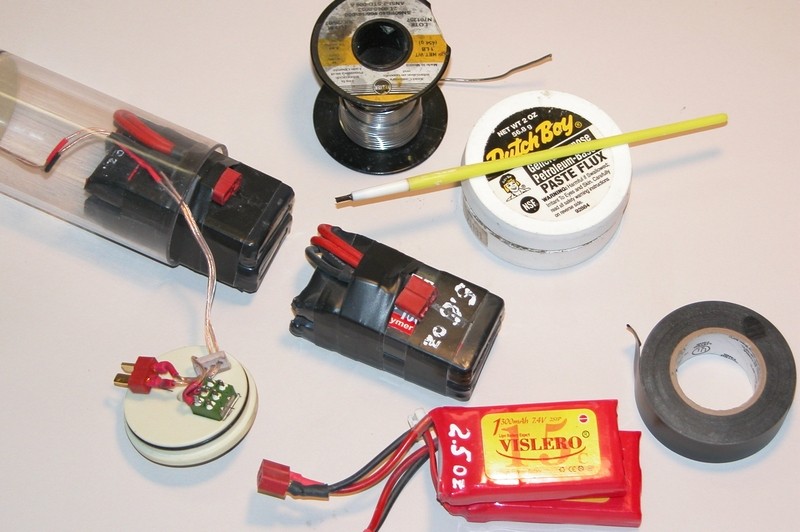
Soldering presents special needs: The medium should be non-ferrous with a high copper content (not always, but a good rule-of-thumb); the work has to be clean and well fluxed; the heat source should have enough calleries to quickly heat the work without being sucked away by adjacent work; and the parts being joined must be held securely till the solder freezes (finger, jig, alligator-clips, etc.).
Acid flux for all non-electrical unions. Non acid flux for all electrical unions.


DavidWho is John Galt?Comment
-
I appreciate the encouraging words. I have absolutely consumed every book and documentary I can find about nuclear submarines. The sheer level of proficiency required for a sailor to be bestowed the title of �Qualified Submarines� just amazes me. Honestly, had I the time to do it all over again, it�s something I wish I could�ve taken a run at.
Anyway. We�ll see what kind of trouble I can get myself into and I�ll report back.
-BradyDead men tell no tales...Comment
-
Well, its been suggested that in an infinite universe there are an infinite number of Earths, going through infinite numbers of time-lines. So, in an infinite number of Earths, you just got your fish slammed into your chest by your sea-daddy. Take heart. (Oh, and in an infinite number of possibilities you are also a serial-killer � and much, much worse).
Food for thought.
DavidWho is John Galt?Comment
-
What does it say that I kind of know what you meant? lol
US Navy Submariners - known for their incredible poise and balance....
Dead men tell no tales...Comment
-
Update: Damn you, Merriman. Happy now? Lol
Still not perfect, but I am much happier with it. Most important, I learned something.
Dead men tell no tales...Comment
-
Much improvement, sir. But way too thick a wire -- looks like a set-piece from the old Invaders TV show!
You can get much smaller gauge copper wire by stripping off some insulation from a length of zip-cord. That small stuff will test your metal as you jig it up, solder, bend to shape, and install.
Try again. Almost there.
DavidLast edited by He Who Shall Not Be Named; 01-08-2019, 05:13 AM.Who is John Galt?Comment
-
Ok, FINE. Slave driving *******.... :-D
That second effort was a product of silver solder and my culinary torch seeing as I still need some rosin flux to go with my haul from yesterday. I thought the paste flux I had at home for the solver solder would work - which it did not. We will see what I can come up with once Amazon comes through.Dead men tell no tales...Comment
-
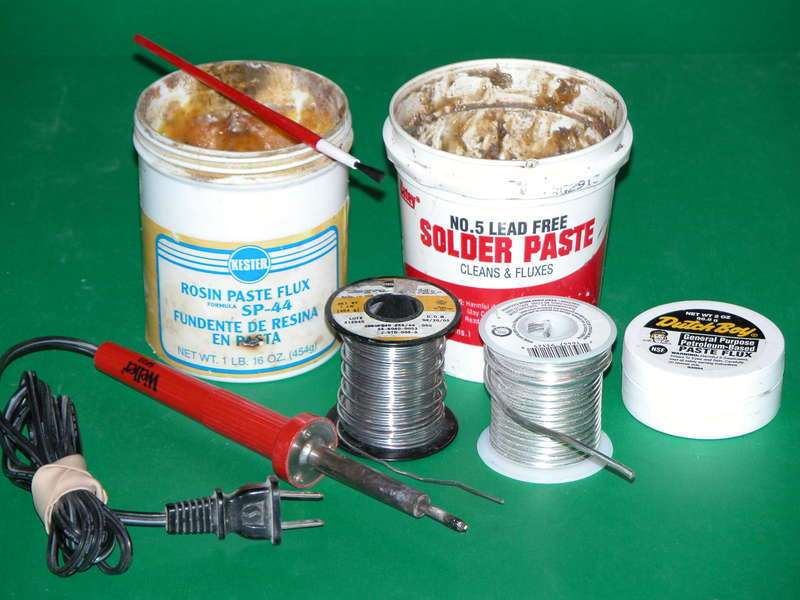
Silver solder is tricky as it has a high working temperature. A better bond, but were' not doing submarine sea-water piping here! Nasty old 60-40 (Lead-Tin) is ideal for our kind of work. Lower working temperature and flows and adheres to the work perfectly. KISS, damit! Get the stuff I pictured a post ago. Lowe's is your friend. An electronics store (damn, I miss Radio Shack) would be worth a good look-see. Failing that look up your local Plumber's supply house. Hell, get the stuff from eBay if you have too!
DavidWho is John Galt?Comment
-
So as to not hijack the Albacore thread, attached are a few of the photos of the linkages, yokes, and results in their current form...
A few notes to clarify...
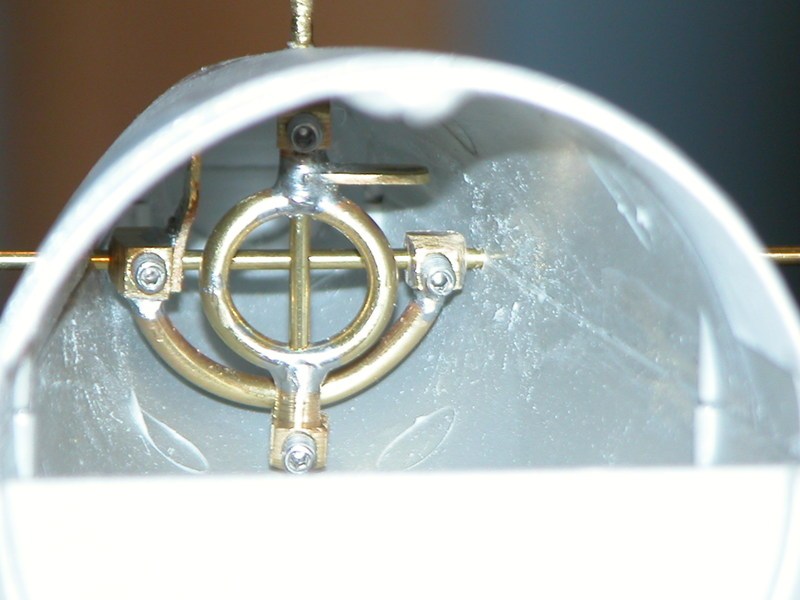
Pic 1 - This is set up using the original set of yokes you sent, David. I managed to get the one for the rudder to work, but had to fabricate the one for the aft planes. The rudder has full travel in either direction, despite just barely eeking by that one collar on the port side of the plane yoke, it does it's job smoothly. I realize now that the control horn on the starboard side is far too short, and that could be the source of the binding you were talking about and the decoupling of the magnet.
Pics 2 & 3 - A close up of the aft plane linkage, and a full-view shot. Sorry for the moody lighting, but my pen light was playing tricks on the camera. As you can see though, it's a pretty straight shot back to the yoke with not a lot of places to bind. Yes, the yoke does touch against the shaft when it's at full-rise, but it doesn't impede anything. Plus it's brass rubbing on stainless steel.
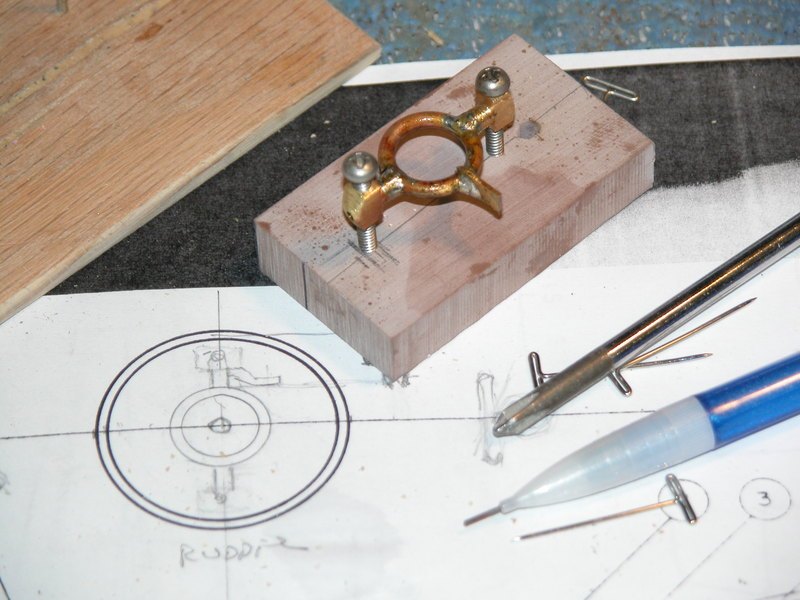
Pics 4 & 5 - Full deflection of the aft planes in either direction. I think, from what I've read of your guys' experience, this should be more than enough deflection for the aft planes, which are connected to an angle-keeper. I've yet to fabricate & hook up the front planes, but they'll be fully operational.
Thoughts?
-Brady
Dead men tell no tales...Comment
-
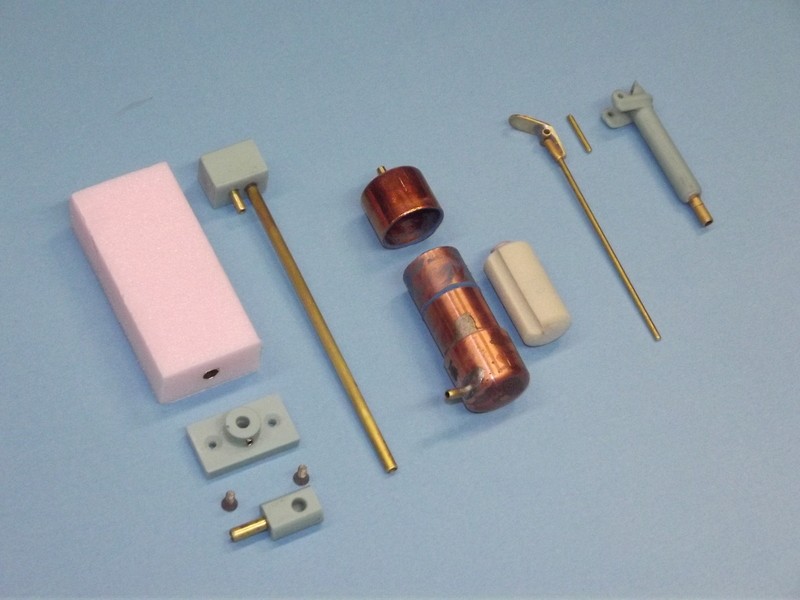
Onto the other matter of the evening - of higher priority than that linkage and the magnet shown above. My gut tells me that there's something not right about my float inside the sail. To be fair, this was one of the very first sub-systems I tried to tackle when I started all this, and I may be working off a bad foundation here.
The float, as I've built it to fit inside the sail is as shown:
Some time back I wrote about getting water in the forward compartment of the sub driver. That's still happening, and I feel like this point in the system has to be the culprit. I have caulked, sealed, epoxied, checked, double-checked, and triple checked every other place I can think of where water could get ingested into the system. Despite it feeling like it gets a good seal when the float is raised, I feel like the interface between the brass tubing and the little blue rubber disc must not be doing it's job. Or the float isn't... floating, properly.
*edit to add - I have also secured the brass air induction tube to the penetration in the upper hull with both CA and RTV at various points, but during all testing, there was no leakage from that part of the system.
Sheesh. You'd think this was my first time doing this or something!Last edited by DMTNT; 01-11-2019, 02:22 AM.Dead men tell no tales...Comment
-
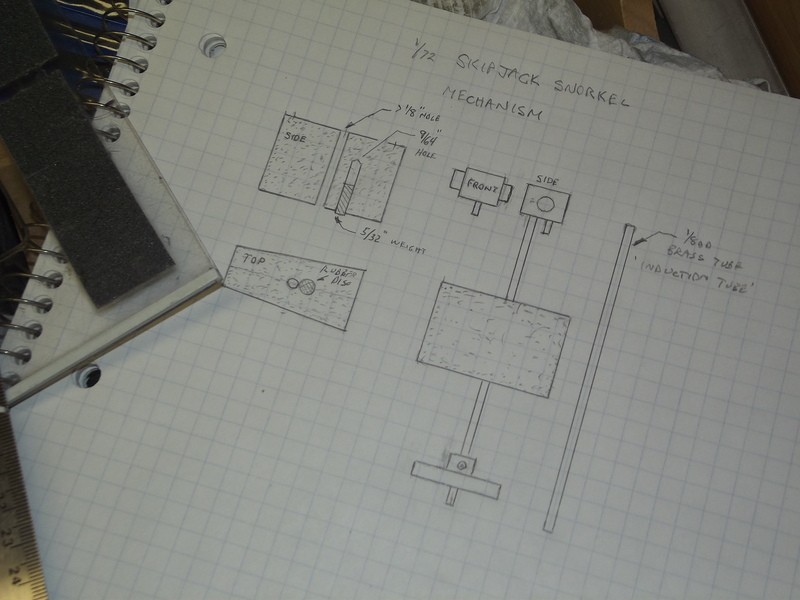
Three things wrong with your embarrassingly ugly and marginally working snorkel assembly:
First, that angled induction tube is inviting a hang-up of the vertically sliding float with attached rubber element.
Second, that very very large intake that mates with the face of the rubber element presents so much surface area that even the slightest of differential pressures between atmosphere and the interior of the cylinder will keep the float valve in the 'closed' condition even when the float rises above the water -- the vacuum will keep it closed.differential force is a function of intake opening area -- the smaller the opening the less force the differential exerts to keep the valve closed.
Third, the center of floatation is so far removed from where the float slides on the induction tube that it invites the slide bushing within the float to kink and jam on the vertical portion of the induction tube.
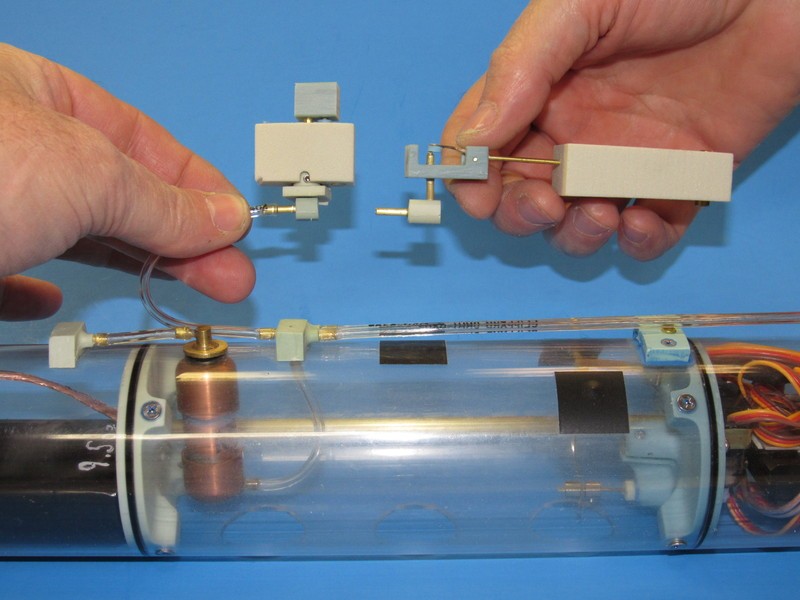
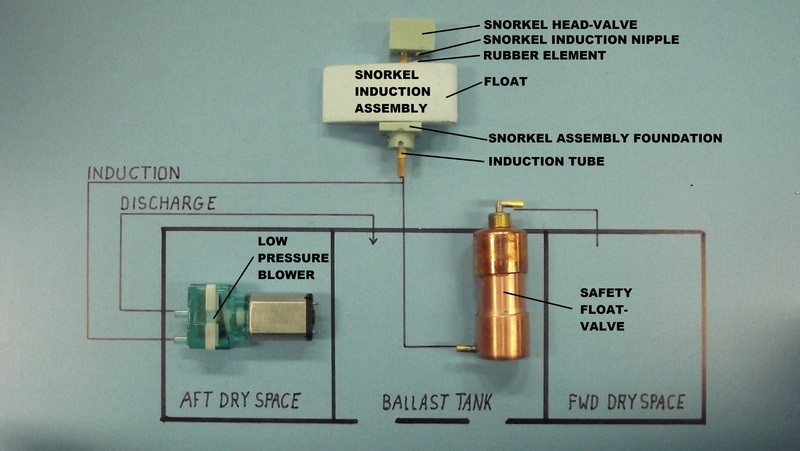
Re-make the snorkel assembly to look like mine. And make the snorkel intake opening .030" diameter.
This is a properly designed snorkel head-valve assembly:


DavidLast edited by He Who Shall Not Be Named; 01-11-2019, 08:20 AM.Who is John Galt?Comment
-
The only bit that�s hanging me up is the resin piece at the top of the induction tube. I need to think about how I�m going to replicate that.
Back to work...Dead men tell no tales...Comment


Comment