
 Tweet
Tweet
She's looking fantastic! I would never guess she was a Robbe kit.
-
-
Yeah, that looks fantastic! Really well done and will look great in the water. Amazing work sir!If you can cut, drill, saw, hit things and swear a lot, you're well on the way to building a working model sub.Comment
-
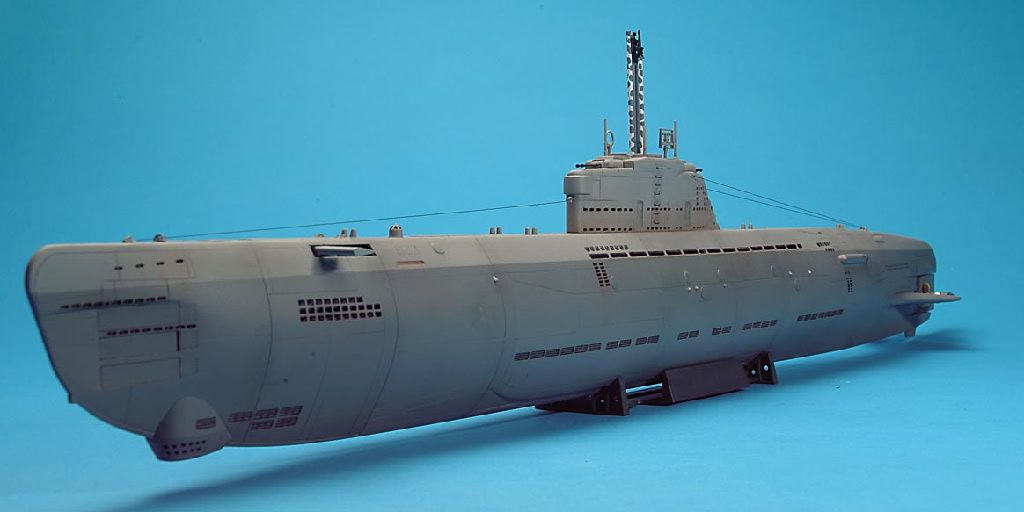
hanks guys, there's very little 'Robbe' left, but I'm trying to prove that the kit is a reasonable candidate for upgrading to a scale sub.
I understand Krick have acquired the Robbe tooling, I wonder will any ex-Robbe kits appear soon, the Type VII is covered by Engel, Arkmodel, OTW and others, but I would love to get the their Type XXI. Robbe ceased before a lot of XXI kits were made, so they are much rarer than the VII, any second hand unmade kits that appear usually go for stupid money.
Rob
Last edited by The Boattrainman; 01-14-2019, 06:25 PM.''We're after men, and I wish to God I was with them........!''Comment
-
I built the Type XXI back in 2007. Its a wreck now after 4 moves, my Friend Carl is re-building her... I have had a look at what Krick has released so far under the RoMarine line. They have many parts for both U boats available including cylinders and end caps, however, they haven't released the full kits yet. I am interested to see which one they do release (if at all).Comment
-
Painting is taking way more time than I anticipated.
I was optimistic in thinking I'd have to fill/sand/spray/repeat the hull sections four times, I've lost count of the number of times at this stage, there were endless nicks and marks from so much scratch building.
Anyway, as each of the hulls dries, I've finished the tower (except for the gun which I broke).
After the Halfords Car Primer, I used Humbrol acrylic spray cans for large areas and small tins of their enamel with a brush for everything else. The tower deck and the boat deck were wooden over thin metal and covered in a thick black preservative over the wood. I hand painted with black enamel and I've added some brown shading, but it will need more.
Apart from weathering the wooden seat and tower side pieces with a dark wash, I'll leave weathering till the Matt Varnish (Rustoleum) has dried. Won't be going for a very distressed look (I don't have the skills for that anyway), as the sub depicted is from early 1941, it doesn't require a heavy weathering. The most important thing is that it all knits together, so I will tone down any jarring colours (the white of the compass dial windows is a bit too white).
The BoattrainmanLast edited by The Boattrainman; 01-17-2019, 02:15 PM.''We're after men, and I wish to God I was with them........!''Comment
-
Finally got the hull painted, ten days of work.
It's a bit bland at the moment, will have to highlight the weld doublers and a few other features.
For the purists (those that know their 'dunklegrau' from their 'hellgrau'), I went with what I could get (Humbrol Acrylic sprays light grey 64, and dark grey 67). Are these the authentic colours for U557? It's unlikely these are exact matches, but I don't care. The argument over precise pigmentation is muddied by the scarcity of colour pics, the conditions under which the few colour pics were taken and even the camera exposure at the time (no digital photography in 1941!!!!!)
The hull split point is fairly well hidden in the two tone paint.
On to paint the deck, a very complicated masking job will be required.
Many thanks to Tom (Trout) he very kindly offered some help, which I may take up in due course, a gentleman.
The BoattrainmanLast edited by The Boattrainman; 01-18-2019, 12:50 PM.''We're after men, and I wish to God I was with them........!''Comment
-
A stunningly well crafted model, sir. You've taken us all back to school. The detail is simply marvelous!
DavidWho is John Galt?Comment
-
Thanks David, encouragement much appreciated.
Still a way to go, but at the least the end is in sight (I think).
rob
''We're after men, and I wish to God I was with them........!''Comment
-
Its hard to believe that this started life as a Robbe kit boat. Amazing attention to detail and dogged determination won out ion the end. Well done.Comment
-
Thanks buddy, or you could say, a touch of insanity, trying to make this work.
I still regret some choices, the prop shaft shrouds aren't right and the rear flood drain holes are skewed a bit (no choice on that one).........but there's a point where you just have to say it's the best you can do starting with such a problematic kit. Anyway, all the major (and most of the minor) features are intact for U557.
However, it's case closed for the Robbe kit (maybe if it's re-released by Krick), the basic kit can be fettled into a decent sub. In future if I see or hear the it getting a bashing I'll be saying that it's entirely possible with a bit of effort to make a decent U-Boat out of it.
It's still a bit early as i've a good bit to go but as every model is a learning curve, a couple of things I've noted. A project list is a must to keep the focus and energy going, ticking each item off the list is very satisfying, there were over 100 modifications required. It's vital not to sweat the paint process, learning a few basic techniques to fix over-spray marks and not to panic by an odd broken item by rough handling.
Also, given how long the process is, I will always take a few weeks away from the build, just to think about the process made and re-charge the personal batteries.
Aiming for a spring launch, that'll be 2 years from the start of the build.
Rob''We're after men, and I wish to God I was with them........!''Comment
-
I cannot believe that time has flown by like it has! This sub is truly outstanding.If you can cut, drill, saw, hit things and swear a lot, you're well on the way to building a working model sub.Comment
-
My replacement AA gun arrived from Accurate Armour and what a disappointment.
It is to 1/35 scale and is very accurate, but very fragile and made from the weirdest plastic I've ever seen, soapy and waxy. Just can't use it, except for the base which is more to scale than mine. No criticism of Accurate Armour, the item is just not meant for R/C.
So I used my overscale but tough gun and mount, all heavy plastic and brass, hope it lasts.
Finished the deck painting...............
..........however, all has not gone to plan.
There is a good deal of variable finish, some flat, some semi matt etc., no idea why this has occurred. Despite three coats of flat matt varnish it perisists, will set it aside for a few days to thoroughly dry then sand the deck back to black and go again............a mystery............and a pain in the ass!
The BoattrainmanLast edited by The Boattrainman; 01-23-2019, 05:07 PM.''We're after men, and I wish to God I was with them........!''Comment
-
Down to the final details.
One of which is that U557 had a distinctive crest on the tower, the town emblem of Dusseldorf. No picture I've seen has this clearly, however I'm using the position from U201, the most common position for a crest design. In fact for U201, the boat had the crest eventually cast as a metal plate and bolted to the tower, whereas most tower art is painted on by crew and workers at the re-fit.
So the Dusseldorf Town emblem will go in the tower centre front above the spray rail. I downloaded the crest from the web and made various sizes to print onto matt vinyl adhesive paper, which I varnished with acrylic spray to fix the design once carefully cut out.
Once stuck in place, it gets a shot of sealer and I will tone it down later as part of the weathering process.
I also printed some compass rose designs on the same sheet, they needed to be 3mm round a very tricky item to cut out for both compasses.
That's the tower fully finished.
The BoattrainmanLast edited by The Boattrainman; 01-24-2019, 03:33 PM.''We're after men, and I wish to God I was with them........!''Comment
-
Congrats, Sir. Expecting to see her perform on water. Sure it would be incredible.Comment
-
So I made a set of aerials/rigging earlier in the build.
But these now appear crude now that the paint job is finished.
I've assembled a kit of parts to make more scale aerials....................left to right............
..........................3mm heat shrink sleeves, walnut blocks for the insulators, a plastic piece for the triangular join of the forward aerial, plastic pieces for the tensioners, four bottlescrews for the deck protection wires and 1mm brass s-shaped wire for connectors (have to sacrifice the scale look in order to get the aerials off).
The aerial wire itself is good quality 1mm rigging thread, 20 feet of it is hanging from weights from the ceiling to take any stretchiness out of it, plus it's layed with a bees wax block to smooth out any loose hairs. The bare wire is fine copper wire twisted in a drill for the jumper wires from the tower to the aerials.
The Boattrainman
Last edited by The Boattrainman; 01-25-2019, 04:13 PM.''We're after men, and I wish to God I was with them........!''Comment


Comment