USS Marlin

Collapse
X
 
  • Time
  • Show
Clear All
new posts
  • trout
    Admiral
    • Jul 2011
    • 3547

    #31
    The original cabal report?
    https://support.caswellplating.com/i...c-instructions
    There is a PDF link at the bottom of the page.

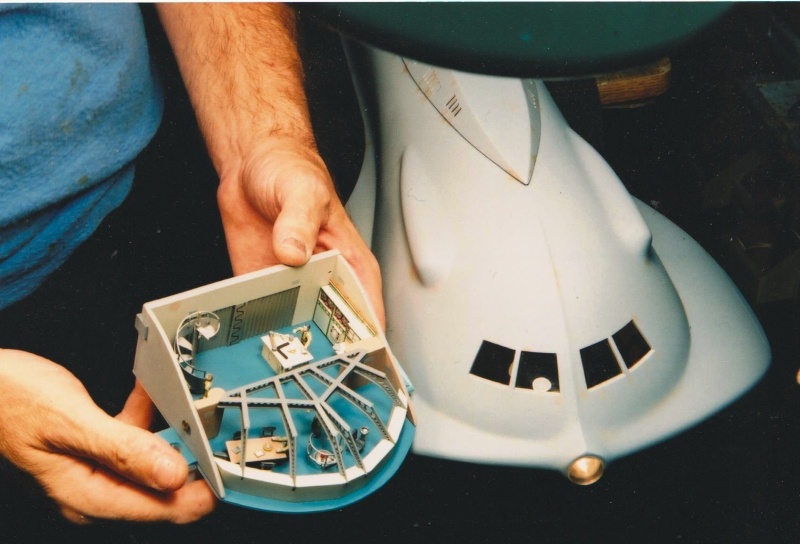
    I made notes where I thought errors were made (like the vent holes on the front deck).
    Last edited by trout; 03-30-2016, 08:51 PM.
    If you can cut, drill, saw, hit things and swear a lot, you're well on the way to building a working model sub.

    Comment

    • Ken_NJ
      Captain
      • Sep 2014
      • 772

      #32
      Thanks. I was reading you build and wanted to add your findings.

      Comment

      • trout
        Admiral
        • Jul 2011
        • 3547

        #33
        Ken,
        You are welcome!
        Peace,
        Tom
        If you can cut, drill, saw, hit things and swear a lot, you're well on the way to building a working model sub.

        Comment

        • Ken_NJ
          Captain
          • Sep 2014
          • 772

          #34


          So what to do to detail the sail? I never did scribing before. This is where Tom told David about my Marlin build and David and I started conversation through email. He encouraged the hell out of me to do the scribing. So I bought some tools from Harbor Freight and practiced. I cut brass templates to use as a guide. Time to simulate some panels. After roughly scribing them out, cleaned them up with an assortment of tools, the back of an Exacto blade works well. Viola! I have panels.

          I had to reduce the picture size to upload them, otherwise the forum said they were too large. Well now they are too small to see. Have to figure this out. Harumph!

          BTW, check out this video.... https://www.youtube.com/embed/ByGSMmenPDM?rel=0!
          Attached Files
          Last edited by Ken_NJ; 04-07-2016, 12:37 AM.

          Comment

          • Ken_NJ
            Captain
            • Sep 2014
            • 772

            #35
            Here's the error I'm getting. I reduced the file size as much as I could, same error different numbers.

            Comment

            • trout
              Admiral
              • Jul 2011
              • 3547

              #36
              Ken ,
              My camera makes the initial JPEG photo at 50-some inches, I first reduce that to 11 on the long side. Then the pixels can make it large too, reducing them to under 100 helps. Can your software do those adjustments?
              Peace,
              Tom
              If you can cut, drill, saw, hit things and swear a lot, you're well on the way to building a working model sub.

              Comment

              • Ken_NJ
                Captain
                • Sep 2014
                • 772

                #37
                Here's the size of an untouched photo. The pics in post #34 were reduced to 80% but when you view them they are hugely smaller than previously posted pictures. I suspect the problem is not necessarily file size, more of a problem with picture size. But I don't know why if I reduce them to 80% original size they post on the forum A LOT smaller.

                Comment

                • trout
                  Admiral
                  • Jul 2011
                  • 3547

                  #38
                  Ken, Try this, on width go to 11", then see if the file size is O.K., if not turn resolution to 100 instead of 300.
                  If you can cut, drill, saw, hit things and swear a lot, you're well on the way to building a working model sub.

                  Comment

                  • Ken_NJ
                    Captain
                    • Sep 2014
                    • 772

                    #39
                    Trying all sorts of things with picture sizes and resolutions. Have not found the right combo yet.
                    Last edited by Ken_NJ; 04-01-2016, 10:09 PM.

                    Comment

                    • trout
                      Admiral
                      • Jul 2011
                      • 3547

                      #40
                      Ken, another try this, try editing your post. When you do you should see the ability to change the size of your photo. Try full size for fun.
                      If you can cut, drill, saw, hit things and swear a lot, you're well on the way to building a working model sub.

                      Comment

                      • He Who Shall Not Be Named
                        Moderator
                        • Aug 2008
                        • 12311

                        #41
                        Originally posted by Ken_NJ
                        I followed the plans Skip supplied to mark off the vent holes. Created a plywood jig to give me a guide line to start with. Used a thin piece of wood to get the downward line going forward. Once they were all located started with 2 small drill holes in each vent.

                        Getting errors when I attach pictures, arghhhhh. It does not let you put picture in the proper order either. Hints anyone?

                        Use an outside picture valt; a host-site. That's the only way I can get big format pictures to post to this site.

                        Who is John Galt?

                        Comment

                        • Ken_NJ
                          Captain
                          • Sep 2014
                          • 772

                          #42
                          Yea probably be best at this point David.

                          Comment

                          • He Who Shall Not Be Named
                            Moderator
                            • Aug 2008
                            • 12311

                            #43
                            Originally posted by Ken_NJ
                            Yea probably be best at this point David.

                            I know it's a pain-in-the-ass to load your picture folders to the outside host; then catagorize them; then have to post their discrete codes to the text of a WIP, like the one you're currently working working here. But, I've found it the only way to get big format pictures to show here. And, anyway, Ken -- it's the one format (for pictures) that works at almost all the other sites that deal with r/c submarines.

                            You're doing an excellent job of chronicaling the super detailing you did to that very basic vacuform kit -- it's a crime not to get the big format pictures to accompany your text.

                            Bite the god-damned bullet and use a picture hosting site, ******! Right now your WIP is eye-strain city!

                            M
                            Who is John Galt?

                            Comment

                            • Ken_NJ
                              Captain
                              • Sep 2014
                              • 772

                              #44
                              And so it is David. Here I started bending thin brass items for the sail. Not sure what the device is with the wire cage around it, last 2 pics, was not easy to get it soldered up. From here on out the pictures will be big. Not spending time editing pics. Good for us older folks. :)


                              Comment

                              • Ken_NJ
                                Captain
                                • Sep 2014
                                • 772

                                #45
                                So many pictures to go through and organize and upload in some type of order, yea a real PITA.

                                At the point now doing ladder rungs, hand rails and scribing, so the pictures are a bit mixed. When scribing, no room for making mistakes, you don't want to slip doing this. Not easy to fix slip ups.


                                Last edited by Ken_NJ; 04-12-2016, 06:06 AM.

                                Comment

                                Working...