
Here is a zoom and highlight on the bridge: Looks kinda crowded , dont it?

-
Last edited by greenman407; 08-15-2012, 03:59 PM.IT TAKES GREAT INTELLIGENCE TO FAKE SUCH STUPIDITY! -
Here is an Akula from WW1. Not much help here, am I?
IT TAKES GREAT INTELLIGENCE TO FAKE SUCH STUPIDITY!Comment
-
Thanks greenman... Struth that bridge does indeed look kind of crowded. I told myself that after the scratch build of the salon for the 1/69 scale disney Nautilus I wouldn't tackle anything that small for detailing again that wasn't part of a kit!! BTW I love the sub pictures you find & post so I just want to say thanks for all the effort you do there.Cheers,
Alec.
Reality is but a dream...
But to dream is a reality
Comment
-
Okay so far things are pretty much true to my timetable!!! I have done the electronics and fitted out the wtc and installed the basic mast setup less the top decorative bits. Hell I even bit the bullet and hot wired the rx bypassing the bec. Tested it and it all seemed good on the bench. I even managed to get the pump/ballast system going right down to the tip Chris has about setting the servo so that there is a slow 'leak' back out of the ballest inlet/out let hose. However tonight will be the first tub test to see if I got it all right... I'l test the wtc solo first and if all is well it will be in the sub and on to ballast n trim The TitanicCheers,
Alec.
Reality is but a dream...
But to dream is a reality
Comment
-
You better be careful. The way you are going at it youll be done in no time. Then what are you going to do with your time........................buy another one?IT TAKES GREAT INTELLIGENCE TO FAKE SUCH STUPIDITY!Comment
-
LOL... Mmm another sub??? But no fear of that yet as painting & weathering will no doubt take longer :P
Now having said that, I had fitted on all the running gear reinstalled, wet the wtc, then fitted & tested it the sub. As well as having it trimmed & ballested completed in just over 3 hours. I reckon the freeboard is just a bit low by by about 6mm but I'm good with that. As for the "slow leak" from the ballast tank safety set up I ran that test last as I cleaned up. With a full ballast the sub sat on the bottom of the bath... sorry, test tank... I set the valve to the fully closed position then the timer and left it to do its thing. Ten minutes later went to check and it had surfaced to show 1/3rd of the sail. So I am thinking that out in a deeper pond with greater water pressure than 40cm's of bath water it would properbly take a bit longer..... But it does what Chris said it would do
Most of this weekend is pre-booked with family things I doubt'll get much more done other than finishing off the mast array and shooting on at least one coat of primer. :(Last edited by alad61; 08-17-2012, 09:54 PM.Cheers,
Alec.
Reality is but a dream...
But to dream is a reality
Comment
-
As predicted not much done over the week end...
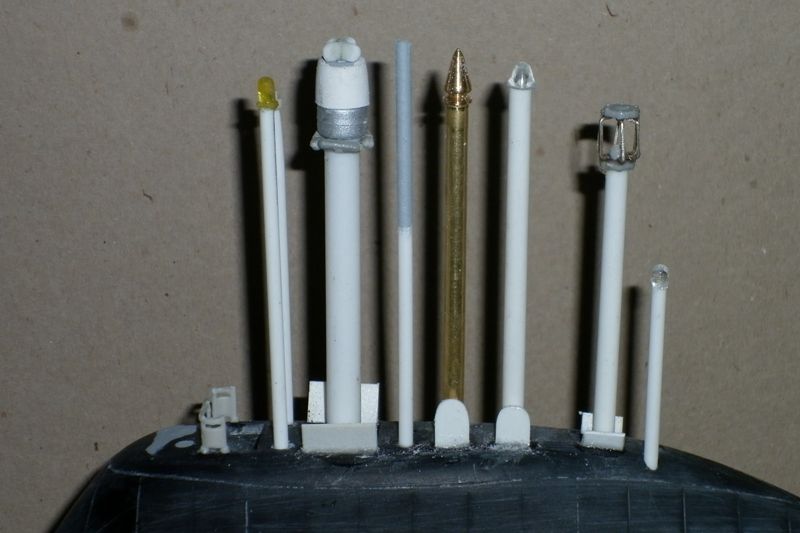
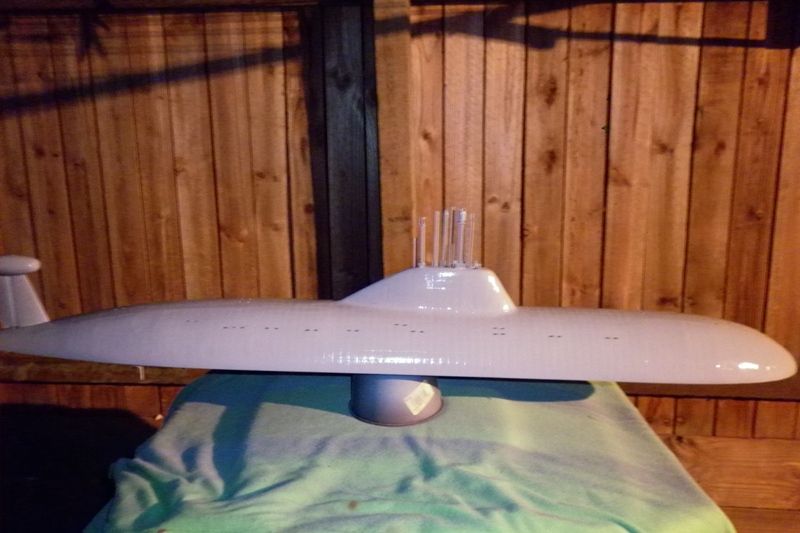
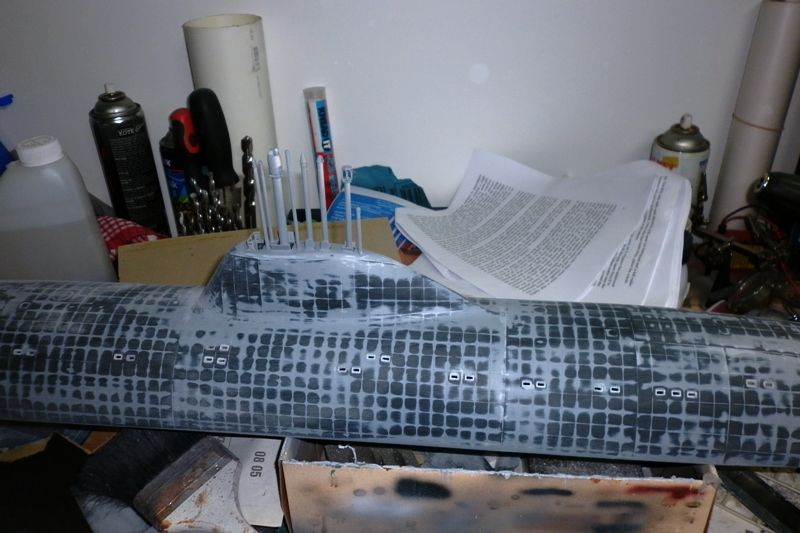
The mast array is now completed. It looks a bit crowded but I pretty much got the look I wanted all with just some plastruct tube, sheet & rod along with various dodads from the bits box. I should point out that the brass piece was kindly made by Chris at Sheerline. Some of the mast I have seen on the web & you tube re model Akulas often show much longer stems, however I tried to keep mine more to scale... I hope.....
As for priming and filling the hull I tried just using my surface/primer on the lower hull piece but that didn't really help with the tile pattern. So on the way back from the in-laws, where we had spent most of Sunday steaming and stripping 30 year old wall paper of walls, I grabbed some spray putty to use on the sub... You can still see that the tile pattern is still pretty dominant and there are some deeper lines from the molds to sort out. However after a really good sanding and then applying the first run of spray putty it came out much better. That may how ever change after the putty has dried over-nite to be sanded...
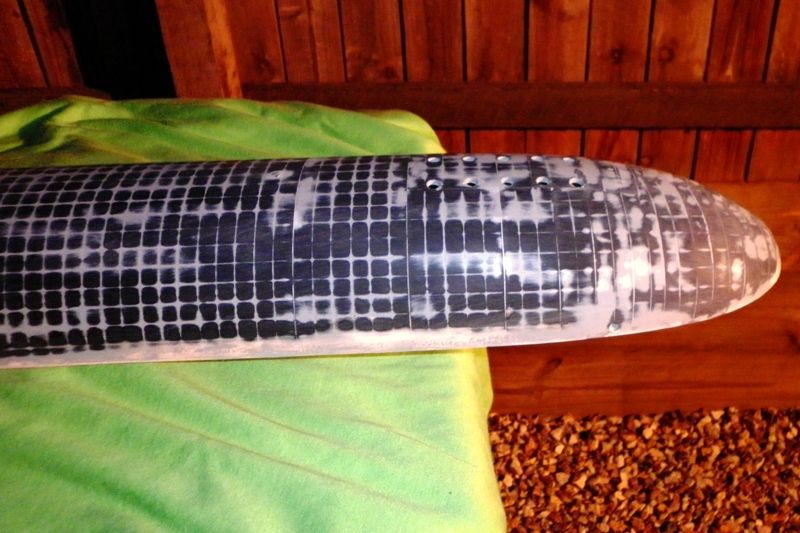
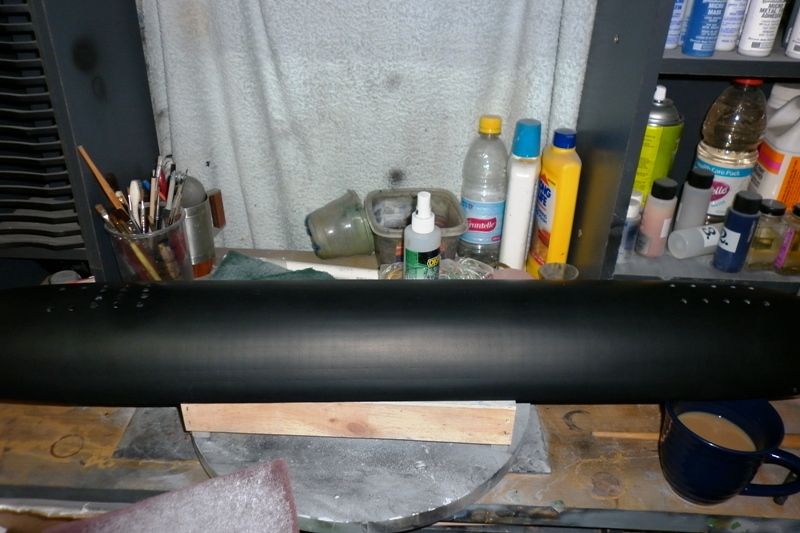
As for the top hull it has had a very liberal coat of the spray putty. But closer inspection showed much the same as the bottom hull with regards to the deeper mold lines and tile pattern... The only good picture I have of the top hull is just after the spray putty was applied... I reckon even after sanding it will need another cote of putty before the primer goes on.
 Cheers,
Alec.
Reality is but a dream...
But to dream is a reality
Comment
-
Man, your moving right along with it.IT TAKES GREAT INTELLIGENCE TO FAKE SUCH STUPIDITY!Comment
-
An update on this weeks progress...
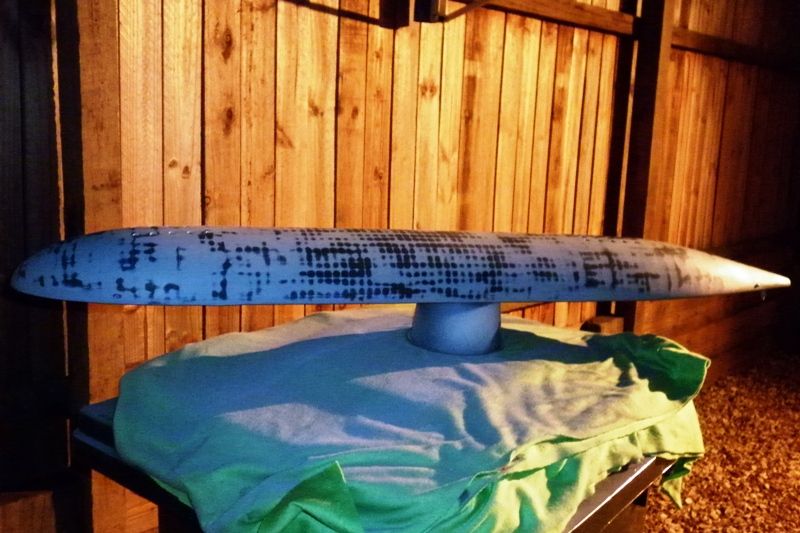
Essentially more sanding, filling and spray putty before moving on to a primer/ surfacer then finishing off with the final primer and base coats. Like the lower hull piece the top required sanding, putty, sanding, putty... well you get the idea. in the end you can still make out the tile pattern but it now more subdued and scale like. I also noticed that in certain pictures of the subs class, that there is a tile pattern that can be seen
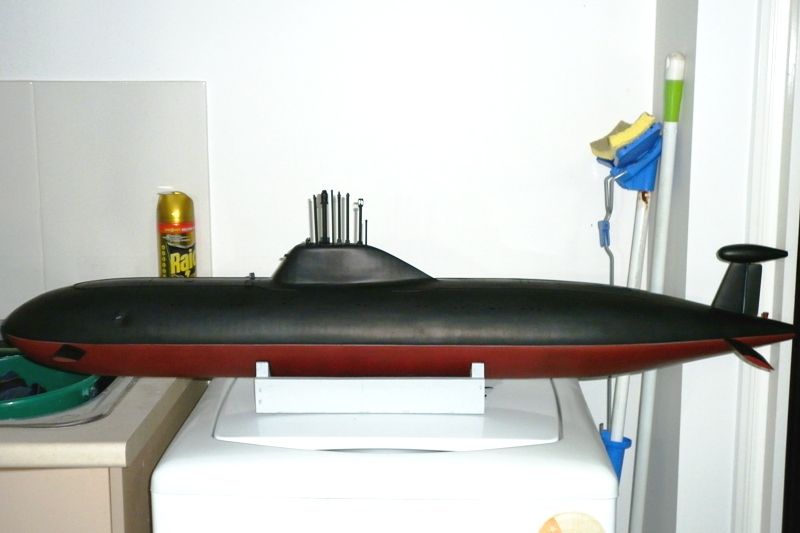
The lower hull with its sanding n putty done and then primed and base coated in a flat black. I also decided to paint the model with the lower half in a hull red colour scheme as opposed to an all black scheme.
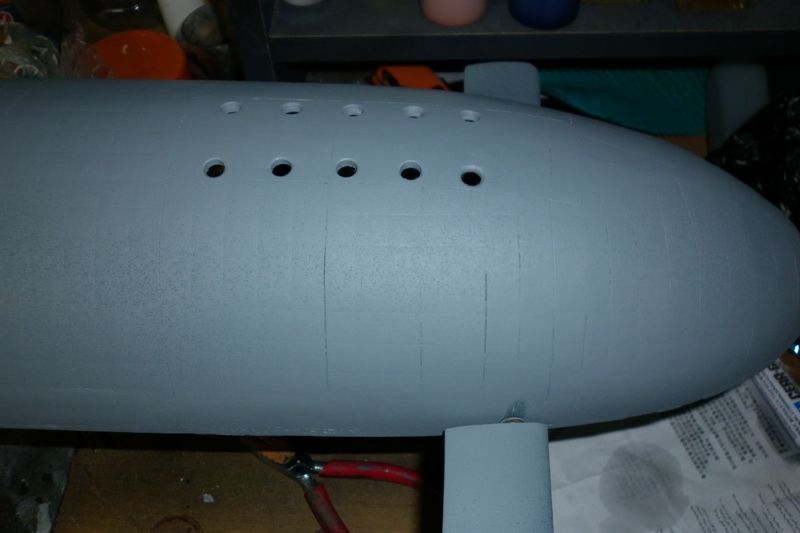
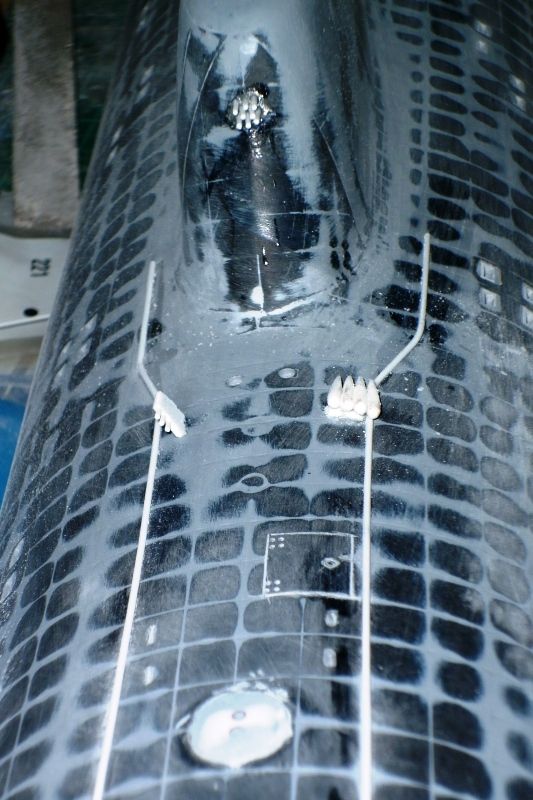
Also during the week I added some extra detail to the top hull in the form of raised discs for the emergency escape hatches and re scribed some of the other detail as well as adding the additional sensor/sonar systems and the piping / tubing on the deck which I take it as being a sort of safety-line runner that I had seen in some pictures. I am also aware that the mast system is a little out of scale as well compared to the sail, but that is not true either as I reckon it is about 20-25mm to short so what the heck.
Two things went against me when I painted the lower hull. Firstly the red I chose was wrong, A: it came out of a rattle can and B: it was to was to bright n clean, in fact it would have looked better on a model fire engine!!! Then to add some more misery the hull fell to the floor as the red was drying which required some more sanding and filling!! I also tried to salvage the red by giving it an all over rub with 400 grit wet n dry. which by the way didn't help so it was a complete respray.
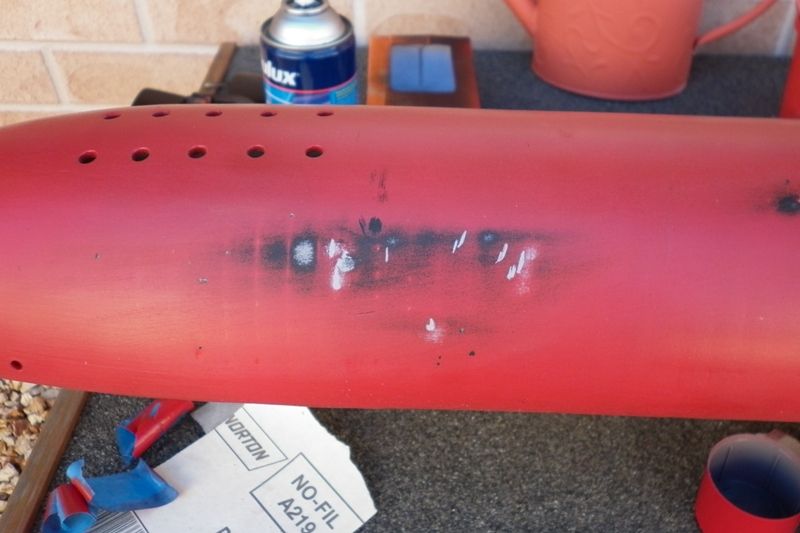
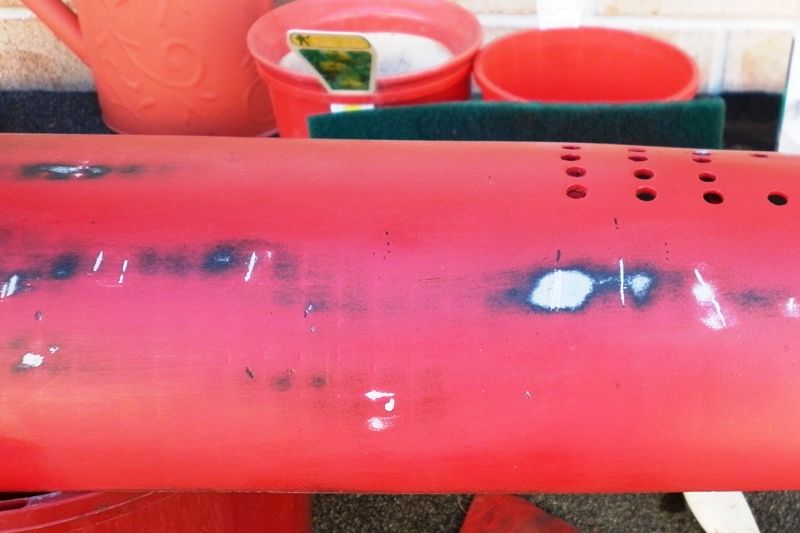
But those pesky gremlins still hung around playing havoc with my primary airbrush causing it to blow out the thread on the fine air adjuster. But I tricked em by whipping out the back up airbrush. Ok yes you can still see some tile pattern artifacts under the paint. but over all they are well disguised beneath the paint...mostly... After applying the second red on the hull I shaded it with some red wash for some added depth. The top hull came out pretty good after its final sand, putty, fill, primer and initial base coat of a flat black.
 .
.
That's about all I will do re the paint job at the moment till after its open water test which all thing going to plan is tomorrow when I take out the Gato for a run. I have a few ideas on weathering as well as some additional paint detail which I reckon I can do ok. However I got some dry transfers for some hull markings, something I have never used before so if anyone has some pointers on how to apply them that would be excellent and greatly appreciated too.Cheers,
Alec.
Reality is but a dream...
But to dream is a reality
Comment
-
You'll want to lay a clear-coat over the dry-transfers or they'll 'rub off' the model when handling. Looking good so far.
DavidWho is John Galt?Comment
-
Coming along nicely. I think all those masts will almost double the drag of the hull.
Whjen Dennis Cater was producing these boats as 'Eden Models', he used to mould the bottom half of the Akula and Ohio hulls in red gelcoat. I think I'm right in saying that it was Chris Cloak who chose to start moulding them all in black, probably becuase most people sprayed them up that way anyway. You seem to have gone in the other direction.
Are you going to paint a scum line on this boat?Comment
-
It looks great! I like the subtle tile effect and the simple beauty of this Akula. Great job Alec!If you can cut, drill, saw, hit things and swear a lot, you're well on the way to building a working model sub.Comment
-
Looking good Alec! I found it helpful to tape down the dry transfer edges so that you can fiddle and adjust their alignment and also you dont have to worry about them moving around on you. Also, pull the paper up slowly and look underneath it before you just pull it all the way off. If the transfers dont all come off you can just lay the paper back down where it was and go over the parts that didnt transfer. This is where the tape comes in. That way you are assured that you are still in alignment. Dave suggests using a pencil point so that as you rub it down you can see where you have been and where you missed.IT TAKES GREAT INTELLIGENCE TO FAKE SUCH STUPIDITY!Comment
-
Thanks David.
I had assumed that a clear coat was a given after they are down but what about before? Do dry transfers suffer the same silvering effect as wet decals do over a flat base?
Thanks as well Subculture.
What I show in the above posts are just the base colours which will be weathered up/down after the open water trials. Of which I did today with great success, damn I may just be getting the hang of driving rc subs. Which leads me to the mast and drag issue. If there was anything that was a negative it certainly wasn't the masts, except they make a great rake for that awfull aquarium weed that infests the clubs lake. What I did like about them was that running the boat out in the distance with the masts only just broaching gave me a good visual reference with the wake they produced. Now as for the colours... Yep that's me going left when the rest of the pack go right... I pretty much decided from day one that I would do the red lower hull just to be a tad differant, as all the videos I had seen on you-tube show only an all black sub. No disrespect to those that went that way but for me is just visually boring!!
Cheers Tom. They did come out nice hey... I must agree that out of many of the nuke subs the russkies do have nice designs. A dream boat for me would be one of those 1/72 foxtrots
Thanks also Mark and thanks for the heads up applying them. It sounds like those letracette things that were around when I was a kid.
So as I mentioned in reply to Subcultures post I took out the Akula along with the Gato to the lake today. :wink: I have got to say that both boats performed above and beyond. The only thing that bummed the day was the Tx running out of battery and guess what I left back home on the bench?? But aside from that my first test today was the "will she rise up again" test. As I said in an earlier post I had set the ballast pump servo so that the inlet/outlet tube has a slight 'leak' as per Chris's assembly instruction. In the tub test at home it took about 10 minutes for it broach about 1/3rd of the sail. Now picture this... Here I am stepping onto the dock amidst the yachties all ready there, all of whom know of my infamous crash dive of my Gato some months back. Trailing from the rear of the new boat is some fishing line connectted to a cast reel. We Aussies are know for our good nature d sarcastic wit and quips so no-one let me down in that area... LOL Taking the giggles in my stride I lowered it into the water and turned on the pump and we all watched as she glided under the surface to the murky depths below, some 5 feet down to rest on the bottom. Yes more quips and comments were made by all though mine did have a nervous hint to them. So for the next 30-40 minutes I bussied myself with trying to get my little target boat going for a few minutes but it was misbehaving... So out it came to my table for an autopsy and it turned out that the batteries was a bit off due to a dodgy cell. Some more time transpired as I chewed an apple and chatted with the target guys n gals and checking the tether line to the sub to find it giving some slack and rising from the murky waters was the dark shape of my sub and within another 5-10 minutes the masts and sail broached the surface... Woo-whoo!!
For the next two hours I sailed above below and in between the sail boats on the water. Remembering that most of them have those long keels probing the depths ready to sheer off the masts of unsuspecting u-boats. I have to say that seeing the small wake, caused from the Akulas masts just skimming the surface as it cruised with only my thumb on the throttle stick gliding like a fat red bellied black snake in the water was a great feeling. Around lunch I decided to give the Gato a run, well it was all pre-mission preped so it needed to get wet. Apart from that ******* listing issue and that the nose is slightly over buoyant I was still able to run some long sweet runs at periscope depth and lower also weaving in and around the surface targets. I even managed to line up some wonderful torpedo alleys too. :biggrin: It was certainly one of those days where I'd wished I had a video camera going!!!
But now I'm off to check out any and all info, tips and cabel reports on weathering & detailing the Akula...Cheers,
Alec.
Reality is but a dream...
But to dream is a reality
Comment


Comment