Welcome to our forums. For the best in R/C submarine kits, components and accessories, be sure to visit the Nautilus Drydocks
If this is your first visit, be sure to
check out the FAQ by clicking the
link above. You may have to register
before you can post: click the register link above to proceed. To start viewing messages,
select the forum that you want to visit from the selection below.
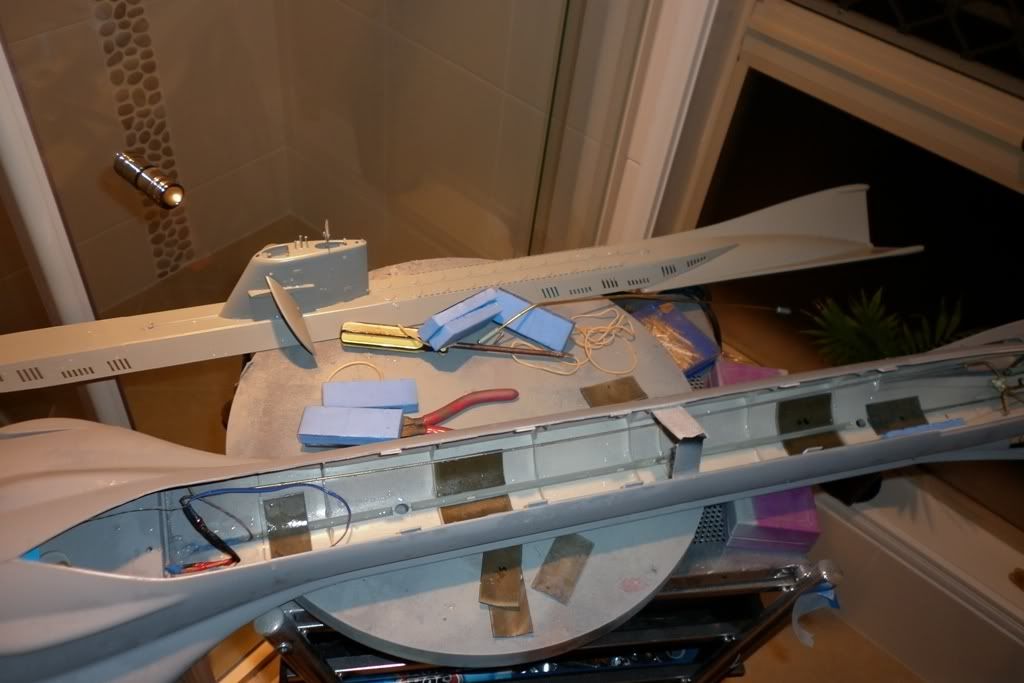
Sorry I should have been more specific... they pretty much travel 10 each way so thats one less worry. I started setting the trim tonight but I buggered up my centre of gravity. I added some 40x25mm lead sheet tacked in place with some blu-tac sat in some water to see where she sat. The super structure was aft heavy so I started adding the foam and got the deck sitting almost right so being clever(NOT) I removed some of the lead, sat the foam lower but all I managed was to get it keeling over. One part of my brain knew what was wrong but the rest was going "Doh!" The harder I thought about it the muddier it got so tomorrow is another day. Good thing I number the sequence of lead strips.
Cheers,
Alec. Reality is but a dream...
But to dream is a reality
You're right. Sometimes you just got to push yourself away from the bench, kick the cat, pop a cool one, and think it over. Coming back to the problem fresh the next day.
I'm supposed to God-almighty in this game, yet I routinely continue with the dumb-**** moves when it comes to initial trimming of a boat -- that's why I do it under cover of darkness, with no witnesses around to tell the tale.
You're doing fine. You'll get it eventually.
The below shots will help you get an idea of how I distributed all of the weight and some of the foam in the boat. Not much foam was stuck in the superstructure owing to the boats very high freeboard in surface trim -- I needed all the buoyant elements under the waterline.
And don't forget: the job is not done after you've finished assembling, painting and trimming your SEAVIEW. You have to protect it. Build a transport-storage box like the one I've shown in the last photo.
Last night was what I would term fairly succesfull. A new day and less over thinking yeilded a good result with trimming. Thanks for the pics David they helped tremendoulsly and a differant foam also added to the result. I will try to post up some trim test shots this weekend. Where I'm at now is a with the free board water line just runneing under the bottom edge of the sonar bumps and level down to the keel under full ballast the deck is only a couple of millimetres off full wash, I do have a piece of foam evenly spaced under the super structure which is proberbly holding the neutral a bit high. So I'll do another tub run without that and see where it sits. Other wise I am very happy with the trim. All the pictures I' seen have her free board with the windows out of the water line yet shots showing the launch of the flyining sub seem to show the windows just beneath the surface... Struth you gotta love good continuity ;) LOL.
Cheers,
Alec. Reality is but a dream...
But to dream is a reality
Ok I think I have got the final trim done. I had a couple of glitches on the way but I'm pretty confident I got there...
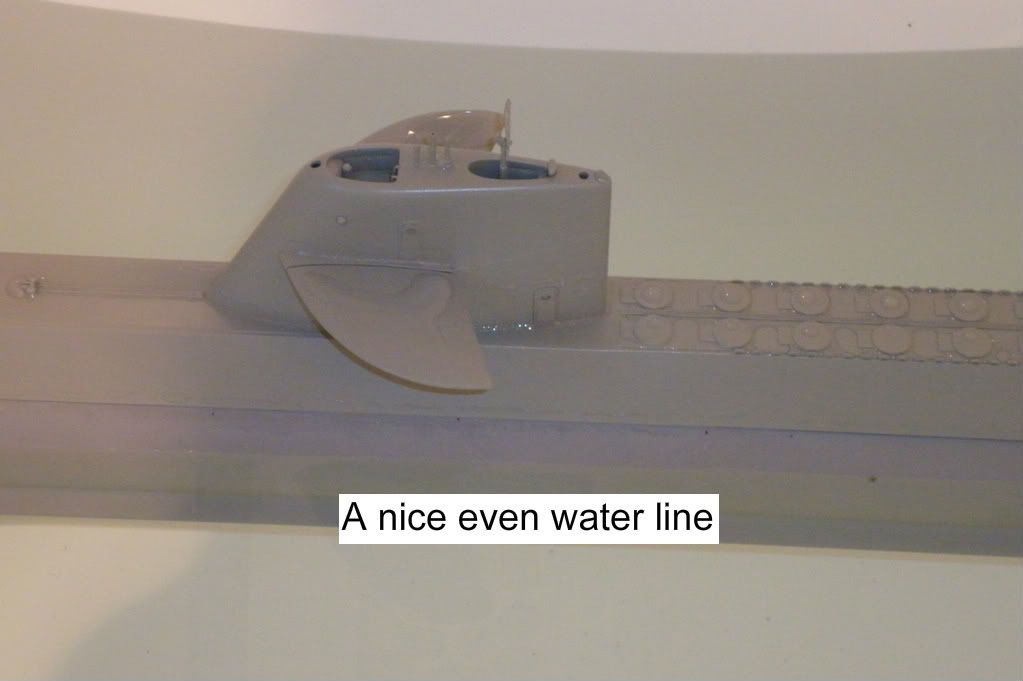
To start with I used blu-tac to hold the lead sheet strips in place and the foam was a snug between the SD and hull. It shows the blue foam in this picture but I ended up going with a different type of closed cell foam. I also repositioned the lead after a couple of test to get a much better c.o.g.
This is where she sits with an empty ballast... The rubber band is there because it was easier than continuously using the hold down screw.
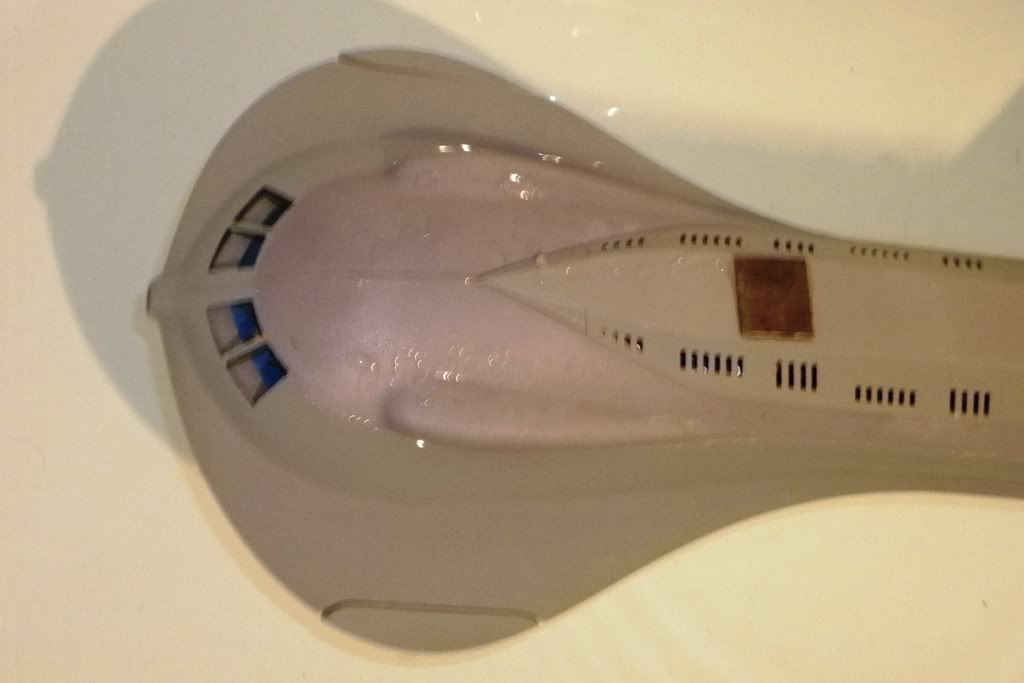
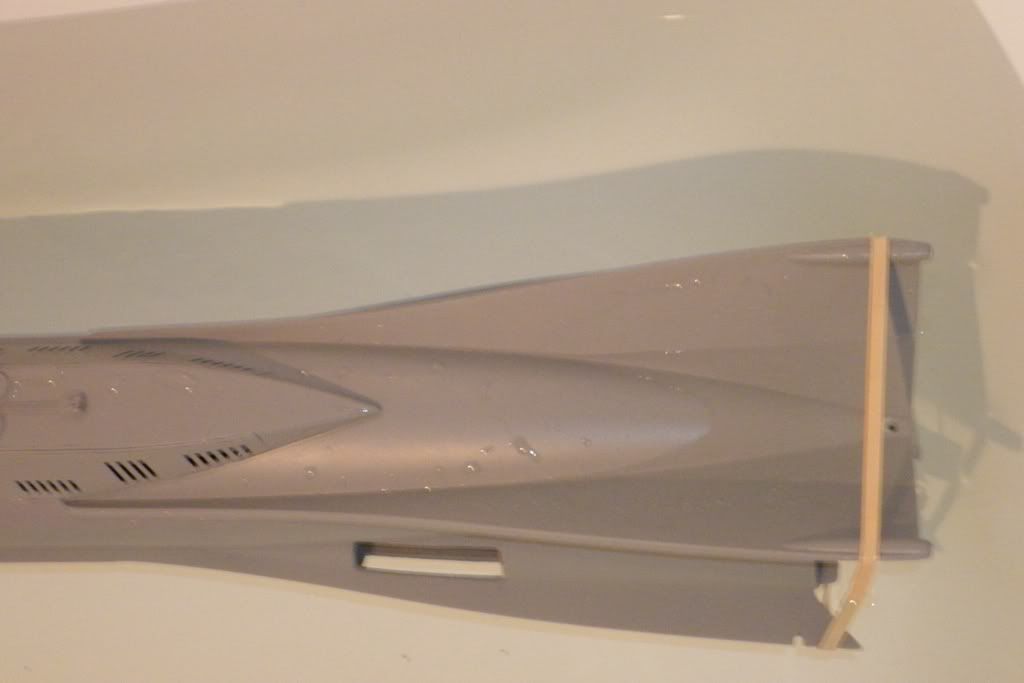
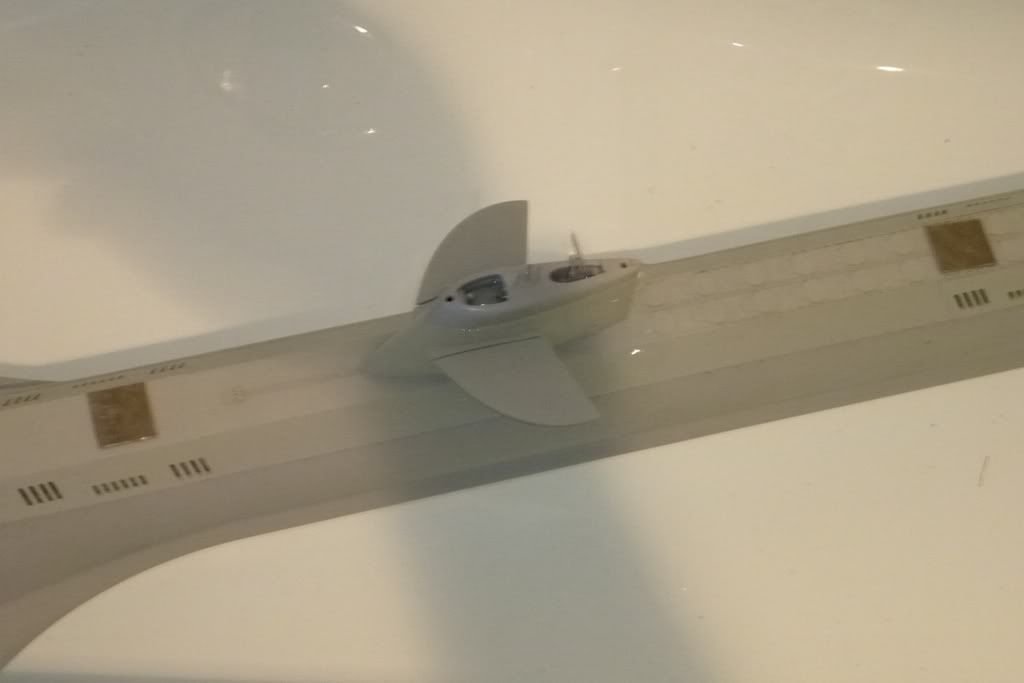
I know that any foam above the water line is not recommended but I found with out it she sank to the bottom. So I added a small piece as far forward and aft on the super structure as I needed to get the neutral buoyancy. The two small squares sitting on the deck are all the extra lead I needed to get the decks fully awash with only about 15mm of sail out of the water. Once the emergency gas is loaded I reckon it will be on the money. The photos are a bit blurry as it was not staying still in the water for the photos. I'm not sure if you can see clearly but I have the snort inlet running between the kits periscope and antenna. However tonight I decided to extend the snort tube so it in about 25mm long now, it's a bit out of scale, but it does add some visual balance to the raised radar. I know that the radar would be lowered for under water but I like it raised though natural attrition may change that look ...:wink:
I had to tweek the vent blow system a bit but following Davids video instructions made that a straight forward task and worked a treat. The only thing that kind of ruined the afternoon testing, apart from having to stop and help the Sandy with some house work, was one of the Dumas couplers... Whilst adjusting the tx for throttle control I heard a muffled clatter and a piece of something green fall out trough the bottom pump jet inlet on the starboard side. on retrieving the piece and taking the sub out and opening it up I discovered that the drive coupler snapped. However not to be deterred I glued it back together with ca some baking powder and a couple of bracing fillets as added reinforcement
I reckon once it has fully cured it will be good to go. Now all I need to do is wait for it to dry out and begin the final exterior paint and weathering.Scuba Diving
Cheers,
Alec. Reality is but a dream...
But to dream is a reality
After waiting a couple of days for things to dry out after setting the trim and buoyancy I set to painting it. I deviated from my usual method by using rattle cans as opposed to everything by airbrush. The main reason was that I don't use oil or solvents through my airbrush. For no other reason than that's what I have used for many years now with the exception of using the Testers dull coat. The top coat is a colour from our colorbond range called 'windspray' and the under side is also a colorbond colour called 'surfmist'.
Then came the weathering detail over the next couple of nights and I did use the airbrush to add the shading which I then dusted over with the rattle cans to soften and blend in.
The next step was using a combination varnish stain on the base and painting the supports.
Cheers,
Alec. Reality is but a dream...
But to dream is a reality
So the weekend came and and I gathered the sub and myself for sea trials in the local lake/pond. However before my venture from the test tub to the open water I decided to recheck things in the safety of the tank/bath first after the final acquisition of propellant gas and some new silicon oil. The tub tests all worked out well, or so I thought. The emergency gas blow worked a treat, the snort pump again showed its worth but I am still having issues regarding the right starboard side motor. It still throws out the dog bone connector whenever I go into reverse. I simply put it down to not having the length right so I adjusted it out some more and then headed up to the pond. That is where it all fell in a HEAP!!
While the sub was close to the shore and little jetty/platform I immersed it to get the surface trim right and I then flooded the ballast and powered her up. with some nervous hesitation I did some forward and reverse tests at low speed... So far so good and with the water still a bit fresh and murky from recent rains I had no intention to dive her more than 3-4 inches below the surface and with the neutral buoyancy set to have the sail planes just broaching the surface that seemed fairly straight forward. At that point I cut the motors and she rose up so I threw on the snort... Nothing changed, it just held the same level so I threw the gas blow and vented the ballast to get the decks just awash. I then increased reverse throttle to line it up to head inshore and for a split second nothing happened, I just put that down to nerves messing with my head. It powered back but seem to yaw a bit the right?? Thinking enough was enough I decided to bring it in, but even under 2/3 throttle I knew something wasn't right. I figured the turning circle of the sub would be a fair radius so I gave myself a bit of head room to maneuver and with full right rudder it pitched and listed all over the place and then all the thrust died but I could still hear the motors running. It had thrown the drive train off the motor. Something I thought I had fixed!!! So there she sat about 10 feet away with the breeze starting to push it out farther. As it was I was pretty sure it had stalled right on the bottoms drop off point. So the shorts got wet but I rescued to sub!! Sitting back on a nearby table I opened her up to investigate. Sure enough it had thrown both dog bones and flexible shafts and I also confirmed the snort system was all connected. The lipo guard was flashing correctly and the esc had the right lights on as did the adf and receiver but not the snort pump which should show an led when its powered up. With a frustrated and heavy heart n soul I packed up for home and back to the bench at home for a good look over.
With the things I discovered I sent an email off to David last night to which he promptly replied and also asked that I post on here rather than ask and point out issues via email. In hind site I would agree, with an embarrassed red face, that he is correct. Below is his response
"last things first: Is the LPB/Snort motor seized. If it is, that's the issue, if not, take the MPC off and run 7-volts through the thing. Does it work or not? If it does, you got a bum MPC -- and your course of action is, as you stated: contact Mike. I've CC' d the MPC's inventor-manufacturer, Kevin McLeod in on this, maybe he has some input here.
Electrically speaking, there is no way for a simple wound DC motor to run in only one direction with the polarity going one way, then switched to the other. Kevin, you're the official keeper of the magic-smoke around here, ever heard of such a thing?
I suspect that either the drive train went sour (your suggestion that your flexible tube element of the running gear is too short is a good possibility, because of the flexible hose issue. That, or, your set-screw to the rotor got loose and the damned thing will lock-up ahead, but slip in reverse -- the flow you are seeing is from turbulence in the stern caused by the 'working' pump-jet. Do you actually see the motor output doing this, or are you just paying attention to the wash from the propulsion tube?
And post this kind of stuff to the forum, so other people can witness your genius/stupidity out in the open ... also, of secondary importance, lessons learned through the discussion will be shared by all and I won't have to repeat myself endlessly in e-mails like this.
David"
Granted yesterday I was perhaps a tad emotional but I felt I needed help. I know a simple dc motor shouldn't act as if it is alternating but that is what it seemed to do. Also the pump controller had one of the chips go thermal when it was powered up so I reckon that that was the issue Kevin Mcleod also replied re the mini pump issue believing the chip had fried also. I will let you all know that after Davids simple suggestion of powering the pump directly was one I didn't even think of last night "DOH" So following his suggestion proved tonight that the pump is fine but not the controller board. As I responded to them I don't get how it worked fine in the tub at home but fragged itself some 20 minutes later at the pond??.
David regarding the wash I saw with both drives running thee is a sloppy wash when in reverse but a definate direction in forward coming from the pumps. When the left diengages you can see clearly the revease wash and forward wash. You made a comment to Kevin that the motors are wired so they both spin the same direction. So assuming I'm not a total twit they both should spin clock wise or anti clock wise together. I never really paid attention to this as I though the motors and pump jets would be set up as a normal twin screw set up in that one turns clock wise and the other turns anti-clock wise. Now from what I can tell the jets are set up in an identical way but the right hand motor spin is opposite to the left hand motor, refer the video. Also after reviewing the DVD's again I reckon I have, hand on heart, buggered up the drive shaft assembly so I'll be redoing those...
Cheers,
Alec. Reality is but a dream...
But to dream is a reality
Beautiful work, Alec. Build up a list of things you need and I'll get them off to you.
OK, it's official: I'm an ASS!!!!
I sent you a SEAVIEW SD with a Type-7 motor-bulkhead. Argh!
The Type-7 motors are wired to rotate in opposite directions.
The SEAVIEW motor bulkhead motors should be wired to spin both motors in a clock-wise direction. Swap the two motor leads on the port motor and your gold.
I really enjoy your build, always have a soft spot for strange subs, what a bummer your maidenvoyage, you always get the feeling, why does this happen to me!!
On the other hand, this proces posting gives us a lot of info that can be used during our own trails, by the way, welcome to the wetpants club, most people will have the same experience.
Looking forward to see her drive in the wet, keep up the good work.
I agree with Manfred. Great build and thank you for your willingness to share the Ups and Downs of the construction. Soon, I hope, we will see the video of a successful dive and return home.
If you can cut, drill, saw, hit things and swear a lot, you're well on the way to building a working model sub.
Well with some trepidation I rewired the motors last night with excellent results I also checked the drive shafts and they were a little short as a precautionary measure I made a couple up for testing but the first ones worked out great. No wet test on the drive yet I did a 5 minute dry run with them aand no issues between forward n revers and more importantly no drive shaft throw outs...
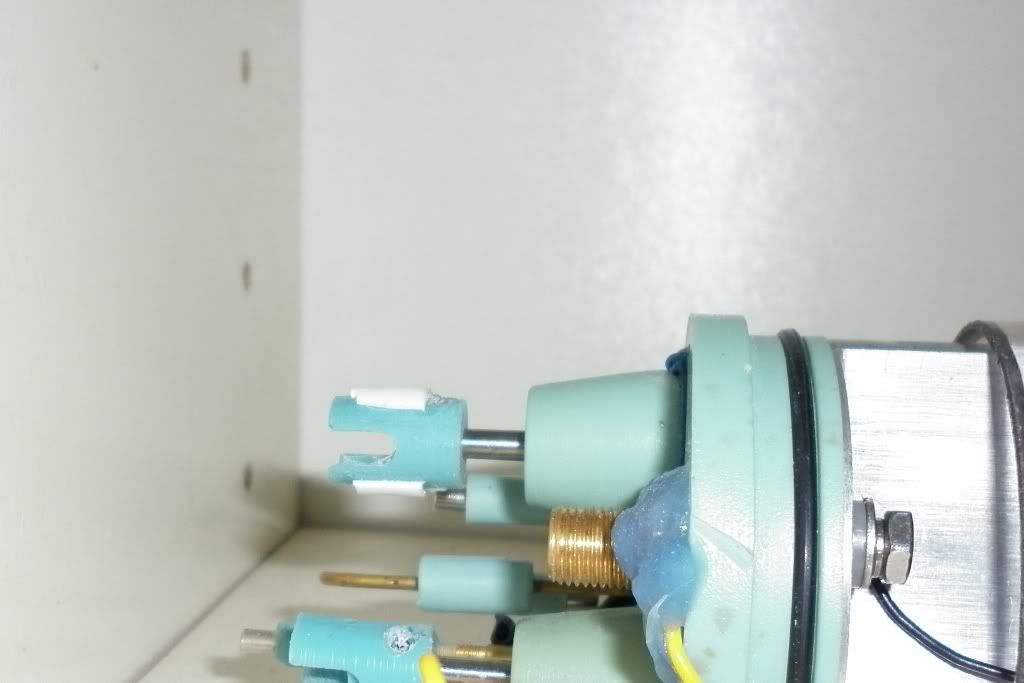
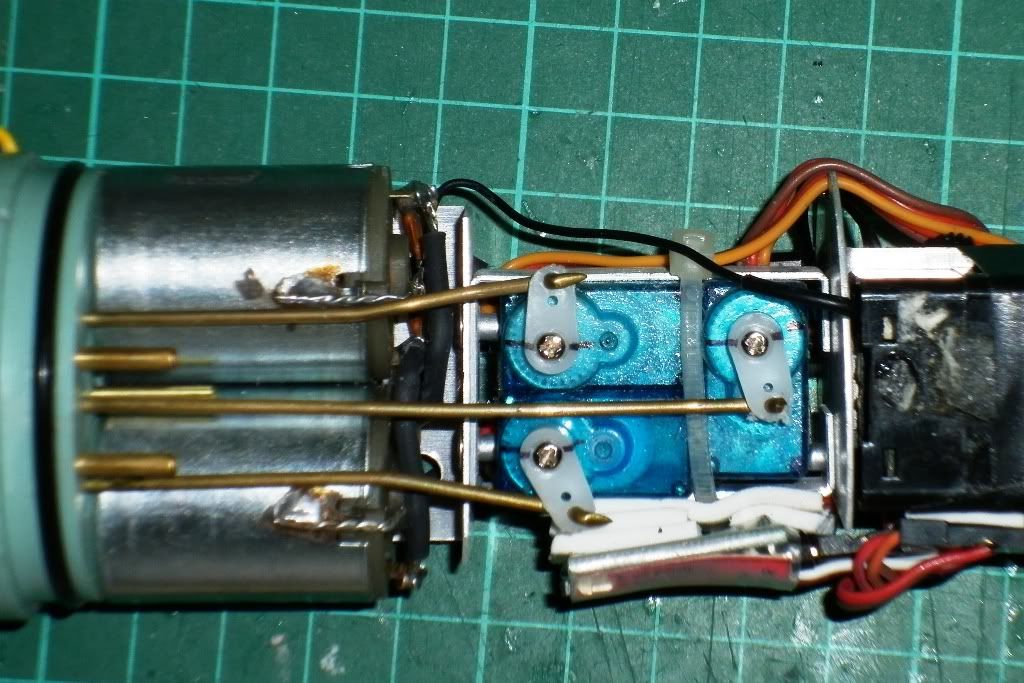
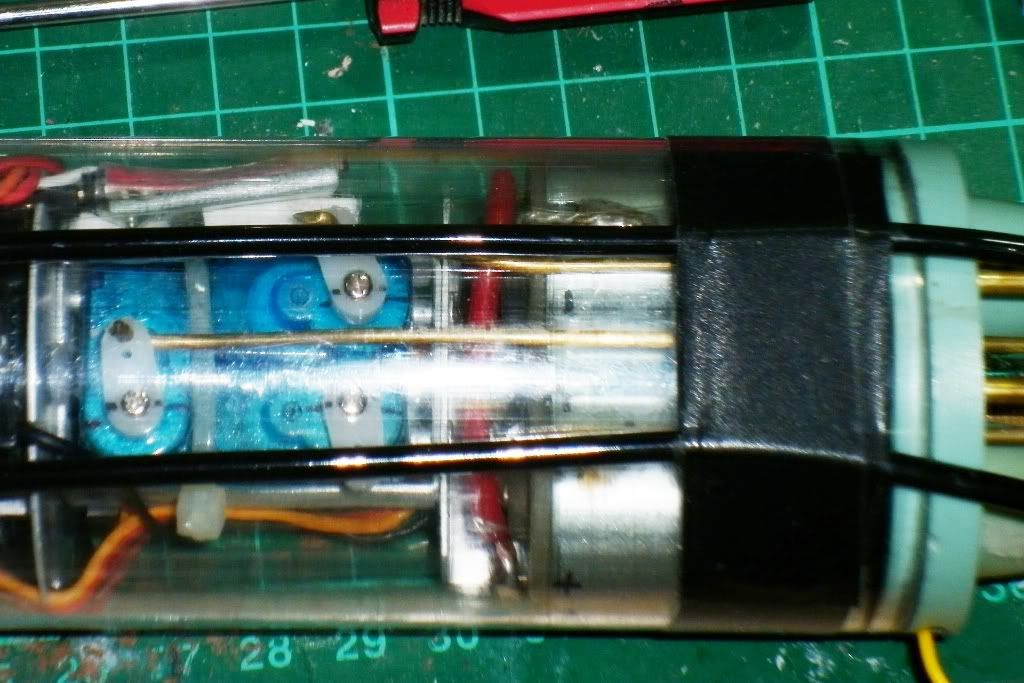
Before I disassembled it all I marked out the servos and arms so they went back in the right position.
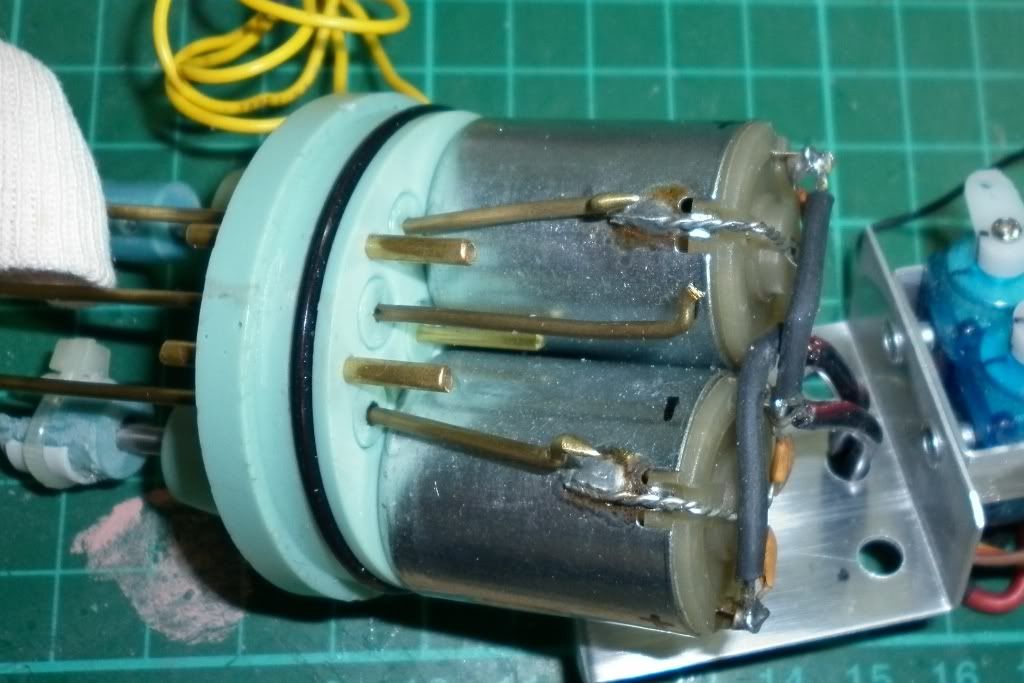
And also before I heated up the soldering iron I retraced the power leads from the ecs worked out the correct polarity and then to make sure I marked a + & - on each motor as well.
And it all went back together nicely you can just make out the red positive jumper wire which goes over the negative jump wire.
When I put it back together I decided to do a wet test on the SD with the motors and recalibrating the gas venting system... and that when I had a huge 'WTF' moment and felt like diving from a plane with out the chute!!! In my haste to get it wet I forgot to put back the snort jumper tube in the motor bulk head as I am still running the main snort tubes connected to the outside of the bulk head. I quickly found out why it is a dry space... Things inside it don't like water. So scratch one receiver and one mini servo!!! As a result I will have a new page in my notes with the big heading - Hey Stupid read this first. I may even keep a laminated copy in the tool kit.
Cheers,
Alec. Reality is but a dream...
But to dream is a reality
Water and electronics don't like to being mixed for sure, had the same experience with my type VIIC, in my hurry forgotten to tighten one of the hatches, she went under quickly, as a matter of fact too quickly, and i went in butt naked to save her, i for sure pleased the crowd of people on the shore.
From that time one the checklist is ingraved in my brains, it never happened me again.
Well things are now progressing better and I can actually see an official deep water run very soon. I tried several ways to check the mpc all ending in the same result :'( Kevin and given me his address to ship it off to... All I have to do is remember to post it... DOH!! In the intrim I have got some solid state on/off reciver switches coming to operate the low presure blower via the gear switch on my radio. I replaced the blown servo and ordered a couple of rx units. What surprised me was the the rx that I had opened up and let dry out for a couple of days actually worked when I got bored and tested it. With all that I have now reseated the lbp, redressesed all the cables, wires etc waiting for the micro switches for the said lpb. I then spent almost
An hour over the test tub running through the gas ballast settings and running the motors with the drive shafts attached. Success and more with the pumps and motors... whoowhoo!!! However with almost 2 hours of having the sd in the water I am now struggling with the ballast & gas adjustments I can get it to vent and flood the tank but it's finding that sweet spot where the valve shuts without blowing the gas yet not venting/leaking any air in neutral... My tx is a hitec 6 chanell which I am using the left and right flap toggles to run the vent blow valve. I am thinking that with my neautral bouyancy on a full ballast the sub sits with the sail dry from the planes up I might pass on the gas when I get the lpb running. Also from my first test in the open she rose to neautral, slowly but surely. So with my trim settings and added to a working lpb system I feel pretty confident about her sailing without the added gas.
Cheers,
Alec. Reality is but a dream...
But to dream is a reality
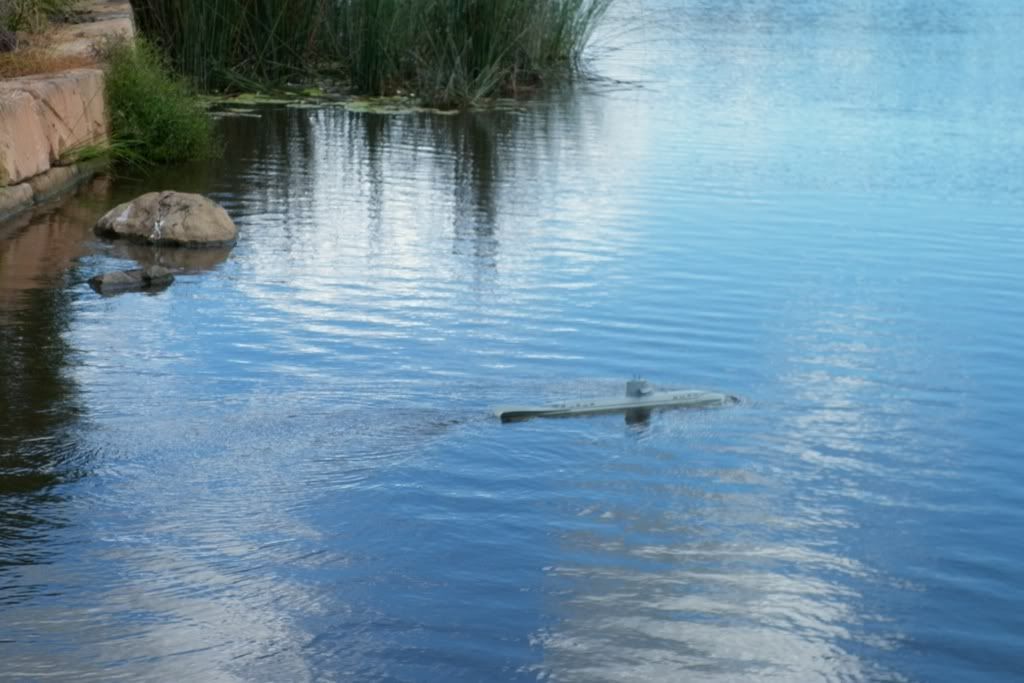
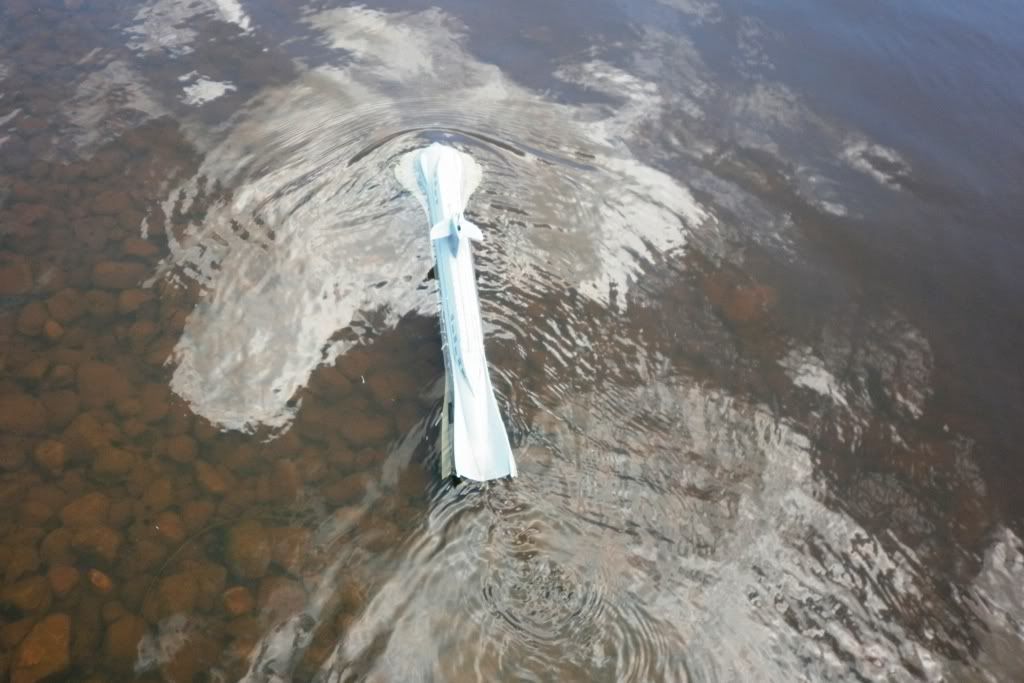
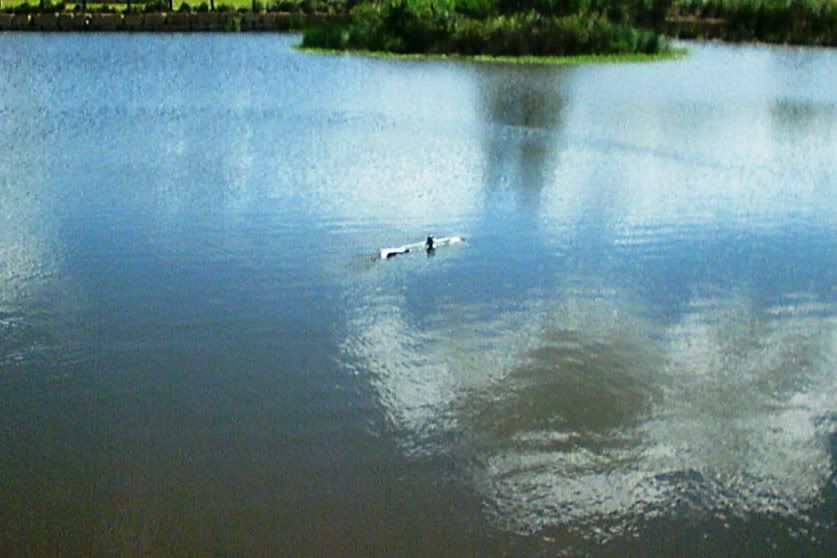
yesterday I had the day off with my wife Sandy as it was our 4th wedding anniversary. Somehow she agreed to heading up to our local ponds and let me trial the seaview while she took some pics & video. After a couple of false starts I finally got her in the water. I should mention that these tests were mostly surface running. I decided that I will tweak the ballast vent & blow so I can run it with gas for emergencies as my confidence with running a no gas back up ebbed away... The Titanic
On the whole the run wasn't to bad though I still had that flaming leak into the electrics/motor dry space. Fortunately no short outs this time as the little silica gel sachet I put in there absorbed most of it and the only other glitch was the port side pump jet dog bones glue gave out so it was just spinning on the shaft and in sympathy the starboard motor decided not to work!!! Yet back home on the bench it spun like a trooper?? I'm getting to know the depth or our little lake here pretty well now, point to remember is don't jump in to your chest without taking your wallet out of your pocket first :biggrin:
So last night I decided to take out the bulkhead between the ballast and motors. Not sure what felt worse making the decision or actually doing it and then putting it back together!! When I got the bulkhead out I followed Davids advice he gave Tom on his Gato and wrapped some teflon tap 4 times around the o ring groove. Cleaned up the o ring and wiped the inside of the tube clean. It was then I noticed a series of hairline fractures just behind the back flood hole in the ballast tank and that where the o ring sat in the tube there was/is a definite but very feint etched groove almost like a catalytic reaction to the o ring?? I also applied a wee bit of ca glue to each of the set screw holes to act as a thread lock/gap filling just to make sure they would re-seat snugly. I have done this trick before with resin pieces that have metal screws in them. The ca mixes with the resin dust from the screws cutting into the resin piece and when its dry it makes a nice fit to re-thread em. I also added a bit of rca on the brass tube between the forward and aft dry spaces to help with their seating on re assembly. After almost passing out a couple of times holding my breath during the process I got it all back together and I was even able to get the vent/blow valve seating better in neutral so it won't vent any air so I'll be gassed up now;) Once I had the bulk head and every thing else back in place I then had a closer look at those fissures. It didn't look as if they went passed the o ring which was a blessing. So I reckon my leak game from one of the set screws loosing tension near the said fissures. To be on the safe side I smeared a good layer of silicon over all the cracks and then wacked on a piece of electricians tape over that with the silicon smeared round the edges to lock out the water. To test it all I dropped the sub driver in the tub and then left it for about 40 minutes as I helped Sandy in the garden. When I retrieved the SD from the water all was good... Did a little happy dance and whispered a small thank you to him above. Finally tonight I added two small additions of lead paced out from the cog to help with getting a little deeper in the water with a full ballast and still have a little of the sail out dry. One other thing I did was to hard wire the lighting off the main battery compartment and all I do is use liquid electrical tape to seal up the connections before it gets wet and another fix was simplifying my wiring from battery to switch in the battery end. Not really sure what I was thinking when I first did it but lets just say I over complicated it a bit :o
So with out any more ramblings here are some pictures and a small video from yesterdays trials. Please excuse the video my beautiful wife is a par excellent in the armature world of theatrics and gift/event card making but not the best camera person.
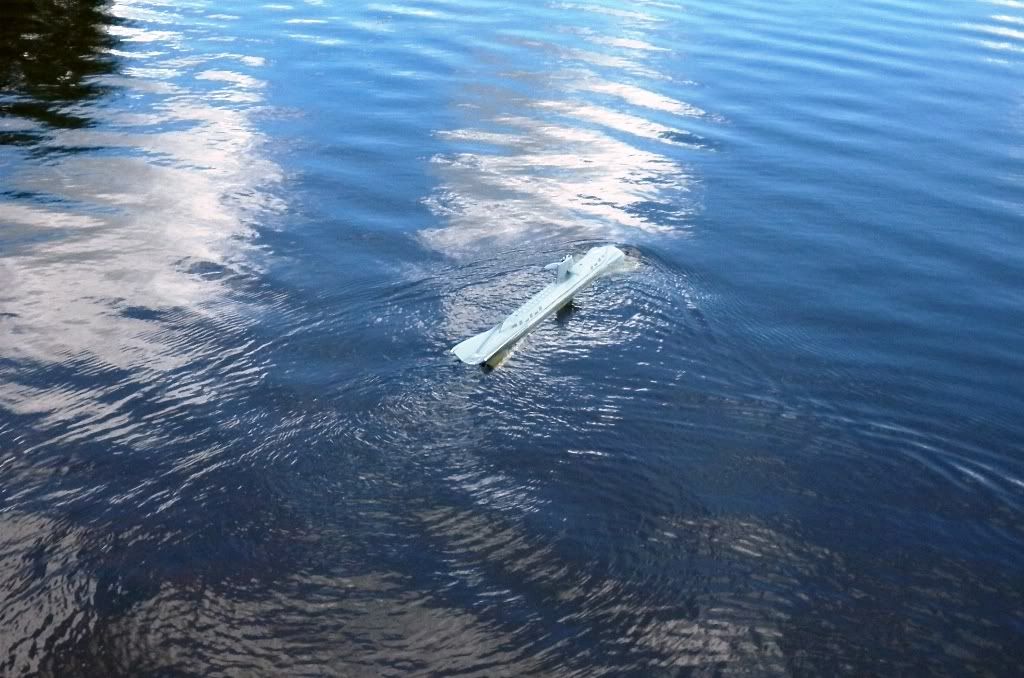
This one is when the dogbone came unstuck, as it were. But I have to say she still performed well with only one p/jet working.
A private space for your group's photos and videos. Share, react, and relive moments together. Available on iOS, Android, and desktop. Free for new sign-ups.
Cheers,
Alec. Reality is but a dream...
But to dream is a reality


Comment