1/48 3D Printed USS Jimmy Carter

Collapse
X
 
  • Time
  • Show
Clear All
new posts

  • hywel
    replied
    Originally posted by SubDude

    No charge. Just need an email to send it to. PM me your email.
    Thank you, it looks like it's going to work out awesomely.

    Leave a comment:


  • SubDude
    replied
    Originally posted by hywel

    Awesome build, I can't imagine how huge this thing is in person! I had a question - would you make the STL for your custom tube anchors available for a fee by chance? I'll need to use something similar on my Typhoon so buying vs. modeling is always better if it's possible. Thanks for your consideration!
    No charge. Just need an email to send it to. PM me your email.

    Leave a comment:


  • Sinksalot
    replied
    Originally posted by SubDude
    All of the printing is done. It took over 1500 hours total and 15 spools of filament. Still a lot of finish work to do but I got a cradle made for it today.

    Click image for larger version

Name:	20220818_132801.jpg
Views:	362
Size:	85.3 KB
ID:	163959
    Click image for larger version

Name:	20220818_132815.jpg
Views:	342
Size:	80.9 KB
ID:	163960
    Very nice build Steve. 1500 hours is a long time.

    When are you going to cut the hole in the roof. For the crane for lifting it.

    Leave a comment:


  • hywel
    replied
    Originally posted by SubDude
    Click image for larger version Name:	20220719_233128.jpg Views:	0 Size:	85.4 KB ID:	163045
    Close up of the same where the extension is located with my custom tube anchors.
    Awesome build, I can't imagine how huge this thing is in person! I had a question - would you make the STL for your custom tube anchors available for a fee by chance? I'll need to use something similar on my Typhoon so buying vs. modeling is always better if it's possible. Thanks for your consideration!

    Leave a comment:


  • SubDude
    replied
    All of the printing is done. It took over 1500 hours total and 15 spools of filament. Still a lot of finish work to do but I got a cradle made for it today.

    Click image for larger version

Name:	20220818_132801.jpg
Views:	362
Size:	85.3 KB
ID:	163959
    Click image for larger version

Name:	20220818_132815.jpg
Views:	342
Size:	80.9 KB
ID:	163960

    Leave a comment:


  • SubDude
    replied
    Originally posted by He Who Shall Not Be Named
    Careful, Steve. If the coefficients of expansion between your WAA substrates are at any significant variance between themselves and your printed hull, the WAA's will evidence cracking as you quench your noon-day sun heated model into the cool waters of Red Clay Resort.

    David
    ABS is 40-60% Styrene which helps and I try to keep a very close eye on sun exposure to my boats no matter what material they are printed out of. It's a left over habit that was developed with flying foamy airplanes. I will certainly be watching out for it.

    Leave a comment:


  • He Who Shall Not Be Named
    replied
    Careful, Steve. If the coefficients of expansion between your WAA substrates are at any significant variance between themselves and your printed hull, the WAA's will evidence cracking as you quench your noon-day sun heated model into the cool waters of Red Clay Resort.

    David

    Leave a comment:


  • SubDude
    replied
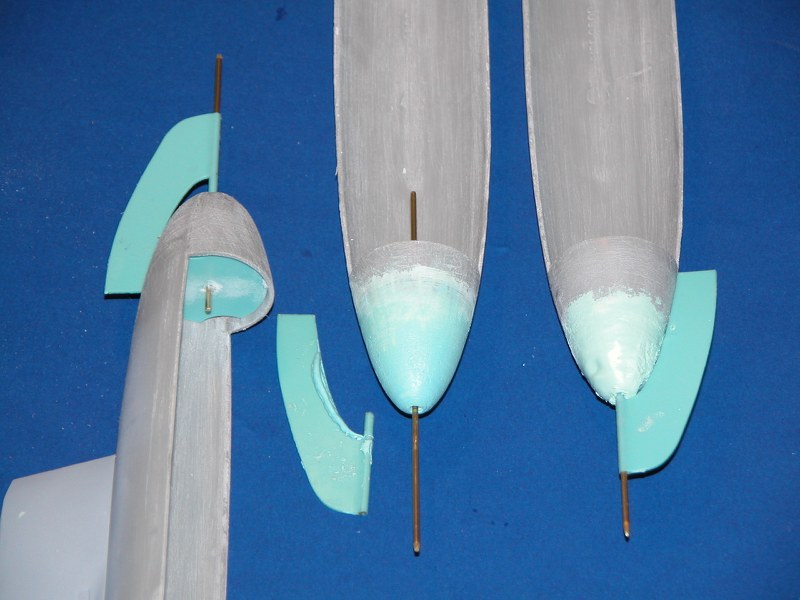
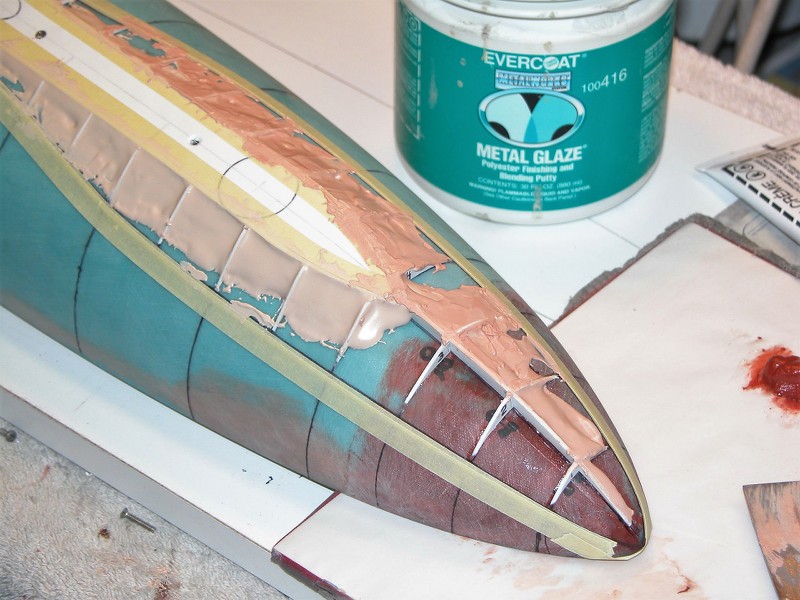
    I decided to change the appearance of the WAA's to be closer to scale. The two most aft ones have convex edges as is proper whereas the remaining four have concave edges. A simple reshaping of the edges with a Dremel sanding drum would be in most cases sufficient but the shapes of the WAA's is also off a bit for me. Having the Trumpeter 1/144 model as an example of what they should look like is a big help. After translating some measurements to the scale of my boat I cut some 0.020 thick Styrene sheet to the proper size and shape for the aft Port WAA. Because the aft most arrays have more of a contoured shape I knew they would be more a challenge to adhere the Styrene properly. I cut some blue foam camping mat to the same shape as the Styrene and using a couple small pieces of plywood clamped the foam tight to help shape the Styrene to the intended surface after applying black Starbond CA to glue it down. Worked like a charm. Once set I did a little grinding work around the edge with the Dremel to clean it up. The new array shape was smaller than the old array which left a large area to remove and was just too much to tackle with the Dremel so I got one of those vibrating saws and used it to cut the remaining array loose. Then it was a simple matter of some Rage Evercoat bondo, sanding, Nitro Stan, sanding and now it is proper. After I do the Starboard side the four remaining WAA's will be a snap. There is also some rework I am going to do regarding the torpedo doors that will come later.

    The Trumpeter WAA I am trying to achieve.

    Click image for larger version

Name:	20220810_212803.jpg
Views:	370
Size:	60.4 KB
ID:	163625
    Before... (Starboard side)

    Click image for larger version

Name:	20220811_080620.jpg
Views:	338
Size:	57.2 KB
ID:	163626
    After... (Port side)

    Click image for larger version

Name:	20220811_080548.jpg
Views:	344
Size:	51.8 KB
ID:	163627
    Close enough for me.

    Leave a comment:


  • He Who Shall Not Be Named
    replied
    Well done, Steve!

    Leave a comment:


  • SubDude
    replied
    Added control horns to the rudders and stern planes. I have a plan for how I am going to set up the linkages. Here is a short video of how the stern planes work.


    And some pics of the inside of the tail cone. I haven't added set screws yet to the control horns. So far everything moves freely and the entire tail section can be easily disassembled.

    Click image for larger version

Name:	20220807_192218.jpg
Views:	402
Size:	80.9 KB
ID:	163551
    Click image for larger version

Name:	20220807_192240.jpg
Views:	362
Size:	80.4 KB
ID:	163552

    Leave a comment:


  • He Who Shall Not Be Named
    replied
    Originally posted by SubDude

    I sense more Tribute is in order at Subfest.
    Cold this time... damnit!

    Leave a comment:


  • He Who Shall Not Be Named
    replied
    Originally posted by SubDude

    I sense more Tribute is in order at Subfest.
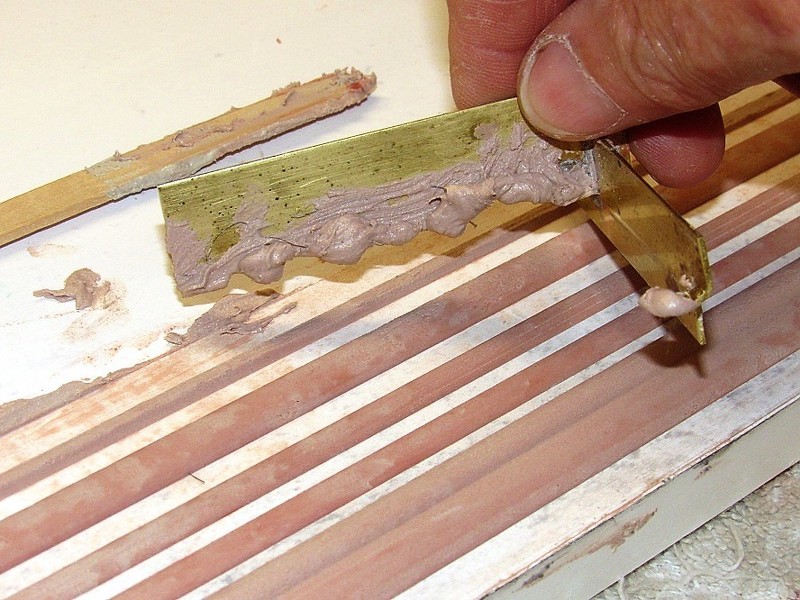
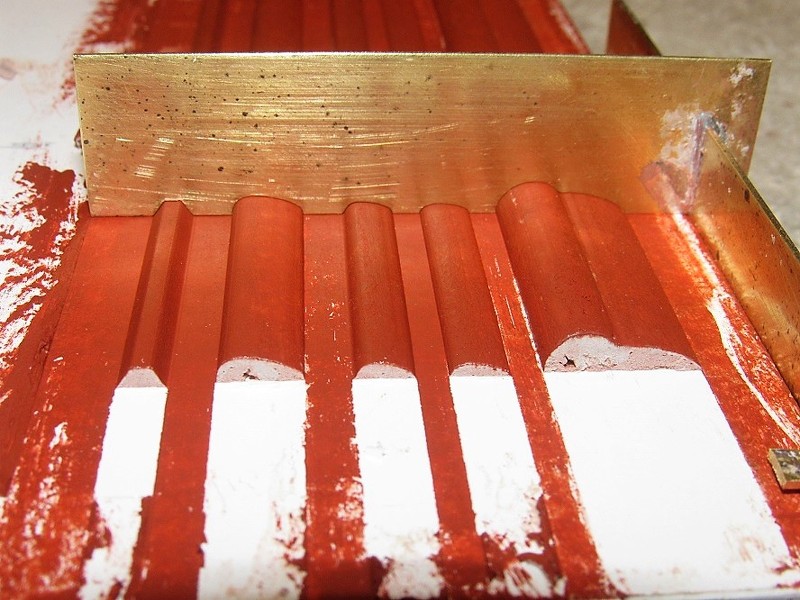
    To ensure uniform fillet shape around the perimeter of the WAA 'blisters' make and employ a screeding-blade which you'll use to give form to the still wet Bondo. Makes the filleting go much quicker and with better uniformity than if you winged it with spatula and fingers.


    Leave a comment:


  • SubDude
    replied
    Originally posted by He Who Shall Not Be Named

    Those six (three on each side) stand-off structures contain arrays of hydrophones that are electronically scanned. They are Wide Aperture Arrays (WAA). Passive sonar that, because of the geometry of their positions on the hull, can derive useful bearing AND range of local noise sources; lets you work up a useful solution without pinging yourself. This is the current offspring of the old PUFFS. Pretty slick. As the exterior structure of all modern American submarines are about 70% pressure hull you can't inlay the WAA hydrophones, that's why the arrays stand proud of the hull. Ugly, but serviceable.

    Break out the Bondo and soften the edges between WAA structure and hull. A convex, not concave transition.


    David
    Task Master
    I sense more Tribute is in order at Subfest.

    Leave a comment:


  • SubDude
    replied
    Originally posted by jphatton
    Here is the link to the thread on the Thresher PUFFS arrays for reference

    https://forum.rc-sub.com/forum/gener...one-end-plates
    Yes. Thank you again for the information on the Thresher PUFFS. I could not rember where your thread was but my rendition is based entirely on your find and documentation. I wish there was similar photo evidence for the prop but I know the Navy's stance on that. My gut feel is that it had the 7-blade but I have not been able to determine that for sure.

    Leave a comment:


  • He Who Shall Not Be Named
    replied
    Originally posted by jphatton
    Here is the link to the thread on the Thresher PUFFS arrays for reference

    https://forum.rc-sub.com/forum/gener...one-end-plates
    Excellent! Thank you so much for your careful work and sharing it with us. I'll start hacking away at a 1/72 and 1/96 PUFF array masters this morning.

    Most appreciated.

    David

    Leave a comment:

Working...