Little Something I've been working on...

Collapse
X
 
  • Time
  • Show
Clear All
new posts
  • TechnoD11
    Ensign
    • Mar 2018
    • 19

    #16
    Hey all, thanks for the kind words!
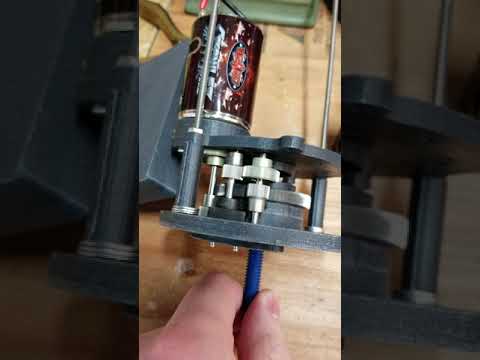
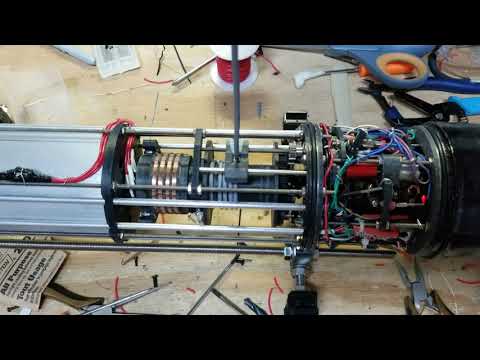
    The Ballast tank is of the piston variety, similar to those used by Engel. A piston, attached with a threaded rod (PTFE coated one in my case, runs easy though the lead nut), moves in and out to displace the water. The motor is run through a gear reduction, pictured below, to increase torque. There are limit switches (see the one mounted in the photo already posted) that stop current flow to the motor when the extremes of the tank are hit. Since the limit switches do not have the current capacity to run the motor when operating at peak without burning out, I modified some relay units and wired up the limit switch output to those (indicated in the photo below).
    The lead nut/spur gear assembly pictured above is inserted into that bearing in the bulkhead next to it (its a press fit). this allows the lead nut to spin freely, while the gear can ride up against the large bronze thrust washer when spinning so it doesn't get caught up or lock up.
    I've also included a video of an initial test run of the motor assembly, which shows pretty well the motion.


    Edit - can't post the video from work. I'll upload it when I get home.

    -Derek

    Comment

    • TechnoD11
      Ensign
      • Mar 2018
      • 19

      #17
      And here's that video:


      Edit: accidentally posted multiple times, my bad. should be fixed now.
      Last edited by TechnoD11; 06-18-2019, 11:33 AM.

      Comment

      • Scott T
        Commander
        • May 2009
        • 378

        #18
        Very good description. Do you have a picture of the lead nut in its gear housing. Also what shape is the lead screw where it attaches to the piston.
        Thanks, Scott T

        Comment

        • TechnoD11
          Ensign
          • Mar 2018
          • 19

          #19
          here's a photo of the end of the piston:

          And here is the lead nut/spur gear assembly pressed into the inner race of the bearing:


          -Derek

          Comment

          • bwi 971
            Captain
            • Jan 2015
            • 896

            #20
            Originally posted by TechnoD11

            -Derek
            Hi Derek, nice work sir.

            As you work with a piston tank I assume it will be a static diver.
            Is the 3 holed alu plate intended to accomodate magnets to trigger reed sensors?
            Just curious.

            Grtz,
            Bart

            Practical wisdom is only to be learned in the school of experience.
            "Samuel Smiles"

            Comment

            • TechnoD11
              Ensign
              • Mar 2018
              • 19

              #21
              Originally posted by bwi 971

              Is the 3 holed alu plate intended to accomodate magnets to trigger reed sensors?
              The three holes are for .25" OD bearings for the gear reduction that drives the lead nut for the ballast. Take a look at the video posted above.

              -Derek

              Comment

              • TechnoD11
                Ensign
                • Mar 2018
                • 19

                #22
                Mounted the windings of the slip ring commutator yesterday. Getting these wound tight was a massive pain, but I verified full 360 degree electrical contact. This will enable the tether wire to spool in and out without getting tangled, as metal contacts will run against this commutator for data transmission.


                -Derek

                Comment

                • TechnoD11
                  Ensign
                  • Mar 2018
                  • 19

                  #23
                  And after some hours in the shop this past weekend, the slip ring and spool assembly is done! Here's a video showing it working (sorry for the focus in some bits):


                  And some stills:


                  As always, more to come. Getting very close to sea trials...

                  -Derek

                  Comment

                  • Bob Gato
                    Captain
                    • Feb 2019
                    • 826

                    #24
                    Nice work, the machining is impeccable! -so this is is going to have a tethered ASDS from the main sub that actually houses the radio gear, keeping the radios close to the surface and the main sub could go 30ft deeper from the ASDS ,technically as a tethered ROV- ...(cool smile emoji)
                    Last edited by Bob Gato; 07-01-2019, 02:23 PM.

                    Comment

                    • TechnoD11
                      Ensign
                      • Mar 2018
                      • 19

                      #25
                      Originally posted by Bob Gato
                      Nice work, the machining is impeccable! -so this is is going to have a tethered ASDS from the main sub that actually houses the radio gear, keeping the radios close to the surface and the main sub could go 30ft deeper from the ASDS ,technically as a tethered ROV- ...(cool smile emoji)
                      Yup! And if everything works correctly (so far, so good...) I'll have a live video feed from the sail. Here's hoping!

                      Comment

                      • TechnoD11
                        Ensign
                        • Mar 2018
                        • 19

                        #26
                        Got the Front bulkhead all wired up with its connectors this past weekend:

                        The front bulkhead slides onto the threaded rods, and in the process mates with the other end of the connector which passes through the controls for the headlights, electromagnet, servo (and analog feedback), and an additional PWM for future expansion. Also carries regulated 5V and ground.
                        Speaking of power, also officially mounted the battery and power switch. This was difficult!

                        Access to the power switch is through the side of the poly carbonate tube - I've got two small, tapped holes right over the on/off positions. A button head bolt threads into the tapped hole with an o ring to seal and is removed to allow a pin to enter and toggle the switch.

                        Comment

                        • TechnoD11
                          Ensign
                          • Mar 2018
                          • 19

                          #27
                          The Camera Works!!

                          In the bottom right, you'll see the sail which has the camera mounted in it. The TV in the background is displaying the footage live from the camera (you can see the multimeter quite clearly). The video feed is run through the front bulkhead, through the shielded conduit, through the tether, to the wireless transmitter, which then sends it to the wireless receiver hooked up to the TV. I had some serious concerns about signal attenuation but everything looks fantastic!

                          Comment

                          • TechnoD11
                            Ensign
                            • Mar 2018
                            • 19

                            #28
                            The Core is done!

                            To slide the tube over, a little bit of silicon/PTFE grease will be needed. Made this cheesy duct tape-wrapping applicator:

                            ...And after being greased:

                            Should still be on track for sea trials end of this week/or next week...
                            God I hope this thing works!

                            Comment

                            • RCSubGuy
                              Welcome to my underwater realm!
                              • Aug 2009
                              • 1768

                              #29
                              This is great work! I can't wait to see her in the water!

                              Comment

                              • TechnoD11
                                Ensign
                                • Mar 2018
                                • 19

                                #30
                                Bathtub Trials were a success!

                                Now to add the diagnostics access holes, sail, and electromagnet. Then mount the mini sub, then time for some real sea trials!

                                Comment

                                Working...