Victor III

Collapse
X
 
  • Time
  • Show
Clear All
new posts
  • bwi 971
    Captain
    • Jan 2015
    • 915

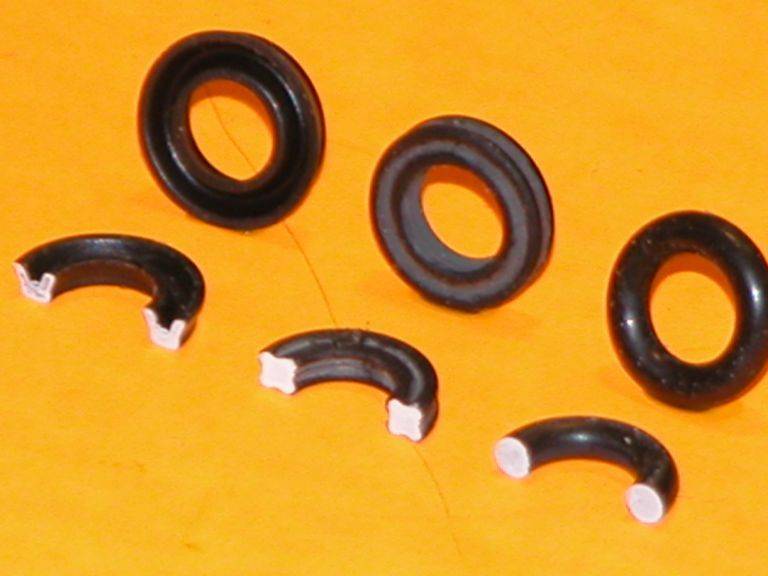
    While awaiting the arrival of the O-rings, I assume the come by pigeony, I designed a gearbox for the pump. This design keeps everything compact, ensuring that the motor's outline fits snugly within the pump's perimeter. A bearing was installed on the pump side, and Teflon washers were utilized to provide clearance between the moving and stationary parts. These washers, originally 1mm thick, were sanded down to 0.5mm for. Despite its small size, the gearbox is provided with openings to facilitate assembly. Additionally, Locktite was applied to the set screws of the gears.

    Click image for larger version

Name:	Victor_III_48.jpg
Views:	130
Size:	55.0 KB
ID:	179822

    Click image for larger version

Name:	Victor_III_46.jpg
Views:	130
Size:	47.7 KB
ID:	179821

    Click image for larger version

Name:	Victor_III_47.jpg
Views:	138
Size:	67.7 KB
ID:	179818

    Click image for larger version

Name:	Victor_III_45.jpg
Views:	130
Size:	61.7 KB
ID:	179820

    Click image for larger version

Name:	Victor_III_44.jpg
Views:	128
Size:	64.7 KB
ID:	179819

    Grtz,
    Bart

    Practical wisdom is only to be learned in the school of experience.
    "Samuel Smiles"

    Comment

    • bwi 971
      Captain
      • Jan 2015
      • 915

      The O-ring has arrived and fits perfectly. There were no leaks during the test run. Results at 3500 rpm show a flow rate of 1.2 liters per minute or 40.6 fluid ounces per minute.

      Click image for larger version

Name:	Victor_III_49.jpg
Views:	113
Size:	43.5 KB
ID:	179922

      Grtz,
      Bart


      Practical wisdom is only to be learned in the school of experience.
      "Samuel Smiles"

      Comment

      • He Who Shall Not Be Named
        Moderator
        • Aug 2008
        • 12373

        That is one well designed, kick-ass little gear pump, pal. Well done sir! The GPM is outstanding. Much backflow when stopped and the backside has a significant pressure over the front end?

        Consider going commercial with this thing, Bart.

        You European's are an amazing bunch.

        David
        Who is John Galt?

        Comment

        • trout
          Admiral
          • Jul 2011
          • 3549

          Bart, that rocks. Solid design ideas!
          I could use something like this in my 1/144 Seawolf sub.
          If you can cut, drill, saw, hit things and swear a lot, you're well on the way to building a working model sub.

          Comment

          • bwi 971
            Captain
            • Jan 2015
            • 915

            Originally posted by He Who Shall Not Be Named
            That is one well designed, kick-ass little gear pump, pal. Well done sir! The GPM is outstanding. Much backflow when stopped and the backside has a significant pressure over the front end?

            Consider going commercial with this thing, Bart.

            You European's are an amazing bunch.

            David
            Backflow, yes as expected. I hope I can eliminate this by raising the suction/discharge line to the ballast tank above the water level in surfaced condition; otherwise, I have to use a solenoid (preferably not). Regarding pressure, it required quite some effort to stop the flow by applying pressure with my finger on the discharge. I can't do it without taking a small shower.

            Grtz,
            Bart


            Practical wisdom is only to be learned in the school of experience.
            "Samuel Smiles"

            Comment

            • bwi 971
              Captain
              • Jan 2015
              • 915

              Originally posted by trout
              Bart, that rocks. Solid design ideas!
              I could use something like this in my 1/144 Seawolf sub.
              It can still be made smaller too, imo. The gearpump and its downsides like the backflow, it just somthing that I need to try.
              Grtz,
              Bart
              Practical wisdom is only to be learned in the school of experience.
              "Samuel Smiles"

              Comment

              • bwi 971
                Captain
                • Jan 2015
                • 915

                The WTC pushrod seals are also ongoing. I wanted to use bellows, so I tried to manufacture them myself; however, all attempts failed. The bushings in the endcap are 8mm while the pushrods will be 2mm.

                The first method I tried involved using flexible resin. Although they looked good, the flexibility was not as expected, even though the wall thickness is only 0.5mm. They can be squeezed between two fingers, but it would challenge the servos. The fatigue test was not good; they broke after being bent a few times."

                Click image for larger version

Name:	Victor_III_50.jpg
Views:	106
Size:	68.7 KB
ID:	179970

                Click image for larger version

Name:	Victor_III_51.jpg
Views:	108
Size:	75.0 KB
ID:	179969

                Then I came up with the idea to cast them out of silicone rubber (mold making rubber). I made a two-part mold with a core. The first attempt failed because the rubber deep inside the mold refused to cure. In subsequent attempts, I placed the mold in an oven with the idea of aiding the curing process, but that didn't work either. From the pictures, it can be seen that deeper in the mold, the curing of the silicone stopped. In my opinion, this was due to the lack of silicone mass to facilitate curing. At the bottom of the mold, the silicone is cured, as the body mass is higher.

                Click image for larger version

Name:	Victor_III_52.jpg
Views:	106
Size:	53.9 KB
ID:	179971

                Then I decided to use O-rings. The bushings in the endcap would come with threads, and an endcap would be used to secure and squeeze the O-ring. Initially, I went for a fine 0.5mm pitch thread. That did not work out, as the threads did not align properly and were damaged when forced.

                Click image for larger version

Name:	Victor_III_53.jpg
Views:	109
Size:	66.3 KB
ID:	179972

                Click image for larger version

Name:	Victor_III_54.jpg
Views:	107
Size:	84.2 KB
ID:	179974

                Click image for larger version

Name:	Victor_III_55.jpg
Views:	109
Size:	84.7 KB
ID:	179973

                I abandoned the idea of using a fine thread and instead applied a pitch of 1.25mm. The standard thread did not work, so I started applying a larger clearance between the endcap and the bushing. Both bushings and endcaps were marked with the applied clearance to keep them identified. An additional clearance of 0.05mm seems to hit the sweet spot.

                Difference between the 0.5mm and 1.25mm pitch

                Click image for larger version

Name:	Victor_III_56.jpg
Views:	111
Size:	95.0 KB
ID:	179975

                Different attempts one fail and two wins.

                Click image for larger version

Name:	Victor_III_57.jpg
Views:	107
Size:	85.8 KB
ID:	179977

                Click image for larger version

Name:	Victor_III_58.jpg
Views:	109
Size:	95.9 KB
ID:	179976

                Again o-rings are on order to carry out some testing.

                Grtz,
                Bart
                Practical wisdom is only to be learned in the school of experience.
                "Samuel Smiles"

                Comment

                • He Who Shall Not Be Named
                  Moderator
                  • Aug 2008
                  • 12373

                  Originally posted by bwi 971
                  The WTC pushrod seals are also ongoing. I wanted to use bellows, so I tried to manufacture them myself; however, all attempts failed. The bushings in the endcap are 8mm while the pushrods will be 2mm.

                  The first method I tried involved using flexible resin. Although they looked good, the flexibility was not as expected, even though the wall thickness is only 0.5mm. They can be squeezed between two fingers, but it would challenge the servos. The fatigue test was not good; they broke after being bent a few times."

                  Click image for larger version  Name:	Victor_III_50.jpg Views:	0 Size:	68.7 KB ID:	179970

                  Click image for larger version  Name:	Victor_III_51.jpg Views:	0 Size:	75.0 KB ID:	179969

                  Then I came up with the idea to cast them out of silicone rubber (mold making rubber). I made a two-part mold with a core. The first attempt failed because the rubber deep inside the mold refused to cure. In subsequent attempts, I placed the mold in an oven with the idea of aiding the curing process, but that didn't work either. From the pictures, it can be seen that deeper in the mold, the curing of the silicone stopped. In my opinion, this was due to the lack of silicone mass to facilitate curing. At the bottom of the mold, the silicone is cured, as the body mass is higher.

                  Click image for larger version  Name:	Victor_III_52.jpg Views:	0 Size:	53.9 KB ID:	179971

                  Then I decided to use O-rings. The bushings in the endcap would come with threads, and an endcap would be used to secure and squeeze the O-ring. Initially, I went for a fine 0.5mm pitch thread. That did not work out, as the threads did not align properly and were damaged when forced.

                  Click image for larger version  Name:	Victor_III_53.jpg Views:	0 Size:	66.3 KB ID:	179972

                  Click image for larger version  Name:	Victor_III_54.jpg Views:	0 Size:	84.2 KB ID:	179974

                  Click image for larger version  Name:	Victor_III_55.jpg Views:	0 Size:	84.7 KB ID:	179973

                  I abandoned the idea of using a fine thread and instead applied a pitch of 1.25mm. The standard thread did not work, so I started applying a larger clearance between the endcap and the bushing. Both bushings and endcaps were marked with the applied clearance to keep them identified. An additional clearance of 0.05mm seems to hit the sweet spot.

                  Difference between the 0.5mm and 1.25mm pitch

                  Click image for larger version  Name:	Victor_III_56.jpg Views:	0 Size:	95.0 KB ID:	179975

                  Different attempts one fail and two wins.

                  Click image for larger version  Name:	Victor_III_57.jpg Views:	0 Size:	85.8 KB ID:	179977

                  Click image for larger version  Name:	Victor_III_58.jpg Views:	0 Size:	95.9 KB ID:	179976

                  Again o-rings are on order to carry out some testing.

                  Grtz,
                  Bart
                  Now switch from O-rings to X-rings, and you have a winner. Good work there, sir -- we're all looking over your shoulder with rapt attention.


                  Who is John Galt?

                  Comment

                  • bwi 971
                    Captain
                    • Jan 2015
                    • 915

                    Originally posted by He Who Shall Not Be Named

                    Now switch from O-rings to X-rings, and you have a winner. Good work there, sir -- we're all looking over your shoulder with rapt attention.
                    I had a look and at this side of the pond they are realy expencive....16 x the cost of the equivalend o-ring.
                    As replcement will be easy I will stick to the o-rings.

                    Grtz,
                    Bart


                    Practical wisdom is only to be learned in the school of experience.
                    "Samuel Smiles"

                    Comment

                    • bwi 971
                      Captain
                      • Jan 2015
                      • 915

                      The end caps of the ballast tank are ready... Perhaps my reasoning behind making a custom water pump did not make sense. Routing the tubing inside is tricky, as the minimum bending radius of the tubing is relatively large. The last picture shows that both the discharge and suction of the pump and the lines integrated in the intermediate cap are in line. This was my aim; this way, no bending of the tubes is required. It will only require a small straight piece of tubing.

                      Click image for larger version  Name:	Victor_III_59.jpg Views:	0 Size:	51.8 KB ID:	180049

                      Click image for larger version  Name:	Victor_III_60.jpg Views:	0 Size:	62.2 KB ID:	180053

                      Click image for larger version  Name:	Victor_III_61.jpg Views:	0 Size:	45.5 KB ID:	180051

                      Click image for larger version  Name:	Victor_III_63.jpg Views:	0 Size:	45.3 KB ID:	180050

                      Click image for larger version  Name:	Victor_III_62.jpg Views:	0 Size:	54.1 KB ID:	180052

                      Grtz,
                      Bart


                      Practical wisdom is only to be learned in the school of experience.
                      "Samuel Smiles"

                      Comment

                      • JHapprich
                        Captain
                        • Oct 2017
                        • 724

                        Neat! End product or master pre-casting?

                        Jörg

                        Comment

                        • redboat219
                          Admiral
                          • Dec 2008
                          • 2775

                          Originally posted by bwi 971
                          The end caps of the ballast tank are ready... Perhaps my reasoning behind making a custom water pump did not make sense. Routing the tubing inside is tricky, as the minimum bending radius of the tubing is relatively large. The last picture shows that both the discharge and suction of the pump and the lines integrated in the intermediate cap are in line. This was my aim; this way, no bending of the tubes is required. It will only require a small straight piece of tubing.

                          Click image for larger version Name:	Victor_III_59.jpg Views:	0 Size:	51.8 KB ID:	180049

                          Click image for larger version Name:	Victor_III_60.jpg Views:	0 Size:	62.2 KB ID:	180053

                          Click image for larger version Name:	Victor_III_61.jpg Views:	0 Size:	45.5 KB ID:	180051

                          Click image for larger version Name:	Victor_III_63.jpg Views:	0 Size:	45.3 KB ID:	180050

                          Click image for larger version Name:	Victor_III_62.jpg Views:	0 Size:	54.1 KB ID:	180052

                          Grtz,
                          Bart


                          Having no access to a 3D resin printer. I, would have done the piping by hand. Annealing brass tubing with a torch then eye balling the bends.
                          Make it simple, make strong, make it work!

                          Comment

                          • bwi 971
                            Captain
                            • Jan 2015
                            • 915

                            Originally posted by JHapprich
                            Neat! End product or master pre-casting?

                            Jörg
                            End product, did the prototyping in PLA to verrify all was ok.
                            Grtz,
                            Bart
                            Practical wisdom is only to be learned in the school of experience.
                            "Samuel Smiles"

                            Comment

                            • bwi 971
                              Captain
                              • Jan 2015
                              • 915

                              Originally posted by redboat219

                              Having no access to a 3D resin printer. I, would have done the piping by hand. Annealing brass tubing with a torch then eye balling the bends.
                              I would have done the same, now its 3D CAD, estimate the tolerances/clearances, add supports, slicing and hope for the best.

                              Grtz,
                              Bart


                              Practical wisdom is only to be learned in the school of experience.
                              "Samuel Smiles"

                              Comment

                              • bwi 971
                                Captain
                                • Jan 2015
                                • 915

                                I noticed that the holes in the motor endcap are too large to accommodate an M3 thread. Instead of redoing the endcap, I decided to enlarge them to 3.5mm and fabricate M3 threaded inserts, and press/glue them in place. Eight pieces need to be fabricated.

                                In the endcap, the M3 bolt just drops into the hole (one of the inserds alongside).

                                Click image for larger version

Name:	Victor_III_70.jpg
Views:	57
Size:	35.8 KB
ID:	180153

                                The existing holes were opened up to 3mm; they just miss the inner edge (left 3,5mm, right 3mm).

                                Click image for larger version

Name:	Victor_III_64.jpg
Views:	55
Size:	51.2 KB
ID:	180154

                                Bushings are fabricated from 10mm aluminum rod that I had lying around.

                                Click image for larger version

Name:	Victor_III_65.jpg
Views:	55
Size:	50.9 KB
ID:	180159

                                Click image for larger version

Name:	Victor_III_66.jpg
Views:	54
Size:	52.1 KB
ID:	180158

                                Click image for larger version

Name:	Victor_III_67.jpg
Views:	55
Size:	87.2 KB
ID:	180157

                                Click image for larger version

Name:	Victor_III_68.jpg
Views:	54
Size:	57.3 KB
ID:	180156

                                Click image for larger version

Name:	Victor_III_69.jpg
Views:	54
Size:	71.7 KB
ID:	180155

                                Click image for larger version

Name:	Victor_III_71.jpg
Views:	55
Size:	31.3 KB
ID:	180160

                                Grtz,
                                Bart


                                Practical wisdom is only to be learned in the school of experience.
                                "Samuel Smiles"

                                Comment

                                Working...