Tom Chalfant - Bronco Type XXIII

Collapse
X
 
  • Time
  • Show
Clear All
new posts

  • trout
    replied
    Mark, I will chronicle my mistakes when they happen, oh look your wish is my command..... That did not take long.
    Oh where to begin......
    I did not get the melamine board, but while at a craft store, I got a pine base (first of many mistakes). It was warped a small bit and my upright, I did not put a angle in the back for support.
    Click image for larger version

Name:	Bronco Type 23_036.jpg
Views:	1
Size:	88.8 KB
ID:	84749
    I did not think that out so well. But hindsight is 20/20
    CA'd a strip of 100 grit sandpaper onto the center of the board to hold it in place. I did use tape to hold it. The blade was put into the Foredom hand piece. It should have been put in deeper (another mistake).
    Once cutting started, it would begin O.K., but soon several factors came into play. One the Foredom slid off center so the blade was cutting at an angle. Two the blade would pull up or down and the warped base allowed movement. Then three, the bit slid out and began to wobble.. So that gave me this:
    Click image for larger version

Name:	Bronco Type 23_037.jpg
Views:	1
Size:	100.5 KB
ID:	84750
    All over the place there were gouges and butchered cuts. I was angry and I just got ticked off the more I cut. So, more work for me. Here is the aft and bow.
    Click image for larger version

Name:	Bronco Type 23_038.jpg
Views:	1
Size:	95.5 KB
ID:	84751Click image for larger version

Name:	Bronco Type 23_039.jpg
Views:	1
Size:	93.4 KB
ID:	84752
    The top came off and for fun, I put the sub-driver in. Here is a panoramic, photo stitched image.
    Click image for larger version

Name:	Bronco Type 23_040.jpg
Views:	1
Size:	100.4 KB
ID:	84753
    There is a lot of space in there. It is interesting to see how the model's supports came out. It held the WTC well and gave me an idea of how it would come together.
    Click image for larger version

Name:	Bronco Type 23_041.jpg
Views:	1
Size:	86.5 KB
ID:	84754
    Next photo is the bow vertical cut. The aft end of the bollard is the reference point for the cut.
    Click image for larger version

Name:	Bronco Type 23_042.jpg
Views:	1
Size:	91.5 KB
ID:	84755
    Before the halves were put together, I should have taken more time to remove more of the internal supports put in the sub. I thought I can just remove them later, and I can, but doing it before would be so much easier.
    Click image for larger version

Name:	Bronco Type 23_043.jpg
Views:	1
Size:	91.9 KB
ID:	84756
    A couple of quick notes about the sub-driver. A look at the seals and the line of o-ring contact was real good.
    Click image for larger version

Name:	Bronco Type 23_044.jpg
Views:	1
Size:	86.4 KB
ID:	84757
    But the best part for me is this modification. The SAS plumbs the air out of the WTC from the battery compartment and not the engine room. I like that better. Plus I can put a desiccant below the opening to keep things dryer.
    Click image for larger version

Name:	Bronco Type 23_045.jpg
Views:	1
Size:	86.4 KB
ID:	84758

    Leave a comment:


  • greenman407
    replied
    Once again Tom, you are Blazing a trail that others will follow, including me. Great thread! I will watch with interest. Please chronicle all your mistakes and all the kits short comings so that we will know what to watch for. You are on the point and we are bringing up the rear. As you "Take Fire" we will be watching from the safety of our computers. LOL
    Last edited by greenman407; 11-30-2013, 08:25 AM.

    Leave a comment:


  • trout
    replied
    Come and listen to a story about a man named Jed
    A poor mountaineer, barely kept his family fed,
    Then one day he was shootin at some food,
    And up through the ground came a bubblin crude.
    Oil that is, black gold, Texas tea.
    Well the first thing you know ol Jed's a millionaire....

    I am not Jed, but you might think that with this contraption.
    Click image for larger version

Name:	Bronco Type 23_031.jpg
Views:	1
Size:	89.1 KB
ID:	84710
    It worked for the most part.
    Click image for larger version

Name:	Bronco Type 23_032.jpg
Views:	1
Size:	87.4 KB
ID:	84711
    My hold down technique leaves a lot to be desired. Surprisingly it held the sub pretty good for getting the cut line laid out.
    Click image for larger version

Name:	Bronco Type 23_033.jpg
Views:	1
Size:	98.9 KB
ID:	84712
    The bow vertical cut is just behind the rectangle square on the bow and the aft vertical cut is along a scribe line.
    Click image for larger version

Name:	Bronco Type 23_034.jpg
Views:	1
Size:	92.1 KB
ID:	84713Click image for larger version

Name:	Bronco Type 23_035.jpg
Views:	1
Size:	107.3 KB
ID:	84714

    Leave a comment:


  • trout
    replied
    Thank you Andy! Using a cable is a great idea, so I will store that for future use. On this build I am using the fittings kit that goes with the Bronco Type XXIII. There are at least 4 or 5 more subs I want to build before I try making one from scratch. I already know which sub I want to do.

    Albion, I just read through your Koryu Type D build. Very informative and is something that would work for this build. The decision is will I want to tackle it.

    Leave a comment:


  • Subculture
    replied
    A technique I've seen used for routing control links into tight areas is to use pulleys, not toothed pulleys though. They used a round pulley (custom machined- easy when you have a lathe) with fishing wire- the metal stuff which won't stretch. Tensioned up it has sufficient grip so that it doesn't slip. You can route the wires to a more accessible part of the boat where it mates up with another pull which can be actuated with a conventional push rod.

    Toothed pulleys would also work, but tend to be on the large side.

    Make sense?

    BTW, Norbert's book is tricky, but stick with it, it makes life much easier later on especially if you plan to design and build boats from scratch.

    Leave a comment:


  • trout
    replied
    David,
    1.Got it!
    2. Yep, did that with the Gato
    3. O.K.
    4. Makes sense
    5. I couldn't carry a note even if it had handles and would you settle for grass clippings and a blow-up doll?

    So with that we continue building......
    There are some things that need to be done prior to sealing up the hull. One is the area the prop bearing will go. There is a thin wall there that was easy to just cut out.
    Click image for larger version

Name:	Bronco Type 23_014.jpg
Views:	1
Size:	111.8 KB
ID:	84632Click image for larger version

Name:	Bronco Type 23_015.jpg
Views:	1
Size:	99.9 KB
ID:	84633
    There are some walls on each side of the hulls that are support structure or maybe has another use, I probably should read the instructions. Anyway, to remove the walls, I used a x-acto blade to score the base of the dividers and the curved walls. Then snipped down to the base.
    Click image for larger version

Name:	Bronco Type 23_016.jpg
Views:	1
Size:	85.1 KB
ID:	84634Click image for larger version

Name:	Bronco Type 23_017.jpg
Views:	1
Size:	83.2 KB
ID:	84635
    Once the wall is separated on each side, then bend the wall and it will split on the area that you scored with the blade.
    Click image for larger version

Name:	Bronco Type 23_018.jpg
Views:	1
Size:	96.0 KB
ID:	84636Click image for larger version

Name:	Bronco Type 23_019.jpg
Views:	1
Size:	90.6 KB
ID:	84637
    For fun I used the sub-driver foundations as a guide to draw the curve of the sub-driver. Scored along the line and "snapped" out the piece. This is not necessary, this is me playing. I will probably end up cutting this out eventually.
    Click image for larger version

Name:	Bronco Type 23_020.jpg
Views:	1
Size:	91.7 KB
ID:	84638Click image for larger version

Name:	Bronco Type 23_021.jpg
Views:	1
Size:	91.1 KB
ID:	84639
    The bow had an area that could trap a lot of air, so I cut out most of it.
    Click image for larger version

Name:	Bronco Type 23_022.jpg
Views:	1
Size:	88.3 KB
ID:	84640Click image for larger version

Name:	Bronco Type 23_023.jpg
Views:	1
Size:	93.0 KB
ID:	84641
    Morked on the upper rudder support where I will need to drill a hole.
    Click image for larger version

Name:	Bronco Type 23_024.jpg
Views:	1
Size:	104.3 KB
ID:	84642
    Also laid the rudder assembly into the notches and marked the range of reach the horn has.
    Click image for larger version

Name:	Bronco Type 23_025.jpg
Views:	1
Size:	86.4 KB
ID:	84643
    CA'd the bearing foundation to one hull side. Tested the two halves together to make sure they fit good. Also before attaching the bearing foundation, check the fit there is a right fit and wrong.
    Click image for larger version

Name:	Bronco Type 23_026.jpg
Views:	1
Size:	97.0 KB
ID:	84644
    Ground out the area holding it up to the light. It is very thin, but still the horn did not travel all the way around. It still hit the hull. That may be O.K., it looked like a lot of range is there, but if necessary there is a little room on the horn that can be shaved down.
    Click image for larger version

Name:	Bronco Type 23_027.jpg
Views:	1
Size:	97.8 KB
ID:	84645
    I did a kit review on the Gato, Aluminaut, and a simple one on the Skipjack. I am not doing this here because you will see the great details as it is built. There are some notable touches like the thinning of the walls near the holes to give them a scale thickness. Very cool.
    Click image for larger version

Name:	Bronco Type 23_028.jpg
Views:	1
Size:	99.5 KB
ID:	84646
    Using a cohesive glue worked my way around the sub's hull seam. You can also see the mark for drilling out on the upper rudder support.
    Click image for larger version

Name:	Bronco Type 23_029.jpg
Views:	1
Size:	104.0 KB
ID:	84647
    Fot he most part everything fit together well. Worked my way around the sub in sections. So, now it is sitting to dry overnight.
    Click image for larger version

Name:	Bronco Type 23_030.jpg
Views:	1
Size:	100.2 KB
ID:	84648
    I will need to build a holder to mark the hull and another for holding the Dremel to saw the hull open. With Thanksgiving coming up this week, sub work space will be hard to come by, but I will try to do what I can.
    Last edited by trout; 11-25-2013, 05:57 AM.

    Leave a comment:


  • He Who Shall Not Be Named
    replied
    Originally posted by trout
    O.K., If I see the photos correctly, there is a hole drilled in the top that you drop the wire (rudder shaft) down through. Do I still need to thin the walls down in the upper rudder support?
    Yes on both counts. Grind a 1/8" hole into the top of the upper rudder support -- in alignment with the rudder operating shaft -- and the bottom of the lower rudder support. Drill holes to pass the 1/16" rudder operating shaft into the bottom of the upper rudder support and the top of the lower rudder support.

    With the hull glued together, to install the rudder:

    1. pass the rudder operating shaft up through the bottom of the lower rudder support -- place the rudder into position -- and push the operating shaft up into the rudder, through the bottom hole in the upper rudder support and hold it there by tightening the rudder operating shaft set-screw (on the starboard side of the rudder)

    2. Put a Z-bend into the end of a 12" length of 1/16" diameter brass rod. This will be your rudder pushrod. Make up the Z-bend to the bell crank and slather on some CA to make the two a rigid assembly (don't sweat it, that union will break later). Push the bell crank, using the pushrod as a handle, into the tight confines of the upper rudder support. While doing this look down through the 1/8" hole in the top of the upper rudder support and finagle things till the bore of the rudder pushrod is in alignment with the top of the rudder operating shaft. Push the rudder operating shaft upward, through the bore of the rudder bell-crank.

    3. tighten the set screw within the rudder bell-crank to make it fast to the rudder operating shaft.

    4. tighten the set-screw in the side of the rudder to make the rudder fast to its operating shaft.

    5. sing my praises, sprinkle rose petals at my feet, and deliver 20 Filipino virgins (female types, please) to my bed chambers, immediately!

    M

    Leave a comment:


  • trout
    replied
    O.K., If I see the photos correctly, there is a hole drilled in the top that you drop the wire (rudder shaft) down through. Do I still need to thin the walls down in the upper rudder support?

    Leave a comment:


  • He Who Shall Not Be Named
    replied
    You can fish the rudder pushrod and bell-crank in there with the unit assembled, so go ahead, glue away, Tom

    Click image for larger version

Name:	DSCF4603.jpg
Views:	2
Size:	91.7 KB
ID:	84604Click image for larger version

Name:	DSCF4642.jpg
Views:	2
Size:	93.6 KB
ID:	84605Click image for larger version

Name:	DSCF4644.jpg
Views:	2
Size:	87.8 KB
ID:	84606Click image for larger version

Name:	DSCF4630.jpg
Views:	2
Size:	87.6 KB
ID:	84607Click image for larger version

Name:	DSCF4632.jpg
Views:	2
Size:	85.8 KB
ID:	84608

    M
    Last edited by He Who Shall Not Be Named; 11-24-2013, 06:20 PM.

    Leave a comment:


  • trout
    replied
    Wow, yeah that is some great input. Andy, you really need to do more videos. I guess I got to open Norbert's book again. It just gives me a headache every time I do.

    Went out and bought a melamine board and began to glue the halves together.
    Click image for larger version

Name:	Bronco Type 23_009.jpg
Views:	1
Size:	96.4 KB
ID:	84599
    The fit was good, but on one set of halves it fit with a wobble in it. Meaning either the bow would go slightly high or slightly low.
    Click image for larger version

Name:	Bronco Type 23_010.jpg
Views:	1
Size:	95.1 KB
ID:	84600
    So I placed the pieces on top of the already glued half and the aft end would not come together. There are some injection tabs left in that needed to be snapped off.
    Click image for larger version

Name:	Bronco Type 23_011.jpg
Views:	1
Size:	94.7 KB
ID:	84601Click image for larger version

Name:	Bronco Type 23_012.jpg
Views:	1
Size:	94.9 KB
ID:	84602
    With the tabs off, I tacked the pieces together and then set the half down on the board for better application of cohesive glue. After it set up, did a test fit and the halves fit pretty good.
    Click image for larger version

Name:	Bronco Type 23_013.jpg
Views:	1
Size:	104.6 KB
ID:	84603
    Now the decision is how to fit the rudder mechanics and when. Place it in now and seal the halves or put it in later and either open the hatch to allow access or I might be able to feed the rod through the bottom.

    Leave a comment:


  • He Who Shall Not Be Named
    replied
    Damn good discussions. I'm taking this all in. Great stuff, guys.

    M

    Leave a comment:


  • Subculture
    replied
    Bear in mind that for a small model like the XXIII a conventional servo has more than sufficient grunt to shift the weight backwards and forwards, and makes installation and control a breeze. Even the small 9 gram servos can move a pound or so of weight fairly easily.

    The little delphin I am working on has a ballast shifter in the outline. I plan to use one of the little 1.5 gram linear servos to push the main battery pack fore and aft.

    Leave a comment:


  • Albion
    replied
    Originally posted by Subculture
    This type of trim is common with many spindle stern type boats, where the prop is prone to ventilation when close to the surface. .
    Check out the Type D koryu's, thats why i installed the ballast shifter

    Leave a comment:


  • Subculture
    replied
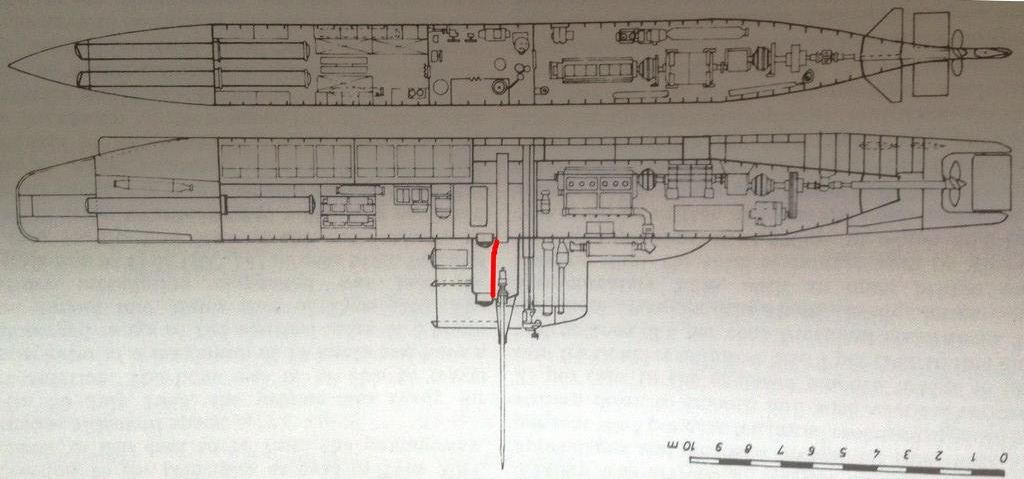
    The C.G on the XXIII should be where I've painted in the red line, no more no less. That would be the C.G when the boat is submerged, and the boat should be level. For surface running with the stern down as shown in earlier pictures, the C.G would be aft of this point.

    Leave a comment:


  • Subculture
    replied
    This type of trim is common with many spindle stern type boats, where the prop is prone to ventilation when close to the surface. They still do it on modern boats, for instance if you look at some pictures of the Astutue class, you'll see it tends to be trimmed with its bum down in the water.

    I've always thought of the XXIII as a 'big' Seehund. The hull shapes are essentially the same, just that the Seehund has a longer and squatter conning tower. these tended to be trimmed in the same way when you look at pictures of them in their element.

    The stern down trim is achieved by flooding the rear tank a little or perhaps stowage of ballast. In a model with a single tank, you can get the same effect by either biasing the tank a little towards the front, or adding ballast shifting. The former method has the snag that with changing water density so will your longitudinal trim alter.

    The latter is most easily achieved by mounting the battery on a cradle and moving it back and forth with a servo. There are details on this in Norberts book. Lipo batteries don't offer the same mass as other types, so you might have to add lead to create a decent amount of weight, generally 10-20% of the boats overall displacement is adequate to get good control of the boats longitudinal trim.

    Not many sub modellers bother with this detail, but it's not a huge effort to install if you have a spare channel and all I can say is try it, you'll like it.

    Leave a comment:

Working...