Fantasy sub build [javelin 7]

Collapse
X
 
  • Time
  • Show
Clear All
new posts
  • WOODWEAVER
    Ensign
    • Aug 2009
    • 7

    Fantasy sub build [javelin 7]

    On Fri, May 6, 2011 at 12:35 AM, MICHAEL GORDON <woodturnerusa@gmail.com> wrote:
    Hi, This is my submission to the 2011 contest. I chose a fantasy sub that I saw on the internet [with 2 utube vids]. The Japanese videos of their fantasy sub meets looked like fun
    I chose this project for several reasons. It is powered by a jet drive and I have never tried one before.
    The model has multiple large access hatches and it appeared to just screw and snap together. This should make construction and maintanence easy.

    I normally build from plans, this time I will wing it and build as I go since there is no real boat to be compared to [this aspect is really appealing].

    Lets get started: PARTS: [1] Javelin 7 --$32 on eBay plus postage.
    [2] Jet drive [note at the time I was looking the Graupner Small Jet Drives were out of production for a indefinate time. I found a German company KMB-Drive Set JEt 2804 which has the ability to deflect the water jet stream to steer the vehicle. Excellent service and quality from the company.
    [3]. Subdriver: I had David customize a subdriver with a motor and tray for all the goodies. You will see that the motor takes up the whole aft bulkhead requiring that the control functions exit the subdriver towards the bow. This will add a challenge since I have never seen this done.
    [4]. Lexan extension: I will extend the vehicle by adding a center section made up of a 2 1/2 inch lexan tube which fits perfectly between the forward and aft sections of the Javelin 7. The model splits in the center. I will build up the tube to follow the contour of the hull. The subdriver fits within this piece. [Lexan supplied by David so that I did not have to buy eight feet for a six inch length.]
    Click image for larger version

Name:	javelin7-mv-superman.jpg
Views:	1
Size:	57.8 KB
ID:	100924Click image for larger version

Name:	DSC_0899 - Copy.jpg
Views:	1
Size:	83.7 KB
ID:	100919Click image for larger version

Name:	JAV 7_0900.jpg
Views:	1
Size:	80.0 KB
ID:	100925Click image for larger version

Name:	JAV7_0907.jpg
Views:	1
Size:	84.2 KB
ID:	100922Click image for larger version

Name:	JAV 7,0.jpg
Views:	1
Size:	82.6 KB
ID:	100920Click image for larger version

Name:	JAV7_0906.jpg
Views:	1
Size:	93.2 KB
ID:	100921Click image for larger version

Name:	JAV7_0904.jpg
Views:	1
Size:	87.7 KB
ID:	100926Click image for larger version

Name:	JAV 7 _0902.jpg
Views:	1
Size:	90.5 KB
ID:	100923
  • oztruck
    Commander
    • May 2010
    • 317

    #2
    Great idea. Looks like it will be a lot of fun to build and drive. Keep the photos coming

    Comment

    • redboat219
      Admiral
      • Dec 2008
      • 2752

      #3
      What's the dimensions of the Javelin SD?
      Last edited by redboat219; 05-07-2011, 03:11 AM.
      Make it simple, make strong, make it work!

      Comment

      • WOODWEAVER
        Ensign
        • Aug 2009
        • 7

        #4
        The SD is 11 1/2 inches including the brass drive coupler.

        Comment

        • WOODWEAVER
          Ensign
          • Aug 2009
          • 7

          #5
          Explanation of previous photographs [left to right]:
          1. Javelin 7 model as it arrived from ebay seller.
          2. Model of Javelin 7
          3. Hatches open showing easy access
          4. top model is 17 1/2 inch long and bottom one dissassembled with SubDriver placed in approximate location is 24 !/2 in long
          5.Bottom shows view of KMB Jet Drive installed
          6. Another view with lexan 7 inch extension tube with subdriver in it.
          7. Lexan tube, model halves and subdriver.
          8. Rear view of model . The entire model came apart by simply unscrewing the different sections. Except the rear area- The two black oval areas with the red center was glued and needed to be cut apart and peeled away. The glue was silicone and strechy.

          Comment

          • redboat219
            Admiral
            • Dec 2008
            • 2752

            #6
            What's the diameter of the SD, around 2" I presume? Where will you be placing the intake for the water jet?
            Make it simple, make strong, make it work!

            Comment

            • RCSubGuy
              Welcome to my underwater realm!
              • Aug 2009
              • 1777

              #7
              I think Aquadeep on Subpirates did a conversion of this. I've seen it in person and it was a blast to watch! He had it set up to drive like a plane, and it was wildly acrobatic, doing barrel rolls and loops all through the pond. Made me want to try one of my own, only bigger, maybe using the old GI JOE Cobra SR-71 blackbird toy. That was around 30" long, if memory serves. Would work great for this, too!

              Good luck!

              Comment

              • WOODWEAVER
                Ensign
                • Aug 2009
                • 7

                #8
                The Sd is 1.75 inch dia. by 11 1/2 inch from end of brass drive coupler to opposite end cap

                Comment

                • WOODWEAVER
                  Ensign
                  • Aug 2009
                  • 7

                  #9
                  Aquadeep was my inspiration

                  Comment

                  • redboat219
                    Admiral
                    • Dec 2008
                    • 2752

                    #10
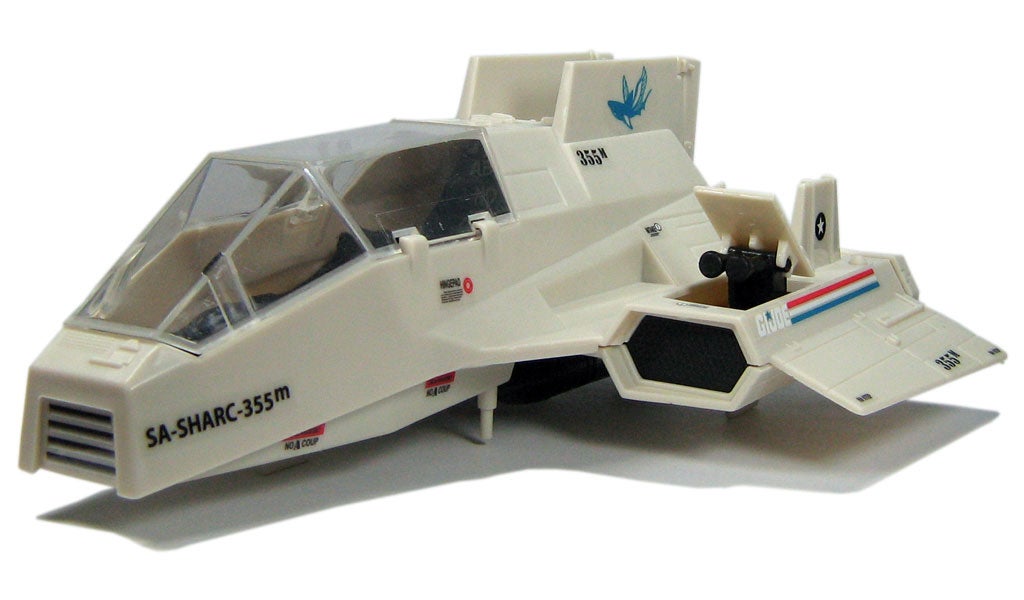
                    Here's another toy that I think would look cool RCed.
                    G.I. Joe's S.H.A.R.C.

                    Make it simple, make strong, make it work!

                    Comment

                    • WOODWEAVER
                      Ensign
                      • Aug 2009
                      • 7

                      #11
                      Fantasy sub build continued

                      I am building the extended center section of the sub. Five ribs were made as follows:
                      Styrene was cut into five equal rectangles that were 1/4inch larger than the final rib size. Each piece was temporarialy attached to each other and to a waste block of wood with indoor-outdoor double side carpet tape. The rib outline was drawn on the top piece of styrene. A 2 1/2 inch hole was drlled in the center with a fostner bit. two holes were drilled the size of the O.D. to snugly fit a carbon fiber arrow shaft. This makes it easy to quickly align the ribs. The outside was cut with a band saw sanded on a 10 inch disk sander and refinded with a spindle sander. A drum sander was used to open up the inside diameter so that the 2 1/2 lexan tube would snugly fit. The ribs were placed over the lexan tube, the pre-cut carbon fiber arrow shafts were inserted and the skeleton was aligned. Supper glue was used to tack everything together. Expandable foam from a spray can was used to fill the spaces. The foam was left to set over night. Rasps were used to get the rough shape. Razor blades were used to trim the excess foam back to the ends of the lexan tube. The foam and the ribs were then trimmed so that the grey plastic end caps could fit over the styrene rib at each end. This removed an extra 1/8 inch of material to allow for the fiberglass hull. The material was removed with the disk and spindal sanders. The end caps were super gued in place. Four layers of fiber glass cloth and resin were applied.
                      Attached Files

                      Comment

                      • redboat219
                        Admiral
                        • Dec 2008
                        • 2752

                        #12
                        Looks like a blackbird.
                        Wonder how the longer fuselage and chines would affect underwater handling?
                        Last edited by redboat219; 05-23-2011, 12:06 PM.
                        Make it simple, make strong, make it work!

                        Comment

                        • WOODWEAVER
                          Ensign
                          • Aug 2009
                          • 7

                          #13
                          Good question. I plan on adding bow planes as next step.

                          Comment

                          • redboat219
                            Admiral
                            • Dec 2008
                            • 2752

                            #14
                            Why not the stern planes?
                            Will you be utilizing elevon controls with your bow planes?
                            Make it simple, make strong, make it work!

                            Comment

                            Working...