

Thanks for keeping us updated. Wow the detail is incredible. I can`t wait to see more.
-
-
And Yes Very Nice !!!What one Man can do, YOU can do too!Comment
-
There’s awful looking model building. There’s just OK model building. There’s fine model building. Then there’s over-the-top-WTF-am-I-doing model building.
We’ve all been there: you’re cruising along with a model job and you’ve got most of the hard work out of the way. Almost ready for paint, you’re looking forward to wrapping the project up so you can move on to the next job. Then, something grabs you: you start obsessing about the small **** – stuff you had not even considered when you prepared the project to-do list: you start counting the god damned rivets; your waking hours find your brain filled with an ever increasing list of things you can do to make the display better; the list of what next to do and how to do it even working its way into your sleeping thoughts.
This project exemplifies. Too late I found myself in the grip of the dreaded, all consuming malady called, Advanced Modelers Syndrome. I blame the Malakhit Design Bureau, who designed this beautiful submarine back in the late 50’s. Somehow I caught a bad dose of AMS from those long dead, sneaky Commie SOB’s!
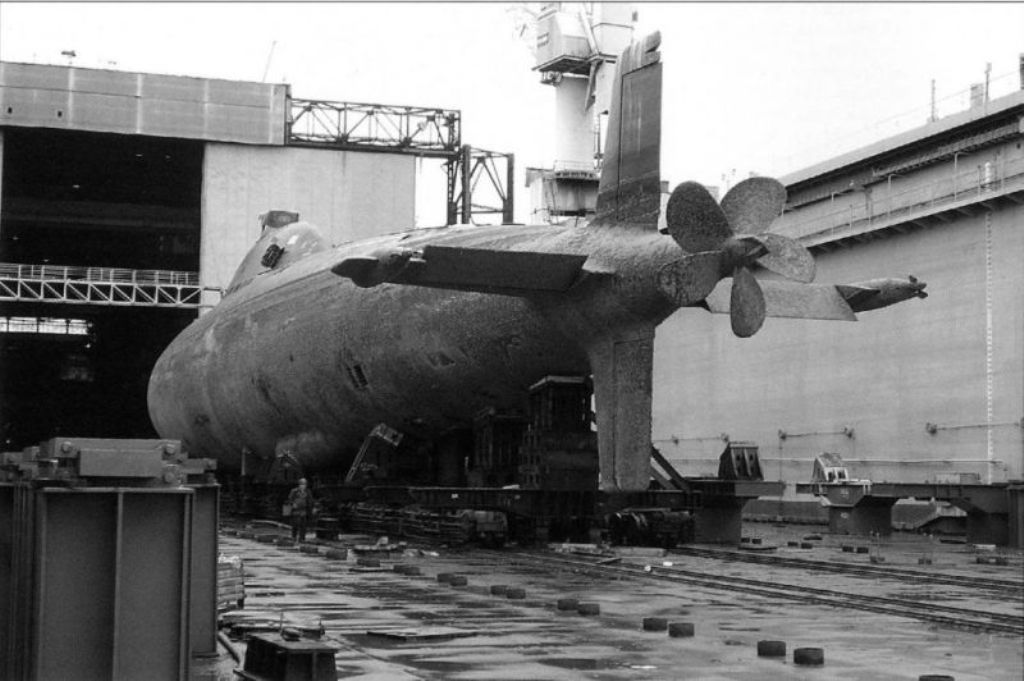
I came to the inescapable conclusion that the display would not be complete without the creeper/outboard propellers.
OK, the angst out of my system. Moving on:
(And let’s change that nomenclature – as the ALFA just was not at all stealthy, no matter what – let’s call these little propellers and their associated running gear, outboards).
The use of such outboards is not unique to the Malakhit ALFA. You see similar units on their VICTOR’s and the single unit of the Rubin design bureau’s MIKE class. The little propellers, which are of the controllable pitch type, are represented as feathered -- the position they normally assumed, the blades offering minimal drag. When in use the outboard propellers would assume a pitch suitable for the direction and amount of thrust required.
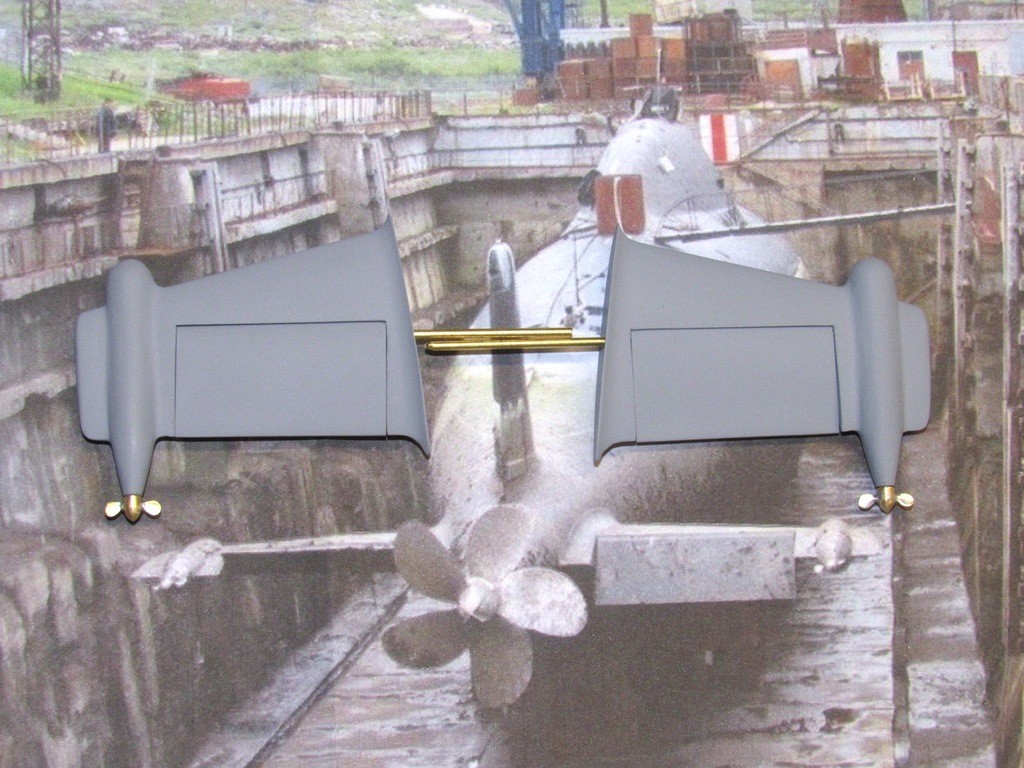
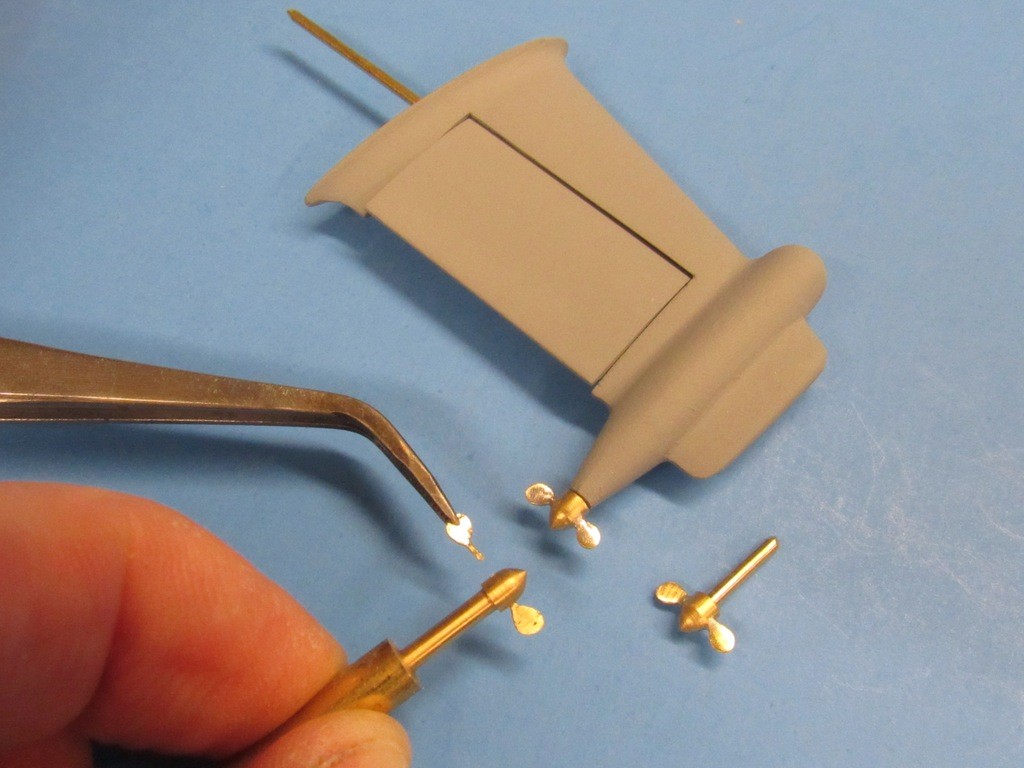
Below are the 1/96 scale horizontal stabilizers-stern plan masters equipped with the just completed outboard propellers, displayed over a picture of a dry-docked ALFA class submarine.
In the interest of imparting strength to small items, be they masters or display parts -- particularly items of thin section like these two propellers -- I typically fabricate from soldered brass, or machined from brass, wood, or RenShape; or cobbled together from commercially available extruded metal/plastic shapes and sheet. There’s nothing more frustrating than putting a lot of work into a sub-assembly only to have it later crumble in your hand at some later point. Mechanically robust, survivable masters and parts are at the top of my list of physical properties when I work out the fabrication methodology and materials selection.
For these little propeller masters I elected to lathe turn the hubs from machine brass, and form the blades from a stamped .032” diameter rod of cartridge brass, bonding the three elements with common Tin-Lead solder.
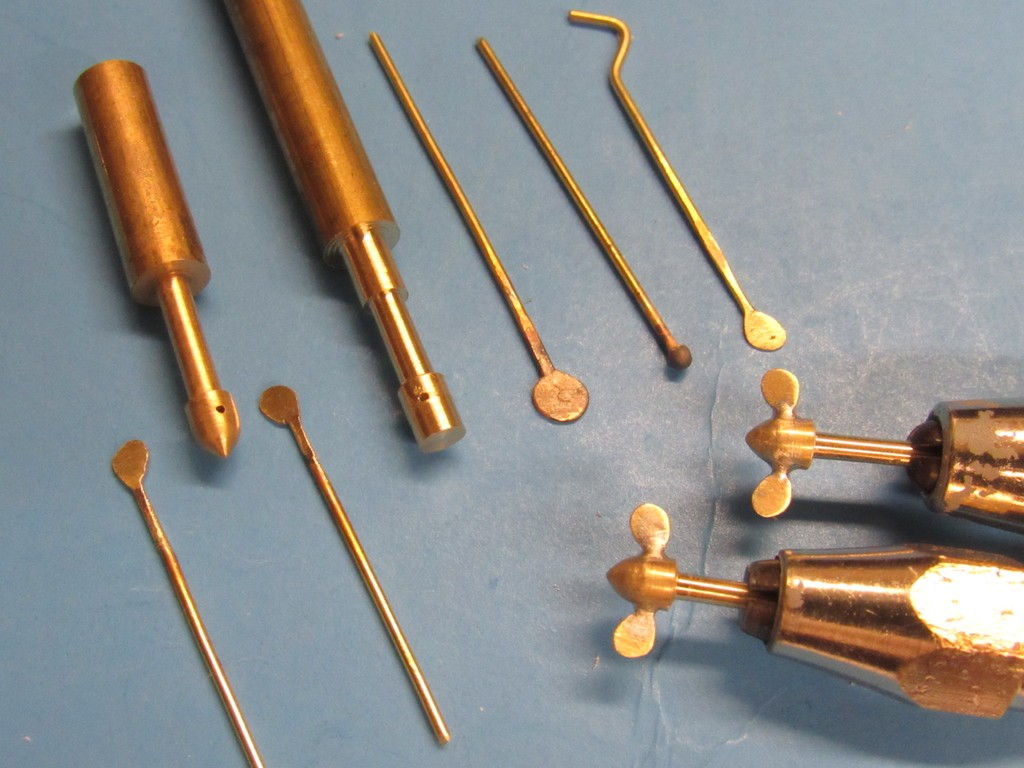
To the extreme left is a turned hub with a transverse .015” hole drilled through it to accept the nubs at the base of the two .020” thick propeller blades.
Center is a hub-in-the-making just after drilling the transverse hole and before the dunce-cap tapper is turned to shape. It’s easier to drill through a simple curve than a complex one.
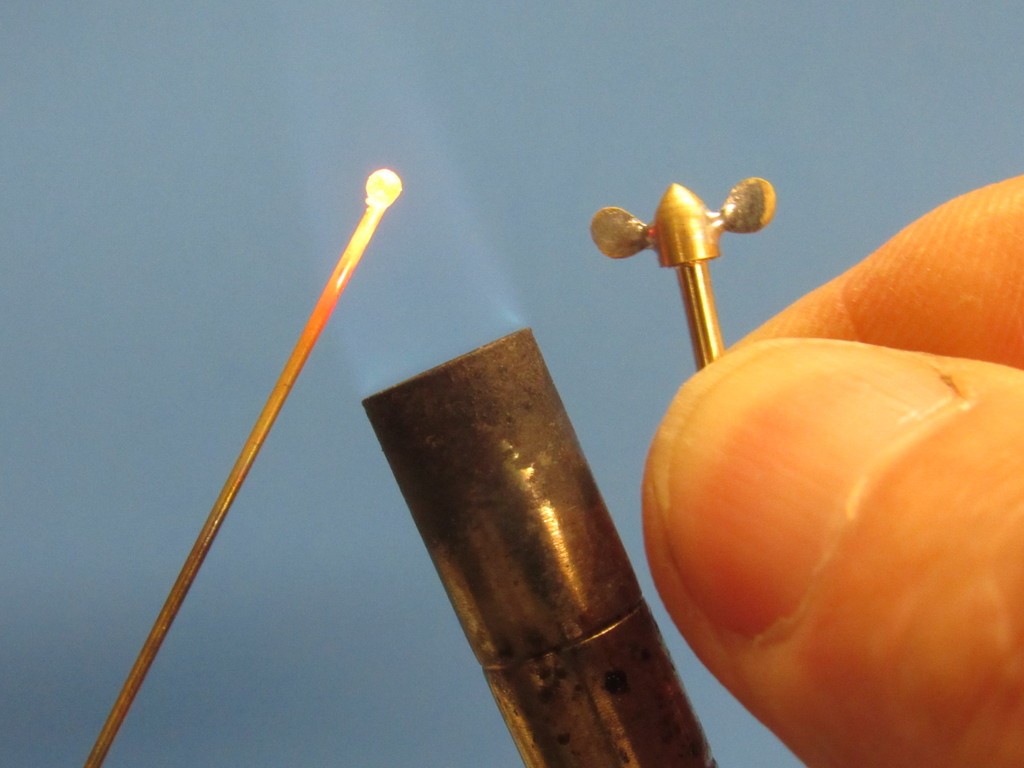
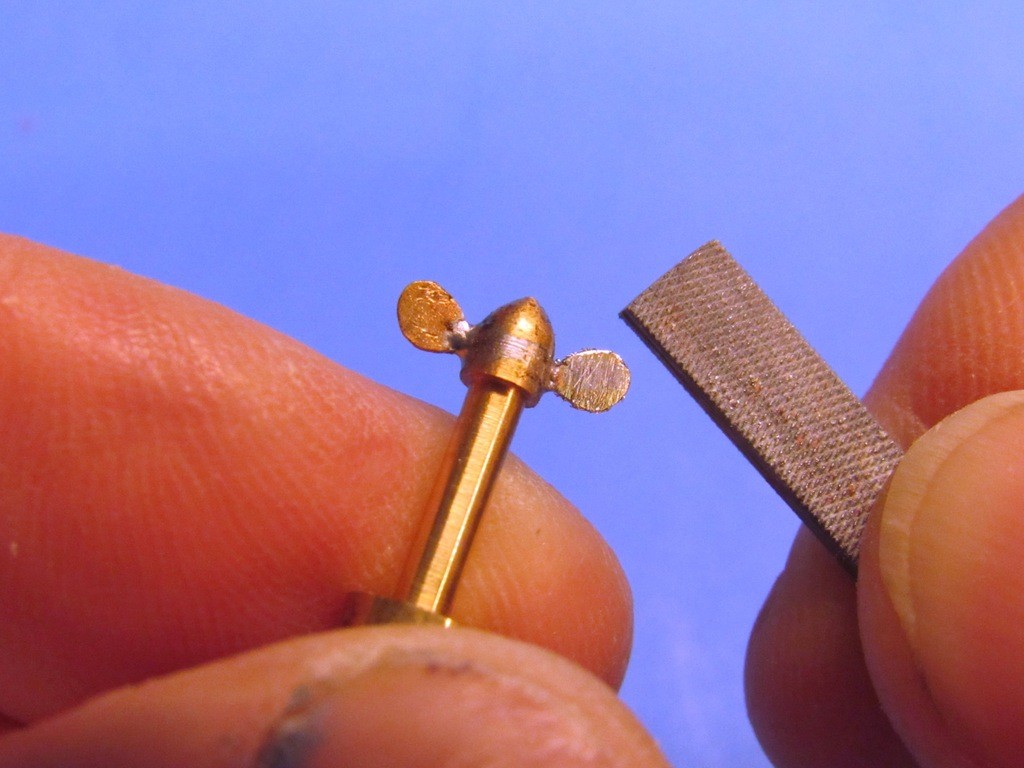
The three items at the upper right of the photo give up how I produce a propeller blade blank from a length of .032” diameter brass rod: The center rod has already had its end heated to the point of collapsing into a substantial ball of the metal; to the left of that is a ball hammered to a flat disc; and to the extreme right a blade part after being shaped with a fine carbide cut-off wheel and files.
(Ben Guenther taught me to get into the habit of making more parts for a small project than you eventually need, as having those spares on hand forestalls frustration when one is lost to the floor, or you want to present a photographic record of process, like you see here).
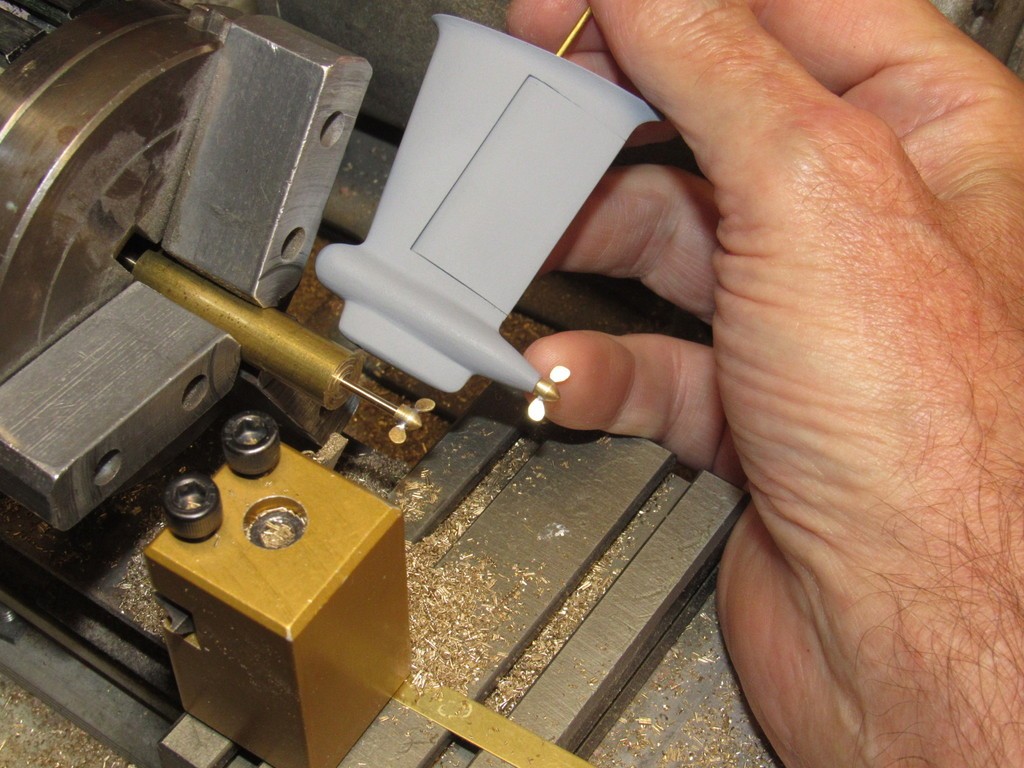
If you heat the end of a brass rod to the point where the tip melts, the molten metal will fall back on the melting material under it, and the process will continue. The size of the molten ball will increase as long as the heat is maintained. Eventually a ball of metal, attached to its parent rod, is produced that is ideal for further shaping with hammer and anvil. This is how a propeller blade starts. In my hand is the end-game, a finished outboard propeller master.
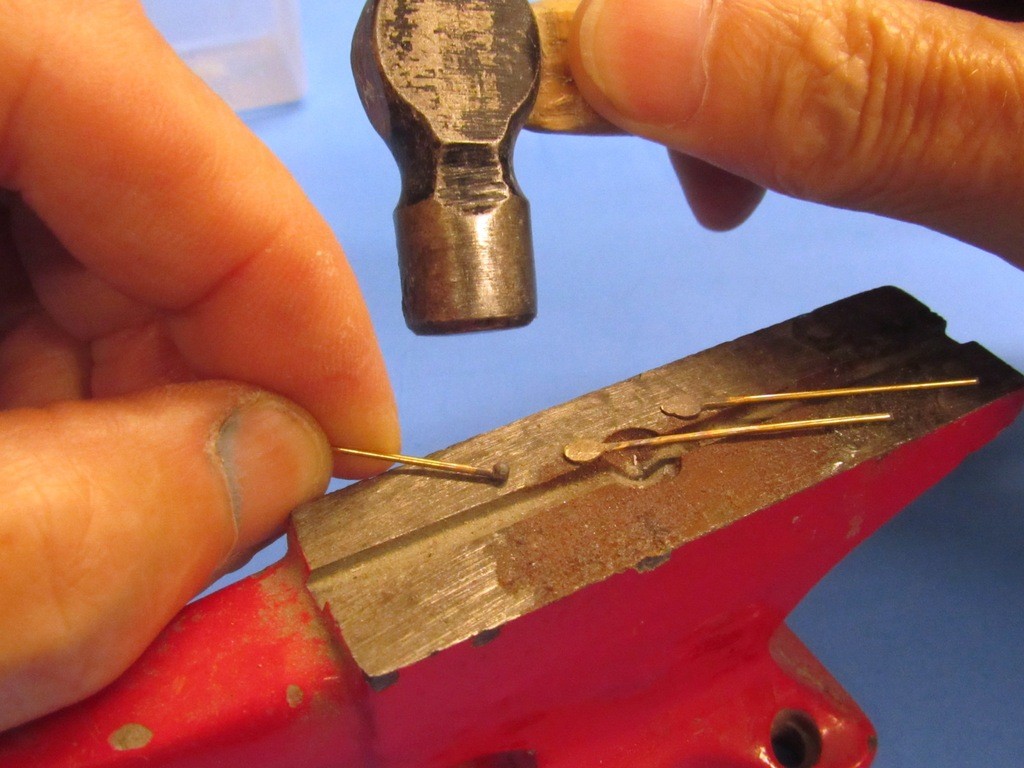
On the face of this little anvil are before-and-after looks at how the hammer is used to mash flat the room-temperature ball of brass into a flat blank ready for profile shaping into a propeller blade part. The ball initially, because of the previous heating, is very soft and easy to shape. But, after a few healthy hammer blows the brass starts to ‘work harden’ and further blows would shatter the metal. So, periodically the work is taken to a red heat and allowed to naturally cool back to room temperature, once again softening the metal into malleability. The thinning-widening process continues till the blade blank, by now a disc and a bit thicker than the desired .020”, is achieved. Then, if required, the disc and stem are further hammered to get them to the desired rigidity necessary for the next step: shaping the disc to the profile of a blade.
Note that a substantial amount of the machine brass round-stock from which the hub was turned is retained and used as a convenient handle during the blade assembly.
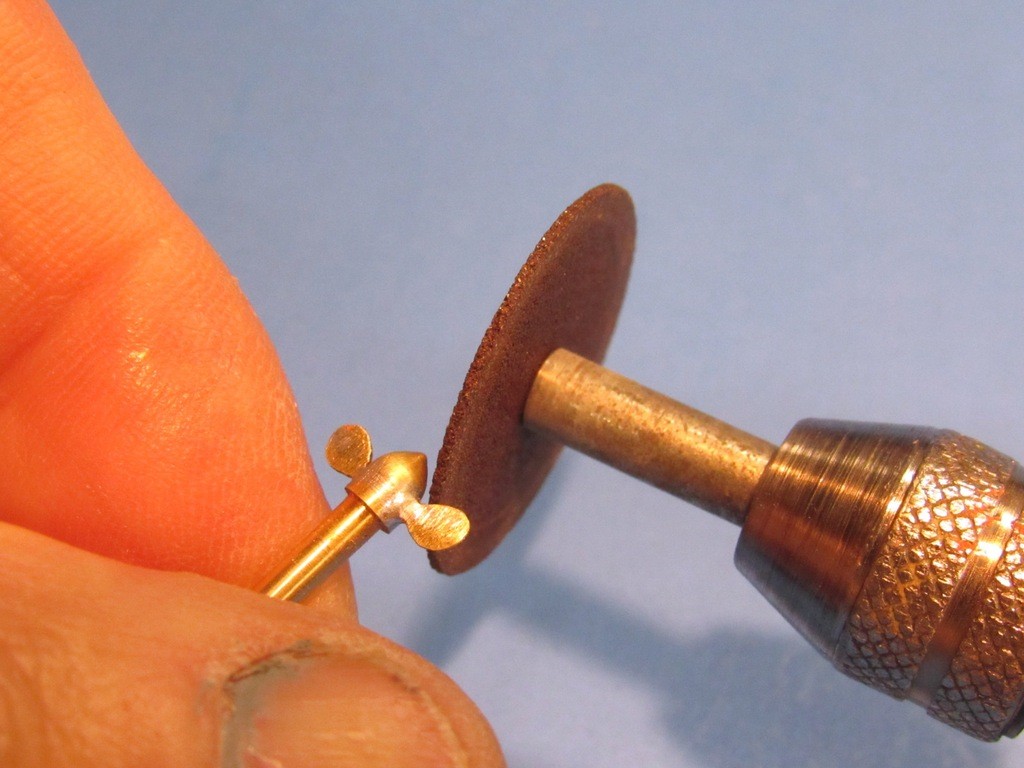
A small, unreinforced carbide cut-off wheel and files get the blade blank to a rough profile of the desired blade shape. The propeller blade stem is cut to a length that will reach half-way into the turned brass hub transverse hole, and the stem crimped as required to make it an interference fit within that hole. The two friction-fit blades are then prepared for soldering to their hub and the assembly set into the jaws of a holding fixture. Note that the blade angle is ‘zero’ to the longitudinal axis of the submarine, representing a feathered controllable-pitch type propeller, in the non-propulsive mode.
The entire assembly was slathered with acid type solder flux, heated, and Tin-Lead solder applied. Capillary action worked to not only draw the solder into the nub filled hub holes, but also produced perfect little fillets between blade roots and hub – some of which would later be shaved away, these propellers were, after all, supposed to be of the controlled-pitch type.
Each assembled propeller was shaved, ground, filed, and sanded. Final smoothing was done by vigorous scrubbing with 0000-steel wool.
Eye-strain city! God I was glad when those chores were done.Who is John Galt?Comment
-
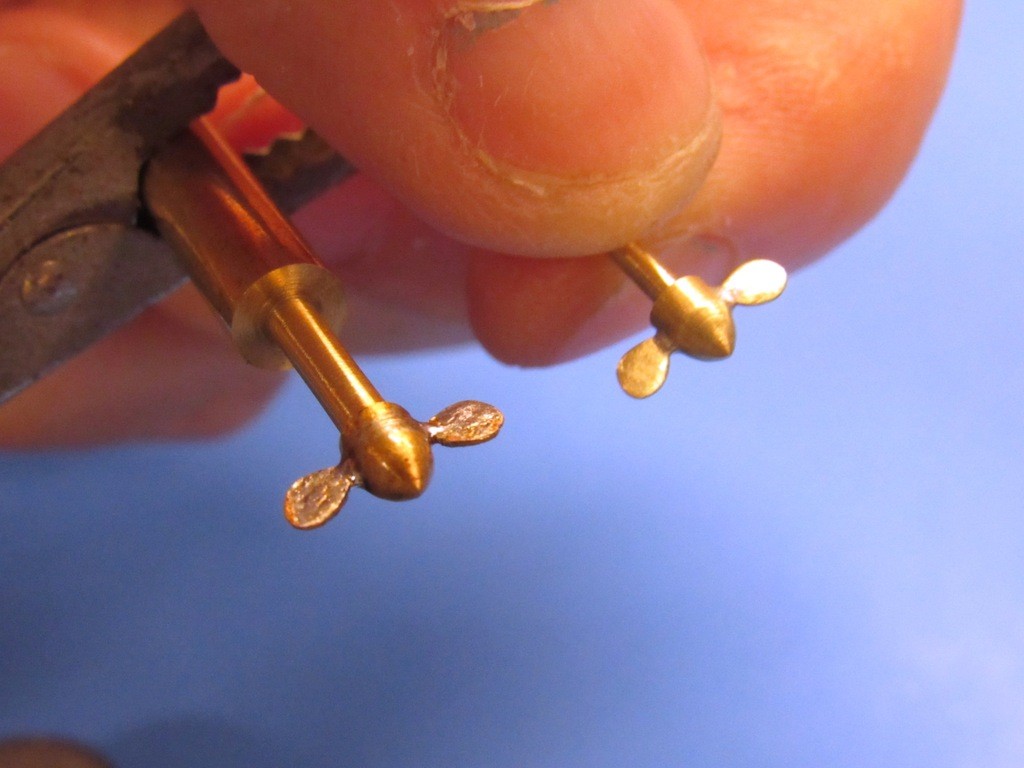
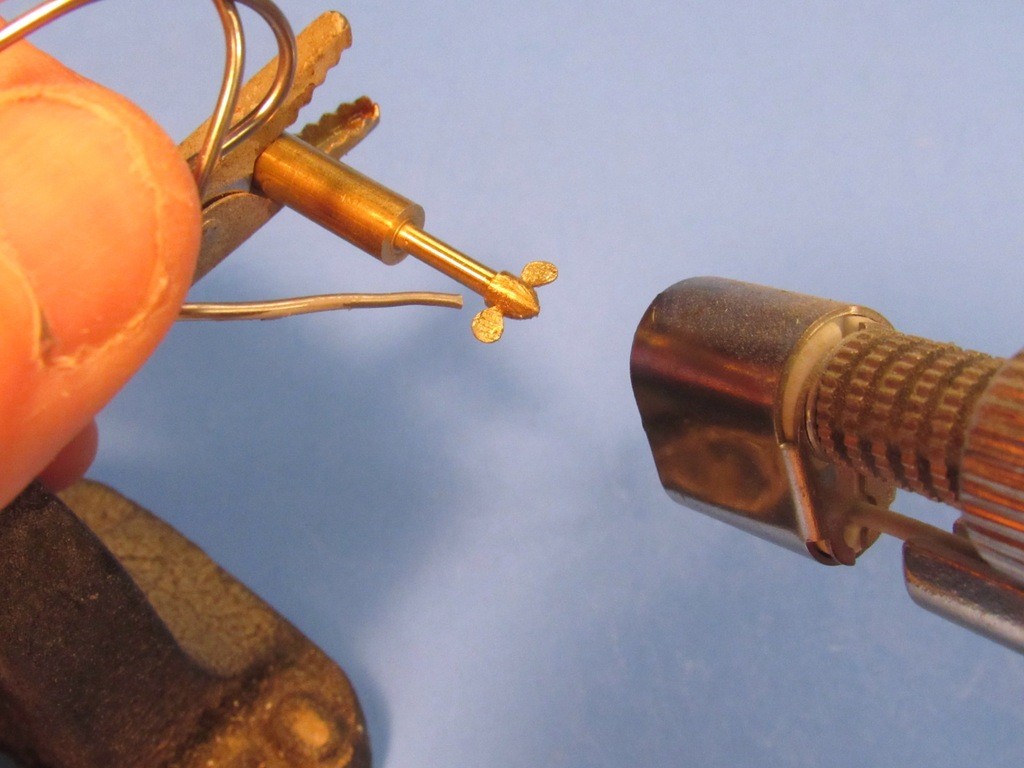
 Once I had snipped the 1/16” diameter shaft equipped propeller hub away from the raw round-stock I employed pin-vices to serve as handles to hold the work.
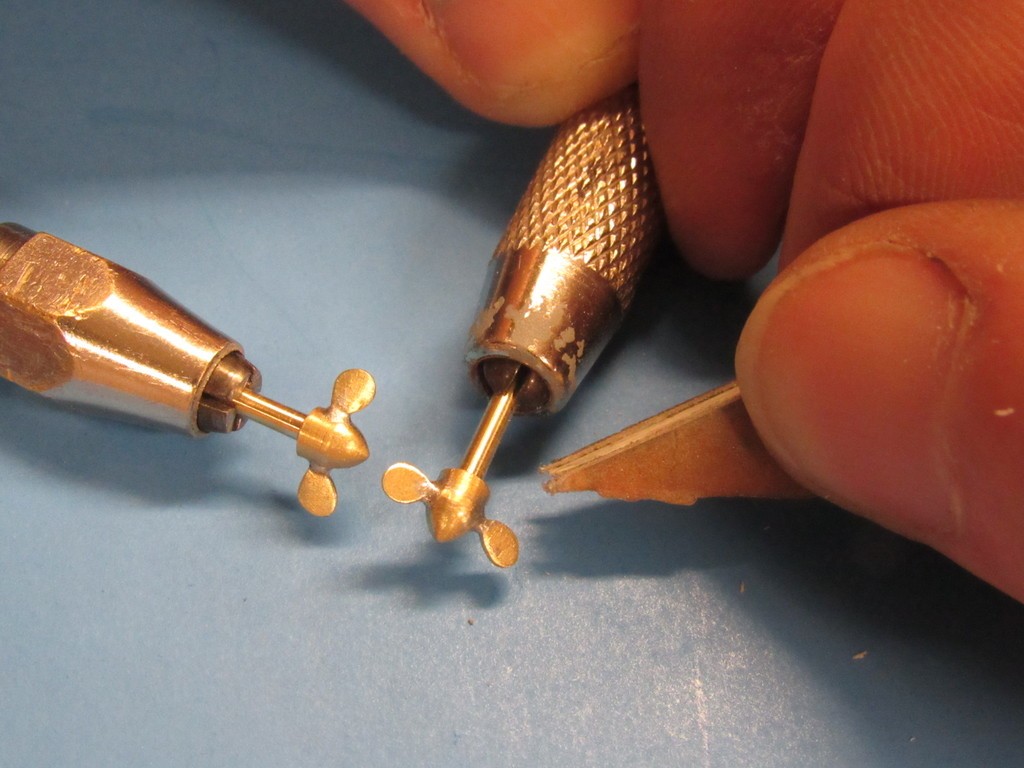 And the finished outboard propellers, represented in the ‘feathered’ position. A dunking in Ferric chloride acid to oxidize their surfaces, a shot of primer, and they join the other masters that will be used to make a spin type metal casting tool. From that tool white-metal (Tin-Antimony) production parts will be produced.
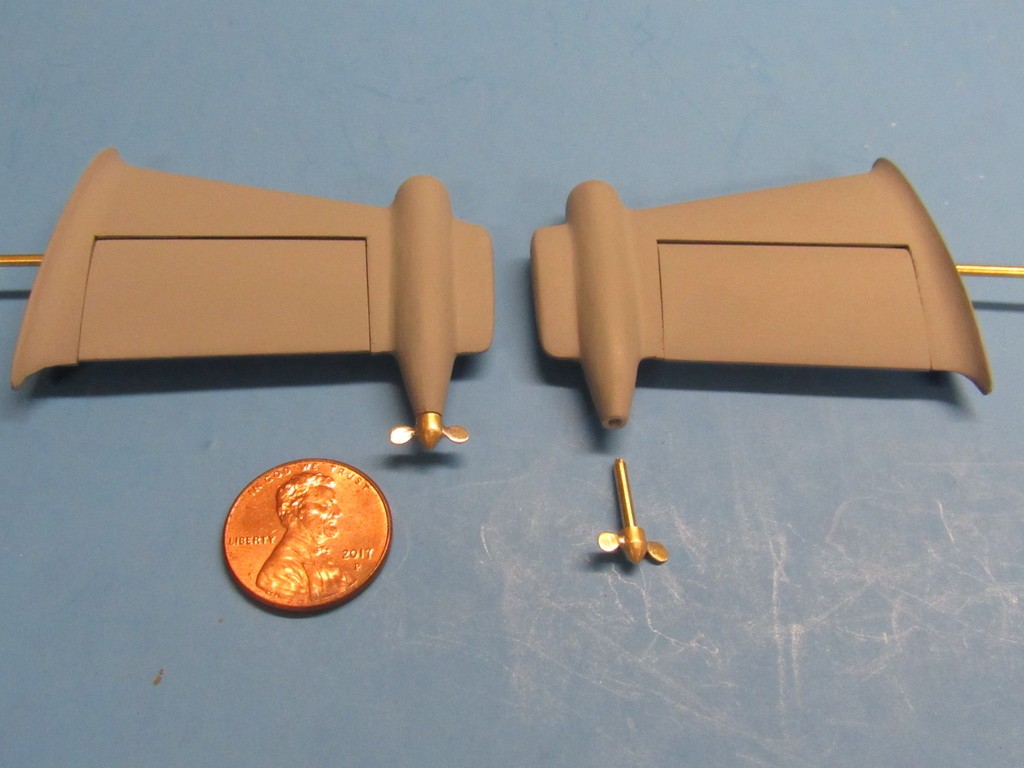
 Who is John Galt?
Comment
-
David,
I am getting old (and older by the second), I recall that to temper brass once you have the beautiful glow from the flame (and it gets a chance to realign the internal molecules) that you then dump it into a cool bath to quench it. It is the opposite of steel or ferrous materials. Quenching steel makes it harder, non-ferrous softens.
I am sure if I remember quickly the locals will tar and feather me. LOL
Peace,
Tom
If you can cut, drill, saw, hit things and swear a lot, you're well on the way to building a working model sub.Comment
-
Did I say temper in that installment of the ALFA WIP?
If you want to soften (anneal) brass, you get it to a red heat and leave it to air-cool to room temperature. I've also quenched the work in water, but with less effective softening of the metal. One and done, I always say.
Note that annealed brass cartridges, in this video, air-cool after having their necks annealed.https://youtu.be/i33z2hflbSY
I trust shooters more than the internet.
David
Who is John Galt?Comment
-
Amazing work. So much information and so many new insights. And I agree with you that those little props are critical to making this thing look right.Comment
-
Who would have thought it? "Captain America joins Russian Navy appreciation Society", Rickover discovered rolling in grave! It is a magnificent thing that you're makeing. I found the shot of what I think is an Alfa prop earlier today - titanium!
Comment
-
If you can cut, drill, saw, hit things and swear a lot, you're well on the way to building a working model sub.Comment
-
No argument, Tom. I always appreciate new/better information to supplement/correct what I spout here. The experience I have with cartridge brass (a bit more copper than 'normal' brass) may be the reason it responds to the cooling rate differently than common brass. You've given me a shove to expand my knowledge of this alloy, Tom. Can't damn you for that. Between the two of us we've made our selves and our audience just a bit more smarter than when we all rolled out of bed this morning.
DavidWho is John Galt?Comment
-
David,
I am chuckling because you "made" me do some research. I am acutely aware of Alzheimer's desease and sometimes fear it is happening to me (family history). So that being said, I turned to the web to just fact check myself and make sure I am not remembering wrong.
It turns out we are both correct or for that matter neither is wrong. I got smarter, for sure. Thank you!
peace,
TomIf you can cut, drill, saw, hit things and swear a lot, you're well on the way to building a working model sub.Comment


Comment