
Thanks John. I have my holidays for that weekend already booked at work. Yeah I have been doing the vinegar thing since my early days of warhammer 40k table top gaming. Last night I finally finished off the weathering detail and clear coating. This weather we've been having turned a 2.5 day job into a 7 day job. Not to mention a busted air brush... I will try to post up som wip pictures of the painting later tonight Australian time and all things going to plan I should be doing a maiden voyage in the pool at one of my subordinates homes tomorrow night. :biggrin:
-
Cheers,
Alec.
Reality is but a dream...
But to dream is a reality
-
How I weathered my Skipjack
Sadly no maiden voyage yetVery Angry so all I can offer is some wip pictures leading to the finished paint job....
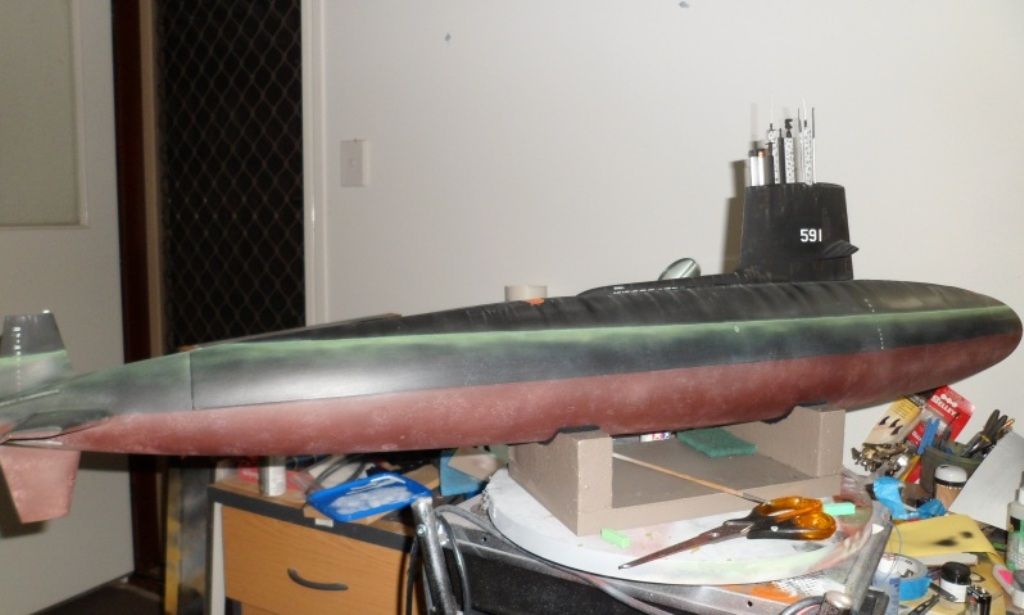
As I mentioned earlier over the yellow oxide primer I lay down a coat of flat black as a base colour. Yes for those who will ask or point out that a black undercoat will affect the hull red for the lower half but that was a look I wanted. A couple of weeks ago I saw one done and the red on the lower hull looked a bit to red for the scale.To me anyway.. It is something I try to keep in mind when I do stuff is getting colours to work in scale. I did one of those little revel titanic kits for a 100 year anniversary party one of Sandys friends hosted. We all had to come in costume of the era and as they are 'foodies' all the food was based on what was done at the time as well. But I digress... Any way it was pointed out that my colours looked off. It took all my control not to throw someone overboard. So I explained about scale, distance, colour temperature, colour shades etc. and my beautiful wife chimed in by adding how much time I take in researching, painting and or detailing... I don't think it was a back hander??? But I accepted it as support.
Anyway enough dribble on to the show! Now before you read on I just want to say that what I write below is not meant to tell you all how to suck eggs I am just filling in how I got to a point in the pictures :biggrin:
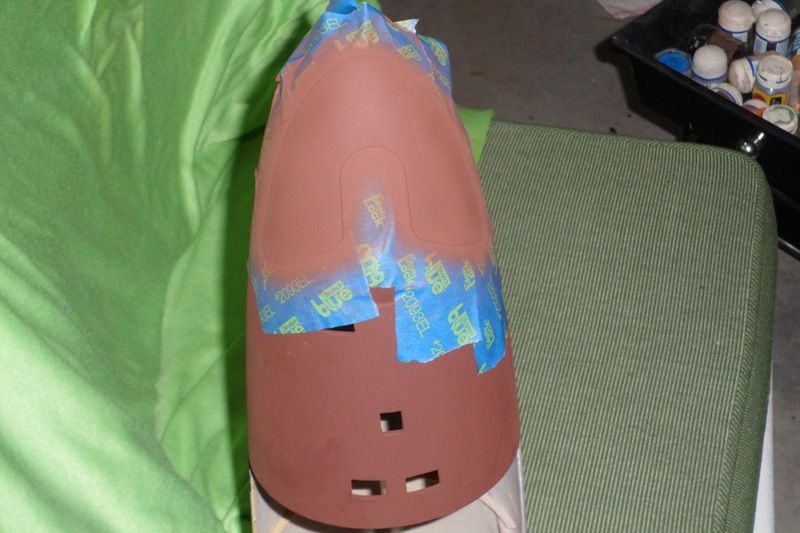
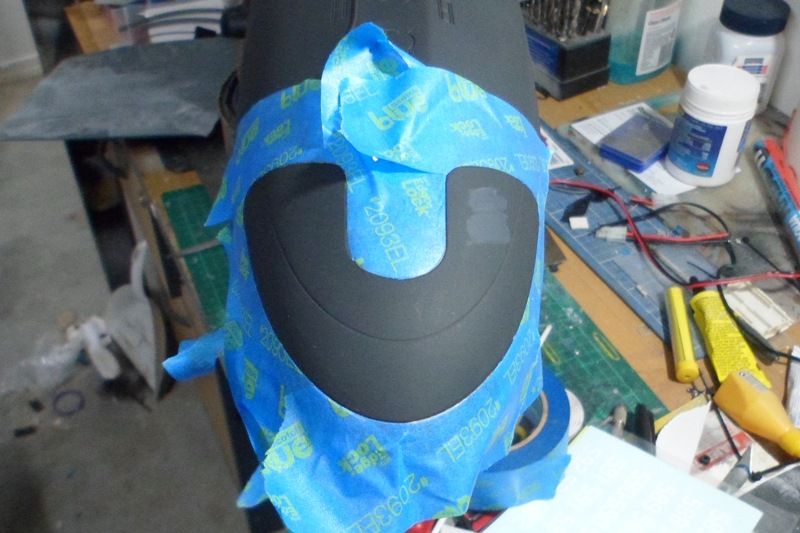
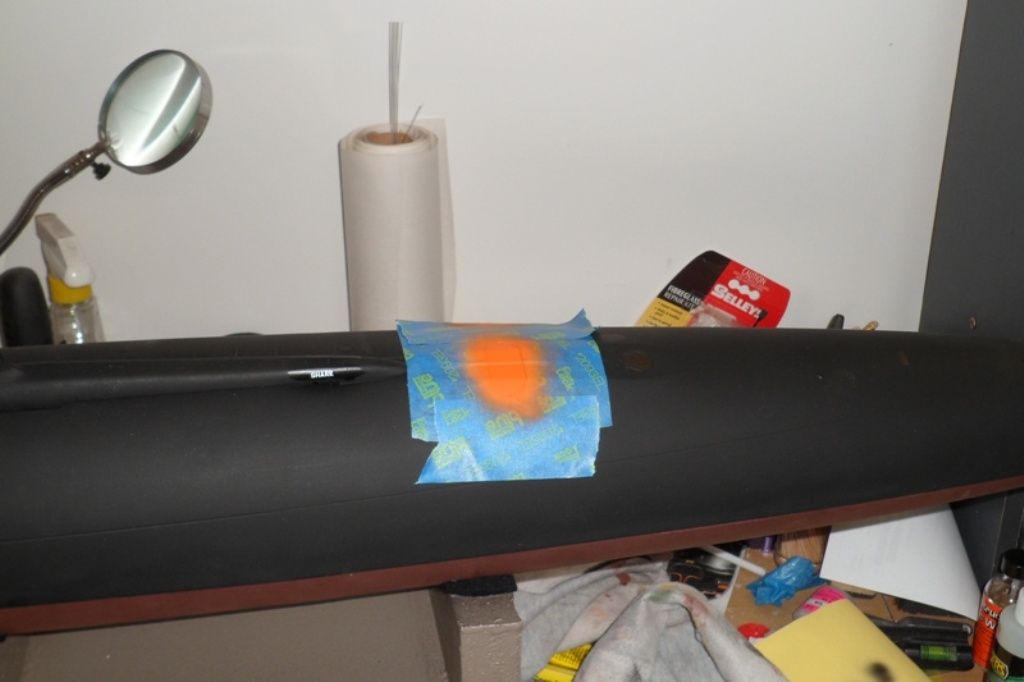
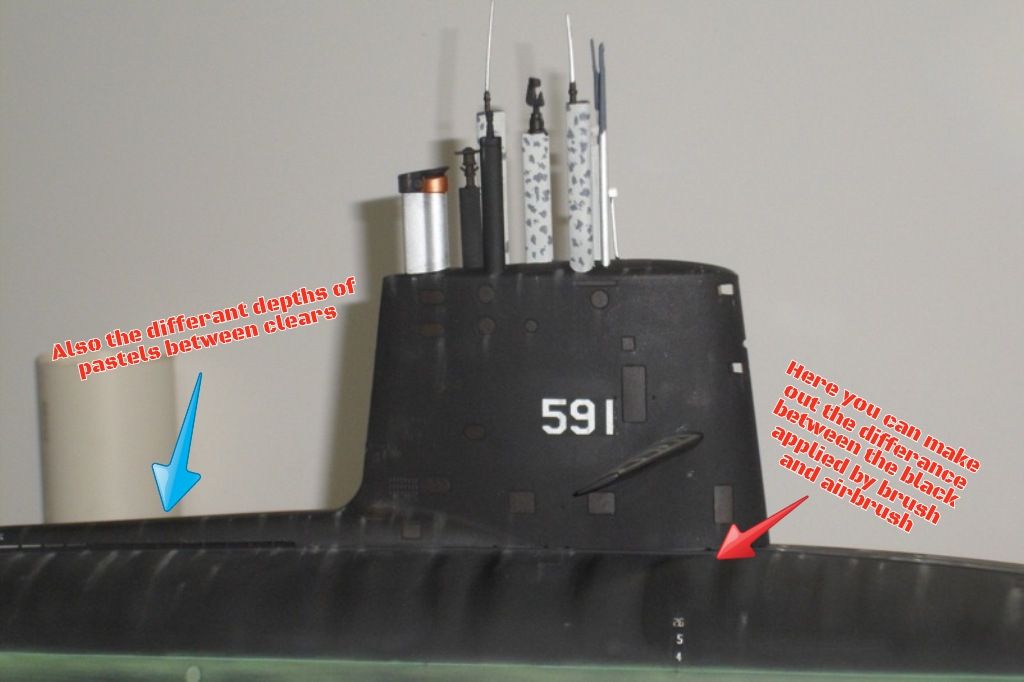
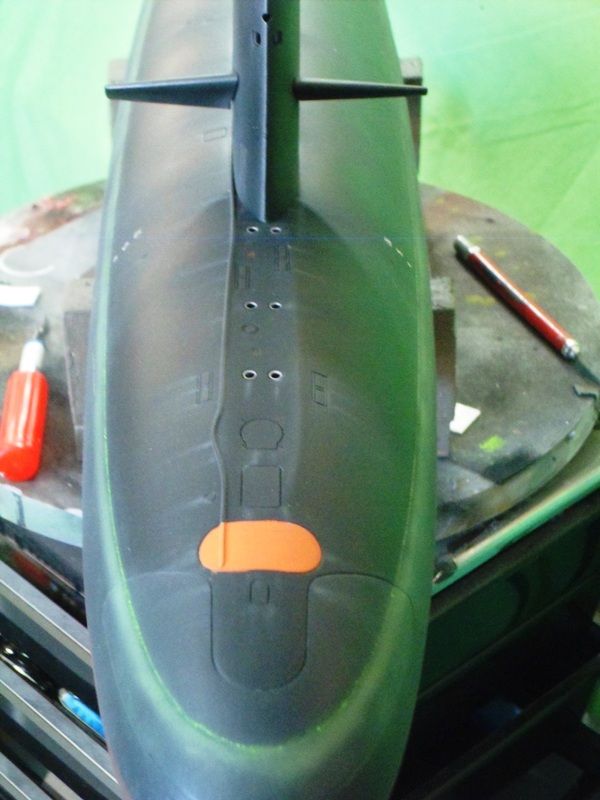
After the hull red went down I then masked out and painted the sonar section covers in a lighter shade, Tip - don't just add white or you'll make it pink add some light ocher first with white added a bit at a time to get the right depth - To get the mask trimmed to shape I lay down the tape and then use a que tip or finger nail to follow the etched line. I then take a No11 blade and hone on some 1500 wet n dry to get a very fine and 'sharp point and edge. I then trace the depressed line in the masking tape, you'll notice I only use the low tack 3m blue tape, remember don't press to hard or you'll cut into the base & prime coats. Then carefully lift out the unwanted sections, check the trimmed edge and gently burnish it if needed which also help reduce paint bleed and paint away... I then went over the base coat black, which was applied with a rattle can, with a flatter black. When that was dry I then masked off the top sonar cover. You can see where I tried a couple of lighter mixes but they went a bit blue so I threw in a drop of red to tone back the blue and add some depth back...
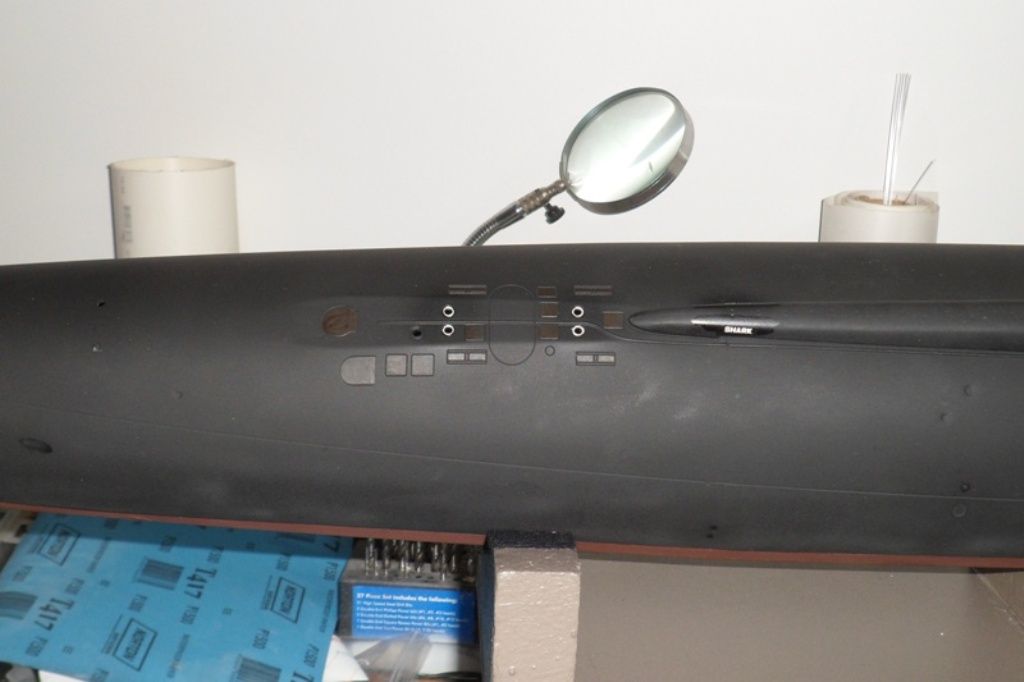
The next thing on the to do list was the decals. These were put down over a gloss surface to stop any silvering that can & does happen when they are applied on flat surfaces. The silvering is from tiny air-bubbles trapped between the very textured surface need to get a dead flat in paints. A nice even coat/s of gloss leaves a glassy finish the eliminates the silvering and also makes applying the decal a lot easier too! Once the decals are done I use micro sol & set solutions to get them bedded in nicely.

Once all that was dry it was on to the weathering detail. Depending on the subject and what look I want I'll use a mix of inks. washes, chalks and over thinned paint. My most common weapons of choice are brushes, que tips, those little foam numbers the girls use to apply eye shadow and a some fine and very fine scouring pads. I'll be honest and say that I didn't use much in the way of washes on my Skipjack . Instead I decided to use alternate blacks and my pastels to do the job. When I ploughed through the web looking at images of the subs I decided that using a wash and inks would give me a 'Russian' sub look even though I wanted a sub to like as it might after a tour of several months at sea between any full dry dock repairs and clean ups.
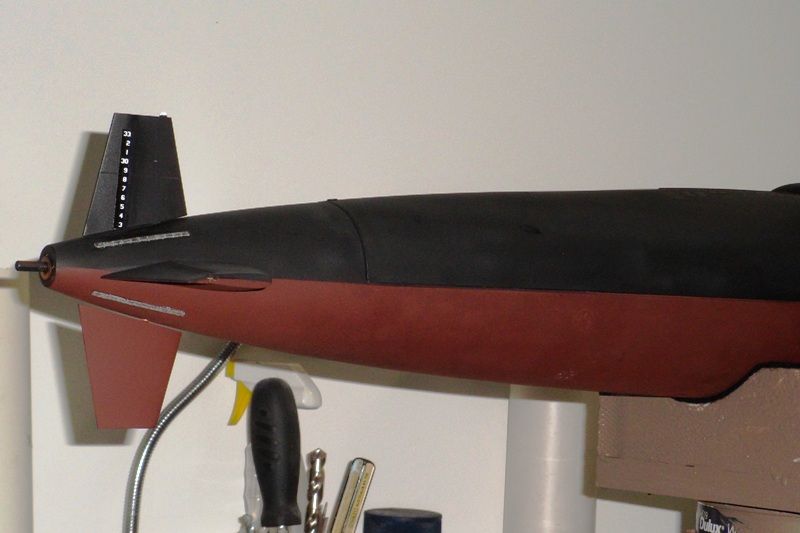
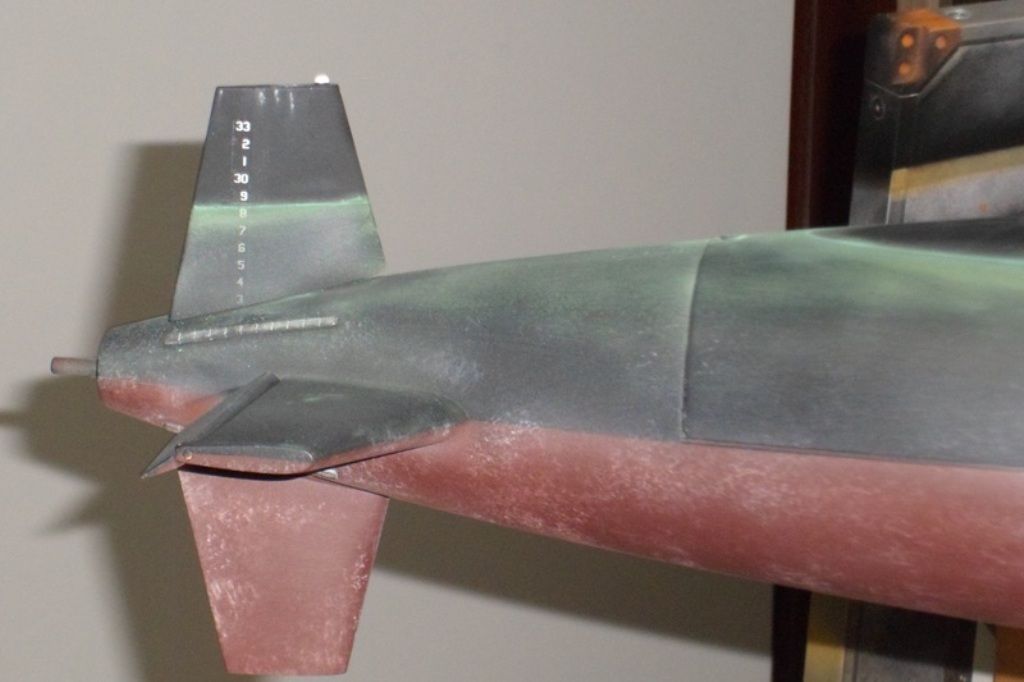
My first weathering was done on the hull proper. I have never managed the toothpaste trick that David does so well. I reckon that is because I use different paint mediums to those that HWSNBN uses. My mottling effect was done in several stages. The first was taking a damp sponge and dipping it white paint then randomly dabbing it on the hull below the water line. Stage two was blending that down with a very thin white airbrushed randomly. this was followed by doing the same, stage 3, with the flat black on the top half below the water line and the hull red on the bottom. These weren't thinned but rather using a finer needle on the airbrush and keeping the airbrush off the model a bit further than normal. The next stage was dropping the needle size again and thinning out some green paint and backing off the psi through the airline. Because of our weather here in Brisbane I run two water traps in my system, one on the compressor and the other at at the end of a 2 meter hose. The first has the psi set to 50 the second is what I regulate the brush with. After the first pass of green I let it almost dry and then used a medium 3m scourer cut to about 3 by 2 inches and gently rubbed it over the entire area below the water line. I then repeated stages two and three before adding the green wash line again. When that was done I used a 1/2 inch wide flat brush and just wet the tip, dabbed it on a rag and then brushed it on the sub from the top down on the top hull. This not a dry brush process I just wanted to get a different black on the hull than the finish the airbrush gives.
Refer below for more...Cheers,
Alec.
Reality is but a dream...
But to dream is a reality
Comment
-
I reckon I have take almost two dozen pictures trying to get the right ones. Sadly I have to do the photography after dark so the flash tends to over accentuate on some of the shots... BLUSHER
I forgot to mention that all the masts are painted but that is really stating the obvious a bit :wink::wink: Also before any clear top coats are done I always go over the decals with some more clear to help protect them duting the handling that happens with the detail process.
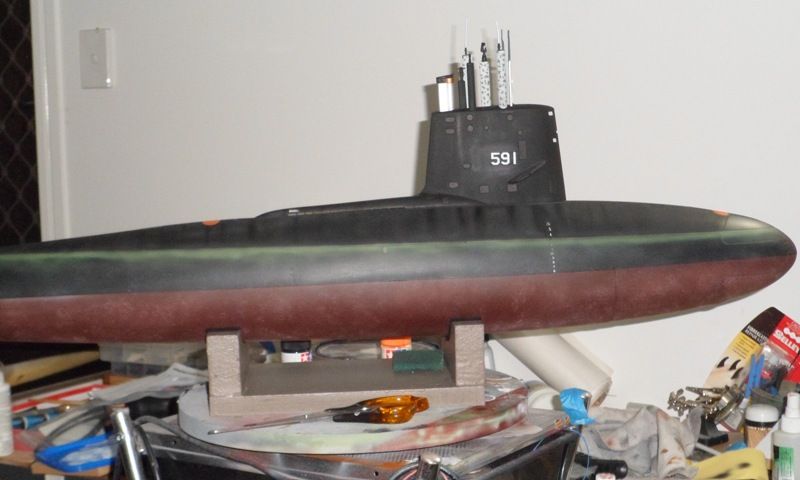
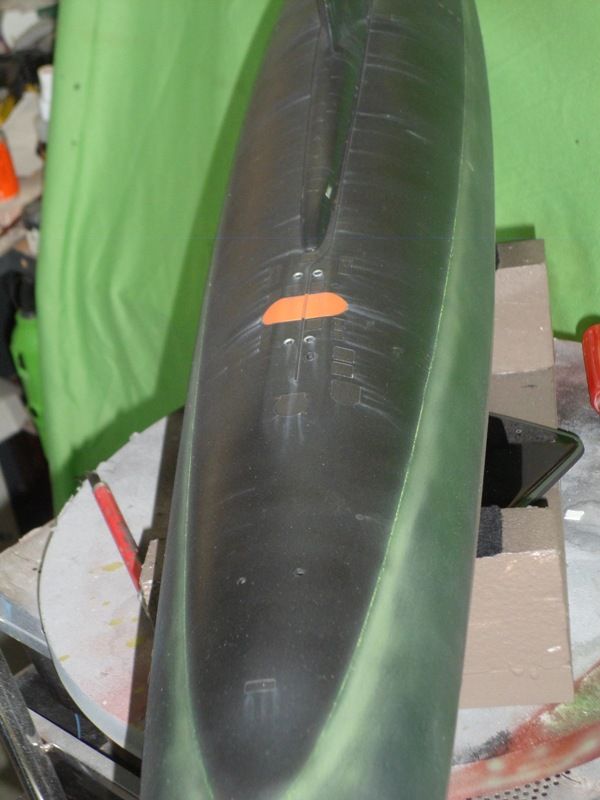
After the paint was done the next stage of the weathering was the water and bird poo streaks. Again I do this in stages in between the clear coats. What that does, I hope is give a some depth of field with the streaking. Looking at a lot of the sub pictures at sea the bow is under an almost constant bow wave so I tried to get the streaking a bit heavier at the aft end of the sail. I mostly used a mix of greys and white pastels with the occasional spot of rust tones. The first of the shots show the sub before the first clear coat which was a couple of coats of gloss... Do remember the Russian sub look I was trying to avoid? Fear not the clear with blend all that in nicely!!
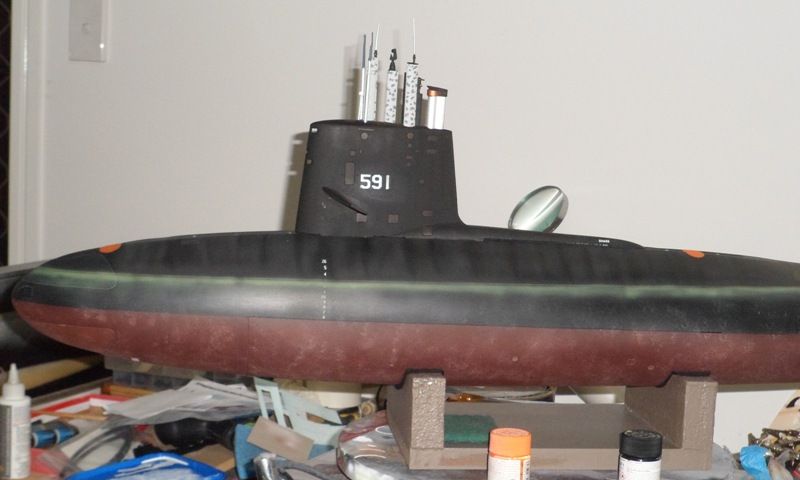
These next ones are after the first of several dull coat clears and pastel work. Using a gloss or semi gloss the dust will blow off if you sneeze on it so I use the dull coat as the flat finish makes adding the pastel dust easier. The other good reason to do them in between layers of clears is that if you screw up an area you can wash it off with out ruining whats under it. As always with pastels you have to take into account that the clears will change them. So remeber to test and confirm first if you aren't sure about the colour you've chosen
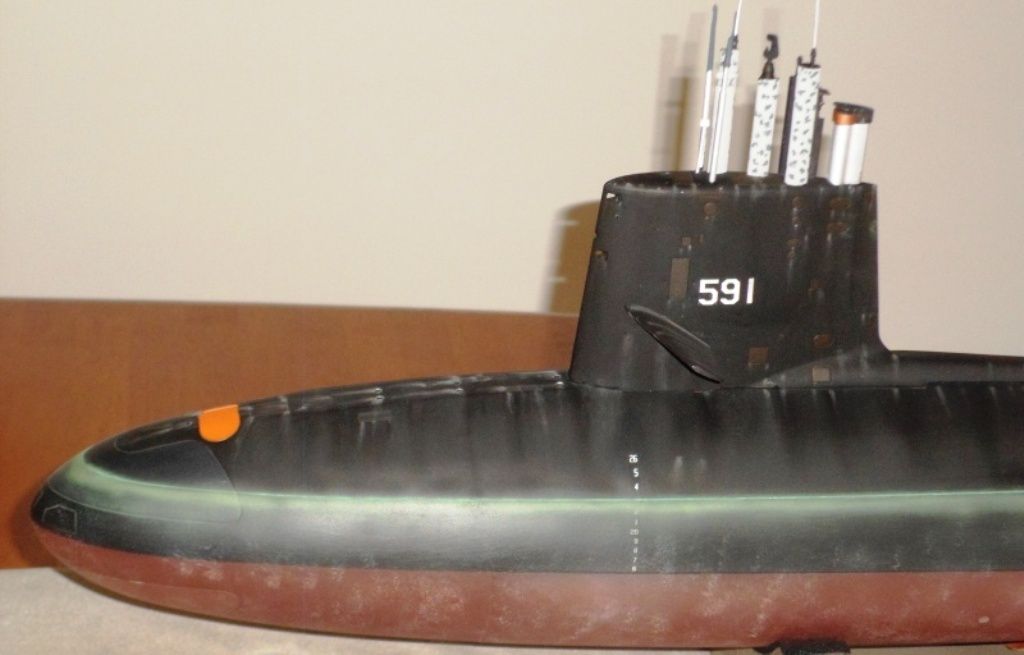
I also feather the airbrush from top to bottom with additional coats as well just to add a bit more texture. Another reason I like dull coat is that it can be worked a bit with some lacquer thinner on a brush if needs be. I also took advantage of the etched water line and rubbed the pastel stick directly the the model following the line and so filling it with chalk dust that I worked in with a brush. The next shots are of the completed model and yest I did leave the rear light clear in the sail I just forgot to remove the masking tape before the photos were taken... And before the final clear coat I again rubbed a pastel stick along the etched water line only with a brighter green and left the dust sit in the groove so that it looked like alge lumps rather than an alge film. It also seemed obvious, to me anyway that the port side would have a few extra water streaks because of the piping (sorry David I'm not sure what it is called) on the top deck which would tend to collect/pool water a bit.
Now all I need to do is put or to sea properly now...Cheers,
Alec.
Reality is but a dream...
But to dream is a reality
Comment
-
Beautiful. Yes, flash-photography on a weathered model at close range renders a much removed form reality picture than the MK-1 Mode-0 eye ball! This is great stuff, Alex. I hate you! You beat me! This is how far I've got with my paint-job:Who is John Galt?Comment
-
Thank David and to be fair you do have a bit on your plate... One of which is the stingray sd for mamas's future kit....Cheers,
Alec.
Reality is but a dream...
But to dream is a reality
Comment
-
David,
The last two pictures of your set of 5, what are you showing and trying to tell us?
Alec,
Nice techniques! Thank you for sharing. She looks ready to go!If you can cut, drill, saw, hit things and swear a lot, you're well on the way to building a working model sub.Comment
-
Alec: Right you are, sir. Got to follow through on my promise to Mamas. The flu season put us back a bit, but we're over that and busy now catching up. Tom: demonstrating how to 'learn' specific weathering techniques (application and mediums) on a test-article before committing to the actual model.Who is John Galt?Comment
-
More sir, may i have more details?If you can cut, drill, saw, hit things and swear a lot, you're well on the way to building a working model sub.Comment
-
Start another thread ... we're hijacking Alec's good work here. Have you decency, sir! ... Hurumph!Who is John Galt?Comment
-
Alec, please forgive me......but David started it with those pictures (said with an obnoxious little brother voice).If you can cut, drill, saw, hit things and swear a lot, you're well on the way to building a working model sub.Comment
-
Excellent work there Alec! This article will be my cheat sheet for my build.IT TAKES GREAT INTELLIGENCE TO FAKE SUCH STUPIDITY!Comment
-
Thanks Mark. By all means use what you will.
My latest update is one of the good, the bad and the (almost)ugly...
I finally got to put the boat in open water rather than the bath tub, A.K.A test tank. And damn it looked good! But there were still some issues that I thought I had resolved came back to haunt me... The bad and an issue with one component that was almost the ugly...About twenty minutes from us is a public swimming lagoon which I have been tooing & froing about running my boats there as it is a salt chlorinated set up but it is lighted at night so I thought I would try it out. I even got the missus to come along as the camera woman. So out we went last Saturday night...
The plus side to her first open water trial was that it handles like a dream and under the waves it is almost a torpedo!!! Now apart from its good looks some of the surface running performance suffered from some disconcerting cavitation. Which simply told me that I need to add some extra lead just offset to the aft of the c.o.g and a little more buoyancy foam in the bow. The tricky bit was getting the ballast and buoyancy right so it sat level with a full ballast tank. I soon learned that going slightly deeper in the clear water the signal from the tx got a bit scrambled. I am guessing that the local council has the chlorine and salt levels up a bit due to the sometimes heavier public use. To be honest I hadn't considered the loss of radio signal but it was a good live open water test on the sas system and the adf2 fail-safe. Both of which performed above and beyond!! apart from the signal losses the other issue that still haunted me was water into the engine compartment of the wtc. Then to add pain to misery the ballast servo was miss behaving badly and not responding to the tx. At poolside I put this down to the signal strengths of the tx through the water. At one point the servo failed to close after throwing the channel to close. The result was the boat dropping signal and with planes locked in a slightly negative she settles on the bottom in the middle of the lagoons end we were at. Swimming time I said to Sandy. When I got to the boat I could here the pump running so I knew the the sas part was working. What it also told me was that I still didn't have the buoyancy right with a full ballast tank. Relying on the sas to bring the sub up on its own was fraught with danger. Back at the steps/dock I put the sub back in the water and did a couple of full and blow ballast tests. All of which worked as it should have so I set sail to do a loop again and decided to deliberately take it below radio signal to see what it does. Sas and ballast valve both worked bringing the sub to the surface and water line but now the aft was sitting very low now, remember the water in the wtc I mentioned?? Somewhat disheartened I opened it up to inspect it all and saw the said volume of water sloshing around the engine compartment.
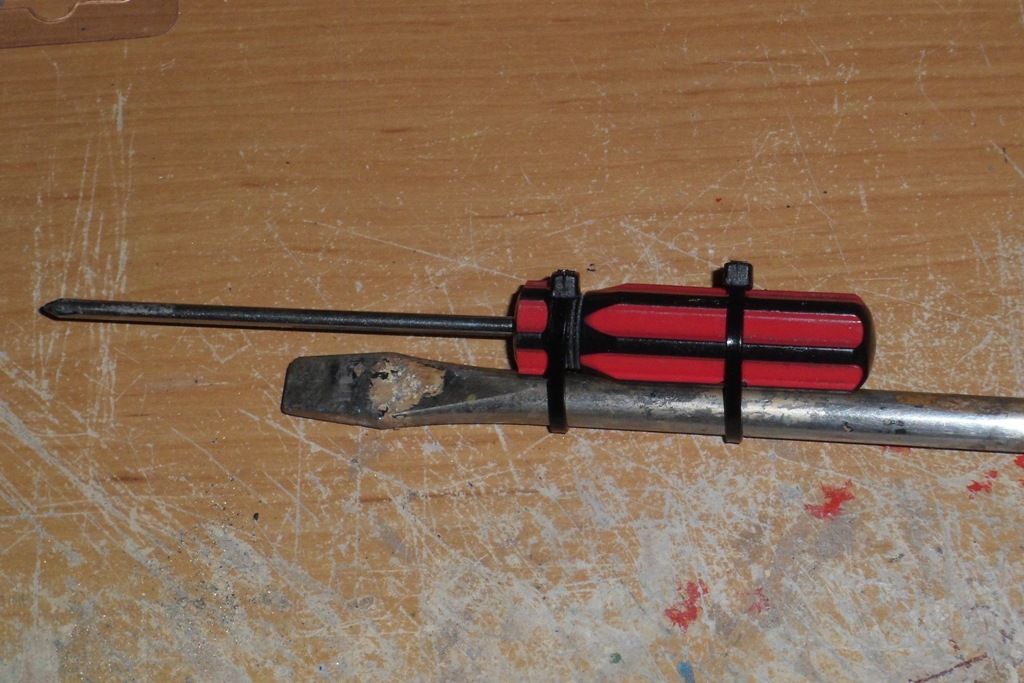
Back home on the bench I set to cleaning and drying the wtc and all its components before any serious post mission review began. Then I started working through all the electrics and setting of the ballast valve system. I found that even on the bench the ballast servo was responding oddly. So I decided to replace the part but getting my little screw driver down the tube to undo the bracket screws required some ingenuity...
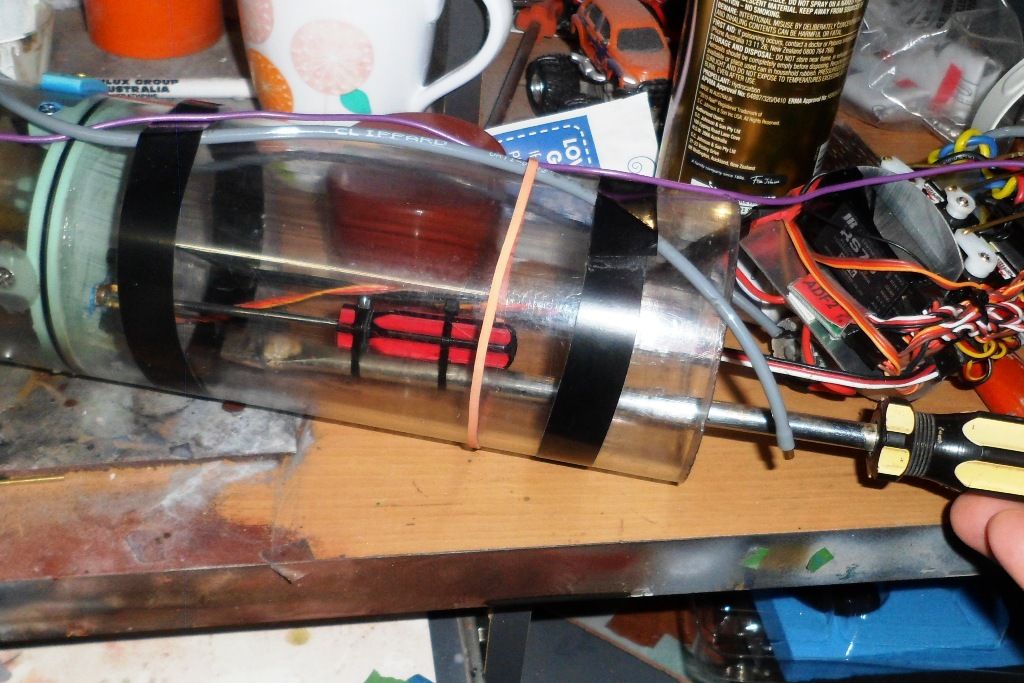
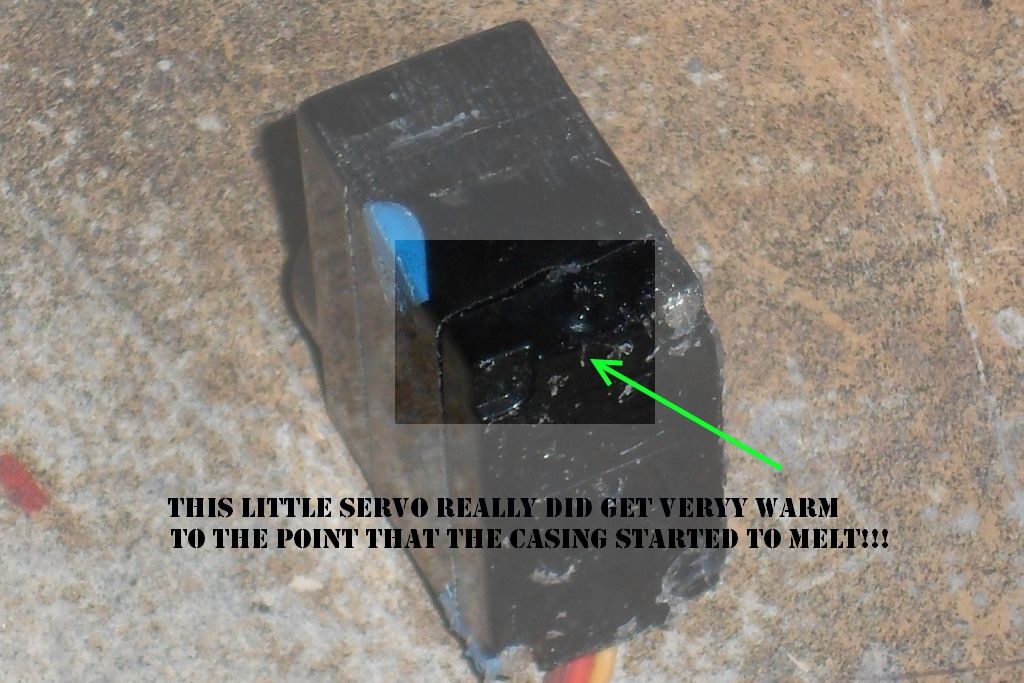
What I found was that the servo was overheating to which I put down to water and shorting...
So with a new servo mounted I set about looking for visible signs of water leaks and the only area I found that was badly stained and show water ingress was the area below the ballast servo where the bulkhead sits. I also found the bottom bulkhed set screw to be very loos and some small cracks in the tube on the ballast tank side of the bulkhead. I fixed those by letting some liquid glue weep into them and let it dry. For the loose screw I added a small drop of ca to the thread and resat the screw in the mounting block, I then used a stiff bristled artist brush to apply a film of clear rtv on the area below the sevo on the electronics side of the ballast bulkhead. The next morning saw me filling the tub again and then blocking off the sas/lpb in& outlets on the rear bulk head I pushed the sd under the water and held it therewith a full ballast tank and scanned every square millimeter of the sd looking for any signs of a leak. Sure enough the rudder push rod bearing had bubbles leaving, about one every second! How the hell did I miss that I cried. Fortunately the fittings kit came with spares so I swapped it out. Once the rtv had dried around the new bearing I took out the tyre valve placed some tubing over the threaded section and pushed it back under the water with all the lpb points closed off and then blew as hard as I could into the tube. Not once but at least three times, to the point I nearly passed out... But I didn't find one out of place leak or air bubble.
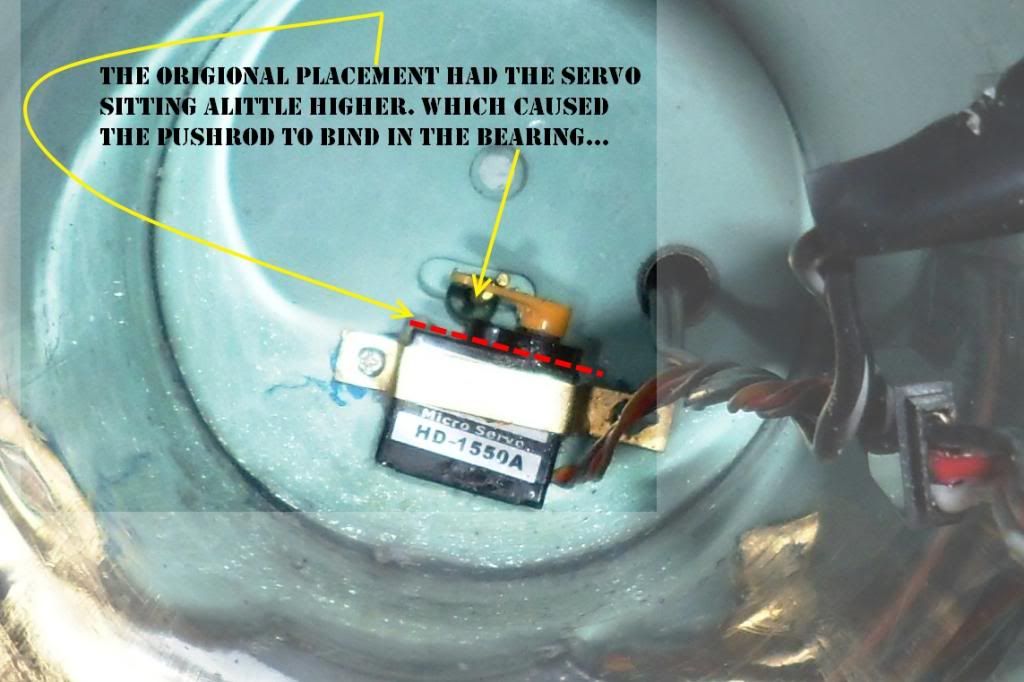
So it was now time to mount the sd back into the sub and work on the trim issues and also run the sas over and over again. The good news was that the volumes of water were now nowhere to be seen. There was some water still but it was only a few drops which I believe came through the sas system from water sneaking past the sail float valve before it sits in place. Because there was evidence of water above the sas copper valve setup and this small amount can be controlled by some silica bags that I keep from the vitamin bottles placed in the sd. However I again found the ballast servo glitching on me again...!!! What I found was that the servo was sitting just a tad high which was causing bind on the push rod and seal. In fact the servo at one point just stopped moving the push rod altogether. So it to was swapped out and sure enough it was a bit hot to touch and the casing showed the same melt signs as the first. So I reinstalled the holding bracket just enough to hold the new servo and maneuvered the servo around till it actuated the push rod with no signs of force or binding. I marked its position undid the bracket and applied some rtv to the bracket and servo to help hold it in place and left it till the next night which became two nights of getting the ballast & trim right.
Tomorrow I have the day off so it's back to the lagoon for a second test run.
Here is a link to the video I posted on you tube for the subs first open water trials...
 Last edited by alad61; 02-14-2013, 04:17 PM.Cheers,
Alec.
Reality is but a dream...
But to dream is a reality
Comment
-
Alec, nice job. My experience with model submarines or any RC hobby is fraught with Gremlins. Sometimes they hit you two or three at a time. You might think about putting a sponge in the bottom of the dry section of your sub driver to contain any water that might get in. Other wise water can splash and soak your electronics during "Maneuvers".IT TAKES GREAT INTELLIGENCE TO FAKE SUCH STUPIDITY!Comment
-
Thanks Mark.
I reckon I have cot the water ingress under control now... The last time out I used this little satchels like what you find in vitamin bottles. I use these occasionaly in some of my static builds to help with our humidity here. A couple of these in the sd help soak up the moisture and afterwords you just lay them on some blotting paper and let them dry out for next time.Cheers,
Alec.
Reality is but a dream...
But to dream is a reality
Comment
-
Last week end was when I headed out to an interclub regatta day this was what I would call the maiden voyage of my Skipjack rather than a sea trial run. The report is just a written debrief as I got carried away talking to others and running my boats I forgot to take pictures or even ask some one else too...BLUSHER
What I can say is that when trimmed right and the all the running gear set true this boat is fun to drive. I'm still not a user of LiPo's so I run a 7.2v 4200mh NhMh battery pack which gives me plenty of play time and more than enough power to run it. I have to say that with the motor set to 100% on the stick she is a rocket in the water. When the stick is pushed to flank speed the boat kicks off with a hellish torque twist and will dive itself dynamically to boot... Let me tell you when that happened it was a real WTF moment and as it was my first time in that particular lake I kicked it in full reverse nearly mincing a young fellas cabin cruiser when it shot out ass end first. So I dialed back on the throttle to 80% epa which still gave me a good scale speed with out the torque roll and dynamic crash drive!!
As for trim with a flooded ballast it sits with about 1/3rd of the sail above the water. With a little up angle on the rear planes she'll lift her bow to the surface at full speed and when I cut back to 2/3rds on the throttle she levels nicely and then its just a touch of down angle on the sail planes and it glides under the waves. To play it safe in the water I trimmed the sail planes with just a touch of rise angle and she would glide back up after some 10-15 feet or so. I did this for a couple of reasons, firstly this was a new lake for me to sail in and secondly I wanted to get the feel of how it handles. A bit more time at the stick to get the habits of her in the water and it will go from fun to delight for sure.
I only had to use the SAS as an emergency blow once when a slower boat crossed my path a little to close forcing me to throw the sail planes at full down angle to get under it. I then threw the toggle for the SAS pump and sail planes on full rise as well as cut back the throttle and held my breath for what was one of the longest three seconds of my life Scuba Divinguntil it broached the surface. I wish I'd paid more attention to how it surfaced but I remember someone behind me saying something about how cool that sub looked coming up. I throttling it back up and let the sub rise to surface trim as she sailed away from the crowded waters and headed back to the dock area. In truth I needed a cup of tea a a sit down what with cruising around the lake with a mix of yachts and power boats driven by boaties that hadn't or didn't have much experience with subs sailing their seas at periscope depth.
All in all the sub worked well along with the sub driver and even the bloke holding the transmitter worked well too. The only people from our club that turned up with subs was myself and our president who also has a Skipjack. Though he makes his own wtc's and running gear. He was even kind and generous enough to comment to some one from another club, who was asking about our boats, about me taking the extra effort to make mine look more realistic rather than his basic paint jobs.Cheers,
Alec.
Reality is but a dream...
But to dream is a reality
Comment


Comment