-
Who is John Galt? -
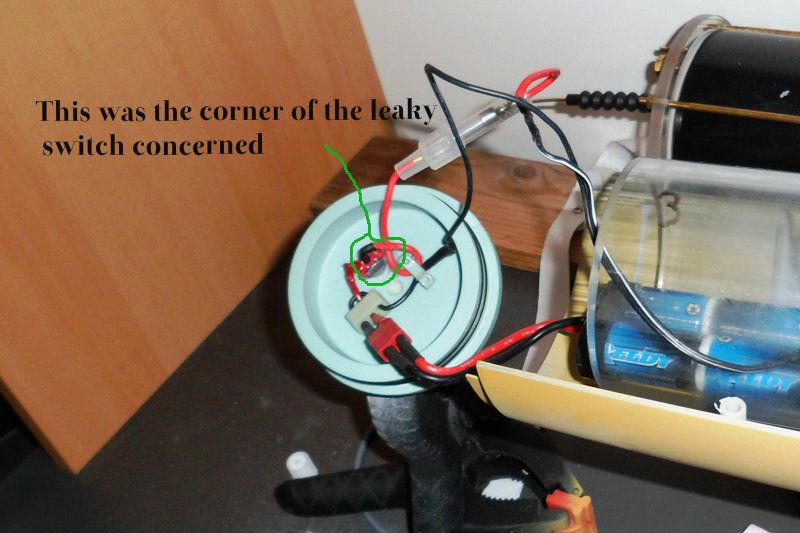
Alec, how are you sealing that switch?
I fill the boot of the switch with silicon grease, and the rear with RTV.
I am keen to know at what point (how many seconds running the SAS) - the LPB suction started acting on the switch?
David - what are your thoughts to minimise any internal suction causing leaking through the switch and other Subdriver seals from using the SAS system upon the internal SD air reserve?
Thanks
JLast edited by Slats; 01-14-2013, 07:57 PM.John Slater
Sydney Australia
You would not steal a wallet so don't steal people's livelihood.
Think of that before your buy "cheap" pirated goods or download others work protected by copyright. Theft is theft.
sigpicComment
-
Normal operating procedure when driving a boat with a SAS type SD is to avoid starting the LPB until a significant portion of the sail has broached -- this insures that only atmospheric air is drawn into the sub-system and no drop in SD air pressure (within the cylinder) occurs. However, as a practical matter I usually put the planes on rise, then start the LPB before the sail punches into the air -- I'm an impatient sort. I spent the entire last operating season (with five SAS equipped models) doing this with no flooding or leaking issue attributed to a high differential pressure between the inside of the SD and outside water do to submerged operation of the LPB. Read this!

All SAS type SD's (and that's the entire line less the KILO and 1.25" SD's) I manufacture are tested in-water, taking a major suction on the SD's interior ... nothing is stamped 'RFI' till they come through that check dry along with the other tests and inspections done to quality the unit ready for sale.
As you can see, normal use of the SAS ballast sub-system minimizes the creation of a partial vacuum within the SD -- a situation that fosters leaks.
DavidWho is John Galt?Comment
-
G'day John.
I hadn't thought about using grease... So no on that bit, but I had a good look at the switch mounting on the inside. The rtv was a bit weak in one area as it peeled back very easily. I just applied several thin layers of ca to the area around that part of the switch and the bulkhead. When that was dry I re applied the rtv. All of which will be retested in the tub.Cheers,
Alec.
Reality is but a dream...
But to dream is a reality
Comment
-
Thanks David - DOH - I have read that before - but the old brain can't retain everything these days.
Alec - yeah I've had that switch ship water too - was just a plain and simple assembly problem on my part. I can voucher for filling the rubber boot part with Silicon. The CA root as you suggest fixed mine too.
Thanks
JJohn Slater
Sydney Australia
You would not steal a wallet so don't steal people's livelihood.
Think of that before your buy "cheap" pirated goods or download others work protected by copyright. Theft is theft.
sigpicComment
-
Thanks David. That makes sense and I will be honest and admit that I ran it longer on the internal air than I probably would have in the wild. On the plus side I got the sd balanced in the tub so the next test is fitted in the model for a final trim...Cheers,
Alec.
Reality is but a dream...
But to dream is a reality
Comment
-
This week has seen the model in and out of the tub for ballast n trimming but it was not without some issues...Very Angry
I finally got the leak through the switch mount addressed and fixed :biggrin: But sadly that joy was washed aside with a considerable leak of water into the drive and electrics compartment but I'll cover that further on.
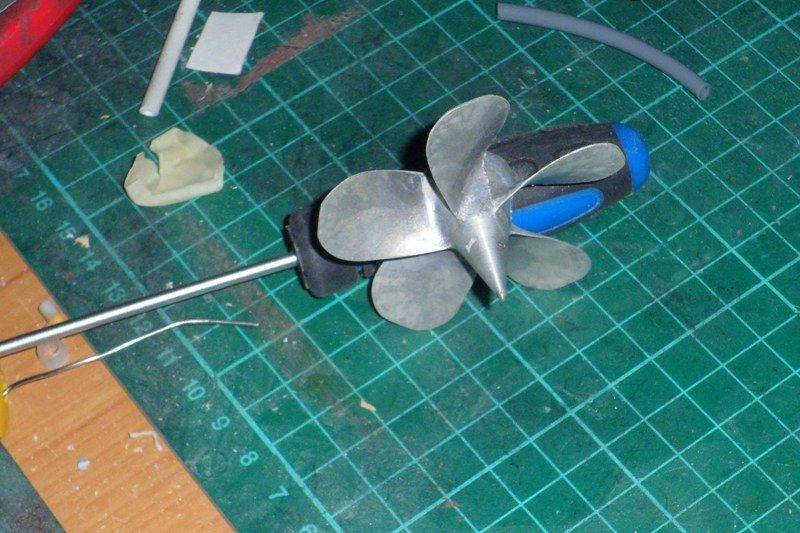
With the sub getting closer to the line I decided it would be time to etch the prop. For this I used a tried and proven method I have been using for decades now and that is white vinegar. Not as fast as some etching solutions but it does the job nicely. I simply bring the vinegar to the boil then drop in the white metal parts and leave it for about 24 hours. Eventually the liquid looks like this...
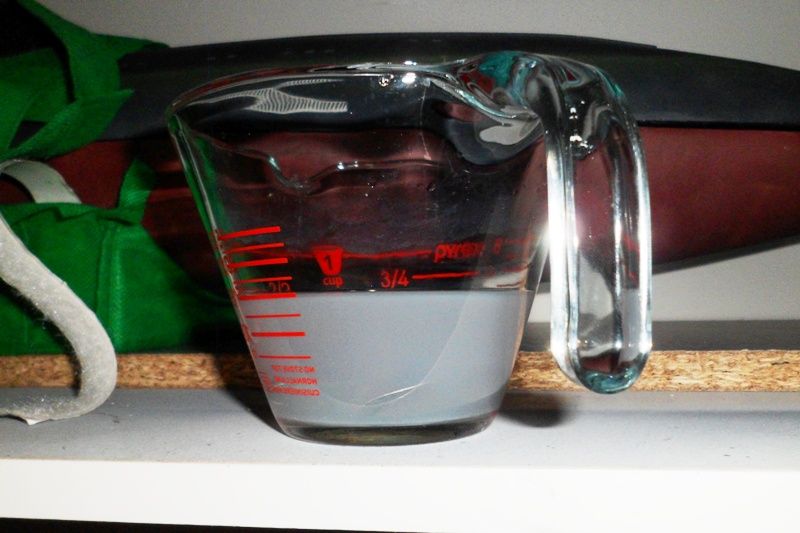
The thing to remember is to give it very thorough wash and clean in clear running water with dish washing liquid scrubbed with a bit of 3m scouring pad or 800+ wet n dry paper and or a hard toothbrush for any hard to reach areas. What you get is a clean part that feels a bit like 1500 wet n dry paper...
As I mentioned I decided to balance the SD before actual fitting in the sub. I have to say it made trimming the boat a hell of a lot easier!! but first I had to fix the leaky switch issue with some ca and rtv as previously mentioned..
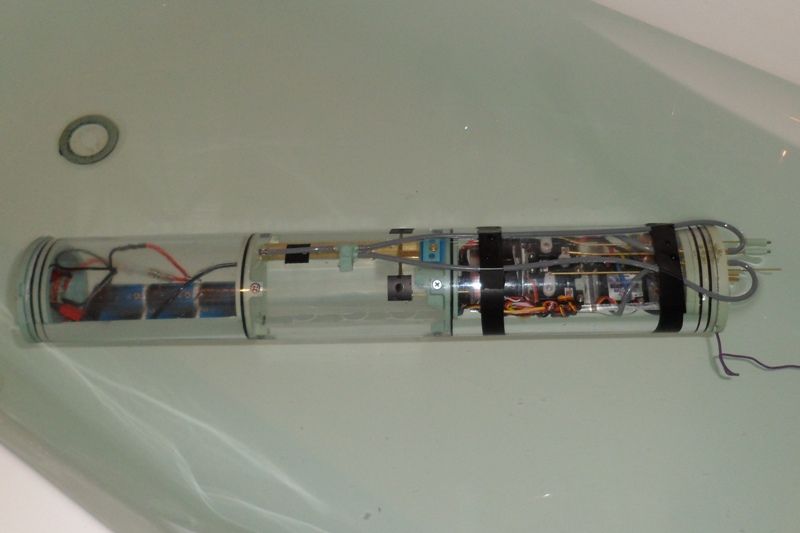
Once I got the SD balanced and corrected the leak in the switch it was on to actual trimming the model with all the installed components.
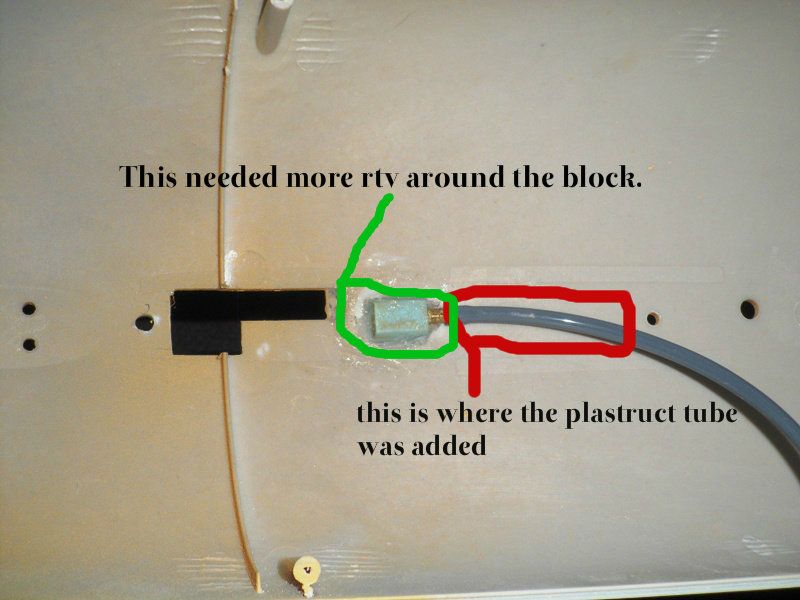
Once installed and in the sub that is where a little frustration set in. I honestly though that Russian gremlins had found the sub. It seemed that with the SD installed and the s.a.s tested water made its way into the engine compartment. I will be honest most of my tub test were at night after 8.30pm on average after work. So my brain was probably not as sharp or quick as it should've been. It took more time than I will admit to, in realizing that any water being drawn into the system seems like its coming via the main induction vent in the sail. But to be sure I have wicked several layers of ca around the lpb inlet/outlet nipples, the schrader valve on the back of the engine bulkhead. This was also done to the mounting block holding the float/inlet assembly. As the boat with a full ballast sits just above the planes of the sail above the water the float is or should be closing off the inlet and before anyone asked I have plenty of free movement with the float so it should behave correctly. I then added more rtv around the inlet block beneath the sail and glued in a piece of plastruct tube just aft of that to take the strain of the induction line to the sd block on the top of the ballast.
In the water I also noticed that air seemed to be escaping from the ballast tank because the sub gradually sank over several minutes. So I tweaked the epa on the tx and adjusted the two collets on the ballast servo arm by a 1/16 of an inch as well as wicking some ca around the ballast inlet block and then smearing some rtv around the base too. Results... No more slow release of air.
Now as for the ballast and trim of the sub itself was pretty straight forward. I reckon that because I balanced the SD helped balancing the sub. All I needed was some foam in the back with a bit of lead to counter balance its level at full ballast. Most of the foam was placed on the top hull above the water line so that when the boat is at surface trim only the foam below the water line effects the surface trim.
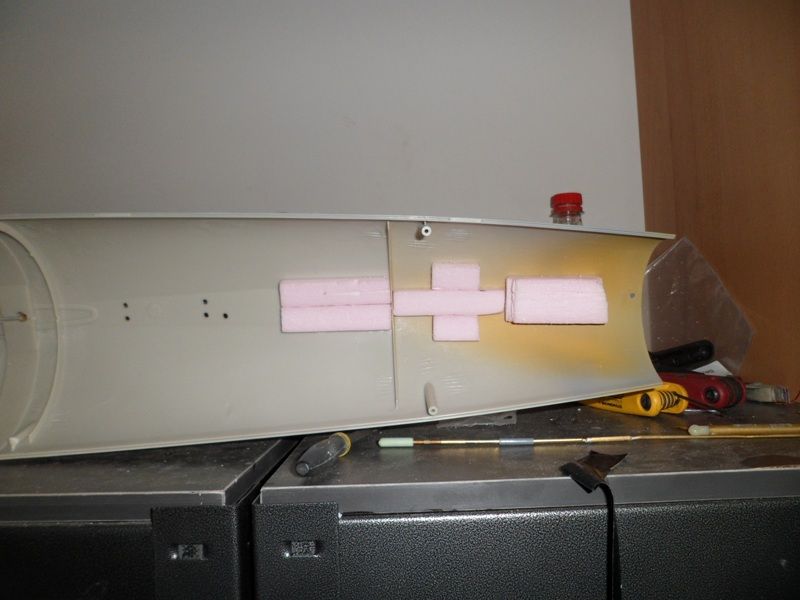
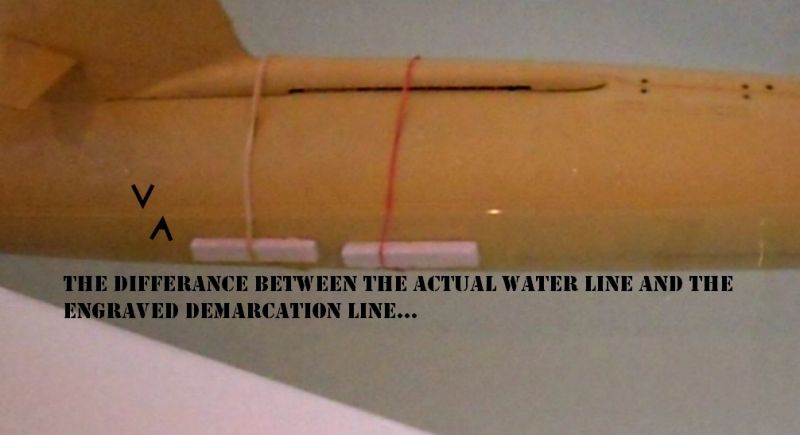
The only other foam was added near the sale just below the water line to correct a slight list to port. At present she sits about a quarter of an inch below the engraved waterline mark so I just need to add a tad more lead to get a better water line.
I also thought about adding an extra couple of vent holes towards the aft for better venting. It will be out of scale but it should help...
Next on the plan is to paint the hull in a flat black before starting on the main range of basic colours and some testing in deeper waters at the lake.
Also I have a question for David... How are you setting up the push rod for the sail planes? It is by far the one area that has tested me almost to the brink!!Last edited by alad61; 01-20-2013, 06:32 AM.Cheers,
Alec.
Reality is but a dream...
But to dream is a reality
Comment
-
As to the propeller pickling: if you finish the job by polishing the metal out with an abrasive pad or fine sandpaper, you obliterate the millions of little pits/holes that give such wonderful tooth to the parts surface. You sand the pickled part, you reduce the 'grab' of the primer. Do your initial pickling to reduce the surface to get rid of flaws and sand, fine, but the final step should be a short-time pickling to impart the pitted surface so receptive of primer. Hang in there, Alec -- I'll have some shots of all the linkage points for you today (along with the final report to H2O on that servo 'jitter' problem). Very good work on your kit-assembly so far -- methodical and right on the money. As to the flooding in the after dry-space: if you roll the model past 45-degrees, the floats (both snorkel and safety float-valve)will unseat and let water into the SD. Did you roll the boat that much while doing the bath-tub tests ?Attached FilesLast edited by He Who Shall Not Be Named; 01-20-2013, 09:00 AM.Who is John Galt?Comment
-
-
I don't recall it rolling and it had very little list to port, maybe 3-4 degrees max. I'm hoping to have some sea trials this coming weekend. The other half needed the testing facilities back so I'll report back on water ingress/flooding then. Thanks also for the pics with the sail pushrod. Looks like I eventualy got headed on the right track.Last edited by alad61; 01-21-2013, 07:19 AM.Cheers,
Alec.
Reality is but a dream...
But to dream is a reality
Comment
-
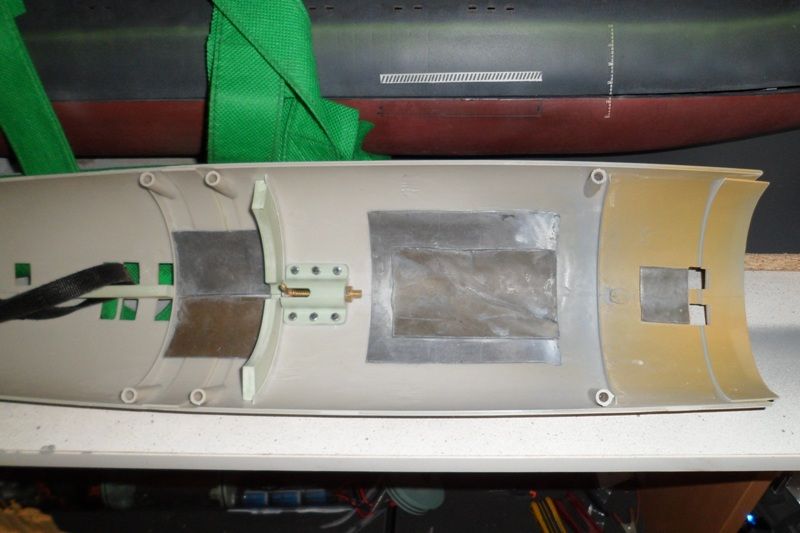
I want to thank Alec for pointing out the design flaw -- not providing a strain-relief tube near the 90-degree induction elbow fitting. Without the strain-relief tube, the induction line flexible hose, when yanked on, could easily break the RTV adhesive bond between elbow and hull. Here is Alec's fix incorporated on one of my assembled 1/72 Moebius SKIPJACK kits:Who is John Galt?Comment
-
Thanks David. To be honest iI hadn't considered it as such. It was more like a fix to my often clumsy & a little rough handling. I did make one deviation to your instructions with the elbow fitting. In that I glued it inplace using ca & baking soda. I held inposition with induction tube and my thumb whilst I dusted the baking soda followed by wicking on ca to each side and then when it was cured I tested it for leaks by blowing air through the flexible hose whilst holding underwater and blocking off the mounting block with my finger. With no leaks present I dried it all off and gave the elbow block several light coats of paint. To seal it up.Cheers,
Alec.
Reality is but a dream...
But to dream is a reality
Comment
-
Sorry I should have said I kept the strain relief tube as I could still see the ca/soda bond cracking with repeated tugging on the flexible hose. Now all I need is the weather to fine up a bit. Constant rain & 94% humidity plays hell with painting!!!Cheers,
Alec.
Reality is but a dream...
But to dream is a reality
Comment
-
BTW you don't strike me as a bloke who couldn't be honest.Cheers,
Alec.
Reality is but a dream...
But to dream is a reality
Comment
-
Great build Alec.
I particularly like the photos with your captions - very clear and informative. And I like you persistence in trouble shooting.
The vinegar etching is something I have never heard of before, am keen to try it. Thanks
Hope to see you at the Triple S Gosford Subregatta scheduled long weekend in October this year.
Best
JLast edited by Slats; 01-26-2013, 07:12 PM.John Slater
Sydney Australia
You would not steal a wallet so don't steal people's livelihood.
Think of that before your buy "cheap" pirated goods or download others work protected by copyright. Theft is theft.
sigpicComment


Comment