Type 212

Collapse
X
 
  • Time
  • Show
Clear All
new posts

  • MFR1964
    replied
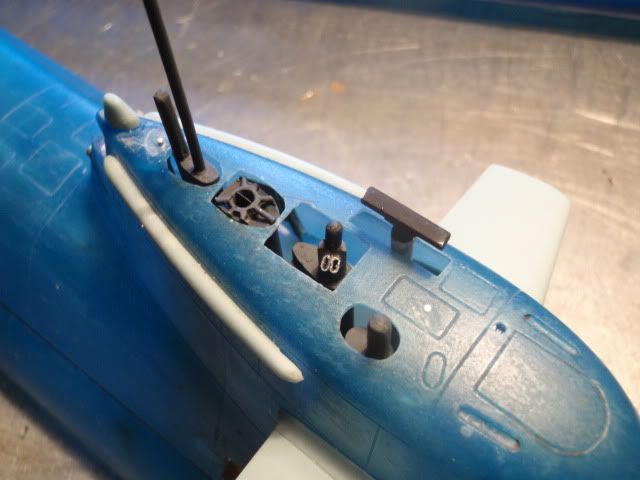
    Well, i'm fiddling around with the lead and the foam, and decided to finish up the peroscope part, i've seen some details on the real live pictures so i took a shot at it, see for yourself.


    I found out on some pics there is a kind of structure on top of the snorkeldevice, carefully hollowed it out, and made that item in copper, i even could reproduce the seperation inside the tube, tricky but possible.
    Used some thin aluminum tube rings and squeezed them into oval shapes, just to reproduce the lenses that are located at the peroscope.
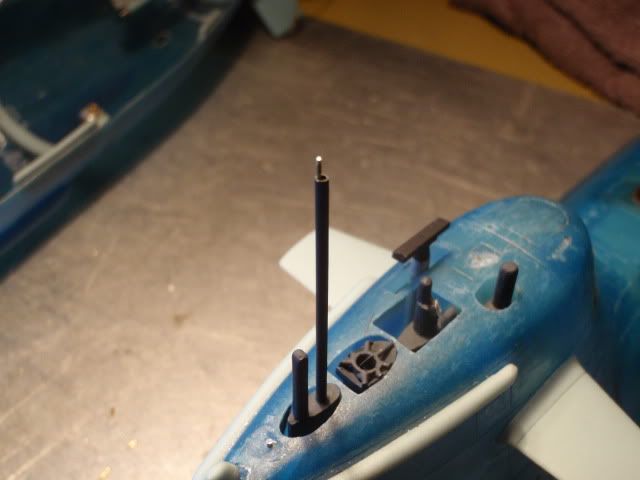


    The front radio mast i've replaced by a thin copper tube, why?, well to be frankly, i've broken the earlier example due to being not carefull, glueing it back would leave a weak spot, so i took it off and made the copper example.


    Other advantage is, i've placed a antenna inside, which you can extend or retract by hand.


    And there is something else growing in the shop, this was the easy part, making the clamps to support the tubes.


    Greetings Manfred.
    Last edited by MFR1964; 05-22-2012, 02:20 PM.

    Leave a comment:


  • MFR1964
    replied
    Thanks David,

    Yes, she is speedy like hell, next drive will be with some altered settings on the transmittor, first get the basics right with the lead and the foam, from that point the journey starts all over again.

    To give your guys a better view i made a slideshow from all taken pictures, enjoy


    Greetings Manfred.

    Leave a comment:


  • He Who Shall Not Be Named
    replied
    Good to see your beast in the fresh-air, hanging it all out in the open water, Manfred. It is s speed demon, yes?

    I took my ahead-astern end-points on my computer radio to 20%! And still had plenty of thrust! Very good shots and text. Thanks for sharing. You made Mike's and my day!

    David

    Leave a comment:


  • MFR1964
    replied
    Yesterday i took the plunge into open water, and i stumbled on some minor things i have to alter,

    1. actionradius compared to the V80 is less, have to reposition the antenna wire.
    2. She still has a tendency to rock, have to add some more lead to get me a lower CG and foam to counteract the lead.
    3. The failsave servo was triggered during a deep dive due to flutter, have to take it loose from the receiver, just let it run by the ADF only.
    4. Torque of the engine is far to high, need to reduce power on the transmittor.
    5. The boat has to much dolphin wave behaviour, have to tinker the sensitivity of the ADF, made this run on the lowest setting.

    Made one attempt to do a high speed run, boy oh boy, she runs like a torpedo, you will certainly need the reduction on the vanes, i have to try that later after my modification, first she has to be stable on the slower runs to get me a marker.

    Sorry no vid, but only pictures, something went wrong with the camera.


    First the pre check before hitting the water, especially the failsave bouy system.


    Made some runs on the surface to let her cool down and submerged near the shore, she is slightly positive balanced.


    A nice scale like run, very responsive on the vanes, power only 30%.


    It's also possible to use creeping speed with the same stable result, trimming accurate the beast pays off.
    Personally i always want to have the same result at either low or high speed, this insures that the boat will handle better, it will take more time balancing the boat in the bath, but the result is a stable boat.


    A sequence of three pics of the boat getting her to the surface by using only power, this ensures me that i'll get her up only on power if other things would fail, better overpowered than underpowered, just like my V80.


    Another thing i tried was, running the boat with the bouy behind it, just to ensure that the wire will not be caught into the propellor, as you can see the god awfull wire guides do their job, just like in real live, made several curves to see if it would work in all directions.


    Well, should i say more, hitted the trottle hard and away she was, maybe i name her, G7e ,after the WW II german torpedo's.


    Broaching the surface at that speed becomes too much messy, she acts like a unguided torpedo, luckely i was the only one in the pond that day, i wouldn't risk the same at a meeting.
    After the run i checked the SD, no moisture inside, the safetyvalve was nearly clear from water, total runtime for more than 1 hour on average speed and still some juice onboard, still have to make my endurance run, just to see how long she will last on one charge.
    So for me it's back to the shop and start to alter some things, most work will be, finding the right balance with the lead and the foam.


    Greetings Manfred.

    Leave a comment:


  • MFR1964
    replied
    Thanks David,

    I'll try the grease trick, i've been enjoying every minute building this little kit, altering the SD was a bit of a task, i know from experience that the maiden will trigger some modifications, made her slightly bouyent, again she will have to undergo some testtrails, like turningradius, actionradius, this will all happen at slow speed to get used to this boat, did the same steps with the V80.

    Leave a comment:


  • He Who Shall Not Be Named
    replied
    Seeing all you've done with that little kit and SD still puts a big smile on my face, Manfred.

    As to that stubborn bubble that won't go through that little vent atop the superstructure:

    Rube a little heavy grease on the inside of the superstructure around the hole. That will break the surface-tension that is holding the bubble of air from passing through the vent hole. Works for me.

    David

    Leave a comment:


  • MFR1964
    replied
    As it looks now, this weekend i'll take a shot at the maiden of the 212, i'm now fine tuning the balance, the technical part is ready, micro SAS is working like intended, made the winch on the lathe, and attached a wire to the float.


    Greetings Manfred.

    Leave a comment:


  • MFR1964
    replied
    Thanks guys,

    It's working well, not what i've intended but it's a good simple solution.

    Many times you will encounter that the wheel is allready invented, in the mid 80's it was a usual solution, untill some guys builded scopes on pressured air, now these days they have them even running on hydraulics, turning back to the past is sometimes the best solution.

    Integrating the float lift with SAS i personally wouldn't do, suppose they hit the scopes by accident, the safety float will save your ass, but you can end your drive due to a broken float, now it's protected inside the conningtower, don't make things to complicated, Murphy is allways around, and believe me, it happens.


    Greetings Manfred.

    Leave a comment:


  • redboat219
    replied
    Originally posted by Reckless
    Manfred will your float lift be used to plug the intake of a future SAS for this sub ?
    Now that's a great idea. Hitting two birds with one stone.

    Leave a comment:


  • Reckless
    replied
    wow.. always nice stuff...


    hey... was my idea to foam lift the antenna's :D well I'm willing to wager someone somewhere came up with it before I mentioned it on the site :D ... but Manfred will your float lift be used to plug the intake of a future SAS for this sub ?

    Leave a comment:


  • alad61
    replied
    Yep a very nice job indeed and I love the mast lifting system. Simpley ingenious... :)

    Leave a comment:


  • bassplayer1
    replied
    Very nice job my friend!!! A smooth operator by all means!!!

    Regards Yannis

    Leave a comment:


  • MFR1964
    replied
    Finally freed from the oblications that mothersday bring i grabbed some precut foam and dunked the 212 into the bath, this time with the goal to get her balanced.
    Read David's cabal report about trimming with foam over and over and took the plunge, with my dry hulls it's the other way around, adding lead for the most part instead of foam, once you get the hang on it, it's working fine.
    Scribed down the positions for glueing the foam parts inside, so this week get me the second run to see if i have the alter some things, i'm getting closer and closer to the maiden of this gritter.


    Greetings Manfred.

    Leave a comment:


  • MFR1964
    replied
    As David decribes i always do work according a plan, always try to think ahead and combine things which will work or not.
    This happens only inside the head and later with shifting the parts around with some dryfitts, this boat was for me not planned, since i was building on the type XVIIb, so i had a gap about info about this boat.

    Surfing around the web solved that problem, and asking around at fellow modelbuilders which allready builded this type solved some more problems for me.

    Normally i take a year for researching on different sources, this includes the technical things, shipyarddrawings and other details, from that point i start with designing the systems that will fill the dryhull i usually build, jumping in with a WTC which i've never build myself was a bit of a shock.
    Never worked inside such cramped spaces not designed by myself, this in a way limits you with the things you can do, my first reaction was to search the web about the SD, and tried to get as much info as possible, in a way tried to get under the skin of the designer.

    Always want to know why and how certain things are designed and which way they work, i was impressed by the way the SD was designed and the flexibillity for altering things to my needs, during the build SAS came around, due to the nature of the SD it was easy to include it also.
    I even think that David already had the view in the past that such a system could be made as a successor of the SNORT system, otherwise it would give more trouble to add SAS, it fitted as a glove.

    This story is a peek inside the way i always try to work.


    Greetings Manfred.

    Leave a comment:


  • He Who Shall Not Be Named
    replied
    And Manfred demonstrates the difference between an engineer and a go-for-it hobbyist: He works to a plan, a broad plan initially -- worked out in his head, then paper, then maybe even a test-article to confirm desired function and fit; a plan that he's pragmatically prepared to deviate from once former 'unknowns' are uncovered and addressed; changing the plan (and, if required, the sub-systems adjacent to or functionally connect to the task at hand); changing the methodology as real-world circumstances dictate.

    Manfred does not get frustrated (that he'll let us see, anyway), he modifies his methodology to achieve the desired goal. Scientific pragmatism on display here. He's taken what is a simple commercial kit of limited ability and is turning it into a working r/c model submarine Rube Goldberg himself would be proud of.

    (Readboat: finish your damned 1/144 KILO!!).

    David

    Leave a comment:

Working...