-
I took the Gato out to the open water, no pool for safety. It is interesting the feeling you go through. I lapped around several times and then took the sub close to the rock wall and did a dive. It was amazing! It was nice not to run out of room to run, but also just how cool the sub looks in non-pool water.
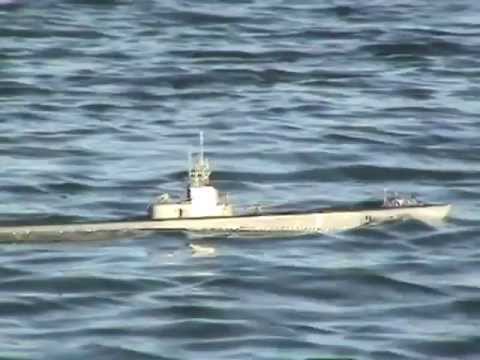
After several runs submerged, it was time to video the run. Unfortunately, we did not get that much good video footage. My son (soon to be 9) was filming and was having trouble following the sub once it submerged or kept at periscope depth. I would need to surface until he acquired it again. Next time I will let him run the sub and I will film.
Maybe the next post will be a summary of what I would do different and what I will keep in future builds. What a great submarine!Last edited by trout; 06-17-2013, 02:05 PM.Leave a comment:
-
You mean the roll as the ballast tank empties? Me too. And the real boats did that in a beam sea. The problem is the free water in the tank as it empites -- if it sloshes to one side, the boat will roll and stay there till enough water has been blown out to permit the boat to stabilize itself.
Long, skinny boats have a shorter than desired metacentric height (vertical distance between c.g. and c.b). That's the source of the problem.
DavidLeave a comment:
-
I like the level idea! And you are correct, I also walked away several times to save my sanity and the sub. When I began to trim, I did it just as David recommended, submerged trim first. Then it became a battle with the tilt as it is surfacing and doing the cycle of submerged trim, surface trim, add weight, add foam, submerged trim, surface trim and on and on. vital.spark, do you have the Gato? Does yours do the tilt as it surfaces?Leave a comment:
-
If you have any of your foam above the waterline, remove a bit and the sub will sit lower when submerged. David always does submerged trim first. It seems you have tried the other way first? You can make a cardboard gauge across the subs beam to the waterline outside, then move it inboard to check the height of the foam inboard. Trimming can be a big pain! I often walk a way for a while and unwind before getting back into it. I use a small sting line level attached with a rubber band which is very helpful.Leave a comment:
-
You are correct, I am not running the SAS, but I am running the SNORT system. My next Gato will use SAS.
Here is a photo of where my Gato sits currently (with gas tank filled). It will sit a little higher when it is empty (i know that is a duh statement).
The blue highlight is where the waterline is.
When it is set up like this, the forward motion needed to submerge is very little. The down side is it also has little lift if it gets in trouble. I have run her with about 1/2" to 1" of sail above waterline and runs pretty good, more speed needed of course. With decks awash you are fighting positive buoyancy IMHO, it works, see below photo. That is the minimum I would go.
Here is where I trimmed it originally. She ran great until I went beyond 3' or 4' then she became slightly negative. There are other issues that played into that like trapped air behind my foam (I did not shape the foam to fit the hull).
And here it is sitting higher in the water
This is the highest I would recommend, I had an empty compressed air tank here. That said, I still could maintain periscope depth!
You will get there. A lot of my weight and foam was added to overcome or minimize the tilt that happens as you empty the ballast tank of water.
Here are embarrassing photos of what my foam looks like.
You can see a lot of small chunks above the waterline. Instead of having the foam under the deck (which I do have some), I kept as much as possible just above the waterline. It still serves the purpose for submerged trim, but also (my thinking goes) when the boat tries to do its tip, it immediately will need to fight the buoyancy of the foam. Do you know what I mean? Sorry to ramble, I would encourage you to keep at it. You will be rewarded with one fantastic sub!Last edited by trout; 05-25-2013, 11:41 AM.Leave a comment:
-
Tom, I assume your not running the snort float valve. What did did you trim your submerged depth at? If I go for waterline to full ballast, I can only get the sail gun decks awash. I'm almost considering going to a periscope tube such as yours. I'm refitting my weights and foam, so things may still change. But I'm thinking about some other options.Leave a comment:
-
Spring prep on the Gato. Time to head to the lakes tomorrow. It rode high at first, but after a short while of just sitting in the water, she settled down.
Ran through all the paces for about 45 minutes and no hiccups. What changed? I used a different battery. It was one of my original ones. Cut the leads on it to match the connectors I am using and tried to match the weight of the ones I was using.
The air way through the periscope puts a slightly longer fill time. It must still be constricting a tad bit, but I like the look of having a periscope.
I am going to see if I can get some underwater shots.Leave a comment:
-
Damn! Since day one I've caught a determined bubble up in the sail which would only get out of there with an extreme down-angle. Now I know where it came from! Thanks for the tip, Tom. Time to punch a like hole under my Oerlikon.
DavidLeave a comment:
-
I failed to add the photo of the gun.
She is tested and ready for another run in the pool.Leave a comment:
-
It is Spring service on the Gato. In between builds and getting some small stuff off the plate.
The Gato's periscope shaft is used to bring air into the SNORT system to empty the ballast tank. Leaving the top of these tubes open looked incomplete. Earlier I posted about casting a new periscope and carving in the air intake.
So tonight tested the periscope and to see if the opening would whistle (my fear) or be very restrictive on the air intake. Out came the inflatable test tank.
Fortunately it did not whistle and it was only slightly slower on bringing air in.
The air intake is pretty well hidden. Shining a spot light on the opening reveals what was cut out. The tube to the aft, is the other scope shaft, but it will be removed prior to sailing. It is a good protector for the periscope. I ran the sub for 40 minutes no issues came up other than it is slightly buoyant. I also took that riser from underneath the 20mm (although some boats had them, I never cared for it.
and drilled a vent hole.Leave a comment:
-
Tom, I am impressed that looks really good............but he is right, get back to work building.
Peter.Leave a comment:
-
Thanks Scott, (in a wispering voice so you know who does not hear) I will practice with a different photo.Leave a comment:


Leave a comment: