-
In the last photo the grating is only placed in dry fit mode, without glue; I'll scrape the hull surface in order to have the grating flat, without protuberance,...
CheersLeave a comment:
-
While I continue the work of reproducing the welding seams, I started with the modification of hole with grating for flooding, situated in both sides of the hull. Now I have to reproduce the inner valve visible through the grating....CheersLeave a comment:
-
Start adding the missing weldings, obtained by plasticard...Leave a comment:
-
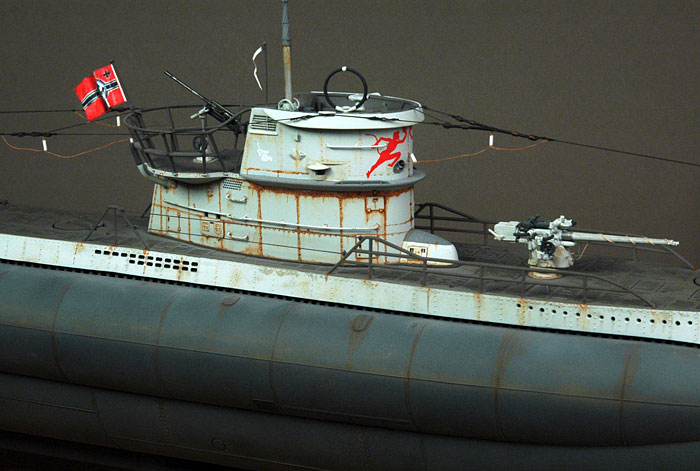
I agree about that many models are done with weathering effects that look like the boat has been sunk twice and been rebuilt. Totally off the hook. One also has to look at which stage of its service time a boat is depicted. New boats looked new. In the beginning of WW2 the boats were maintained properly and also looked good. With the turnaround in the war, servicing became increasingly bad, and such the looks of the boats. Have a look at these pics of U-552. In most of the pics it looks quite posh.
I also think, that U-995 is not a good start point, as it had a very long service time, and now sits on a beach in open weather�..Leave a comment:
-
Hi guys,
I completely agree with your comments about the exaggerate effects of wheathering in many models...
In my model, I didn't start with the painting yet, and so it's a problem that I'll deal with in the next months...
About the hull, many modelers ( and me too) tried to point out the difference from the inner pressure hull plates and the scaffolding plates of the external hull: the first were very rough and rugged, the second were perfectly smooth.....surely it's easy to exaggerate the effects, but also not differentiating the surfaces it's, in my opinion, an error....
I post some photos of the rough surface typical of the pressure hull, and a good example of a possibile method to reproduce it ( courtesy of a Dutch modeler ).
CheersLeave a comment:
-
Yeah, please do not take my thoughts as to take away from your incredible build. I have seen too many builds that use a museum submarine like U-995 and not recognize the abuse, lack of upkeep, or how it was originally acquired. Some over do the weathering, but I believe it is their own choice none the less. When it is out on the pond, no one will care about some of the thoughts we share here.Leave a comment:
-
I agree with Trout here, but super work all the same and clever technique for the weld seams.
It seems to me that the corrosion forms part of what I call the 'over weathering' effect that in my view can go a bit too far. Again, not a criticism of the technique to do it and the end result is certainly realistic but I've looked at hundreds of photos of subs on the water and by and large they don'y have the massive corrosion and rust effects seen on many models even by renowned model makers. The model train world is bedevilled with vastly over distressed models (though it doesn't seem such a massive problem in the USA as the UK and here).
Take these famous photos of U552 (a sister boat to U557 which I'm building)..........

Now compare it with one of the many of the models of U552 built from the Revell 1/72 kit..............
To my mind the real boat, even the more aged one, does not look like this model. The upper grey is too bright and consequently the weathering effects are very stark, too much in my view. And this is mild weathering!
Or how about this stunning build of U995 again from the Revell Kit.................

In my view this boat looks riduculous,a personal opinion and no comment on the skill of the builder.
The problem with weathering (and I freely admit it's not one of my strong suits), is that it crosses over into the boundary of artistic licence, and one of the most famous problems with amateur painters for example is they don't know when to stop, less is more does not seem to apply.
All very subjective of course.
The Boattrainman
Last edited by The Boattrainman; 10-26-2017, 04:20 PM.Leave a comment:
-
Nice technique! I use CA and Baking soda, but I like what you have going on there.
I see you put wear on the hull, pitting and erosion effect. I have seen several people do that and I think it is because of the sub that was brought out of the sea after being sunk for decades (now a museum submarine). Did the subs in active duty get eroded that quickly?Leave a comment:
-
Continues the work on internal part of the forward hull; the ribs will be visible only from outside, through the drainage holes....Leave a comment:
-
Still working on internal surface of the bow hull casing, not printed by Trumpeter to be visible....the ribs visible between forward drainage holes are still incomplete, with only one part of the two ones glued...Leave a comment:
-
Modified the ejector draining holes, wrong in position...later I'll modify also the joint between the pressure hull and the external case, in bow section, wrong too...
Start to cut off the plastic deck for replacing with photohetched one, and started the work of sanding the internal hull, visible in my model...Leave a comment:


Leave a comment: