SS-581 Blueback

Collapse
X
 
  • Time
  • Show
Clear All
new posts
  • SSN687
    Lieutenant Commander
    • Nov 2015
    • 119

    #16
    11 July 2016
    David,
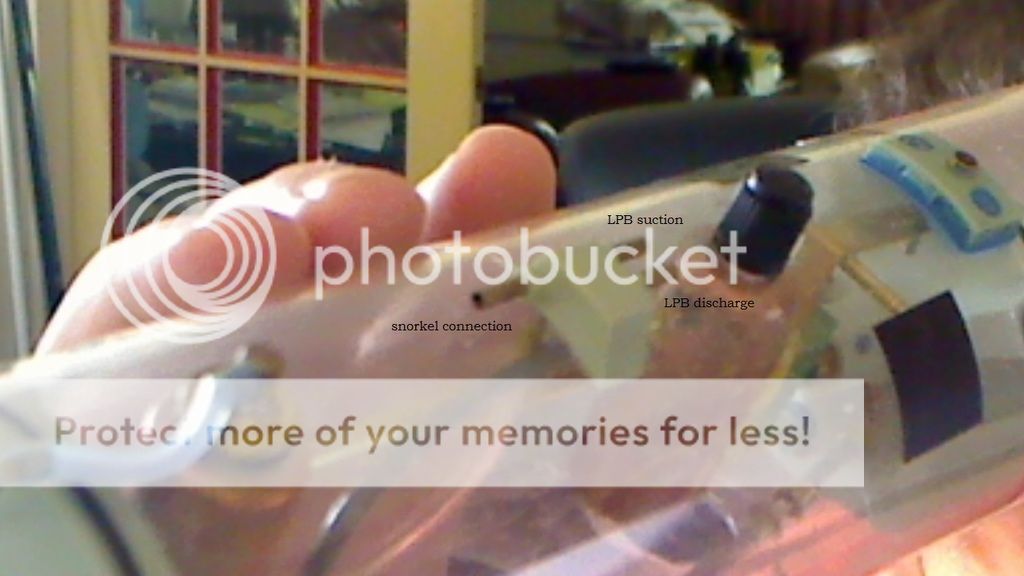
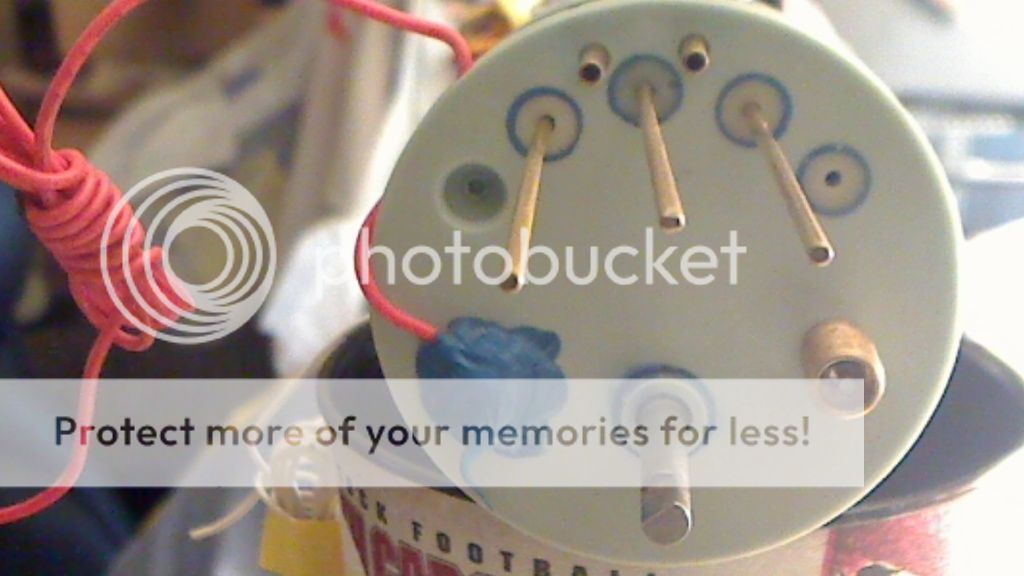
    I understand your configuration of the blow system now. The package that you send me for the addition of the emergency blow system didn’t have a spacer the spacer that goes between the ballast linkage arm and the gas blow valve. I didn’t think of trying that, of course I chose the hard path. I was trying to extend the gas blow valve (Schrader valve) out to the ballast linkage arm. I found a Schrader valve extension and was going to drill it out to fit over the gas blow valve, and cut the extension to length, so that the ballast linkage arm would strike the valve stem of the newly extended Schrader valve (gas blow valve) in the failsafe condition, then solder the extension over the piece that is locked into the end cap.
    I’m thinking that your method is much easier to do. I haven’t done anything yet, I was waiting to hear from you. Somehow I thought you might have a better idea, again thanks.

    Thanks
    Ernie

    Comment

    • SSN687
      Lieutenant Commander
      • Nov 2015
      • 119

      #17
      12 July 2016
      David,
      How is the spacer between the ballast linkage arm and the gas blow valve attached to the ballast linkage arm? Velcro

      Thanks
      Ernie

      Comment

      • He Who Shall Not Be Named
        Moderator
        • Aug 2008
        • 12313

        #18
        Glad I headed you off at the pass, pardner! And sorry I missed your first cry of help.

        ​SuperGlue.
        Who is John Galt?

        Comment

        • SSN687
          Lieutenant Commander
          • Nov 2015
          • 119

          #19
          15 July 2016
          David,
          ARRRR, this xgency blow system, I’m having to work through the bottom of the ballast tank. I wouldn’t make a good surgeon, I'm a spastic when it comes to using hemostats and my finger are sore. I got a Lego epoxy to the ballast linkage arm, now. I had to take the vent servo out again it was binding and then the plastic servo arm tore, more ARRR. I’m adding a small piece of carbon fiber flat stock, cut out about the same as the servo arm and letting the epoxy dry 24 hours before cleaning it up to make sure it will stroke the same as before.

          I'm going to have to enlarge one of the ballast tank bottom inlets to get the flash into the ballast tank. If I add a small oval about 0.25 inch to the middle inlet hole and have no sharp edges I think that it will be acceptable. I'm going to use a small file to open it up, trying not to put any stress cracks in the Lexan tube. I sure don’t want to take the out one of the bulk heads. I know I would do more damage by taking them out and not be able to get them back in the correct position to attempt to get it to seal again. If there is another way to get the flask into the ballast tank let me know.

          I need the flat threaded washer that hold the xgency blow flask in place in the ballast tank, there wasn’t one in the bag either.

          The first one sure is a steep learning curve, I sure hope it makes the next ones easier. I’ll get there, seems like half step forward and 10 steps back, but with the heat here it’s the only game in town.
          Thanks
          Ernie

          Comment

          • He Who Shall Not Be Named
            Moderator
            • Aug 2008
            • 12313

            #20
            Originally posted by SSN687
            15 July 2016
            David,
            ARRRR, this xgency blow system, I’m having to work through the bottom of the ballast tank. I wouldn’t make a good surgeon, I'm a spastic when it comes to using hemostats and my finger are sore. I got a Lego epoxy to the ballast linkage arm, now. I had to take the vent servo out again it was binding and then the plastic servo arm tore, more ARRR. I’m adding a small piece of carbon fiber flat stock, cut out about the same as the servo arm and letting the epoxy dry 24 hours before cleaning it up to make sure it will stroke the same as before.

            I'm going to have to enlarge one of the ballast tank bottom inlets to get the flash into the ballast tank. If I add a small oval about 0.25 inch to the middle inlet hole and have no sharp edges I think that it will be acceptable. I'm going to use a small file to open it up, trying not to put any stress cracks in the Lexan tube. I sure don’t want to take the out one of the bulk heads. I know I would do more damage by taking them out and not be able to get them back in the correct position to attempt to get it to seal again. If there is another way to get the flask into the ballast tank let me know.

            I need the flat threaded washer that hold the xgency blow flask in place in the ballast tank, there wasn’t one in the bag either.

            The first one sure is a steep learning curve, I sure hope it makes the next ones easier. I’ll get there, seems like half step forward and 10 steps back, but with the heat here it’s the only game in town.
            Thanks
            Ernie
            dmeriman@aol.com


            Who is John Galt?

            Comment

            • SSN687
              Lieutenant Commander
              • Nov 2015
              • 119

              #21
              23 July 2016

              Installed the emergency blow flask into the ballast tank by enlarging the bottom middle open by file. The flask is held in place by the plastic Schrader cap until I get the proper nut installed. Made new carbon fiber servo arm for vent system and installed. Received and installed the magnetic power switch to the electronic harness, tested, ok. All electronics are working properly outside the WTC, some minor adjustments maybe needed but workable now. As soon as I get the nut for the emergency blow flask, I'm going to reinstall the engine room electronics, battery, and both end caps. It’s time to water test the WTC in the kitchen sink to check it for leaks.
              Next I need to get the lead ballast poured and install it into the hull. I used clay to replicate the lead ballast, then made a LEGO mold and poured plaster of paris molds around the clay. I used Mod Podge clear acrylic sealer over the plaster of paris, to seal and help get the lead out after pouring it. I don’t want to tear the mold up just in case I have to repour the lead ballast again. I will melt a 3 lbs lead diving weight and pour the lead into the mold but it’s too hot outside to mess with the propane burner.
              Thanks
              Ernie

              Comment

              • trout
                Admiral
                • Jul 2011
                • 3547

                #22
                I stumbled unto a bullet making site and for separating lead from their molds they used graphite powder. When I used plaster of Paris, it worked well enough, most broke with repeated pours. I think the biggest problem I have with plaster is my impatience to make sure all the water is out. Using Mod Podge is creative and look to see how it works. The better plaster is a dental plaster called Hydrocal, it can take very high heat. The best purchase I did for pouring lead is a small lead ladle called Palmers Lead Melting Hot Pot . Look it up on google, I am sure you can find one locally.
                Oh and were are the pictures? I am such a visual learner.
                Last edited by trout; 07-24-2016, 12:32 PM.
                If you can cut, drill, saw, hit things and swear a lot, you're well on the way to building a working model sub.

                Comment

                • He Who Shall Not Be Named
                  Moderator
                  • Aug 2008
                  • 12313

                  #23
                  Who is John Galt?

                  Comment

                  • bwi 971
                    Captain
                    • Jan 2015
                    • 902

                    #24
                    Originally posted by He Who Shall Not Be Named
                    What do you use as metal alloy mixture David?

                    Grtz,
                    Bart
                    Practical wisdom is only to be learned in the school of experience.
                    "Samuel Smiles"

                    Comment

                    • He Who Shall Not Be Named
                      Moderator
                      • Aug 2008
                      • 12313

                      #25
                      Pure Lead for weights. 95%Tin-5%Antemoney for parts (leadless solder).


                      Who is John Galt?

                      Comment

                      • SSN687
                        Lieutenant Commander
                        • Nov 2015
                        • 119

                        #26


                        29 July 2016
                        Still too hot to crank up my foundry to melt and pour the lead ballast.
                        Getting ready for the first water test of the WTC in the kitchen sink to check it for leaks.
                        Cannot find a good labeled picture of the LPB suction, discharge, and snorkel lines to the 4 point manifold. So I'm guessing and asking if these are the correct connections to the 4 point manifold?
                        Thanks
                        Ernie

                        Comment

                        • He Who Shall Not Be Named
                          Moderator
                          • Aug 2008
                          • 12313

                          #27
                          Originally posted by SSN687


                          29 July 2016
                          Still too hot to crank up my foundry to melt and pour the lead ballast.
                          Getting ready for the first water test of the WTC in the kitchen sink to check it for leaks.
                          Cannot find a good labeled picture of the LPB suction, discharge, and snorkel lines to the 4 point manifold. So I'm guessing and asking if these are the correct connections to the 4 point manifold?
                          Thanks
                          Ernie
                          ​Bingo!..........


                          Who is John Galt?

                          Comment

                          • SSN687
                            Lieutenant Commander
                            • Nov 2015
                            • 119

                            #28
                            30 July 2016
                            In getting ready for the first water test of the WTC for leaks, I'm not using the 4th control rod hole on the engine room WTC bulk head, right now.

                            1. What is the best way to seal this control rod hole leaving my options open and use it if needed?

                            2. The engine room WTC bulk head penetration with the Allen cap in it, is it just a plugged hole or does it have anything in it?

                            I'm trying to get the basic Blueback together, up and running before I try modifying any of controls or anything. I have purchased an electronic depth control (DC) circuit from Kevin McLeod. After I have gotten the Blueback up and running, I will add the DC to the controls. The DC circuit will need to sense the water pressure. I could use the 4th control rod hole or the opposite side penetration that has an Allen cap screw and place a small diameter metal tubing through one of them.

                            Thanks
                            Ernie

                            Comment

                            • trout
                              Admiral
                              • Jul 2011
                              • 3547

                              #29
                              If you are going to use the 4th hole eventually, put a 1/16" rod in there bent on both ends so it does not pull out. The seal with a drop of silicon should keep it watertight.
                              I am not picturing the Allen cap, do you have a photo?
                              If you can cut, drill, saw, hit things and swear a lot, you're well on the way to building a working model sub.

                              Comment

                              • SSN687
                                Lieutenant Commander
                                • Nov 2015
                                • 119

                                #30


                                Penetration with Allen Cap Screw and 4th control rod penetration

                                Thanks
                                Ernie
                                Last edited by SSN687; 08-02-2016, 11:22 AM.

                                Comment

                                Working...