Japanese BI I-25 in 1/72

Collapse
X
 
  • Time
  • Show
Clear All
new posts
  • Albion
    Captain
    • Dec 2008
    • 651

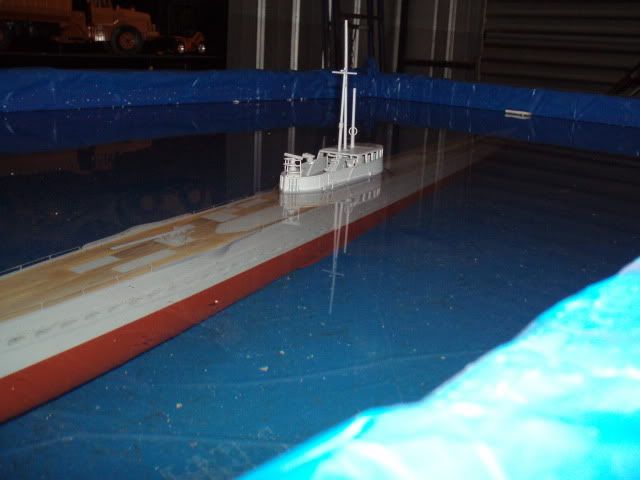
    Looking good, i also have that floatplane kit, but not built, so gives a good impression of the size.


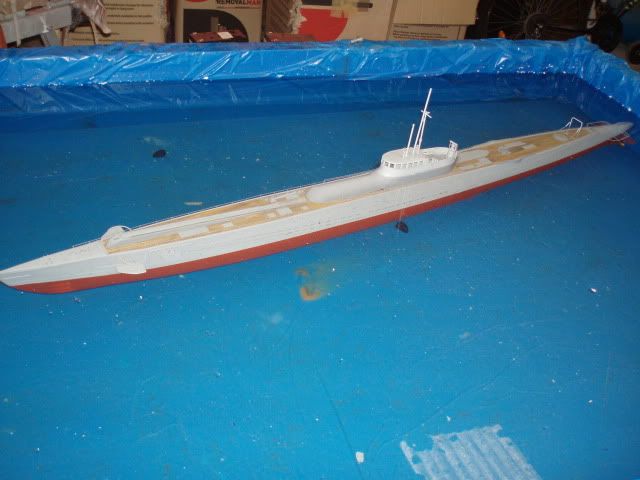
    Seems to me proof , you can polish a turd, in the nicest possible way
    Next time someone points out it takes 42 muscles to frown, point out it will only take 4 muscles to b1tch slap them if they tell you how mnay muscles you need to smile:pop

    Comment

    • redboat219
      Admiral
      • Dec 2008
      • 2735

      Somebody call 911. I'm dying of envy.
      Make it simple, make strong, make it work!

      Comment

      • oztruck
        Commander
        • May 2010
        • 317

        OK back to the mechanics.

        I still need to make the emergency gas blow tank and control.

        What I am planing is an external gas tank, one not inside the W.T. Thingy. One that can be easily recharged and hopefully 100% safe. The last one I built is on the inside of the W.T.Thingy of my Alfa look a like.

        Although it has never given any trouble there is always a chance of a leak, and we all know happens if we let off gas when we don't want to.

        The other project is a recovery buoy that is activated manually or by a fail safe. My plan is that it should have enough buoyancy be able to float to the surface still tethered to the sub by a cable and be easily seen from the shore.

        We put too much time into our subs to turn them into an artificial reef for the local fish.

        Comment

        • oztruck
          Commander
          • May 2010
          • 317

          I have made a bit of progress on the recovery buoy system.

          As we all know one of the BIG problems with the "Lindberg" kit is the hatches on the deck. They are in the wrong place and are way too big.

          To correct the problem I first filled the hole where they were to go with 3mm plastic card cut the same size as the hatch, glued it in place them scribed a wood pattern into the plastic and cut the board lines.


          That worked well for most of them but it still left me with the one on the rear deck. It stood out like a pimple on your nose.
          Because it was the problem I thought why not turn the problem into a solution. A solution as to where to put the recovery buoy.


          As you can see the hatch was still too big even at half it original size, so I converted the hatch to be even smaller. It's still too big but what it does will make up for the size of it.

          This is what I ended up with


          And this is why I don't mind that it is too big


          And how it looks on the boat now


          As you can see glued to the underside of the hatch is an air tight tube with a brass ring fitted to the bottom of it, the tube fits inside an other tube with holes each end and mounted into the hull


          The air tight tube when installed is firmly connected to feet of lb fishing line which in turn is firmly connected to the rear of the hull.

          A piece of brass rod passed through the ring on the bottom of the recovery buoy to hold it in place when not needed.


          The other end of the rod is connected to a servo which is connected to a fail safe circuit. If I loose signal the failsafe kicks in, pulls the pin, the recovery buoy bobs quickly up to the surface and then I decide who is going to get wet.

          I have painted the recovery buoy a bright yellow to make it easy to see and if needed I could put a self powered bright flashing LED in the buoy as well. At the moment I think I will just stick with the bright yellow paint.

          Comment

          • redboat219
            Admiral
            • Dec 2008
            • 2735

            Yellow? Go with Day-Glo Orange.
            Make it simple, make strong, make it work!

            Comment

            • oztruck
              Commander
              • May 2010
              • 317

              Still held up with the emergency gas system but I could not help myself. Just had to get it wet.

              Trimmed for both surface running and snorting. Can't wait to take it for it's shake down run


              Comment

              • He Who Shall Not Be Named
                Moderator
                • Aug 2008
                • 12253

                Perfect trim!

                The job you've done to get that awful kit presentable is simply magnificent!

                Weather that thing!

                David
                Who is John Galt?

                Comment

                • oztruck
                  Commander
                  • May 2010
                  • 317

                  Thanks David for the encouragement. Just like the real ones though, it won't get the final paint/weathering till it is a reliable runner.
                  It already has some natural weathering. The black iron hand rails and steps that come in the kit that I changed and mounted on the sail have started to rust already. Giving rust stains down the sail where they go through the plastic.

                  Comment

                  • oztruck
                    Commander
                    • May 2010
                    • 317

                    Well I couldn't help myself.

                    Even though it is still not complete I had to get the boat wet.
                    We had a club run day last Saturday with NO public visitors so I could be self indulgent and concentrate on what I was doing and not on what I was being asked.

                    As shown in the video the boat ran well. On the surface it sits nice and starts and stops without any sideways movement, the props spin but not the hull. It does not turn as good as I want it to YET but that is because of the radio I am using and the rudder could be a bit bigger. Both an easy fix.

                    Submerged running is another story.
                    It sat at the correct depth when still but when moving forward it wanted to poke it's nose out of the water and while I was trying to get that sorted out, on the second lap of the pond I found the bottom and got the props caught it the weeds.

                    Two of three of my fail safes worked, because only two are fitted at the moment. The first one is a weak link in the prop shafts, a piece of silicon tube acting as a universal and fail safe. If the props get caught up on something the idea is for the silicon tube to let go before the the ESC cooks its self. That seemed to work but only on one shaft. So I guess it half worked.

                    The next fail safe is the recovery buoy that worked very well. I knew as soon as the buoy surfaced just where it was and was able to use the buoy cable to free it from the weeds and get it back to the pond side.

                    The fine tuning on the submerged running is very close to being complete. The next time I try and fine tune the submerged running it won't be a full steam ahead.

                    Sorry about the quality of the video but trying to drive and video at the same time is a bit beyond me.

                    When it is all working as it should I will get someone else to video it for me.

                    Hope you enjoy the video.

                    Last edited by oztruck; 06-27-2011, 03:43 AM. Reason: spealing

                    Comment

                    • He Who Shall Not Be Named
                      Moderator
                      • Aug 2008
                      • 12253

                      Well done, sir!

                      David
                      Who is John Galt?

                      Comment

                      • oztruck
                        Commander
                        • May 2010
                        • 317

                        And a little bit more.

                        Comment

                        • greenman407
                          Admiral
                          • Feb 2009
                          • 7530

                          Impressive to say the least Oztruck. Here are some pictures that you may already have , Im not sure. Better late than not.Click image for larger version

Name:	jbplanewatersb3.jpg
Views:	2
Size:	79.4 KB
ID:	62892Click image for larger version

Name:	I-19.jpg
Views:	1
Size:	95.0 KB
ID:	62894Click image for larger version

Name:	I-19.jpg
Views:	1
Size:	95.0 KB
ID:	62894Click image for larger version

Name:	I_19_SUBMARINE_KIT.jpg
Views:	2
Size:	44.1 KB
ID:	62893Click image for larger version

Name:	ModelBClassJapanseSubmarine.jpg
Views:	2
Size:	11.9 KB
ID:	62895
                          IT TAKES GREAT INTELLIGENCE TO FAKE SUCH STUPIDITY!

                          Comment

                          • greenman407
                            Admiral
                            • Feb 2009
                            • 7530

                            Click image for larger version

Name:	Japanese cruiser subs.jpg
Views:	1
Size:	55.4 KB
ID:	62899Click image for larger version

Name:	1601xu8.jpg
Views:	1
Size:	33.1 KB
ID:	62898Click image for larger version

Name:	!BqJ74EwBmk~$(KGrHqMOKisEuZLMURsgBLuiZ1w1zw~~_3.jpg
Views:	1
Size:	42.4 KB
ID:	62897Click image for larger version

Name:	i19_7.jpg
Views:	1
Size:	88.4 KB
ID:	62896
                            Last edited by greenman407; 06-29-2011, 04:54 PM.
                            IT TAKES GREAT INTELLIGENCE TO FAKE SUCH STUPIDITY!

                            Comment

                            • herrmill
                              Commander
                              • Dec 2008
                              • 360

                              Great job, OZ! Talk about making a purse from the proverbial sow's ear.

                              Once again, with all the available reference data on these I-boats, I still shake my head at how Lindberg's guy got this kit so f'd up! That exaggerated line of vents on upper hull is so wrong but there isn't much you can do about that unless you want to do some major corrective surgery.

                              Comment

                              • oztruck
                                Commander
                                • May 2010
                                • 317

                                Thanks for the nice words guys.

                                Yes it did start out as a pig and even after a bit of work it is still a long way off being 100%.
                                But even with all its faults, when I took it out on its first run I was pleased that the people that know about subs (all 3 of them) had no trouble spotting it was a B1 class.

                                I guess its a bit like when you own a particular model and make of car, you can tell the difference between the top end of the range and the cheap version.

                                I am happy with the way mine looks and there is still a lot of work that others can do to make these models even better and I am happy with that too.

                                I think I have found a solution for the emergency gas blow system but can't tell until I get the rest of the parts and try it out.

                                I have also done a bit of work on the rudder and at the moment I am swapping out the radio system with a more up to date set with EPA's to help to get the boat to turn better and give me a bit more scope with the fine tuning of the submerged running.

                                Looking forward to getting it wet again soon.

                                Comment

                                Working...