OTW Type VII buildup in 1/32 scale

Collapse
X
 
  • Time
  • Show
Clear All
new posts
  • RCSubGuy
    Welcome to my underwater realm!
    • Aug 2009
    • 1773

    OTW Type VII buildup in 1/32 scale

    Well, I'm a terrible blogger. I keep telling myself that I'll post up progress on my builds as I make it, but then I get busy... and forget... and really have no other excuses.

    Here is some information and pics on my current project, a 1/32 scale Type VII from OTW Designs:

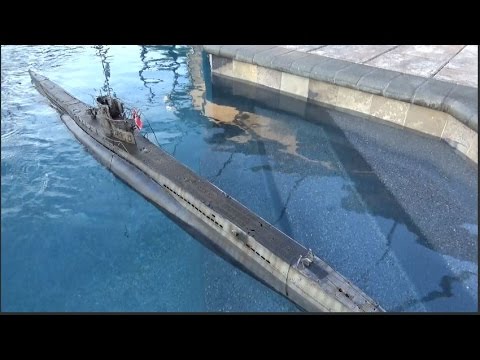
    This is a commissioned build for a customer who bought it as a retirement gift to himself. Like all things, this has taken longer than I anticipated, but I'm getting near the finish line now, having nearly completed paint and hoping to move on to trimming within a week.

    Here is how I received the hull. Most of the basic assembly was complete, but there was some damage in shipping that needed to be reworked. I also needed to redo the linkages as there was considerable binding. The OTW cylinder was fresh out of the box and I started my work on that aspect first.


    Attached Files
  • RCSubGuy
    Welcome to my underwater realm!
    • Aug 2009
    • 1773

    #2
    I moved on to fabricating some new torpedo shutters from brass sheet by embossing the rivets from behind. The brass railings were repaired using silver solder and new brass chains were installed.
    Attached Files

    Comment

    • RCSubGuy
      Welcome to my underwater realm!
      • Aug 2009
      • 1773

      #3
      It was here that I got serious. Shipping and handling a boat of this size (over 82" long) is challenging, and getting that big 4" diameter cylinder in the hull is also a challenge. I hated the idea of spreading the hull and jamming the cylinder through the top. It seemed like a recipe for cracked paint, damaged fiberglass and scratched cylinders.

      So... I cut the whole hull into three sections. Theoretically these will fit into a Pelican transport case that will make transport a breeze and protect the boat from damage. The hull was cut with a diamond cutoff wheel and then 1/4" thick plastic bulkheads were put in place to keep the hull shape and bolt each section together on.

      I also elected to install a bow thruster, though just how effective this will be is anyone's guess. I went with mounting the motor in the wet. It will be oiled well prior to and after each run. My research shows that this is a viable alternative to trying to seal the thing in a watertight compartment. Time will tell!
      Attached Files

      Comment

      • RCSubGuy
        Welcome to my underwater realm!
        • Aug 2009
        • 1773

        #4
        Now is probably a good time to note that this build will have three fully functional torpedoes; two front and one rear. I experimented with gas powered torpedoes with limited success. I found the path just too unpredictable and didn't like the dangerous aspect of messing with the liquid air.

        From there, I committed to making an electric torpedo work. To that end, I sourced a (supposedly) 32nd scale torpedo kit from China. It was really not usable as it came, but the core stuff would work well to get me started. The key is finding a timer circuit that will only power the weapon for about 4 seconds or so after launch. The weapon is activated with a reed switch that is energized from a magnet from the launcher assemblies. A timer circuit that I found allows a customized time from 1 second to 4 hours. I have them set for between 3 and 5 seconds, which should be plenty of time to get the weapon about 10 or 15ft from the boat.

        I ran into major issues with the cheap components that came from China, namely the batteries and reed switches. New ones have just been ordered and I created a new body in 3D and am printing that out.

        Preliminary testing is really exciting and I can't wait for testing of these new weapons!
        Attached Files

        Comment

        • RCSubGuy
          Welcome to my underwater realm!
          • Aug 2009
          • 1773

          #5
          Here is a bit of a breakdown on my painting procedure. It's a departure for me from my usual methodology, but I'm excited about how it's turning out so far:

          1.) Base coat of red primer
          2.) Wet hull and apply rock salt. Let dry
          3.) Base coat of appropriate gray colors
          4.) wet hull and scrub salt off
          5.) matte clear coat
          6.) Grimey black/rust paint dilution wash over entire model
          7.) matte clear coat
          8.) apply acrylic rust solution with clear matte acrylic and chalk powders
          9.) apply semi-gloss clear
          10.)Final weathering with pastels, paint, etc.
          Attached Files

          Comment

          • RCSubGuy
            Welcome to my underwater realm!
            • Aug 2009
            • 1773

            #6
            You can view more pics, info and videos of this build so far on my site at www.rc-sub.com.

            Here are a few more pics of my hull split (I noticed I missed them earlier!)
            Attached Files

            Comment

            • Tom Martin
              Lieutenant, Junior Grade
              • Apr 2014
              • 32

              #7
              Bob:
              All that's needed is a tiny Jürgen Prochnow on the sail.
              Best complement I can give: She Looks REAL!

              Tommie
              nautilusreproductions.com

              Comment

              • greenman407
                Admiral
                • Feb 2009
                • 7530

                #8
                Bob, whats the purpose of the rock salt in your painting procedure? Perhaps to etch the red primer?
                IT TAKES GREAT INTELLIGENCE TO FAKE SUCH STUPIDITY!

                Comment

                • greenman407
                  Admiral
                  • Feb 2009
                  • 7530

                  #9
                  Originally posted by Tom Martin
                  Bob:
                  All that's needed is a tiny Jürgen Prochnow on the sail.
                  Best complement I can give: She Looks REAL!

                  Tommie
                  AH....the "Das BOOT" guy
                  IT TAKES GREAT INTELLIGENCE TO FAKE SUCH STUPIDITY!

                  Comment

                  • RCSubGuy
                    Welcome to my underwater realm!
                    • Aug 2009
                    • 1773

                    #10
                    Originally posted by greenman407
                    Bob, whats the purpose of the rock salt in your painting procedure? Perhaps to etch the red primer?

                    It's a new procedure that I'm just learning about. If you search it on Youtube you'll see it in better detail than I could offer, but in general, you use it to create random paint chipping effects that do wonders for creating realistic weathering. Not only are the colors there, but the texture, too! I'm really liking it and will use it in the future for sure!

                    Comment

                    • RCSubGuy
                      Welcome to my underwater realm!
                      • Aug 2009
                      • 1773

                      #11
                      Final paint and weathering is complete. You can check my YouTube channel under "RCSubGuy" for a complete work up if you're interested, but the Cliff's Notes version is that the final paint was applied, the salt scraped and washed off and weathering was accomplished with a mixture of acrylic matte clear and chalks. I really like how it turned out in the end. Jeweler's string (1mm diam) was used for the rigging and I fashioned some magnetic latches for easy disassembly of the rigging for access and transport.

                      All in all I really like how it turned out.

                      Now.. on to trimming!

                      Click image for larger version

Name:	20150707_080705_resized.jpg
Views:	118
Size:	18.5 KB
ID:	108634Click image for larger version

Name:	20150707_080711_resized.jpg
Views:	126
Size:	13.1 KB
ID:	108635Click image for larger version

Name:	20150707_080716_resized.jpg
Views:	102
Size:	12.4 KB
ID:	108636Click image for larger version

Name:	20150707_080747_resized.jpg
Views:	100
Size:	16.9 KB
ID:	108637
                      Attached Files

                      Comment

                      • RCSubGuy
                        Welcome to my underwater realm!
                        • Aug 2009
                        • 1773

                        #12
                        Trimming is complete!

                        I've successfully trimmed out the boat over the weekend. I was very surprised that I actually ended up with more flotation than I needed, which was a very good thing as it's much easier to add weight or remove foam than it is to add foam if space is limited.

                        The boat has full surfaced trim at the correct waterline and submerges on a perfectly even keel. I'm very much looking forward to how it will perform during her maiden voyage which will likely take place on or about the 8th of next month (I'm leaving on a business trip this weekend for two weeks :(

                        Enjoy the video!:


                        Click image for larger version

Name:	7ade4825-9809-309a-6792-f22d21b7aab7.jpg
Views:	123
Size:	52.8 KB
ID:	108763

                        Comment

                        • He Who Shall Not Be Named
                          Moderator
                          • Aug 2008
                          • 12286

                          #13
                          Great stuff, Bob. Be safe.

                          M
                          Who is John Galt?

                          Comment

                          Working...