OTW NACKEN BUILD THREAD HMS Neptun

Collapse
X
 
  • Time
  • Show
Clear All
new posts
  • ffr2608
    Lieutenant Commander
    • Oct 2009
    • 234

    #16
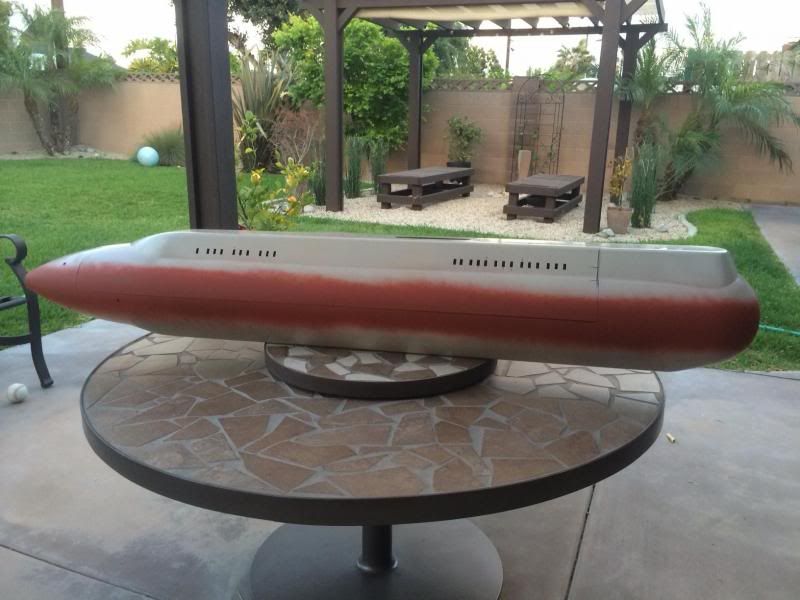
    Got the hull pinned today and did a quick block-in to see where the seam is. Not a bad start. I still need to fabricate the hold down locations so it does not shift while sanding.

    D


    Comment

    • ffr2608
      Lieutenant Commander
      • Oct 2009
      • 234

      #17
      Blocking out the hull seam and filling the minor imperfections. Still needs some tuning and then its on to the hull details. I like seeing it in a darker color. I can see the imperfections and details better in the dark red over primer gray.


      D


      Comment

      • ffr2608
        Lieutenant Commander
        • Oct 2009
        • 234

        #18
        Started the subs tail bearing. 60# renn first, then an 1/8" sheet of G10. Inside is a recess for the oilite bushing and a nylon washer. Makes for a nice fit. Will be bonded to the rear of the hull with acrylic adhesive.


        Comment

        • ffr2608
          Lieutenant Commander
          • Oct 2009
          • 234

          #19
          Turned a quick bearing carrier for the front of the shaft. Alignment after the tube is done.


          Comment

          • ffr2608
            Lieutenant Commander
            • Oct 2009
            • 234

            #20
            Getting the boat ready for the West Coast Sub Run. Prop hub is bonded and so is the front bearing block. Wanted to have everything in 1 color for display. Another shot of the monster prop.

            D


            Comment

            • ffr2608
              Lieutenant Commander
              • Oct 2009
              • 234

              #21
              Just turned a tube for the piston tank rod. Used PVC from the home store. Very fun to machine this stuff.


              Comment

              • greenman407
                Admiral
                • Feb 2009
                • 7530

                #22
                Heres the top of the sail of the RSS Archer. Maybe that will help.
                Click image for larger version

Name:	RSS Archer bridge zoom.jpg
Views:	1
Size:	97.3 KB
ID:	91220Click image for larger version

Name:	Rss_archer.jpg
Views:	1
Size:	100.8 KB
ID:	91221
                IT TAKES GREAT INTELLIGENCE TO FAKE SUCH STUPIDITY!

                Comment

                • greenman407
                  Admiral
                  • Feb 2009
                  • 7530

                  #23
                  A little closer, its starting to lose clarity.Click image for larger version

Name:	RSS Archer zoom more.JPG
Views:	1
Size:	77.0 KB
ID:	91222
                  IT TAKES GREAT INTELLIGENCE TO FAKE SUCH STUPIDITY!

                  Comment

                  • ffr2608
                    Lieutenant Commander
                    • Oct 2009
                    • 234

                    #24
                    Thanks for the photos. I love the below waterline color.....

                    D

                    Comment

                    • ffr2608
                      Lieutenant Commander
                      • Oct 2009
                      • 234

                      #25
                      Got some paint on the tower today. Did a few black variations based on photos. Also painted the lettering using vinyl decals for paint masks. Worked really well.
                      The 3 crowns roundel is now only yellow but the blue will be painted on after everything fully dries.
                      You can also see some details at the nose of the sail. Interesting add on parts and a light blue funnel thingy.


                      Comment

                      • roedj
                        Captain
                        • Sep 2008
                        • 563

                        #26
                        Absolutely wonderful build.
                        Please explain how that decal paint mask technique works.

                        Dan
                        Born in Detroit - where the weak are killed and eaten.

                        Comment

                        • ffr2608
                          Lieutenant Commander
                          • Oct 2009
                          • 234

                          #27
                          Use a vinyl decal cutter and make the masks instead of the actual decal. Then, airbrush the color and remove the mask.
                          I will take some pics for the second color tonight. Everything is dry.

                          D

                          Comment

                          • ffr2608
                            Lieutenant Commander
                            • Oct 2009
                            • 234

                            #28
                            Just got the blue on the insignia. I'm really happy with the results. This is all paint. No stickers and the lines are just as crisp. About 6 hours work just for the lettering and insignia. Also added the darker black which I believe is some sort of sealant. This is a photo from 1984 and shows the sub ready for a repaint which is how I am going to model mine. The colors are subtle on camera but look nice outside.

                            D


                            Comment

                            • ffr2608
                              Lieutenant Commander
                              • Oct 2009
                              • 234

                              #29
                              Getting glitching on my servos. How would I add capacitors to this motor?


                              D
                              Attached Files

                              Comment

                              • trout
                                Admiral
                                • Jul 2011
                                • 3547

                                #30
                                Darrin,
                                I do not know for sure so please take it with a grain of salt. It might be possible to take the end off, there appears to be tabs. If not, you could possibly split the wires enough to solder the caps in there. Then twist to the motor casing. See crayon drawing. One of the electronic gurus can tell me I am all wrong.
                                Click image for larger version

Name:	caps_idea.jpg
Views:	1
Size:	86.3 KB
ID:	91465
                                Then there is also a ferrite bead or core that can be used to suppress noise.

                                Peace,
                                Tom
                                If you can cut, drill, saw, hit things and swear a lot, you're well on the way to building a working model sub.

                                Comment

                                Working...