3D printed Collins class (1:72 scale)

Collapse
X
 
  • Time
  • Show
Clear All
new posts
  • gboxwood
    Lieutenant
    • Nov 2023
    • 77

    3D printed Collins class (1:72 scale)

    Fellow R/C submariners, here I am with my second project in the making.

    I know, I know… why more than one project at the time? Do I really have to explain myself here?

    In principle, the ALVIN is great but it is also quite unconventional and I was looking to gather some additional experience in parallel to that build by diving into a more conventional boat and use readily available cylinders.
    I also value the lessons learned among both projects as they will inevitably influence each build in a positive fashion and in particular now that I have a lot to learn.

    So, let’s get into it.

    This is the 1:72 scale Collins Class from the Nautilus Drydocks files, it is a nice boat, stubby enough to push some water around and to offer plenty of room to make the build not too tight.

    A nice size. Printing time is also reasonable, at a layer height of 0.2mm the overall time is approx. 8 days and 4 hours for a total of 1.8 kg of material. That is, printing at 100% infill all hull parts (including planes and other details), the additional components required to fit the cylinders and others will come on top of that time and material budget.

    The files also comes with a decent stand, something that came in handy during the build.

    By design, it is a Z-split hull but I saw videos where it was split differently (in particular the 1:54 version on Bob’s channel).

    Here is the parts layout:

    Senza titolo by Giacomo Bosso, su Flickr
    Senza titolo by Giacomo Bosso, su Flickr
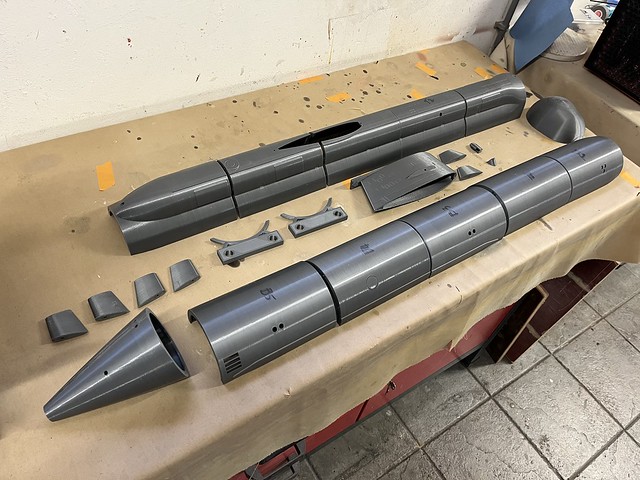
    Please note I made the mistake of “shifting the sail” to the stern in the above picture… actually I pushed the mistake beyond the parts layout and glued the upper hull like this…

    Ok, I had to print the five upper hull sections again, no way I could separate them afterwards. No problem, I will use them as weathering canvas to experiment with later on.

    Anyway, the good thing about the design of this 3D printed parts is that you can slide 2.5mm diameter carbon rods into each section while glueing everything together.

    This will make it very easy to keep everything aligned as you go.


    Senza titolo by Giacomo Bosso, su Flickr
    Senza titolo by Giacomo Bosso, su Flickr
  • gboxwood
    Lieutenant
    • Nov 2023
    • 77

    #2
    You see that two 12mm wooden dowels can be used to join the printed stand pieces.

    Senza titolo by Giacomo Bosso, su Flickr

    My finishing strategy for this one is simple: coarse sanding to get rid of the print lines and then primer with occasional filler at the hull section joints.


    Senza titolo by Giacomo Bosso, su Flickr
    Senza titolo by Giacomo Bosso, su Flickr

    Comment

    • gboxwood
      Lieutenant
      • Nov 2023
      • 77

      #3
      The watertight cylinder

      I purchased a readymade cylinder by R&R Engineering out of UK, the dual ballast version.

      The central section is 90mm in diameter, the two ballasts are 60mm in diameter. The central section is 500mm long and it proved a bit too long for this boat.


      Senza titolo by Giacomo Bosso, su Flickr
      I mean, you can make it work but I did not think I needed all that length for the central compartment.

      This is also my first cylinder and I have mixed feelings about it (considering the price point): there are some smart things in it but overall, I think it is a little bit too expensive for what you get.

      Anyway, I took it apart and decided to shorten it by 110mm. I designed and printed a new tray which was shorter and offered the same interfaces to the components:

      Senza titolo by Giacomo Bosso, su Flickr
      Senza titolo by Giacomo Bosso, su Flickr
      The only concession is that now the battery will be outside of the cylinder rather than inside of it.

      That’s fine by me because I will use a custom made battery pack that will also double as a ballast.

      Comment

      • gboxwood
        Lieutenant
        • Nov 2023
        • 77

        #4
        Here is the new tray attached to the existing one:

        Senza titolo by Giacomo Bosso, su Flickr

        I really like the terminal blocks trick to connect all the electricals once you close up the cylinder, that’s one smart trick (there are two terminal block banks, one at the top and one at the bottom offering up to 12 contacts).

        A quick electrical scheme before I wired everything together:
        Collins-DES-001_0 by Giacomo Bosso, su Flickr

        Almost there; the battery connector was moved to the outside through the bulkhead and it was replaced with a 2-pins waterproof connector.

        Senza titolo by Giacomo Bosso, su Flickr
        I also left the original switch by R&R, it seems like a decent solution that will still require to remove the upper hull but…

        Comment

        • gboxwood
          Lieutenant
          • Nov 2023
          • 77

          #5
          The underside of it:

          Senza titolo by Giacomo Bosso, su Flickr

          The joint area:

          Senza titolo by Giacomo Bosso, su Flickr

          The 900 MHz antenna:

          Senza titolo by Giacomo Bosso, su Flickr
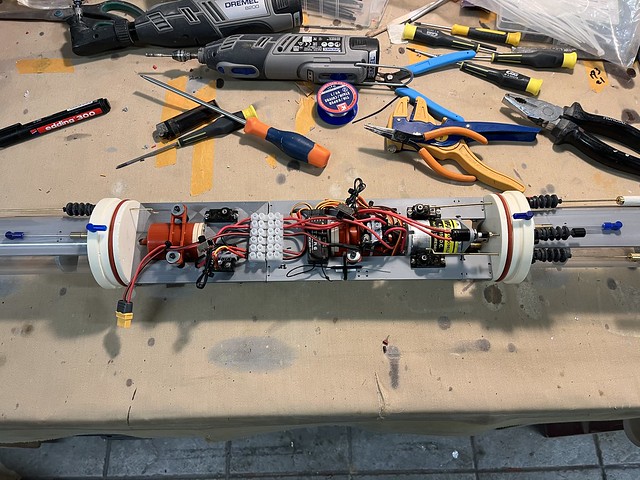
          It was then time to hack the tube itself and fit everything together.

          Senza titolo by Giacomo Bosso, su Flickr

          Comment

          • gboxwood
            Lieutenant
            • Nov 2023
            • 77

            #6
            The endcaps are not positively retained.

            However, they are also not pushed out by any inside pressure as the dual tanks vent into each other by means of an external venting line (which by-passes the electronics module).


            Senza titolo by Giacomo Bosso, su Flickr

            Everything was setup on the radio and tested. I’m using Mtroniks Micro Viper 10 ESC’s for the three motors (2 pumps and the propeller).

            I’m quite happy with them and I’m now waiting for the Viper 15’s for the ALVIN.


            This piece of gear is also a promising one… thank you for introducing this brand Bob & others!

            Senza titolo by Giacomo Bosso, su Flickr

            Comment

            • gboxwood
              Lieutenant
              • Nov 2023
              • 77

              #7
              Next, a couple of cylinder saddles (quick design by me):

              Senza titolo by Giacomo Bosso, su Flickr

              Senza titolo by Giacomo Bosso, su Flickr

              Comment

              • gboxwood
                Lieutenant
                • Nov 2023
                • 77

                #8
                I’m currently working on the battery boxes: they are conformal boxes to the bottom of the hull.

                I'm using two of them with 10 AA size NiMh batteries of 2200 mAh capacity each.

                he two “packs” will be wired in parallel to achieve a 4400 mAh total capacity.


                Each box will be filled with epoxy to make it completely waterproof.

                Collins-DES-004_0 by Giacomo Bosso, su Flickr
                Collins-DES-005_0 by Giacomo Bosso, su Flickr

                They will be located at the stern and at the bow, under the 60mm OD ballast tanks:

                Collins-DES-006_0 by Giacomo Bosso, su Flickr
                Collins-DES-007_0 by Giacomo Bosso, su Flickr
                Collins-DES-008_0 by Giacomo Bosso, su Flickr

                Comment

                • gboxwood
                  Lieutenant
                  • Nov 2023
                  • 77

                  #9
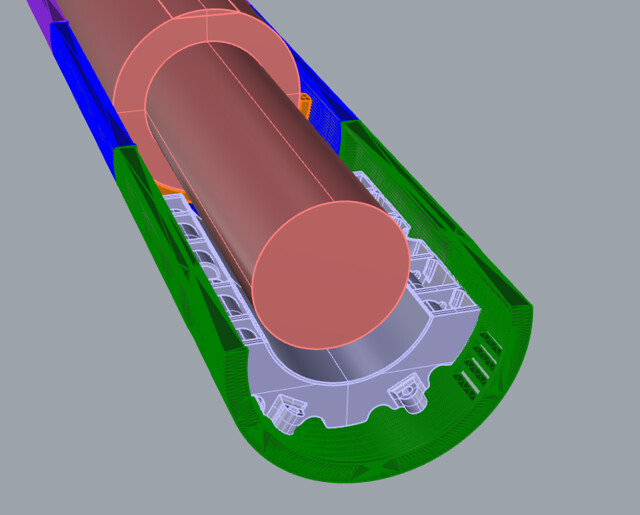
                  Waterline study

                  The main reason for shortening the cylinder was that given its size vs. the boat size, it would make it too difficult to dive the boat with the available volume of the two ballasts. Or at the very least, it would require a lot of lead ballast...

                  I therefore run some waterline checks by splitting the model at the waterline level and came up with these numbers.

                  It seems the 2 tanks could do it at this point: sinking the upper hull above the waterline requires a minimum of 511 ml and the tanks can deliver 400+400 ml combined.

                  This is still a naïve assumption maybe because it relies on the concept that those tanks can be fully flooded (they can't) and no floating material inside the upper hull is taken into consideration.

                  So, I think I will learn this "the hard way" as I will try to trim the boat above and below the surface.

                  Collins-DES-009_0 by Giacomo Bosso, su Flickr
                  Collins-DES-010_0 by Giacomo Bosso, su Flickr

                  Comment

                  • rwtdiver
                    Vice Admiral
                    • Feb 2019
                    • 1805

                    #10
                    gboxwood,

                    I am seeing some very nice 3D printing work going on here! You have mastered CAD work design along with the printing. I am with you about having more than one build going on at the same time. One project going on the printers, and others ready to be put together, or in the finishing stage.

                    Nice work!

                    Rob
                    "Firemen can stand the heat."

                    Comment

                    • Albacore 569
                      Commander
                      • Sep 2020
                      • 338

                      #11
                      Bon Martins work is wonderful. Looks like a great model

                      Comment

                      • gboxwood
                        Lieutenant
                        • Nov 2023
                        • 77

                        #12
                        Hi Rob, thank you!

                        On one hand, 3D printing is handy and it revolutionized the hobby, on the other, it really feels like cheating to me and I still envy the craftsmanship of those modelers who fabricate everything in a more traditional fashion.

                        I also do that (I do not believe that everything should be 3D printed) but given the inevitable time constraints, I find 3D printing helps me making far more progress in the available time.

                        Giacomo

                        Comment

                        • Subculture
                          Admiral
                          • Feb 2009
                          • 2123

                          #13
                          Are you using weight in water or PLA for your calculations? If it's the former then you'll either need bigger tanks, thinner hull cross-section or accept a lower waterline. If it's the latter, PLA is around 25% denser than water, so your tanks should be just about right.

                          I always like to go by volume of material, which is rather difficult to calculate with hand methods, but easy if you're working with a file for printing. 10% fudge factor isn't much required either, that's more applicable for something like a hand-laid GRP hull.

                          Comment

                          • gboxwood
                            Lieutenant
                            • Nov 2023
                            • 77

                            #14
                            Good point, I'm indeed using the PLA weight.

                            Comment

                            • Subculture
                              Admiral
                              • Feb 2009
                              • 2123

                              #15
                              You'll have plenty of volume then, in fact I think you'll need to put in some foam above the waterline to increase the volume a bit. Going by your figures I get about 412ml of displacement, and those tanks look like they fill to about three-quarters of their volume or more, giving 800ml of displacement. A single tank pump R&R module may have been more appropriate.

                              Comment

                              Working...