Nautilus Drydocks ALVIN (3D printed)

Collapse
X
 
  • Time
  • Show
Clear All
new posts
  • gboxwood
    Lieutenant
    • Nov 2023
    • 77

    Nautilus Drydocks ALVIN (3D printed)

    Good afternoon,

    my first thread in here and my first build attempt as well.

    Typically I start posting once I have tons of pictures but due to the fact that this is quite new to me, I will start posting anyway because I will need more support than usual.

    I have been a big ALVIN fan since I was a teenager (I used to follow most of Rob Ballard's expeditions back then).
    The opportunity to build a scale and functional ALVIN for myself is therefore a no brainer and if it does not go as planned, I can always enjoy it as a static piece in my house.

    Now, I purchased the files (which are scale 1:12) and I tried to match the size of the FX Models hull, 1:8. This gives me the best opportunity to be inspired by what Bob did with his:

    (11) Alvin R/C Submarine - Completed project overview - YouTube

    The printing has already started and it will take some time given the size. Almost all the hull parts fit in the build volume of my Ender 2 S1 Plus (300x300x300) and those who don't, were cut to fit.

    As I wait for them, I started looking for the components I will need and the first challenge seems to be sourcing the vertical thrusters. The closest I can get to what I see in Bob's video are these Graupner Schottel drives in the 40mm range.

    ALVIN-001 by Giacomo Bosso, su Flickr

    ALVIN-002 by Giacomo Bosso, su Flickr

    The ID of the shroud is 40mm and the OD is 50mm. They are not super scale but again, this is the closest I can get. I printed out the scale vertical thrusters in the files and they are 42/45mm (ID/OD) with a more elaborate shape of the shroud.

    I can live with them and I would be grateful if anybody with ALVIN experience could confirm they can be used for this purpose.

    Next question is: what are these waterproof motors with flex drives? And where can I find them?

    ALVIN-NDD-001 by Giacomo Bosso, su Flickr

    Thank you for the moment, I hope I will come back next time with more pictures of the process and less words...

    Giacomo
  • gboxwood
    Lieutenant
    • Nov 2023
    • 77

    #2
    I have been 3D printing for a long time now and a lot of different things, from toys and static props all the way to radio controlled airplanes.

    One new thing for me when it comes to submarines is the 100% infill which I never had to experiment with before. I eventually came to the following conclusion and it is based on two reasons:
    • reducing printing time
    • preventing the nozzle from clogging
    it is not a big deal but again, it is quite specific to printing sub hulls: I found the best way to print the infill is to select a "concentric" pattern for it rather than the more common "lines" or "grid" patterns.

    ALVIN-003 by Giacomo Bosso, su Flickr

    This way the nozzle keeps pushing filament out in a continuous fashion rather than constantly starting and stopping at the beginning/end of each line.
    This motion together with the associated retraction makes it very likely to generate a clog during such large prints (there is a lot of infill material to be deposited in these parts).

    With a concentric pattern, the nozzle basically follows the wall perimeters and this results in a much smoother material deposition.
    The same "concentric" pattern can be applied to the top and bottom faces, similar advantages apply there as well. It might not look as smooth as with a "line" pattern but I plan on finishing those surfaces anyway so it does not really matter to me.

    This method also shortens the print by some time, there is simply less to do in order to deposit the material: the path is smoother and the infill is typically printed at a higher speed than the outer walls so... you get a shorter printing time as a result.

    Comment

    • RCSubGuy
      Welcome to my underwater realm!
      • Aug 2009
      • 1777

      #3
      I've done partial infill in the past and will not do it again.

      You will undoubtedly eventually get a compromised exterior or interior shell, which means you will end up with water in your hull parts that can significantly affect trim and will take hours to drain.

      If I understand you, you are doing 100%, but with concentric versus linear filling. If so, that's good stuff, and the clogging issue is definitely a concern that you may have addressed.
      Last edited by RCSubGuy; 11-20-2023, 08:59 AM.

      Comment

      • gboxwood
        Lieutenant
        • Nov 2023
        • 77

        #4
        Yes Bob, I watched most of your videos and I learned it there, i.e., partial infill might not work.

        Even if I plan to coat both the interior and exterior surfaces with a number of layers of XTC resin by Smooth On or fiberglass.

        The biggest infill challenge with the ALVIN are the landing skids.

        Maybe another option could be: leave infill to 0%, then drill a hole from the inside and pour laminating resin in it to fill it up.

        Important point: the significant amount of resin (thickness) will heat up dramatically so it is important to leave the part curing in a bucket of icy water.

        Comment

        • RCSubGuy
          Welcome to my underwater realm!
          • Aug 2009
          • 1777

          #5
          Regarding the thrusters, in my experience operating the large Alvin, they were basically useless. They were a tremendous amount of engineering with little to no payoff. Depth is better controlled via a precise ballast system such as a water pump. My advise would be to simply print the thrusters as provided and keep them cosmetic and then focus your attention on making a robust and precise ballast system.

          Comment

          • gboxwood
            Lieutenant
            • Nov 2023
            • 77

            #6
            Valid point, thank you for the advise.

            Comment

            • Subculture
              Admiral
              • Feb 2009
              • 2123

              #7
              I don't know if the thrusters are able to swing through a 180 degree arc, but for best effect you need to operate them when pitched vertical. A later iteration of the Alvin had fixed thrusters mounted vertically.

              Edit, saw on the video posted earlier you had about 100 degree swing, so close enough. One other thing where was the c.g? If it was well forward of the thrusters that would affect things. I reckon the boats C.G should be where the red dotted line is going by the positioning of the batteries and main ballast spheres.

              Click image for larger version  Name:	Alvin_(DSV-2)_drawing2.jpg Views:	0 Size:	60.8 KB ID:	175896
              Last edited by Subculture; 11-22-2023, 12:44 PM.

              Comment

              • gboxwood
                Lieutenant
                • Nov 2023
                • 77

                #8
                This all makes sense, there are a number of documentaries about the ALVIN on YT and it went through several design updates through its 50+ years of honorable service.
                The fixed thrusters appear around the mid/late 80's...

                ALVIN-004 by Giacomo Bosso, su Flickr

                ALVIN-005 by Giacomo Bosso, su Flickr

                ALVIN-006 by Giacomo Bosso, su Flickr

                BTW, the Graupner/Krick plastic Schottel drives are impossible to find, they seem to be no longer in production after I asked every possible European shop.
                There are alternatives of higher quality but they are extremely expensive... like 250 each with no motor and drive shaft.

                ALVIN-002 by Giacomo Bosso, su Flickr

                ALVIN-002b by Giacomo Bosso, su Flickr

                So, I am leaning towards Bob's advise to drop this feature and stick with an accurate ballast system... even if it feels like flying a plane with a fixed elevator...

                Comment

                • Subculture
                  Admiral
                  • Feb 2009
                  • 2123

                  #9
                  Alternatives to Graupner

                  A range of model boat drive systems. These include various styles of drive units and are suitable for both race and scale models. Styles Include Jet Drives, Z Drives, Schottel Drives and Outboard Motors


                  You have a printer- grow your own?

                  This is an AZIPOD or Schottel Drive or in German Schottelantrieb to drive the RC model 1:100 of the NEUWERK. You can print either twice the Azipod_Cover (1 time z axis mirrored) or twice the Azipod_Cover_Blocks (1 time z axis mirrored). The difference is, that the ball bearings have holding blocks in the "Blocks" file so that they do not move in the housing. The Azipod_Throughput is glued into the RC wooden hull, so that the drive moves freely. You need all 4 gears that are a remix of the Halter Zahnriehmen: https://www.thingiverse.com/thing:2498786. 1 for the motor, 1 for the servo, 1 for the ruder (comes first), and 1 for the drive (comes second). Between the ruder gear and the drive gear there is a 3mm screw nut as well as on top so that via counter screwing the gear is fixed. As a propellor I use the 32-5-3mm file: https://www.thingiverse.com/thing:4714701. It gets also a 3mm screw nut before and after the propellor so that counter screwing fixes it. Thus, you need 3mm endless screws in the length of 49mm and 56mm: http://schrauben-niro.de/product/de/Gewindestangen/DIN-976-A2/Gewindebolzen-M3-x-1000-mm-rostfreier-Edelstahl-A2-70.html You need a pair of Reely bevel gears with 15 tooth module 0.5: https://www.conrad.de/de/p/reely-messing-kegelrad-modul-typ-0-5-anzahl-zaehne-15-15-1-paar-547237.html. They are screwed against the endless 3mm screw so that they easily snap together in the hull. And you need per drive 4 ball bearings of size F 623 ZZ which has a 10mm outer diameter, 3mm inner diameter and a thickness of 4mm. Well finally, the driving wheels need to be linked via a belt drive. This is an MXL 6mm as here available in different length: https://www.ebay.de/itm/133479399786?var=432936801368 Printing: All is printed in orange Prusa PETG with 90% infill with support between the heat bed and the parts for the Cover files only.


                  Also could consider brushless thrusters like the one supplied for the DeepRover from Norbert.


                  Also you could look at ballast shifting, move a large weight e.g. drive battery and/or ballast tank with a servo. Works very effectively for a slower craft.​

                  Comment

                  • gboxwood
                    Lieutenant
                    • Nov 2023
                    • 77

                    #10
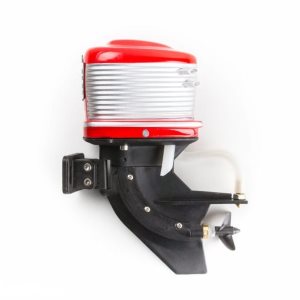
                    Yes! I feel like I won the lottery... I found this beauty on eBay and it is basically in mint condition @ 40 dollars.

                    Senza titolo by Giacomo Bosso, su Flickr

                    Senza titolo by Giacomo Bosso, su Flickr

                    Comment

                    • gboxwood
                      Lieutenant
                      • Nov 2023
                      • 77

                      #11
                      Originally posted by Subculture
                      Alternatives to Graupner

                      You have a printer- grow your own?

                      Also could consider brushless thrusters like the one supplied for the DeepRover from Norbert.
                      Great advises Subculture, I think I will definitely give the Azipod a try.
                      I also eventually found 2 Graupner drives in the size I want, I might want to get them anyway and then choose for the best option.

                      Thank you again!

                      Comment

                      • gboxwood
                        Lieutenant
                        • Nov 2023
                        • 77

                        #12
                        Alright, the longest print of this project is done and I'm more relaxed now, one last hull part and it is almost over.

                        Senza titolo by Giacomo Bosso, su Flickr

                        Not my longest print to date but it had a few new challenges for me and the part in itself is quite complex.

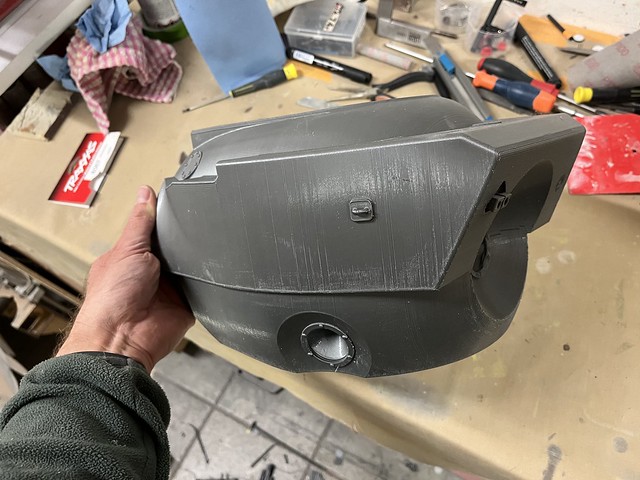
                        This is the front upper hull, the section that would release for emergency:

                        by Giacomo Bosso, su Flickr

                        Senza titolo by Giacomo Bosso, su Flickr

                        Comment

                        • gboxwood
                          Lieutenant
                          • Nov 2023
                          • 77

                          #13
                          The quality of the print is ok, the size has its challenges and post processing is a given for me, so this should work.

                          Senza titolo by Giacomo Bosso, su Flickr

                          Senza titolo by Giacomo Bosso, su Flickr

                          Senza titolo by Giacomo Bosso, su Flickr

                          The support material for all the parts so far is not that much and the latest releases of CURA are making it very easy to snap it off with little effort.

                          Senza titolo by Giacomo Bosso, su Flickr

                          Comment

                          • gboxwood
                            Lieutenant
                            • Nov 2023
                            • 77

                            #14
                            I have other hull parts ready but I could not resist fitting the sail on it:

                            by Giacomo Bosso, su Flickr

                            Senza titolo by Giacomo Bosso, su Flickr

                            Senza titolo by Giacomo Bosso, su Flickr​

                            Comment

                            • gboxwood
                              Lieutenant
                              • Nov 2023
                              • 77

                              #15
                              I already printed the Azipod and the size seems legit, I will definitely give it a try...

                              Senza titolo by Giacomo Bosso, su Flickr

                              Senza titolo by Giacomo Bosso, su Flickr

                              Senza titolo by Giacomo Bosso, su Flickr

                              I will need to design and print a shroud for the propeller but that's ok. This solves quite some issues with investment and sourcing of ready-made components (after it proves itself tough).
                              ​​

                              Comment

                              Working...