Welcome to our forums. For the best in R/C submarine kits, components and accessories, be sure to visit the Nautilus Drydocks
If this is your first visit, be sure to
check out the FAQ by clicking the
link above. You may have to register
before you can post: click the register link above to proceed. To start viewing messages,
select the forum that you want to visit from the selection below.
OK, finally figured out the right settings in Photobucket. Don't know why I couldn't link directly from my computer. Anyhow, in my next posts I'll describe how I built my VICTOR 3 from scratch.
Still cannot post photos from my hard drive. Each time I click the post image icon and try to paste into the panel I crash my internet connection. Something changed from my first posting of the plans and now if I post from Photobucket, it links to all the photos in my album. Bare with me, I'll get it sooner or later.
Ok, I think I finally have it. I forgot you could put your photos in an album on this site. Let's try this.
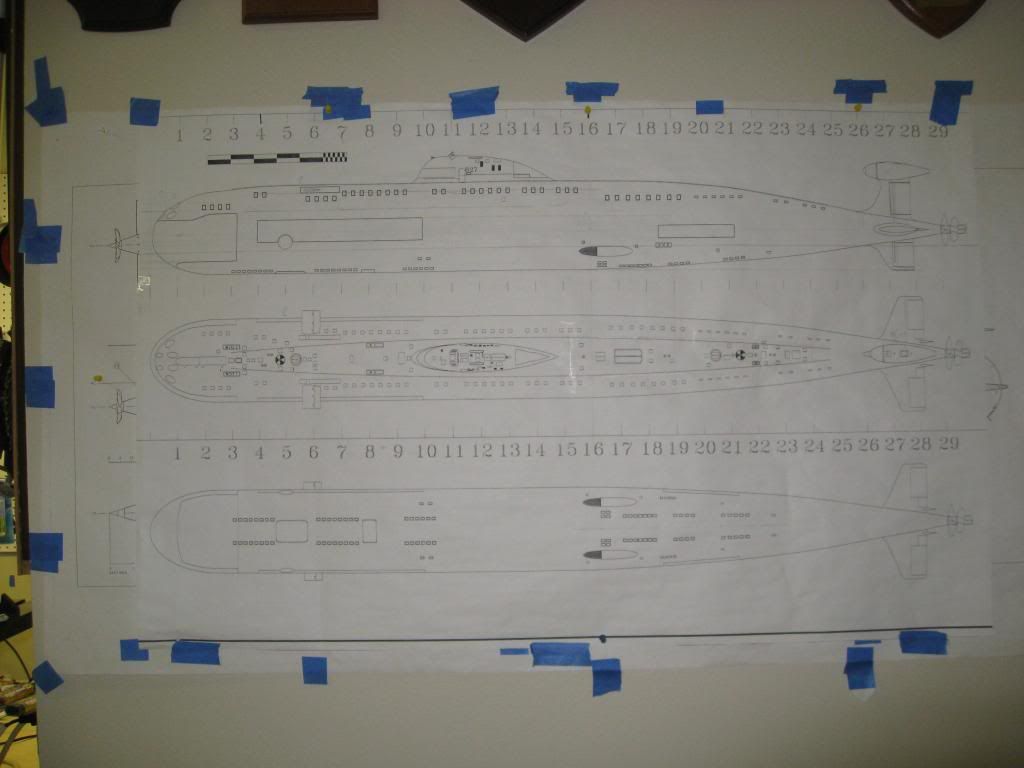
About 5 years ago after assembling a PERMIT kit with a 3” WTC I decided to build my own boat from scratch. Little did I realize then what I was getting into. I taped my Victor 3 plans up on the wall in my garage, bought a sheet of 1” white insulating foam at my local Home Depot and went to work cutting foam on my band saw. The sections were glued to a �” strip of MDF. The challenge was how to fill the voids between sections. Expanding foam sounded like a good idea but it didn’t work out well.
So, off to Home Depot for some thicker foam and start again. Although not perfect, this foam worked out better. I used spackling paste to taper the sections then sanded to get as close to shape as I could. Note two hulls in the next photo. I wasn’t sure which would be my final but I had a lot to learn and practicing on two different hulls taught me a lot. I also started on the sail and other appendages using balsa and templates.
It took a lot of sanding and priming but I was getting close to the next step which I’ll cover in my next post. By that time i should have figured out how to get the pix in the right order.
Stay with me guys, I'll have done by December, if not sooner:)
After a lot of filling and sanding I had the hull ready for priming. I laid out all upper and lower hull openings then sized, cut and placed two layers of blue tape on the hull at each location. I then sprayed several coats of grey auto primer over the hull so that when I removed the tape each hull opening would be indented. You can see the indents on the upper hull the next picture if you look closely. I didn�t do any scribing on the hull before making the mold. The scribing would be done later.
I won�t cover the mold and glass layup in detail except to say I had to do it twice because I was learning by trial and error. My first attempt using polyester resin was a failure and my second attempt using epoxy was much better.
In the next three photos you can see how I again used blue tape as guides to outline the many hull openings that had to be drilled and filed to shape. You can also see some of the scribing on the upper hull forward in the last photo. At this point I had made my Z cut and attached the forward end of the lower hull to the upper hull.
By now you can see some progress from the foam sections laid out earlier. My point in posting this build, in addition to the contest, is to show other beginners out there who may be reading this to pick a project and go for it. If I can do it, you can do it. Go for it and IAFYDSTTA.
In a previous post I said the scribing was done after the hull was pulled from the mold - I was wrong. It was done before pouring the mold. Looking at some pictures with better resolution cleared this up so I resized this photo to show the scribing. More later as I have some other photos to resize.
After pulling the upper and lower hull I started some hull index strips. Two strips of 1” wide fiberglass tape were laid down in the mold and brushed with epoxy resin to saturate them. Once cured the strips were cut to length, brushed with epoxy and held in place with clothespins.
The same technique was used to create indexing strips for the forward and after Z cuts. These are not new ideas. I learned these long ago from others who shared them in magazines and forums like this.
To hold the after Z cut in place see the small piece of aluminum held in place by epoxy. The aluminum is bent just enough to slide easily under the after indexing strip.
At the forward Z cut a stainless nut held in place with epoxy and a screw secures the lower hull.
When I look back on my work here it looks primitive, but it works. For clean joints I used blue tape to protect the hull where necessary and applied and sanded Evercoat filler.
In this post I�ll cover making the rudders and stern planes. In the first photo you see some of the balsa masters as well as some of the casts, all in various stages of primers and sanding. By the looks of my bench I can tell this picture was not staged for publication.
Next you see my home food seal packaging system pulling a vacuum on a canister with a batch of silicon rubber inside. We had never used the system for food but it worked well for to removing bubbles entrained in the rubber.
Aligning and drilling rudder post and stern plane shafts is made easy when using a jig as shown in the next photo.
I made 4 �L� shaped pieces of MDF clamped short leg to long leg to form an adjustable box for mold making. Several coats of wax and mold release spray were applied to the masters before laying them in the clay bed. Then I poured the silicon and let it cure. The busy workbench shows the progress being made and finally the results of the bottom rudder casting.
Keep in mind this model was built about 5 or 6 years ago so that makes it easy to post progress quickly. The tough part is trying to remember some of the steps I did so I may have left out some of them.
My mold making and fiberglassing skills were at zero when I started this build but I had to try it. The first try on this boat was really ugly but I got better on the next try. Still have a long way to go. It helps if you have a boat that you just really have to build. There is a lot of info out there so give it a try Alec.


Comment