-
Sooner than that you'll want to scratch-build sub-assemblies.
No matter:
You'll want to get the much denser 40-pound RenShape, as it can be sanded down to a state that will accept primer without evidencing a cell-structure underneath. RenShape is a vital element in my shop. Get it from Caswell ...
... or suffer my wrath!
DavidLeave a comment:
-
-
There you go, Mike. A Customer. I'll hold him down ... you take his wallet!
DavidLeave a comment:
-
Being a Brit i would really like a WWII brit boat, and the S class ones are all a bit big for me. i didnt honestly believe anyone would be crazy enough to try a T class in 1/72, but here it is, and slowly creeping towards conclusion. im putting Dibs on HMS Tally hoLeave a comment:
-
Mike,
I won't beat you up over having to use explosives to get those GRP parts out of the tool ... as you observed, its all part of the learning-curve. The hull parts look good. You're well on your way of having your very own T-class submarine model
You 1/72 guys in the Land-Down-Under taking notes?!... It's gonna be, On The Beach time soon.
I do want to comment on that left-over shot of the RenShape sail, Mike:
You're using that very soft 20-pound stuff. What's wrong with you!? You sell the 40-pound Renshape, use it next time you tackle a master that requires so much careful carving and detailing.
Don't make me come over there!
As you likely have found, as you filed off the excess filler around the 20-pound substrate, the very soft adjacent un-filed RenShape will all too easily abrade away with just the lightest of file over-strikes. Bad Ju-Ju!
Next time, once you have the light-weight RenShape to a form you like, heat it up to around 120-degrees, and while still warm, quickly give it a coat of epoxy laminating resin. This will fill those little cell holes on the surface. As the air within the open surface cells shrinks as it cools, it pulls the resin within those open RenShape cells. Also, the epoxy shell substrate will better resist the occasional light pass of sandpaper and file.
I have spoken, so let it be written (insert 'clap-of-thunder' sound effect here).
DavidLeave a comment:
-
"Get that submarine off the dining table!"
"Yes dear!"
Anyhow, while it's there, I have a T Class hull! It didn't come out easily, and obviously I haven't greased up the mold sufficiently. Good grief!
My first attempt had several bubbles in the gel coat. I have now mastered that and have eliminated them. I still need to be more careful along the waterline. In future, I think I'm going to lay that area up with the molds split apart. I can then lay a strip of fiberglass ribbon right along the edge, double it up and get it thoroughly stiffened up, and finally put the two halves together and lay up the keel and remainder of the hull!
Boy, this sure is a learning curve.
I'd better move that damned boat, if I know what's good for me!Attached FilesLeave a comment:
-
-
I'm not happy with the plans I'm working from. I don't think the conning tower is the right height, compared to many photos.
Here is one of the Tactician. I've drawn lines along where I the deck levels are. If I'm wrong about the bridge deck, then those men have bloody long legs.
My question now is where the bandstand deck actually goes. I think they step down from the bridge onto the bandstand deck. Therefore it would be on the same level as the gun deck. Of course, Tactician doesn't have a bandstand here, but I'm making a 'generic' boat.Last edited by Kazzer; 01-01-2012, 03:49 PM.Leave a comment:
-
After a lot of tinkering, and looking at old photos, and scratching my um - head, I've figured out that this plug has to be split up.
The gun platform actually swivels
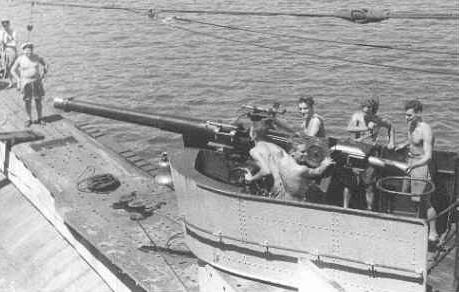
This picture doesn't have the gun armored dome, but you can see how much actually swivels.
Here's another photo -

You can see how the platform has swung out over the superstructure.
Note the low walls running back to the tower/bridge.
I've made the plug with the dome on and the walls leading back top the tower. I've had to split the plug unto two pieces, so that we get a conning tower reaching right down to the superstructure.
I used my new Harborfreight scroll saw to cut the arc around the conning tower, and then removed the upper section of the the plug between the dome and the tower.
After cleaning up the cut, and doing some minor repairs with Easysand Body Filler,
I placed some masking tape around the conning tower and coated it with Release Agent (wax). Using more Easysand, I skim coated the inside curve of the forward piece of the plug and pressed it into the conning tower. It molded perfectly against the tower.
Note the two forward dive planes cut from a sliver of Renshape. Darn! This is great stuff! Why didn't I think of using this before?Leave a comment:
-
It is really interesting to see this coming along, keep it up! I am learning from you.Leave a comment:
-
Over the past couple of days, I've tinkered with the Conning Tower plug.
The Wizard told me to make the plug in two halves, left and right, so they would be identical. I hate it when he's right. I used Renshape for the first time. Boy, I'm never using anything else for this job - wonderful stuff.
I also split the tower at the deck height. this plane runs from the bandstand aft to the gun platform for'ard. I've always had problems inserting decks into these towers, but with this idea, that won't be a problem. I could also make recesses for the periscope tubes, hatches, and other neat things, all molded into the deck. We'll see!
The upper section will sit on top of the lower one. It can also be cut to house the bandstand.
The gun dome for'ard can also be cut off if that particular boat didn't have one.
This is easier than I thought!Leave a comment:
-
I ran out of patience a long time ago, waiting for my damned Foxtrot Fittings Kits. (bloody cheek!)
Anyhow, here's my latest update.
I couldn't get over the similarities of these two mortal enemies German and British, and it's obvious both parties were guilty of copyright fraud. I wonder if Mr. Churchill filed his lawsuit first, and if Mr Hitler just laughed. Whatever happened, there was obviously a lot of stealing ideas going on. :biggrin: I'll bet Carl Donitz knew exactly what was going on. AND Mr.Merriman has a letter from him, somewhere in his extensive files. I'd love to see it, just to feel the aura of this great German Officer.
I'll come back to the hull in a couple of days and pull another model, but first, I want to try the upper hull mold. Then, to figure out the conning tower and control surfaces.Last edited by Kazzer; 12-20-2011, 10:44 AM.Leave a comment:
-
Looks great, luv your work ethic. For me even instant coffee takes to long.Leave a comment:
-
I couldn't wait to pull the boat out of the mold, and as The Missus woke me at 6am, I dashed to the basement and pulled the mold apart. I was a trifle hasty, as the resin was very raw, and uncured. That's the trouble with epoxy, it needs a good day at 75 deg f. However, I have a boat!
The string around the edge worked wonders and its obvious this has considerably stiffened the sides. The keel - just perfect!
I think the cloth I used was too thin, and I'm going to do another one shortly using a thicker material.
I wiped of most of the PVA film, but this hull will clean up more.
Last edited by Kazzer; 01-01-2012, 09:22 AM.Leave a comment:

Leave a comment: