
I haven't been doing any updates, of late, over here ... but for a good reason.
There's a boatload of stuff going on, over on the discussion thread called "Civil War Talk". Several people over there did some fan-frakkin'-tastic research work, and came up with all sort of cool historical tidbits that many of us had never seen before ... including the "lines" drawing of the tug or tow boat slash icebreaker which had been the "donor" vehicle, when private Southern citizens had made the Manassas.
Up until now, figuring out what the real boat(s) looked like, was full of conjecture. Now, our "guesswork" can become WAY more educated!!
One of the latest things which happened, over there, was that I managed to figure out what I feel is a really good guess at the true "scale" of that drawing by J.A. Chalaron, from 1861. (Having figured out, thanks in part to all the great new research findings that are turning up, that the stated measurements, on that drawing, are way off. Turns out you'd have to enlarge those drawings to the scale it claims / implies it is ... and then, do an enlargement of 133 percent on those first blown-up drawings ... and then, or so it appears right now, you'd have a much more accurate scale drawing. Ones which, once properly re-sized, match up REALLY well with the "lines" drawing of the Enoch Train tug / icebreaker.
http://www.civilwartalk.com/threads/....81908/page-15
If you go over there, via that link, and then go backwards a few message thread pages, you'll find all kinds of things that make the history of the boat "come alive". There were a bunch of newspaper clippings that I hadn't seen before (many of which look to me to invalidate much of the prior research work done by official historians -- who apparently felt the info wasn't available; and then just filled in the blanks in their own stories with their personal best guesses; which is fine, if that's actually the case, but it wasn't as hard to obtain "real" info as some thought.)
Also ... there's news over there about several private letters I was kindly given copies of, from a private university in New Orleans (Tulane University) and was also given permission to type in, and share the contents (but not scans of the actual letters) with other Manassas fans ... and of course, those "lines" drawings of the Enoch Train ... and on top of that, a full color oil painting of the Enoch Train was also located.
So, suddenly, we know what the real tug boat's proportions / outlines / contours were like, in real life (which was a big mystery, before) ... and we also have that one-of-a-kind full color oil painting (or more correctly, some "up for sale, by an action house" photos of that painting) ... and we're finally able to start debunking some of the invalid guesswork that has been done about the Manassas, over the years.
Exciting times, for those of us who are big fans of this historical period's greatest technological achievements!
Sooooo ... just know that it hasn't been laziness on my part, which caused the lack of message thread updates, over here!
-- Ward Shrake --
-
Thanks for the compliments!
In thinking about your comment regarding patience: while I understand what you mean -- (and mostly agree) -- I think it could be argued the other way, too.
Yes, it was tedious work, and took (relatively speaking) a long time. Thing is, I had REALLY wanted to "see" this thing, armored in that totally unexpected way ... and no one else was doing it, back then, that I knew of ... soooo, at some point my patience (in waiting, and hoping to see someone else's model "textured" in that way) ran out, and I ended up doing it myself. So, yeah, I can see how some folks would describe what I did with that "flat street car iron" as requiring a lot of patience ... but, compared to waiting years and years in the hopes that someone else would do it: by that way of thinking, what I did was arguably an act of extreme impatience.
(That is: arguably, anyone "sane" would have weighed the workload, up front; and would have waited for someone else to do it.)
I wanted to see that shape, "textured" in that way, pretty badly. That was an itch I wasn't willing to wait, any longer, to scratch. After waiting for a few years (and working on other projects), I figured no one else was likely to do it "for me" any time soon ... so I spent a week making my fingers all super-glooey.
Also, I wanted some solid, workable idea of how the real builders might have gotten around the various practical problems inherent with doing things, by adding one hard-to-bend, "iron plank" at a time. A big part of the pay-off, for me, was figuring out how the "real people" might have worked around the lack of ideal materials, etc., that they had faced, back then.
Being able to physically place (without glue) several "iron planks" side-by-side, in various ways and positions, and then try some other way of positioning the unglued iron planks, until it seemed like I'd found the "easiest" direction for each plank to have been positioned and attached ... well, maybe I'm a hopeless nerd or something for thinking that was exciting stuff to have been able to have "reverse-engineered" ... but, I'm just mentally wired that way ... and as it turns out, that was enough to keep me motivated. Seeing it all "come to life," a little at a time, in one area and then another, motivated me to keep going.
At the end, I was glad that it was over! But I was even more glad that I had done it. Because if I hadn't have worked out the practical problems, as I went, (by what amounts to determination and brute force, in a sense) I would have never figured out how the real thing might have actually been armored. Having done the work, I could "understand" the real thing quite a bit better ... and to me, that knowledge was motivating enough to have made it all satisfying.
If the purpose of a model is to put a person's mind closer to the point where they can imagine the nuts and bolts that make it all work: mission accomplished!Last edited by Steampunk; 08-11-2014, 01:33 PM. Reason: the usual minor boo-boos I missed during editingLeave a comment:
-
A lot of Tedious work with the thin wood striping material. And it turned out so well too. You must have a great deal of patience.Leave a comment:
-
Here's a shot of the turret on my model, taken when the model was fairly far along, in terms of having the whole thing completed.

The idea behind having taken an almost-directly-overhead camera angle on that area of the vessel was partly for the purposes of that article I'd written; but it was also sort of a "Wow!" moment for me, in that I had been trying all along to interpret whatever in the heck this mystery was all about:
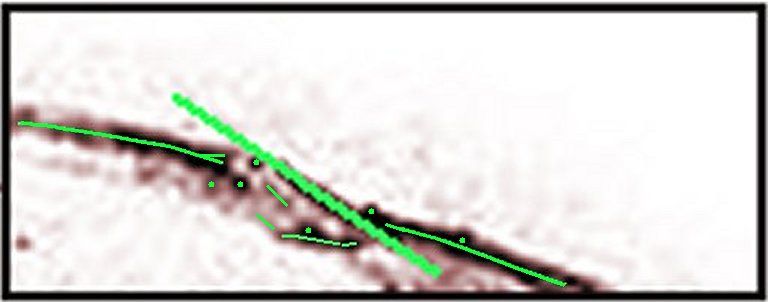
The photo above being a partial view or close-up on J.A. Chalaron's drawing (seen in a modified view, with various mysterious features sort of circled and enlarged), as seen here:
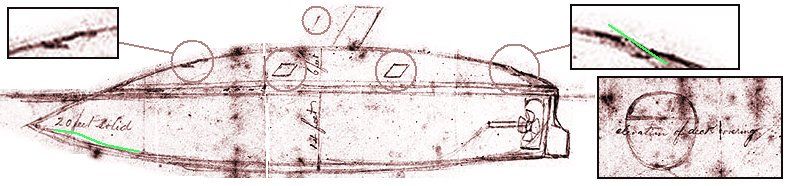
A quick aside: please notice the partial, slanting line, above, that I circled. The one that is located just in front of the very visible smokestack. Was that an indication of a second smokestack, being added (or removed?) in front of the one shown? Notice that the line's angle is virtually identical to the smokestack's angle. It seems like too big of a coincidence that such a line should be located in front of those other lines; and spaced at just about the right spacing to be an indication of two like-thickness stacks, mounted on in front of the other.
Could their have been two smokestacks, at some point in this craft's life, located one in front of another? Thereby cutting down the apparent obviousness of such a feature, for stealth purposes? (Reducing "frontal area".) If so, then such a feature could appear to viewers (as seen from directly ahead or behind) as a single smokestack; while also being seen (by viewers from either side), as if they were two smokestacks ... but, when viewed at an angle to the craft, appearing like one really fat smokestack?
This is one of the reasons that research into this craft is so enticing, on some levels ... while also being potentially frustrating, in matching accounts up.
Something I've begun to notice, more and more, in various other historical drawings, is that sometimes when two smokestacks are shown, they're not shown as being directly side-by-side. Some drawings give that impression -- at least at a glance, to the casual viewer -- but when studied more literally, with the assumption that the artist wasn't intentionally fudging their "perspective" in the drawings, and that the artist knew just what they were doing ... there are a lot of hints in the extant records, hinting at smokestacks mounted along the craft's upper lines ... but which weren't mounted directly side-by-side. Some of the drawings, when you study how masterfully the artists handled their visual perspective in other areas within their lines of sight (such as when seeing other vessels on the water, things on shore banks, etc.) seem to indicate that some sort of anomaly is possibly going on, from a strict interpretation of the two smokestacks being side-by-side. I've obviously taken things farther, with my model: and have mounted my smokestacks considerably lower: and not sticking up super-blatantly, along the upper edges of the turtle's shell. My excuse for having done so being those mysterious slanting things, located just a bit above the apparent waterline; as seen in Chalaron's 1861 dry dock sketch. My interpretation, as I had mentioned things before, being an elimination of the obvious smokestacks, mounted alongside the turtle's back -- and then having those older items replaced via the experimental addition of "low visibility" stacks, which wouldn't disrupt the organic-looking "whale's back" and give away the position of the craft. Or immediately stick out, visually, as something man-made, etc.
I'll show what I mean, later on ... but for now, I'll get more firmly back on the topic of the possibility of Chalaron's drawing showing a turret, mounted aft.
As a reminder, here (below) is the unaltered original image of Chalaron's drawing: just as anyone can download it from history dot navy dot mil.
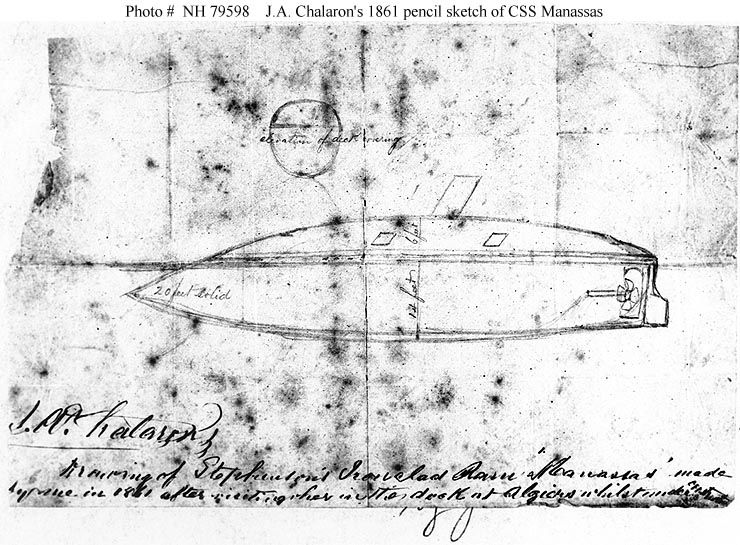
Whatever's going on, back in that area, Chalaron has always struck me as too good of a trained artist to have "accidentally" made all that.
My thoughts have always been that all those "extra" lines were indicative of something ... and I was curious to test the turret possibility.
For further comparison purposes, below is the relevant page I had initially drawn up, as part of my self-made blueprints for creating that model. (That is, these drawings date back to before the time the model itself was fully complete. So, some things had yet to be worked out in 3D.)
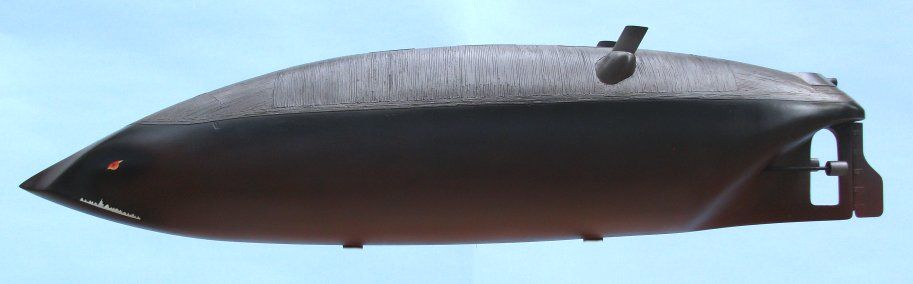
While the image below does not show the very "curvy" looking lines around the turret's sides, that are present on the actual model, you can see that I was initially trying to explore two different ways of representing that area of the model. On the one hand, I had a continuous line shown: sort of as a sensible "backup" to the possibly unworkable idea that Chalaron's drawings may have indicated a turret was in progress, at the time that artist had seen the reconstruction work going on. On the other hand, even early on, I had begun to mentally explore the idea that, maybe, just maybe, the non-visual reports sometimes seen in things like newspaper accounts, might have been hinting at a gun, located aft. Which some folks saw, in person. But some didn't notice. Had the craft had a single possible freeboard height, some people noticing it and others not, would have seemed odd. But if you factor in that idea, above, of a variable freeboard -- (ranging from approximately six foot of craft visible; to only three foot or less visible) -- well, at least I was exploring some ideas on why there is so much disagreement in the verbal and visual accounts of the period. Doesn't mean my guesses are correct: just that, visually speaking, what I have included on my model isn't immediately impossible, as one way to interpret the available data.

And lastly, here's a photo of the finished model: as seen from an almost-orthographic sort of camera angle. (I say "almost" because the shot was taken, for purposes of visual drama, with the camera below the craft's vertical mid-point. So, the upper edge of the turret's shape looks like a much larger interruption to the "flow" of the aft end of the vessel, than would have been the case had the camera angle been closer to the visual, vertical mid-point of the model. Further exaggerating things: I have the little carronade poking outside of the turret, itself. Making the image below sort of a "worst case scenario" as far as the turret and weapon "blending in" ... but even so, it's not wildly impossible.)
And last but not least, here's a quoted section from an 1903 article in the New Orleans Picayune newspaper: as found on the navy's historical web site.
(quotes on)
“The boat turned into the ram was reconstructed by putting on an extra bow, made solid and extending out a few feet, with an iron prow for ramming purposes. A shield, or roof, was put over the deck in the shape of a whale back. The frames were eight inches thick, moulding way -- that is, solid against each other crossways from forward to aft, and the planking on top of this was four inches thick. Outside of this she was covered with a single layer of flat street car iron, such as was used at that time to run the street cars on -- not rails such as are used now. On the water line all around she had a solid sponson four feet thick to protect her from being rammed. She carried two sixty-eight pounders, one over the stem and the other over the sternpost."
(quotes off)
Mystery solved, or mystery deepened? Historical, or hysterical? Each viewer must decide for themselves!Last edited by Steampunk; 08-09-2014, 01:59 PM.Leave a comment:
-
Last three pics, for now. It will take me some time to get more pics "developed" and ready for posting ... but that will give folks some time to be looking over the work, so far; and to be wondering why no one has taken the time and effort to dig up the real thing; to study it in detail!?! Until that day, who's to say the actual historical "pygmy monster" wasn't quite a bit more strange than any amount of "truth" a person like me is able to squeeze out of old drawings?!


 Last edited by Steampunk; 08-09-2014, 04:28 AM.
Leave a comment:
-
Something I should point out, which is not a "how to" sort of thing, but that may interest fans of the real-life Manassas: as I had worked on the hull itself, I was able to transfer some of the "datum lines" or what not, from the 2D drawings I had come up with; onto the model's 3D form.
As I began to work on the armoring process, I wanted to get an idea of what would be positioned where, in terms of visibility during combat, etc.
Hopefully, I haven't stayed up past my bedtime too much; and am not making a total mess of this explanation ... but here goes, anyway.
I mention those lines or rings drawn onto the upper hull areas, to explain that I guessed there would be two seperate "water lines". I felt the drawing by J.A. Chalaron had indicated a six-foot tall freeboard was the "maximum height visible, out of the water" sort of situation.
I had assumed the armor would be a bit lower than the water's surface: but probably not TOO much lower. I guessed at, say, a scale foot of "extra" armor depth, below that "six foot of freeboard" point ... and that's more or less where I had located the lower edge of the iron planks.
When I first built this thing, I didn't have one hundred percent proof that the real Manassas ever had a functioning water ballast system: to adjust the vessel's freeboard, or height out of the water. I felt it likely had one; but didn't expect to find proof. Very recently, however, thanks to the excellent research being done by the people who have been hitting the books, and digging up old records, and also comparing notes, for several years now (that I know of; and possibly longer) -- see the discussions over on the Civil War Talk forums -- the presence of such a water ballast system has now been absolutely proven. Turns out that it had one, even before the war!
Having suspected, from close readings of the various texts on the subject of the Real Thing, that the historical CSS Manassas could likely adjust its height out of the water, and having noted that some accounts said that only something ridiculously small, like two and a half feet, was all that was visible (during combat situations) ... I fudged that number, a bit; called it three foot; and marked a second "waterline" at that height, from the top of the vessel. The fat, dark, dotted lines you see about halfway up, from the armor's lower edge: that's the line I mean.
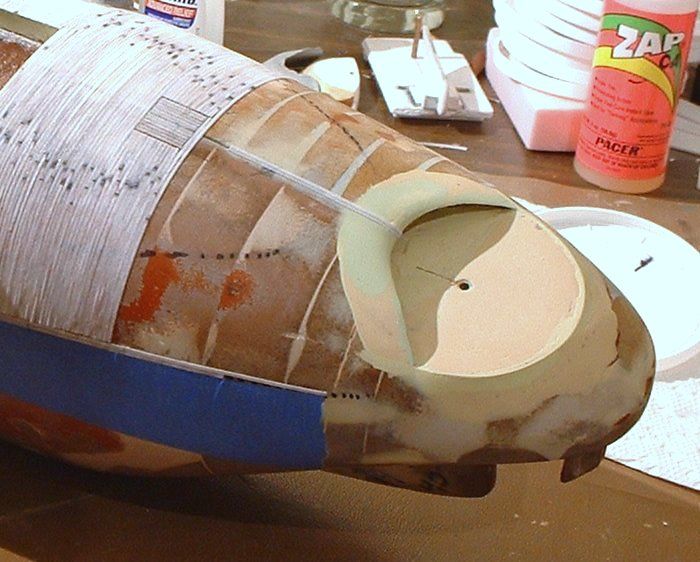
The reason I'm going to such lengths to explain THAT situation, instead of just shutting up and letting the pics explain things, is that I had used that "two different freeboard heights" idea, when I had positioned the smokestacks along the sides; the turret in back, and so forth.
Which means that, if this model was a true representation of the real thing, and this thing was sitting in a quiet, friendly port, than it would be possible to see that turret, in back. Which might be just enough of a deterent, or so I had pictured things, to keep boarders away and so on -- should someone want to sneak up on this thing, from what (during combat situations) might seem to be the very vulnerable, unprotected aft end. However, during combat, if the river conditions (depth) allowed it, only three foot or so would be above water ... making it seem that no protection of any kind was planned or built, in the aft end of this thing. Which might (key word!) explain why there were so many radical differences in various texts: as to whether the real CSS Manassas ever had a second gun, mounted somehow in the aft end of this thing.
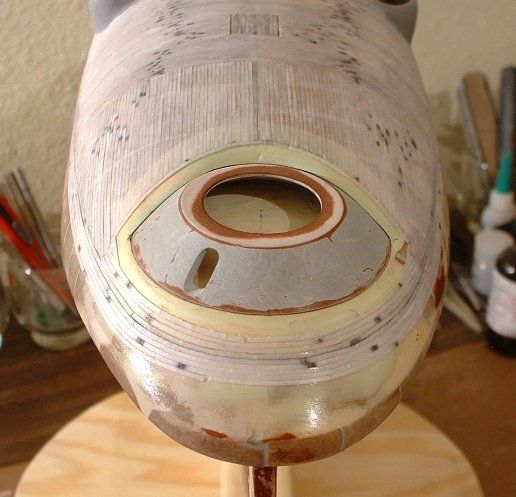
While I realize that a rotating turret is on the extreme side of historical interpretation, the idea of the shape (upper outline) of the aft end (as defined well in J.A. Chalaron's dockside drawing from 1861; and copied as literally as possible, on my model), when combined with the idea of a variable freeboard, would mean that even an "aiming straight back" cannon, in some sort of minimal cupola or whatever, would be possible, in terms of interpreting that primary source document ... while also potentially going a long way towards explaining conflicts in text records, etc.
I'll include one image of the aft end, for now -- (and more, probably, way later on) --with the model's turret removed. You can likely "see" how the side-view or "profile" drawing's curving lines in that area could allow for something to be facing backwards, if they had wanted to do that. Or, if you were inclined to believe that the aft end was essentially smooth and featureless ... you can visually just "fill in that hole" to see it.
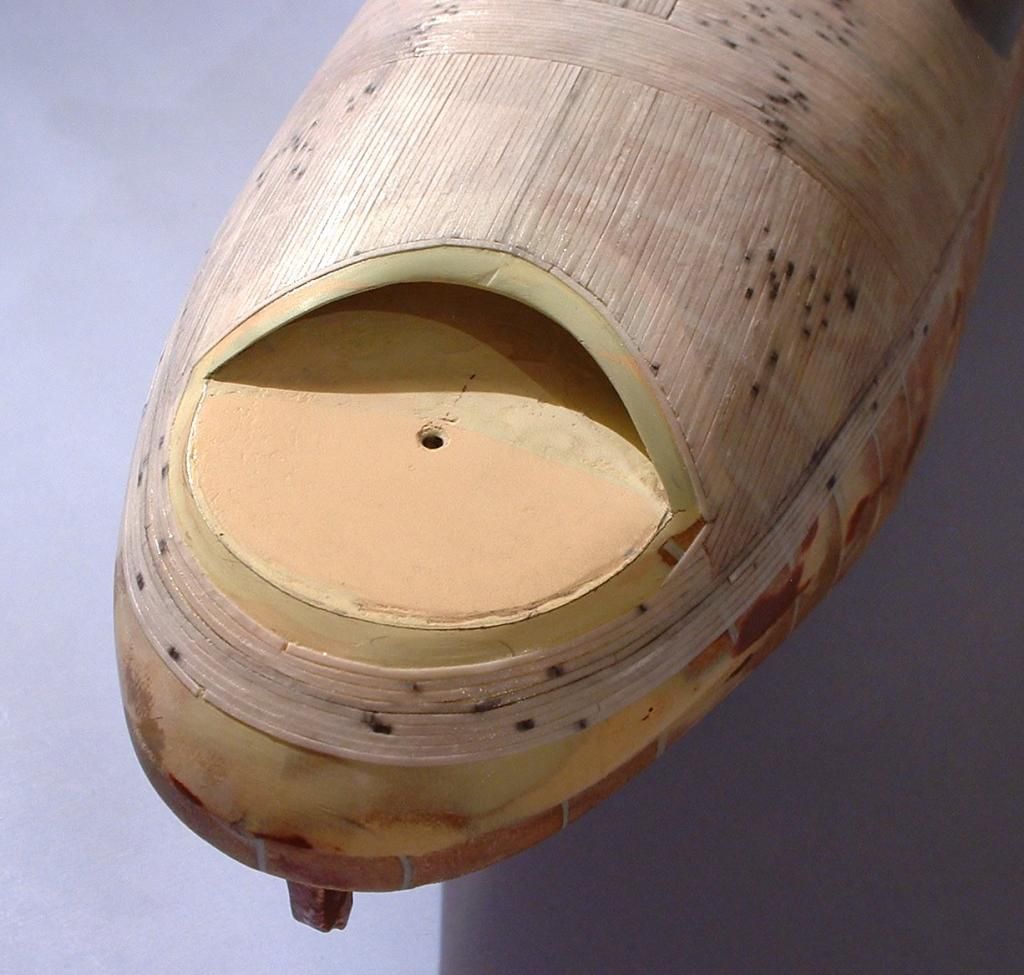
If I had built this model as a strict attempt at a "historical" model, I probably would have left the turret off.
As a sci-fi and fantasy modeller, it felt like it very much belonged!
Not because I wanted it to be there, and was "forcing" it to be there, by "drawing outside the lines," with my model ... but because I wanted to build what I felt was the extreme end of a strict interpretation of Chalaron's 1861 drawing. And Chalaron didn't seem to be drawing a single, continuous line, back there.
Right from the start, I felt that something was being indicated, that was outside the norm, in that area of the drawing ... and it looked potentially a bit like, maybe, they were planning on some sort of a pivoting or rotating, protected gun, back there ... and what my intent was, right from the start, was to build that part of the model in such a way that if you overlaid the fan-made blueprints I had drawn up (and built my model from) over Chalaron's drawing, most of the historical drawing would line up, exactly as-was. There was something unusual back there ... and I had to scratch the itch of seeing it if was a turret!
As I will attempt to show, at a later time: even having built what Chalaron drew, back there, didn't limit the idea of a turret being "orthographically possible". In fact, once I had it built and installed, it not only was a close match for what I saw in Chalaron's side view drawing; but it could rotate a full 180 degrees!
The danger of trying to interpret something that was as radical as the Manassas was, for its time, with absolutely minimal primary source material, is that you're always running the risk that some part of your audience may think you're "on something". However, a different audience might think you're "onto something". There's a fine line between those two extremes! But in terms of interpreting the orthographic profile-view drawing Chalaron did in 1861: it's possible. My interpretation, in 3D, didn't radically alter the 2D source document.
Is it likely there was a turret (or gun) back there? Who knows!?! The argument, I suppose, is that the model builder is "onto something" ... but the real-life vessel's designers were "on something"! (Or, to put it more respectfully: had done what people like Peetz had said they had done: put much thought into it!)Leave a comment:
-
Moving into other areas of the hull; but using the same repetitive technique, over and over and ...
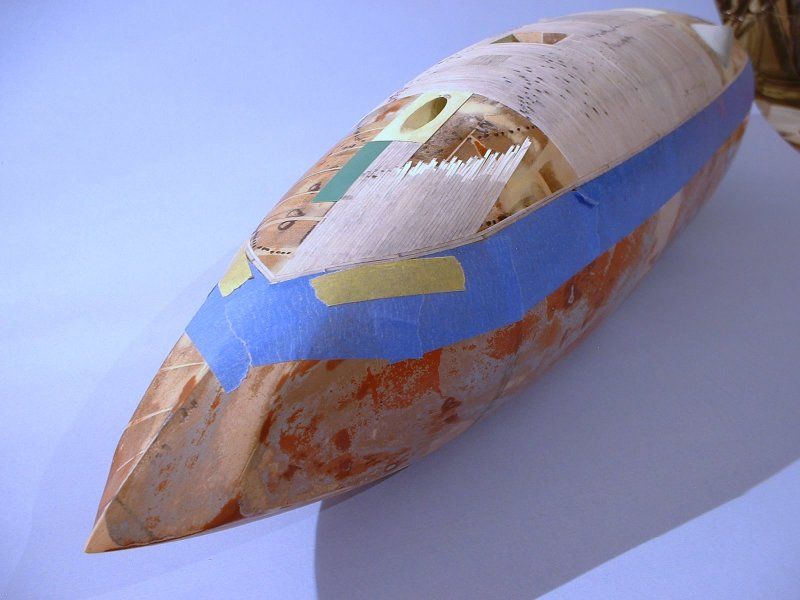
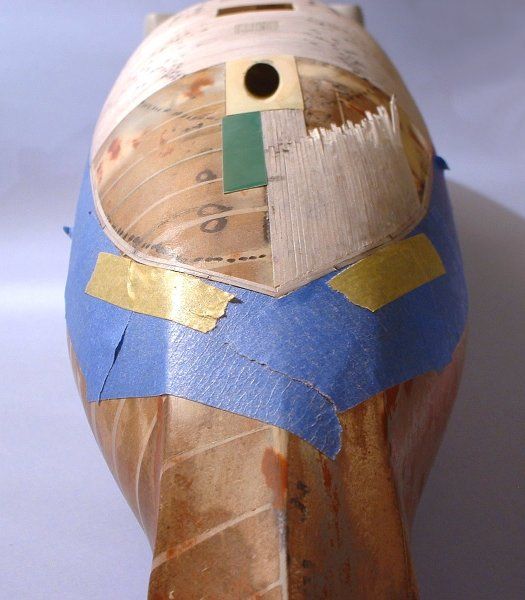
Note the use of Dymo Label Tape, in the shots above. (The green rectangles.) I used it to make that armored tube for the cannon, as well. That and a fat drill bit, turned shank-end-in. Rubbed some of the great "Butcher's Bowling Alley Wax" on the drill bit, and applied auto body "icing" around all that. (Which work I'll show, later on, when I get back to a semi-linear "start at the beginning of the hull's creation" stuff.)
Dymo is great for setting a hard, straight edge on a specific spot on the hull. Once you have, say, four or five "iron planks" glued side-by-side, you could probably safely remove the tape guides. I left it on there, specifically for the photos: so my "cheating" methods would be evident.
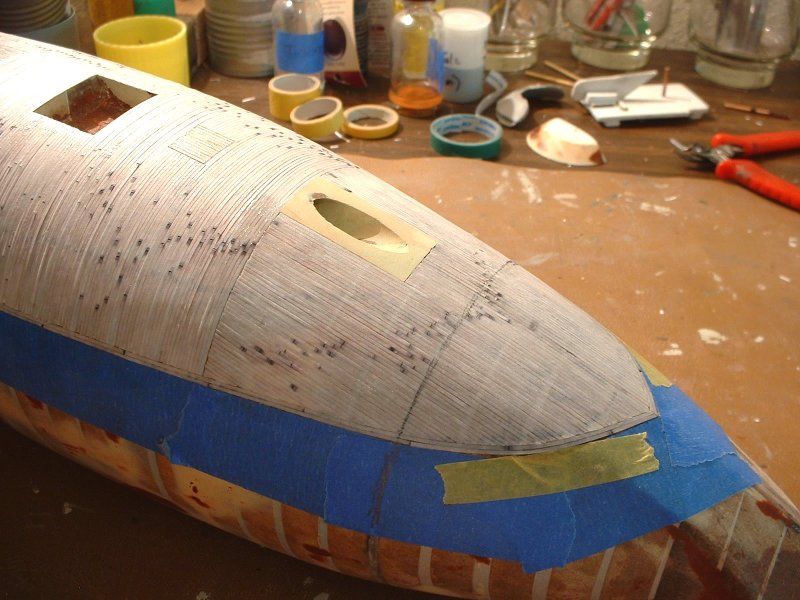
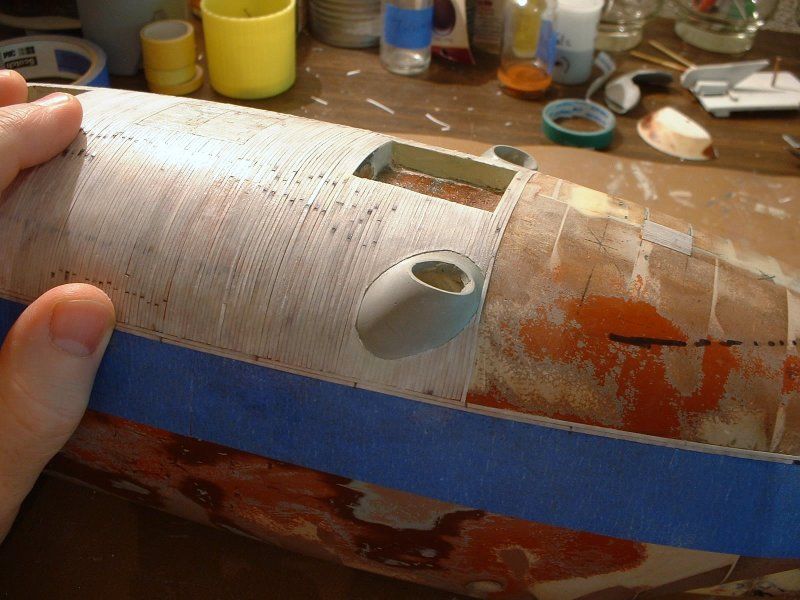
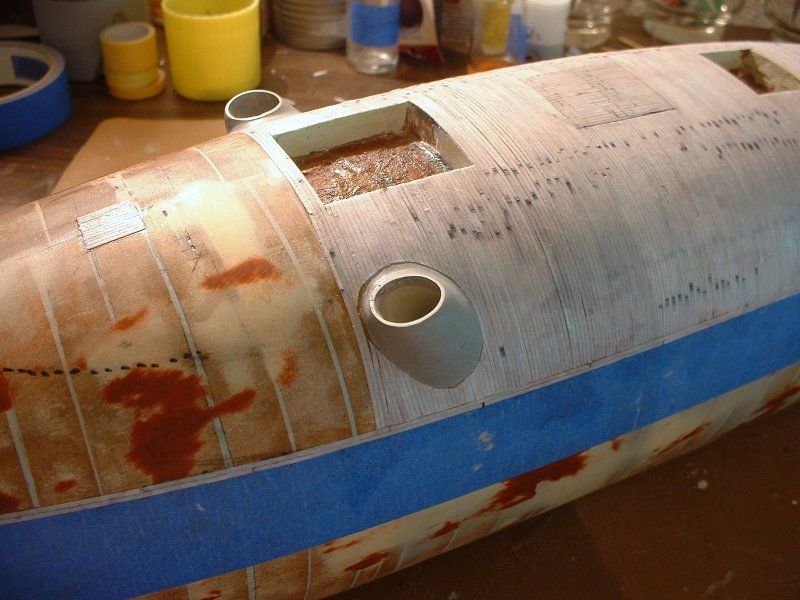
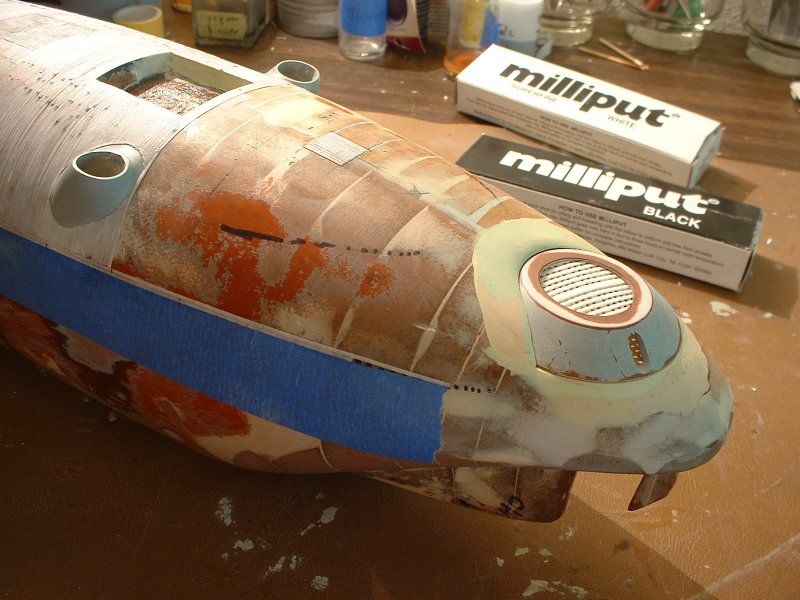
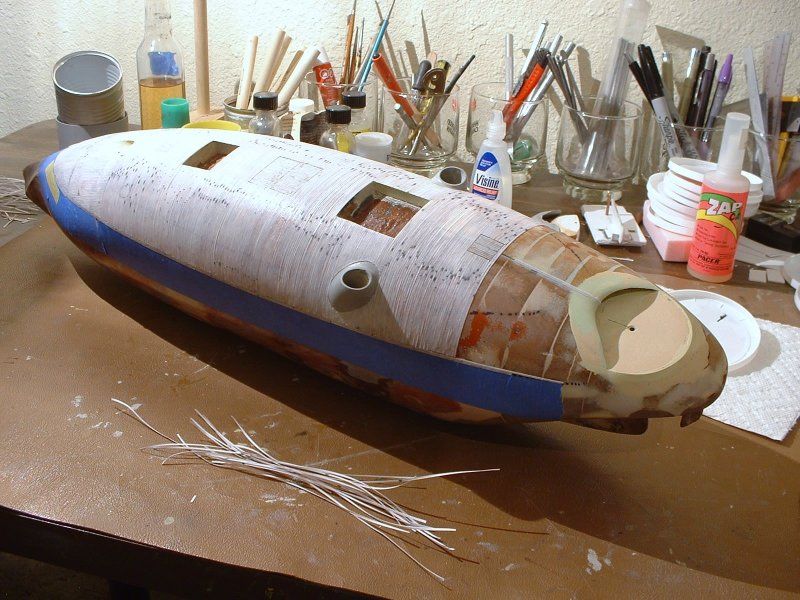
(About the time I was to this point, I had begun to start thinking of this thing as the "CSS Wickerclad" ... which shows my mind was mush!?)Leave a comment:
-
I'll try to "write short" for a change ... and mostly just post pictures, for now ... but I'll explain some high points of the how-to, later on, if it feels like it's necessary.
For now, one of the main things I'll point out is that, to get started in some area or other, I often used "Dymo Label Tape" as a hard, "tall," self-adhesive straight edge. (Sometimes reinforced with masking tape, in large areas; or areas with a highly curving surfaces under them. Better paranoid than sorry, I always say! And I definitely did not want my straight edges or guides popping up and off, in the middle of this work. And it felt like they just might, so ...)
And yes, every single "iron plank" had to be cut to length, one by one: to fit into the specific area it was being glued onto.
To cheat things, a bit, you'll note where some "fake" panel lines were scored into the sheets, prior to cutting planks out ... but it's still very tedious work! The kind of work where your fellow scale modellers might award you some serious Martyr Points (tm) once they know what you did ... but, hey, I really wanted to be able to see, right in front of me, the sense of what an all-wooden vessel of this shape would have looked like, with very unusual, early-war armor on it.
The finger, seen in the shot immediately below, is pointing to the cut-off drill bits I used in the two drilled holes I had mentioned (in the quotes, above). The drill bits were used to keep the two rulers properly aligned with one another: but at the same time, I could easily spread the rules apart, or tightly clamp them together: smoothly and without much hassle. Which was very much necessary, for my sanity if nothing else: since I had to just keep on doing and doing it.
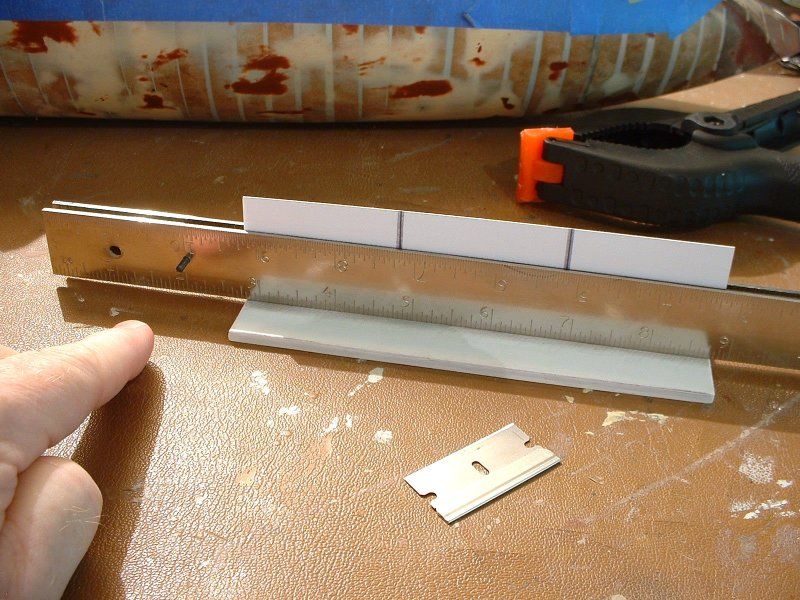
(Photo below.) Not wanting to have to figure out where hatches and the like should go, way too late into the overall process, I started the overall process by adding those features; and adding things like the "circle" at the lower edge of the turtle's iron armor. That greatly cut the mental part of the workload, way down: by giving me definite starting and stopping points. Which made cutting "planks" to length, easier and less prone to mis-measurements and general stupidity on my part. You'll see what I mean, as I post the rest of the in-progess pictures.
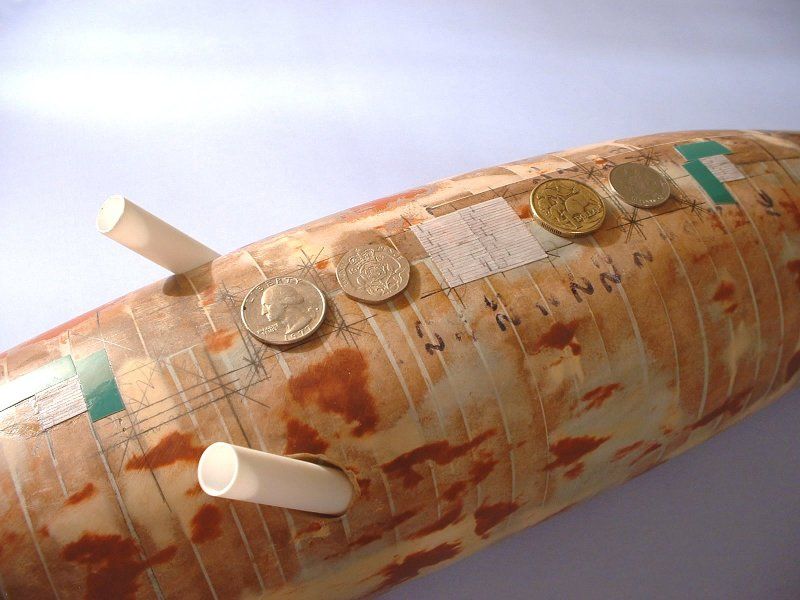
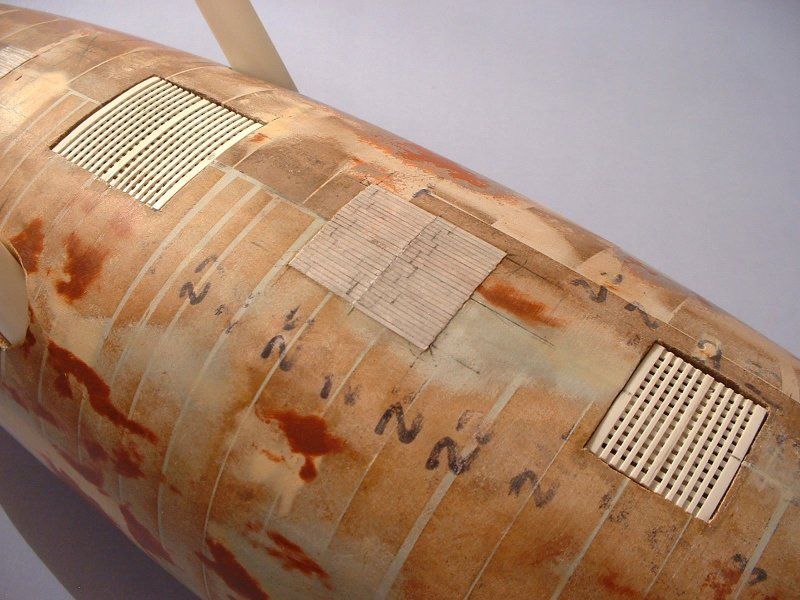
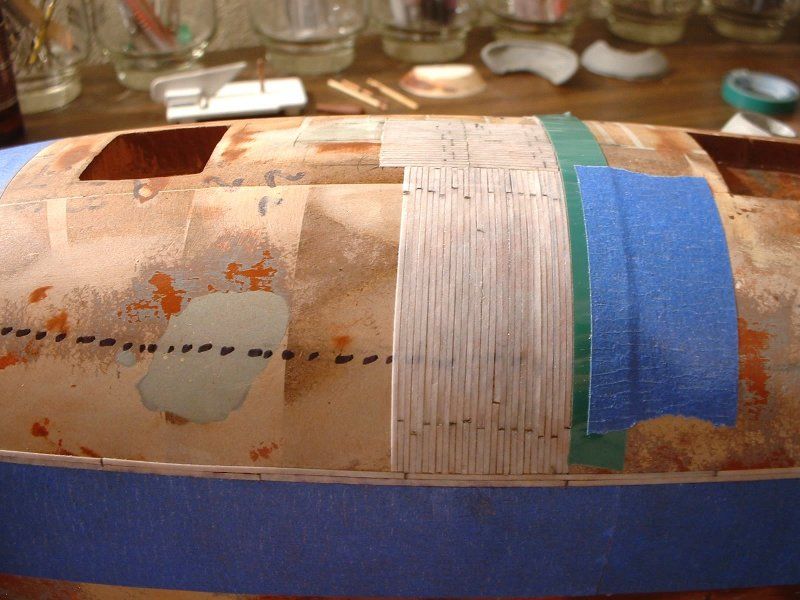
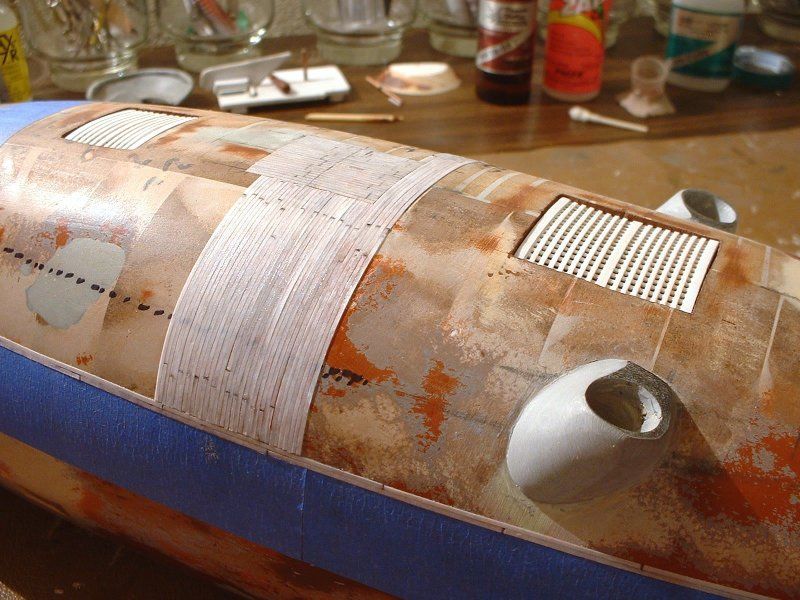
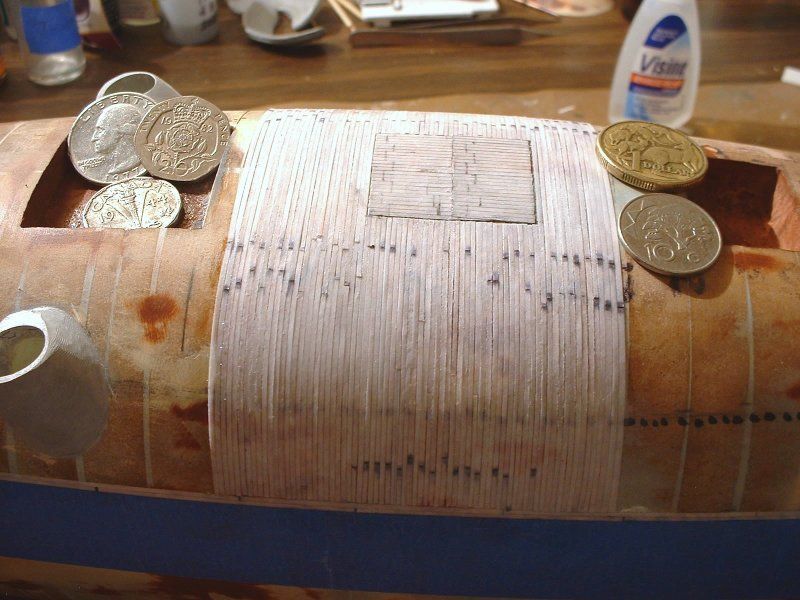
(And believe it or not, what you just saw, above, took up an entire day's work! Things move vveeerrrrryyy slowly, with strips this skinny! Especially when you are doing some critical "layout" work, that will determine how easy later work can be done. Figuring out how best to do those two horizontal strips, all around the circumference or whatever, took some heavy figuring and playing around with paper strips -- basically dry fitting and testing positions, and so forth.)Leave a comment:
-
Okay. Finally! I'm ready for another update. Over the last several days, I've been going through many old photos, and getting things "organizee". That took forever, and it isn't even completely done yet ... but, I have almost two dozen new pics ready to upload and explain.
You'll notice, as you look through these pics, that I'm "jumping forward" quite a bit. I'll come back, sometime later, to do things like show how (and sometimes why) I did what I did, to create the main hull shapes and so forth. But before I figure out which of the hull-creation photos are necessary to explain things, adequately enough: here's something some folks -- (such as the guys over on the "Aye Candy: CSS Manassas" thread, over on the Civil War Talk web forums) -- are likely to be far more interested in.
Specifically, how I managed to simulate "flat street car iron" being bent over and around this compound, wooden shape: to be used as armor!
First step: Try some ideas out, to see if they're going to work at all. Partly to get a good idea of how it would all look, when I'm done.
There would be no sense in doing things in the labor-intensive way I had planned to, if, when the final paint was applied, you couldn't really see any difference in the "texture" of the areas I was going to paper-clad. But as you can see: even with flat black paint applied, the iron bands or stripes can be seen for what they are. The spaces between each peice of paper didn't "go away" during the glueing process ... etc., etc. ... and all it looked like it would take to bring out some of the feeling of these bands being "metal" was going to be rubbing some graphite over the flat black paint. (Thereby giving it a subtle but evident sheen: just enough to emphasize highlights, if the available lighting hit it just right.) In the end, I did more than that: using metallic paints, with no attempt at making the upper armor look like part of the "black devil" that some historical documents colourfully called the real-life CSS Manassas.
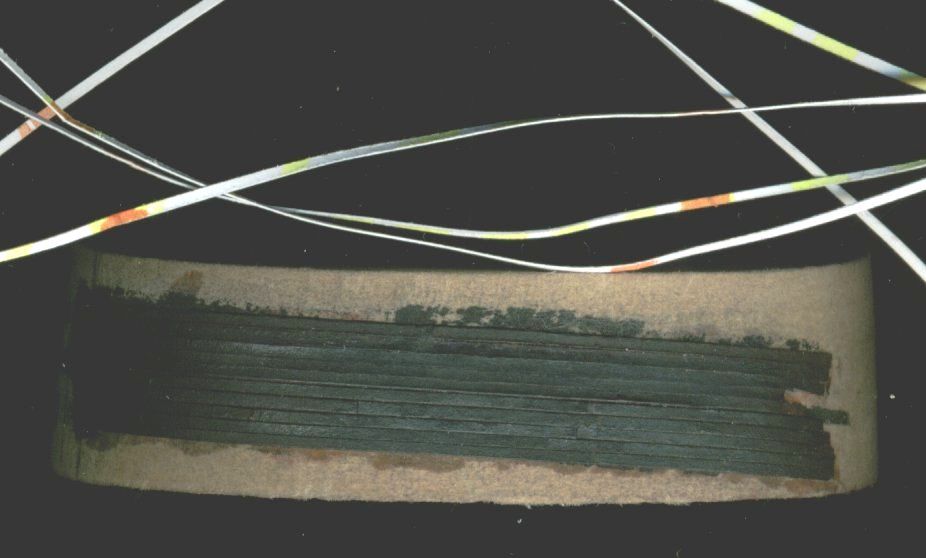
You'll see better images, as we progress along ... but what that picture shows is ordinary card stock type of paper, which had been cut into very thin-width strips, after they had been glued down (with the very thin-viscosity "Pink-label" Zap CA glue) onto a leftover "slice" of MDF (or Medium Density Fiberboard). That MDF "slice" or section having been cut and angled and shaped, just as if it were a legit (instead of spare or leftover) cross section of the hull.
I should probably mention that this work was all done, several months before the actual need for this work -- partly in hopes that I'd come up with some less-labor-intensive way of doing things, when I DID get to that point. But as it turns out: no such idea was forthcoming, so, in the end, what it took was biting the bullet, and using up a week of "vacation time" (for lack of a better way to describe it) doing very tedious WORK! As with a lot of things in this hobby, though: if you want the end result to look really unusual / interesting, sometimes the only thing to do is just get it done, however you need to. Even when it's incredibly tedious, at the time you're sitting there and doing it, sometimes, there's no easier way or more exciting way. So, you do what'cha gotta do!
Here's a visual idea of how each of the paper strips were cut:
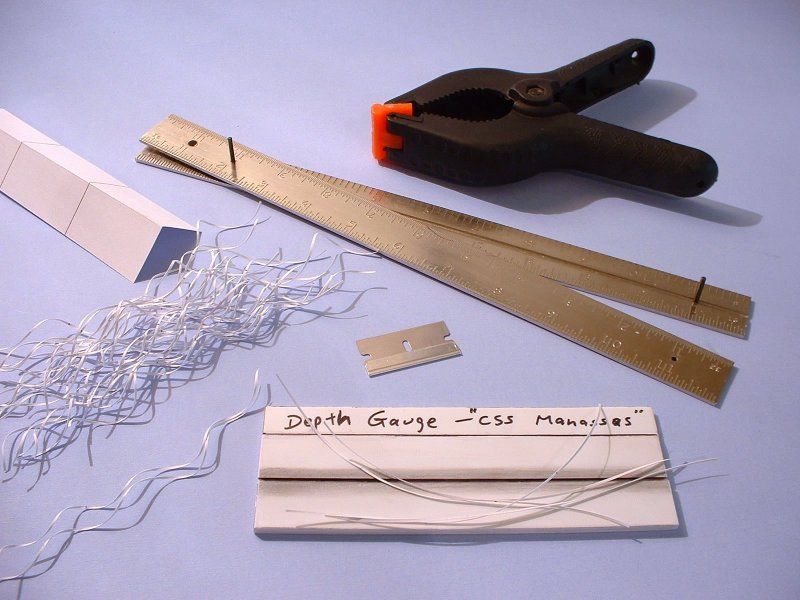
I'll cheat a bit, and explain what's going on, via some quotes from that published article ... showing first the "why," and then the "how".
(Quotes ON)
THE TURTLE’S SHELL
“A shield, or roof, was put over the deck in the shape of a whale back.” (A later reprint from the New York Times used the term turtle back – or so one copy makes it appear.) “The frames were eight inches thick, moulding way – that is, solid against each other crossways from forward to aft, and the planking on top of this was four inches thick. Outside of this she was covered with a single layer of flat street car iron, such as was used at that time to run the street cars on - not rails such as are used now.”
This unusual iron-cladding or armoring process interested me quite a bit. I had previously researched another ACW “infernal machine,” and had run across the idea that the metallurgy of the early 1800s wasn’t good enough to produce large iron plates. Peetz makes it clear the Manassas was largely made of wood, structurally-speaking. It was then covered with what might be thought of as an outer layer of iron “planks”. Quite a clever idea. It would have been a great intermediate step from all-wooden ship building, towards all-iron ship building. Technical people with lots of training wouldn’t feel lost, or like they had to start over. It would all be do-able, “today,” without delay. And if it worked, other Southerners could also quickly do the same thing: quickly creating an ultra-modern navy. (And in the process, arguably forcing the US to build the Monitor, to be able to counter-act Southern boats like this one.)
I tried to get a solid idea of exactly how wide, long, and thick each of Peetz’s iron “planks” would have been. No one really knew with the type of precision we scale modellers hope for. Daniel Pete of the Southern Museum of Civil War and Locomotive History and I had traded several e-mails. He passed on my “flat street car iron” questions. Museum Curator Michael Bearrow’s reply was that, "Iron and rail were often locally produced and/or imported very much adhoc." Which broke my temporary paralysis. That being the case, I felt I couldn’t go too far wrong just by going out and getting width measurements from things like mine car tracks – assuming that would be about as close to early 1800s street car wheel widths as I was likely to find.
CLADDING WITH PAPER PLANKS
I set up a homemade strip-cutting system that would allow me to create many same-size “iron planks”. My model is built in 1:48 scale, and I was aiming at planks two scale inches wide by eight scale feet long. The latter was easy: a 4” x 6” index card measured three planks long. Cutting the strips to two scale inches was another matter. (There was no way on earth I was going to try to scribe all those lines onto the final model! Pick your battles, says I! And for the same reason, I totally ignored making rivets.)
To cut the very thin strips, I had to make two tools. One was a pair of metal rulers, which I had modified so they could be held together tightly and in proper alignment, with minimal hassle. Clamping them into a vise and drilling two holes (one in each end) and then putting a cut-off piece of that drill bit in each hole, sufficed nicely to make that tool. The second tool was a depth gauge of sorts. One flat piece of sheet plastic (as a valley floor) had two other pieces of sheet plastic glued to it; with a trench running between them. The thickness of the two upper sheets set the proper depth. The paper was allowed to drop between the two rulers, and to rest on the floor; while the ruler’s edges were held up by the two plastic sheets. I could use a clamp to hold one end of the two rulers together; and my hand to clamp the other end. I ran a razor blade along the two metal rulers ... and if I held everything steady, I got a very thin, nicely parallel paper strip for my troubles. As a time-saver, I had scored the index card into thirds: thereby making three connected planks, from every strip.
The application of the many simulated iron planks took me a solid week. What I did was to use a rounded (#10, general purpose) X-acto blade to pick up small drops of Zap CA super glue. (The water thin type; not the gel type). I positioned each new strip; held it down with one hand; applied a drop of glue on top of each strip with the other hand; it soaked through the paper and stuck the paper down; and hardened the paper, when it set. I then repeated that, an awful lot of times! (And no, I’m not trying to belittle or demean the metal-working skills of anyone who worked to reconstruct the real thing. Assume any errors in planking were caused or amplified by the carpal tunnel in my aging wrists; my aging eyes; not to mention fingers that felt like they had glass gloves on, after a while, from all of the dried super glue on my fingers!)
Although it was tedious work, I felt it was well worth it. I had wanted to know what the real Manassas most likely looked like – and now I have a much better image. And a new respect for people whose hobby involves precisely cutting wood, to plank large ship models. As a bonus, I understand why residents of New Orleans, who had apparently seen the real thing being reconstructed in dry dock, had called it the turtle. Assuming it was only armored along the surfaces that would stick up out of the water; and if it had a compound curvature to that upper hull, then the armor plating on top would indeed resemble a turtle’s shell.
(Quotes OFF)
I'll just quickly mention, in passing, that that's the final-final version of that published article's text: as I had submitted it. Andy Pearson, the editor for the various special issues published by "Sci-Fi & Fantasy Modeller," does a fine job of surgically removing off-topic tangents and the like, when I submit article copy which is really pushing things, in terms of overall length. (Which is arguably almost always!?) But, give or take a few words: that's "as published".Last edited by Steampunk; 08-09-2014, 02:50 AM. Reason: minor additions and alterations, here and thereLeave a comment:
-
I'll give it one more attempt to post an off-site link, to where you folks can see an on-going conversation regarding this boat's history:
http://www.civilwartalk.com/threads/...anassas.81908/
Hopefully, that link will cooperate? (I've tried to post it, here, before -- but the system, for some reason, didn't want it to be posted.) Being a relative newbie to both this forum, and that one, it's possible I'm just doing something wrong ... but other links "worked" over here, so ...??
Anyway, assuming this gets posted ... I feel that (historical research type of) conversation is well worth reading; for anyone here who is beginning to be interested in digging up more info about the Real Life, actually-existed craft.
I feel they've got a lot of good, solid, relevant info over there. And they keep looking for more. The idea of on-going research excites me, when it's centered on finding out more and more of the truth about bits and peices of technological history. Some of the stuff they're coming up with, over there, makes prior mentions or write-ups in historical records, obsolete in some ways.
For instance: virtually every after-the-war bit of visual information I've seen to date, which tries to show how the real CSS Manassas was armored, states or implies that large iron plates were used. And that's just not true! And it's been, arguably, well known that that wasn't true, for over 100 years -- but only a relative handful of the people who have studying the real thing, have taken enough time to gather up extant bits and pieces of info; and to try to use it to sort of make a "composite sketch," as it were, of how the real thing was constructed. Despite newspaper articles from the early 1900s, which made it clear that the real thing's armor wasn't large iron plates; and it wasn't the type of iron rails used today in railroad transportation, the bulk of the drawings and such that were created, to show what this thing likely looked like, show huge iron plates in use.
Besides the accounts in newspapers, roughly 50 years after the American Civil War, further proof making large iron plates unlikely has long existed --but was largely ignored. What I'm referring to is this: the metallurgy of the time simply wouldn't have allowed that to be the case. What was commonly done at the time this thing was first created was for much smaller-in-size metal plates to be manufactured. The larger "sheets" were considerably harder to manufacture, even in "just bent or rolled in one direction" form. The idea that armor plating which consisted of compound curves on large, armor-thickness plating, on the Manassas -- which was built in a relative hurry; and was funded via private not government sources -- all along, that should have been mostly obvious as a really "pushing it" idea. But that's what the visual record has often shown. Those who have been doing their best to sift and sort through the historical record have learned to look past that misinformation ... but there isn't any huge amount of a "push," that I'm aware of, to sort of "proofread history". What little there is, seems to be little tiny pockets, here or there; of people who are fascinated with the real-life vessel; and want to know more about it -- but want proof, before they'll believe unlikely stories.
Anyway, for those who have an interest in finding out more about the lateral thinking going on, 150 years ago: that other site is deserving of some of your time. Those who are extra-deep into this stuff -- (that is, want to do some actual research and thinking, themselves) -- will be fascinated by the tantalizing tidbits that are being dug up. Just as one tiny example: the folks over at that other site took photos of the type of early, relatively-primitive railroad technology that it appears was used on the real life Manassas. I'd never seen such real-world examples of what I had presumed, from those newspaper accounts, had likely been "recycled" for use as armor, when the real Manassas was constructed.
Ten years or so ago, as many of you readers here already know, there was a resurgence of interest in the USS Alligator. Which ended up being the subject of a DVD that's still available. (Discovery Channel, if I remember correctly, did that one. Number four in their military series, I think it was. I'd have to get my copy out and double-check that; but off-hand, that sounds about right.) My point is: people once had certain ways of thinking about certain things, which turned out to be either totally untrue, or largely untrue. And once modern people started really taking advantage of the idea that information is much easier to share, than it was 100 or more years ago: huge amounts of data suddenly came into the awareness of the people who were looking for it. And once the study started, again -- well, as they say: truth is stranger than fiction!
As it turns out in that case, although the USS Alligator was a little-noted historical footnote, here in the US; over in France, they still had full blueprints for that technological wonder, tucked away in their vaults, as it were. Enough info that David Merriman was commissioned to build an R/C submarine of the USS Alligator; which was then tested, in real life, in a super secretive modern facility the US Navy maintains. So, on the one hand, history in the US largely pretended the Alligator never existed ... but the truth was out there; and good research by long-time fans of old inventions dug it back up. That resulted in not only a modern DVD on the subject; but also resulted in some very impressive test results, at that US Navy facility. (But look for that DVD, to find out more about the Alligator, the easy way!) It's probably apparent, but the reason I'm talking about the Alligator, here, is that I believe the same kind of resurrection of more historical truths, based on solid science, could easily be applied to the CSS Manassas. After all, it's last known resting place has been recorded in history -- and it's not some vague notion of hundreds of square miles of ultra-deep water, or whatever. Its operational life ended in an inland river; within a certain pretty specific distance of known landmarks. Making the Manassas, arguably, a hundred or more times easier to locate. Hence my trying to get people to be more interested in the real Manassas -- since, comparatively speaking, it would be"easy pickings" to locate the real thing, and study it.Leave a comment:
-
Found time to upload one more picture.
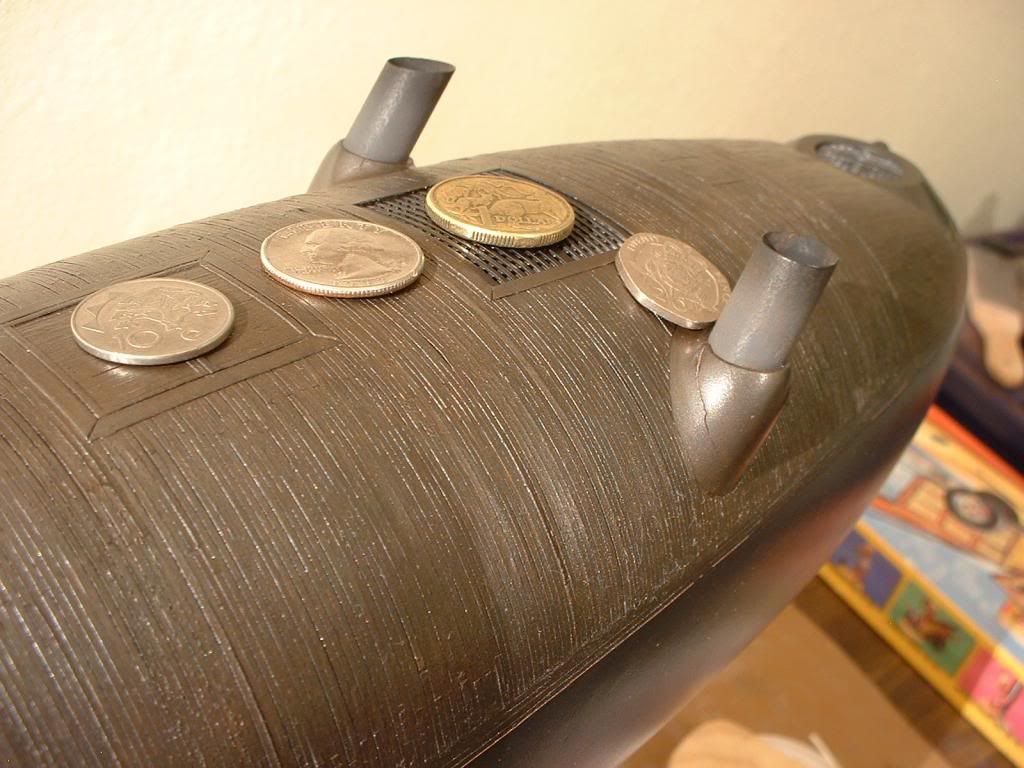
This one, if I had been "organizee" enough, before this, probably would have counted as a Beauty Shot ... but, hey -- better late than never!Leave a comment:
-
Four shots of the model, in primer, when it was a bit farther along ... and then, I'm gonna take a break for a while to get "real life" dealt with.
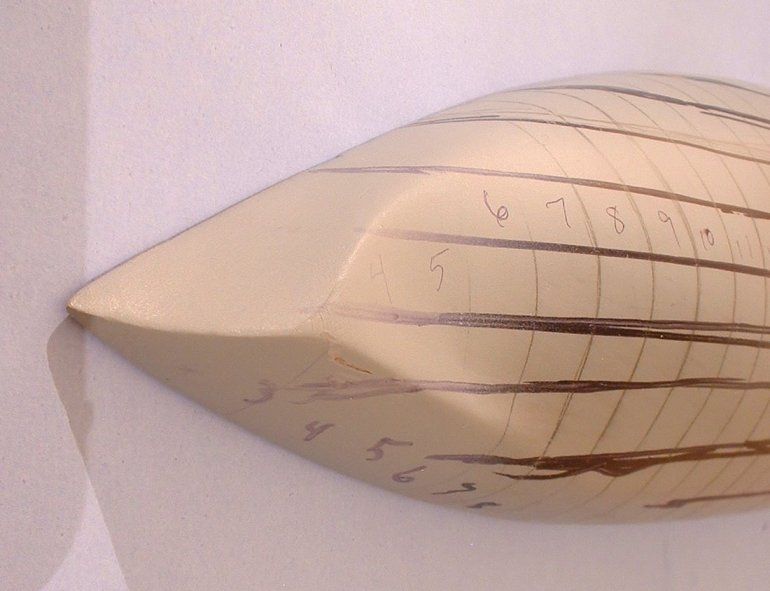
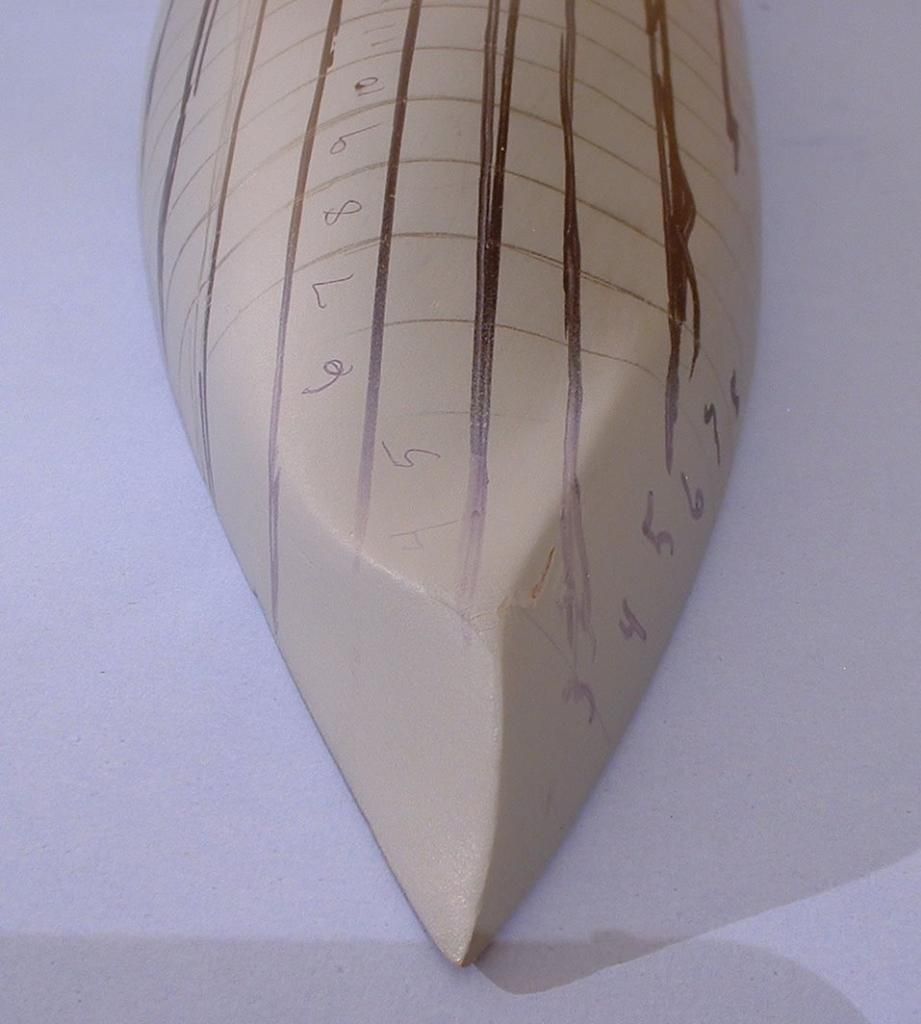
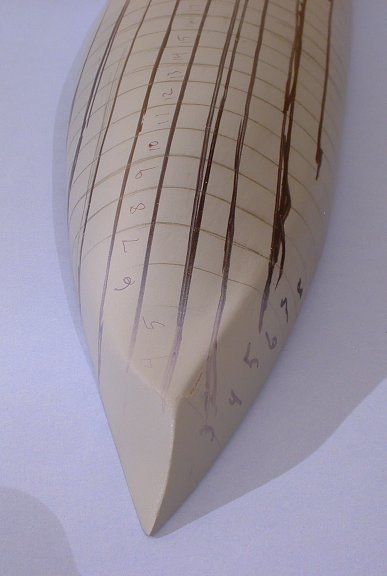
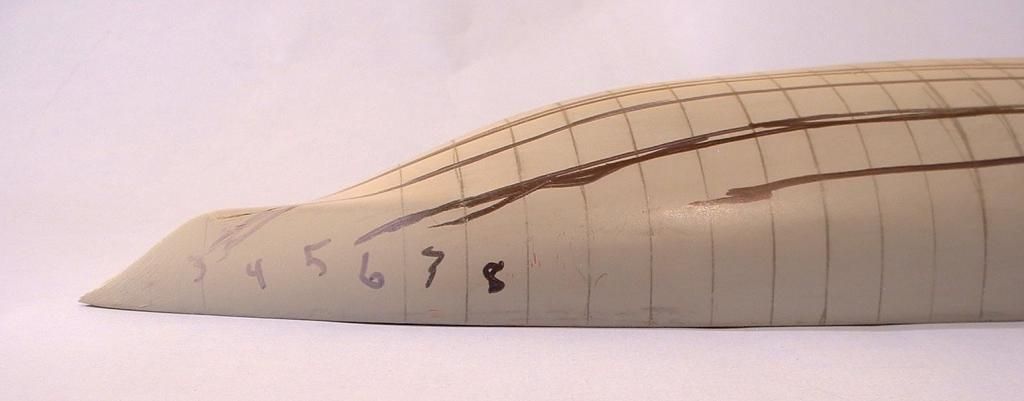
That last shot is probably the one that tells me I "got it right," more than the other shots. It looks like something Ancient Romans would have tried, if they had steam power instead of having to deal with oars and/or sails. And more importantly, it looks a lot like something that could have been built out of a bunch of wooden beams, stuck together in some way, and facing forward. Something do-able, within the means of a bunch of people under both time and budget pressure.
But the one thing that makes me think I'm not too horribly off the mark, as far as interpreting the meaning of Chalaron's 1861 pencil "blueprint," and translating what I thought I was seeing, from a 2D form into a 3D form, was this: the whole "Bowie knife" bow shape strikes me as being over-engineered, in a sense.
Yes, it would be remarkably strong. As designed.
Yes, it would have kicked major bootie, against "hollow hulled" wooden ships. No question there, either.
But if you try to see the bow of this thing striking, say, the USS Richmond ... I can see why, if the crew of the Manassas didn't manage to come directly in, at essentially right angles to what they were trying to punch a hole in ... yeah, I can see that bow's shape sliding sideways, and scraping anything on the exterior, completely off of the ship it was ramming!
And doing a lot more damage than the US Navy wanted to admit ever happened!
Notice that although they claim virtually no damage was done by the Manassas, during that initial attack, that the Richmond itself was pretty much all but mothballed, after that attack. Kept around, for the sake of appearance, it seemed ... but other than that, it was largely useless in combat, as far as I can tell. I'd have to find the exact quotes, again -- (maybe lurking in the ORN, or Official Records of the Navy) -- but as I recall it now, there were letters saying that the Richmond didn't steer worth a darn, after this encounter ... and was just generally a mess!
Despite the US Navy claiming, "That didn't hurt!" in regards to the attack by the Manassas, the reality seemed to be considerably otherwise.
From my reading of that recently discovered journal, kept by a US sailer on board one of the attacked ships ... the psychological damage alone was considerable. Something that heavy, moving at even a slow speed, would have transferred a LOT of energy during any collision.
But at the same time, the Confederates found out, to their apparent disappointment, that only a head-on collision was likely to accomplish the end goal they had initally desired. And since the Federal forces seemed to have learned that, very early on ... it wasn't likely they'd get such a chance, a second time. That said, the Manassas and the other vessels they'd rounded up, for that initial attack, DID manage to "scare off" the Federal warships for a considerable length of time. And apparently stopped them from building a battery on land; which they had desired to do.
Anyway ... more pics and such, later ... but for now, "Real Life" calls!Leave a comment:
-
I'll throw in one shot which shows the second phase of the "paper half-model" stages of things; and some of the early work, using MDF.
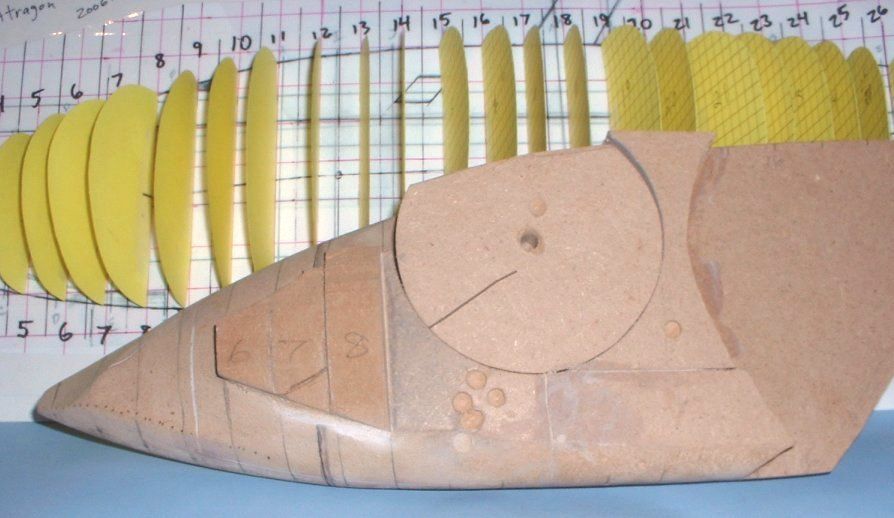
What that shot, immediately above, told me was that, yes, I did do a second round of the "paper model" work. I had stopped where readers saw it last, with that particular paper model; and, using the improved data I'd gained from doing that work, had generated what amounts to a tracing of that work (a new side view drawing, I mean) ... and had "tape armored" that drawing, etc. ... and had generated new cross section drawings, using yellow-colored card stock or whatever. That work being intended to let me get a bit closer, without having to do much "new" work. What I mean is: I could see lots of little things I'd want to correct, all over the place, on that first paper half-model. It was easier to just trace the "old" paper cross sections onto new paper; and then do the corrections, by eye, by drawing them onto or over those "version two" tracings or whatever you want to call them ... and then, cut out the new cross sections. Tape them onto the new side-view tracing. Study them by staring at the new "half solid" model, from various angles and so on ... and then, start cutting some solid MDF sections out.
Doing stuff this way works out well ... but you have to be able to control your desire to be overly-anal, at every step ... or you'll take forever to get anywhere! It's sort of like, at some stages, you're banging your head against a wall ... but in others, you're all "Use the force, Luke!" I don't mean that in an overly flippant way. It's just a humorous way to say that as I'm doing this, I'm consciously "flipping sides of my brain".
The analytical left side is a very necessary component to figuring stuff out.
But so is the right side. The artistic side. The side of your brain which was purpose-built for analyzing shapes, and what not.
If you try to do work like this with only one side of your brain, exclusively, my feeling is that you won't get far.
Sometimes, using the right side DOES feel a lot like "magic," or "Use the force, Luke!" ... but when your left-brain runs out of ideas on what to do, it's time to "let go of your conscious self; and act on instinct". (To steal or paraphrase an Obi-Wan'ism, from "Star Wars: A New Hope".)Leave a comment:
-
I was getting some photos I liked -- (as seen immediately above) -- but the photos weren't showing the "drama" of that ramming device, well enough to show what I was seeing when I had the thing in my hands, and could turn it around in natural light or whatever, and study it that way. So, I played around with some ways to attempt to show the thing, more or less like someone underwater might have viewed that bow.
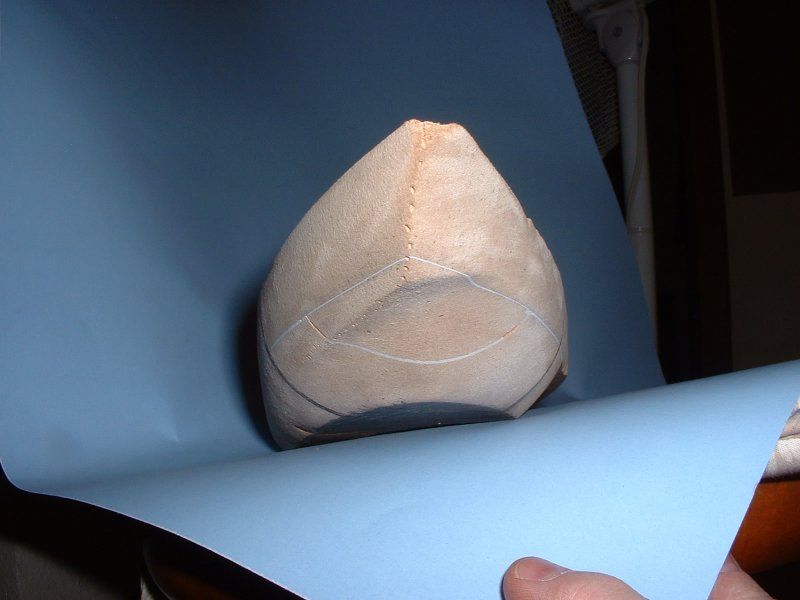
Taking that shot, and some other ones like it, and rotating and cropping it, gave me images like these:
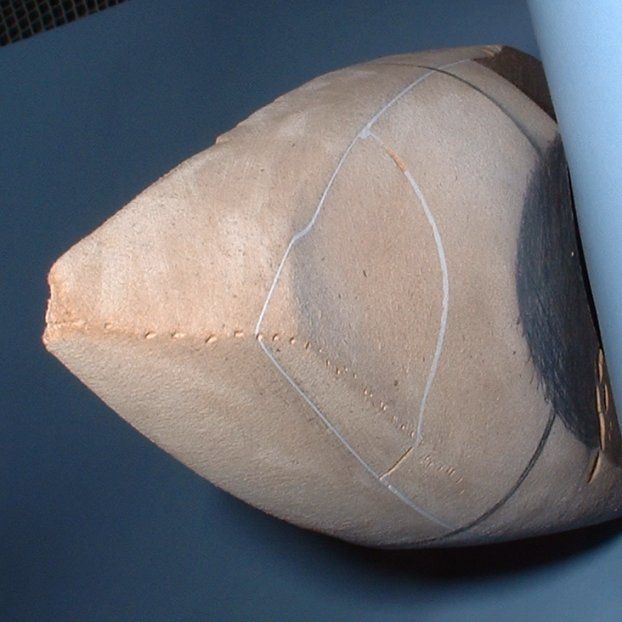
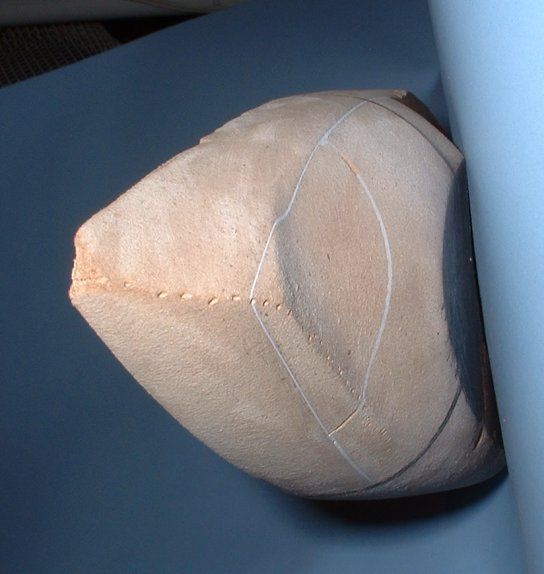
Short story was: it was shots like those which later inspired me to think I could spice this thing up, enough, for publication in a sci-fi bookazine, just by sticking some eyes and teeth on it. Even so, I had kept that "face" fairly cartoon-like. Painting it up like a sea monster's skull would have been even cooler, and would have taken advantage of the skull-like shape this arguably turned out to be ... but, hey, what can I say. Maybe later. But with deadlines looming, I stuck with what was quick (and that I wouldn't likely screw up!) on the "final" paint job.Leave a comment:


Leave a comment: