Need assistance, advice, guidance with a Lathe

Collapse
X
 
  • Time
  • Show
Clear All
new posts
  • Ken_NJ
    Captain
    • Sep 2014
    • 751

    Need assistance, advice, guidance with a Lathe

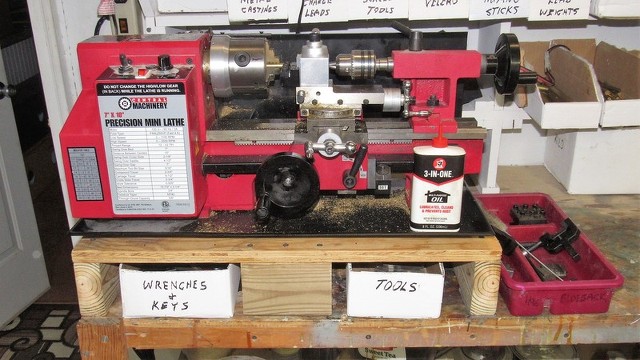
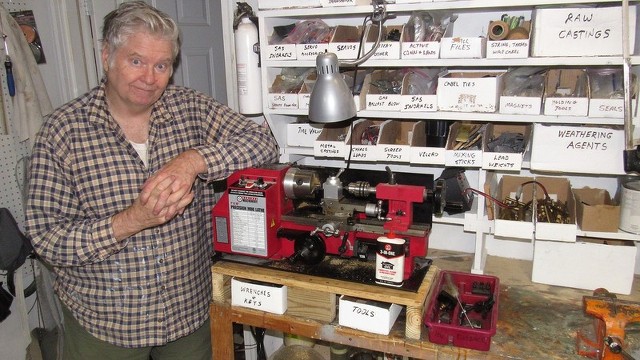
    About 10-13ish years ago when I built Skip's Marlin, I saved my nickels and dimes to buy a lathe from Micro-Mark. I picked it up directly from MM to save on shipping. Machining was something I wanted to get into at the time. Now, some of the things you would make on the lathe you can make with 3D printing. I don't have a 3D printer, yet, maybe in the future, but I'd like to start using the lathe more. Haven't powered it on in the past 10 years. The only time I used it, when I first got it, bought a large bolt to practice on, see pic below. I don't have much tooling, only what you see below. I bought blank bits that I had to put an end on myself, which I did, and was a pain in the butt. I think I need to buy a more variety of bits. So I need some guidance were to go with this. David said at Subfest, stick something in the lathe and just use it. Of course the best method to learn is use it, maybe make some mistakes along the way and learn from that.

    I know I have some of the terminology wrong. I'll eventually get it right as I learn.

    A few pics of what I'm working with.

    Click image for larger version  Name:	IMG_0621.jpg Views:	0 Size:	60.6 KB ID:	168420

    Click image for larger version  Name:	IMG_0622.jpg Views:	0 Size:	58.5 KB ID:	168421

    Click image for larger version  Name:	IMG_0623.jpg Views:	0 Size:	58.5 KB ID:	168422

    All of the bits the bits that I have.

    Click image for larger version  Name:	IMG_0624.jpg Views:	0 Size:	56.0 KB ID:	168424

    These are blanks.

    Click image for larger version  Name:	IMG_0625.jpg Views:	0 Size:	56.7 KB ID:	168423

    Centering bits.

    Click image for larger version  Name:	IMG_0626.jpg Views:	0 Size:	57.9 KB ID:	168428

    Measuring tools.

    Click image for larger version  Name:	IMG_0627.jpg Views:	0 Size:	50.7 KB ID:	168426

    Click image for larger version  Name:	IMG_0628.jpg Views:	0 Size:	49.2 KB ID:	168425

    Click image for larger version  Name:	IMG_0629.jpg Views:	0 Size:	50.9 KB ID:	168427

    Click image for larger version  Name:	IMG_0630.jpg Views:	0 Size:	42.9 KB ID:	168429

    Click image for larger version  Name:	IMG_0631.jpg Views:	0 Size:	41.0 KB ID:	168430

    These are parts that came with the lathe. The gear set I think is for cutting threads. Have to read the manual.

    Click image for larger version  Name:	IMG_0632.jpg Views:	0 Size:	52.9 KB ID:	168433

    Centering tool and spares jaws.

    Click image for larger version  Name:	IMG_0633.jpg Views:	0 Size:	54.4 KB ID:	168434

    Not sure what this is. Will refer to the manual.

    Click image for larger version  Name:	IMG_0634.jpg Views:	0 Size:	54.2 KB ID:	168435

    The manual.

    Click image for larger version  Name:	IMG_0635.jpg Views:	0 Size:	49.9 KB ID:	168431

    And reading material. Looks kinda dated.

    Click image for larger version  Name:	IMG_0636.jpg Views:	0 Size:	57.6 KB ID:	168432

    Some of the stock I can use to practice on. Aluminum.

    Click image for larger version  Name:	IMG_0638.jpg Views:	0 Size:	45.8 KB ID:	168437

    This is the bolt I practiced on when I got the lathe.

    Click image for larger version  Name:	IMG_0639.jpg Views:	0 Size:	49.0 KB ID:	168439

    Plastic rod.

    Click image for larger version  Name:	IMG_0640.jpg Views:	0 Size:	46.0 KB ID:	168438

    This is the bit I ground myself on the HF grinder I have. The grinder i have is too lightweight for this kind of work.

    Click image for larger version  Name:	IMG_0641.jpg Views:	0 Size:	63.5 KB ID:	168436

    So besides chucking something up and using it, what additional tooling should I get? I'm sure I need more types of bits and other stuff. What advice do you have?
    Last edited by Ken_NJ; 01-09-2023, 03:29 PM.
  • He Who Shall Not Be Named
    Moderator
    • Aug 2008
    • 12287

    #2
    Get yourself a set of cut-off bits; a quick-change tool with assorted tool holders, a cheap dial-indicator and arm, an adjustable interface plate to get your three-jaw chuck as close to zero runout as you can. If you don't have one, spring for a four-jaw chuck. Oh... and plenty of band-aids.

    Your plastic gears should hold up but be prepared for a nasty surprise down the road if you get over-confident with this thing. (One of the best things to come from the Chinese since fireworks I use mine almost as much as the trusty old Taig).

    Practice (and most of your actual work will use this alloy) with 'machine brass'. Easy to cut and gentle on your cheap-ass high-speed, high-carbon cutting tools.

    Play with it using different mediums with varying spindle speed and feed rates. Get some Tungsten tipped tools for the harder metals. Harbor Freight is your friend.

    Play!


    David
    Who is John Galt?

    Comment

    • Subculture
      Admiral
      • Feb 2009
      • 2121

      #3
      I would say it depends on what you want to make with it.

      High speed steel is fine for the majority of materials. Carbide will hold an edge for longer, important in production but less of an issue for the hobbyist. Also you can never grind carbide tips up as sharp as HSS.

      I would want a parting tool, side and face cutter and a small boring tool is useful too. You can get these sort of tools pre ground to shape, then you only need to keep them sharp.

      Most things we make for model submarines have a pretty loose tolerance, so you can get away with blue murder. The most important thing with a three jaw is make sure you complete all your machining operations before you remove it from the chuck, otherwise you'll have little hope of getting it back in true again- that's where a four jaw comes in.

      Lots of tutorials on youtube.

      Comment

      • Ken_NJ
        Captain
        • Sep 2014
        • 751

        #4
        Thanks David. I do have a quick change tool holder. I got that and a few of the cutting tools from Little Machine Shop. The other things you mention I'll add to my shopping list. What is an adjustable interface plate? I'll get a four jaw chuck anyway. I think Micro-Mark sells a metal gear set, will look into that as well.

        Quick change tool.

        Click image for larger version

Name:	IMG_0622.jpg
Views:	278
Size:	58.5 KB
ID:	168443

        The plastic gears shown previously were spares. I opened the gear cover, plastic gears in there as well. Will order a metal gear set that MM sells, I think.


        Click image for larger version

Name:	IMG_0642.jpg
Views:	249
Size:	54.8 KB
ID:	168444

        By the way. Bought this about 10 years ago, think I paid about $800-900 for it. Today it is on sale for $1599.

        Comment

        • Das Boot
          Rear Admiral
          • Dec 2019
          • 1152

          #5
          Originally posted by

          [URL=https://imageshack.com/i/pmyCuqTWj
          [/URL]


          David
          Get a haircut. You look like a bum.
          Of the 40,000 men who served on German submarines, 30,000 never returned.”

          Comment

          • He Who Shall Not Be Named
            Moderator
            • Aug 2008
            • 12287

            #6
            Originally posted by Das Boot

            Get a haircut. You look like a bum.
            You'll never take me alive, Cop'er!

            ... busy making more toys for Red Clay.
            Who is John Galt?

            Comment

            • Subculture
              Admiral
              • Feb 2009
              • 2121

              #7
              If you're going to be mainly working with non ferrous metals and plastics, then the plastic gears should suffice.

              Tools required depend a lot on what you intend to machine, but I'd say a general side and face cutter and a parting off tool are staples for basic machining, plus a small boring tool comes i useful now and again. A rotating centre is useful if you want to machine parts that extend well beyond the chuck.

              Comment

              • Ken_NJ
                Captain
                • Sep 2014
                • 751

                #8
                On the 4 jaw chuck. There is self centering and independent. I understand independent is working with odd shapes. I don't think that is something I'll be working with, at least for now. Any other reasons for getting one over the other?

                These bits seem sufficient? https://littlemachineshop.com/produc...ProductID=2412

                These HSS bits also look OK? https://littlemachineshop.com/produc...ory=1208242246

                My tool post is actually not quick change for the tools themselves, although it rotates.
                So, this QCTP should suffice? https://littlemachineshop.com/produc...3112&category=

                And how bout this rotaing center? https://www.micromark.com/Live-Ball-Bearing-Center-MT2

                Opinions? Thank you!

                Comment

                • MFR1964
                  Detail Nut of the First Order
                  • Sep 2010
                  • 1304

                  #9
                  Ken,

                  The rotating center looks good to me, believe me that will become handy when turning long pieces, i also have a tool to support tubes, i'll take a picture to show it to you, be patient


                  Manfred.
                  I went underground

                  Comment

                  • He Who Shall Not Be Named
                    Moderator
                    • Aug 2008
                    • 12287

                    #10
                    Originally posted by Ken_NJ
                    On the 4 jaw chuck. There is self centering and independent. I understand independent is working with odd shapes. I don't think that is something I'll be working with, at least for now. Any other reasons for getting one over the other?

                    These bits seem sufficient? https://littlemachineshop.com/produc...ProductID=2412

                    These HSS bits also look OK? https://littlemachineshop.com/produc...ory=1208242246

                    My tool post is actually not quick change for the tools themselves, although it rotates.
                    So, this QCTP should suffice? https://littlemachineshop.com/produc...3112&category=

                    And how bout this rotaing center? https://www.micromark.com/Live-Ball-Bearing-Center-MT2

                    Opinions? Thank you!
                    You want the ability to center the work with your 4-jaw chuck -- because most self-centering chucks never achieve perfect run-out. With a chuck with independent jaw adjustment and a good dial-indicator you can center the work to a Nat's ass tolerance.

                    You're not cutting Kryptonite, for Christ's Sake. Go with the cheap stuff:

                    Get this Aluminum, quick-change tool post set Amazon.com: JWGJW 120034 Tooling Package Mini Lathe Quick Change Tool Post & Holders Multifid Tool Holder : Tools & Home Improvement

                    Go with the dead-center that came with your machine -- you don't need a live-center unless you're turning plastic.

                    I like the high-speed steel cutting bits you listed.

                    Get a set of proper Carbide cutters with removable blades, not those awful Harbor Freight red jobs. OMEX INDEXABLE TURNING TOOL BITS LATHE SET 8MM (5/16") - 5 PIECES - 10 INSERTS TCMT - - Amazon.com

                    David​
                    Who is John Galt?

                    Comment

                    • Davjacva
                      Lieutenant Commander
                      • Nov 2022
                      • 239

                      #11
                      Ken, there are some good video series on Youtube for the lathe (Mr Pete, or This Old Tony), but from the ground up, if you were just starting or or a raving expert, check out Blondihacks, she has about 22 videos to get you started and goes into detail of the 'why' and you'll be running in no time. Right now stay basic, stay with HSS cutters for now. Stay with cutting brass and aluminum as they're stupid easy and learn to do each facet per the videos. I have a TAIG that Merriman gave me back in 2004. I replaced somethings on it, but you can do a ton of crap with it just knowing the basics. I absolutely don't know how people can be in this hobby and not have and use a lathe. A mill is especially great too.

                      Comment

                      • Ken_NJ
                        Captain
                        • Sep 2014
                        • 751

                        #12
                        I've been watching some videos by Frank Hoose. They are from about seven years ago, but they cover the same model lathe I have and learned a few things already, even if they are an overview. He's apparently from Little Machine Shop at the time. I'll check out the channels you suggested.

                        In the meantime, I placed orders with Micro-Mark and Little Machine Shop. Once I get those items I'll post what I got. Some things mentioned I'm not ready for just yet but have them on my list of things to eventually get.

                        In the meantime again. For the fishing boat model I'm currently working on, I need lock nuts for the two props. The shafts are 3/16 Dumas shafts. I don't want to use standard nuts. Too big and way way out of scale and they look lousy. So, I bought 1/4 brass hex bar, 1/4 across the flats, from Amazon. Put that in the lathe. Used the center drill to make a starting point for a drill bit. With a #21 drill bit drilled to the depth of the end of the flutes. Cleaned out the debris. Switched to a HF tap in the tailstock chuck. Put the tap in the hex bar and by hand turned the spindle chuck pulling in the tap. Cleaned out the debris and did it again. Changed to the cut off bit and cut off a nut. Repeat, repeat, repeat. Only needed two nuts but I made 10 while I was at it, for future boats I intend to build.

                        After done with lathe had to clean up the nuts. Had to remove the helical burr with needle nose pliers, then filed the nut end flat. To put a nice finish on the ends, sanded with 220 and 600 grit sandpaper. I was shooting for about an 1/8" nut. Three and a half turns on the compound slide. The average turn out to be 0.008 under 1/8th. Not bad and happy with what I did.

                        No broken tooling, no boo-boo's, no need for band aids.

                        And David, realized the tool post I have is not a quick change TP. Realized this after your post and looking at tooling and watching videos. I'm getting there!

                        Picture of helical burr on a nut.

                        Click image for larger version  Name:	IMG_0685.jpg Views:	0 Size:	60.8 KB ID:	168824

                        Here is what I ended up with.

                        Click image for larger version  Name:	IMG_0698.jpg Views:	0 Size:	52.6 KB ID:	168825

                        Comment

                        • Subculture
                          Admiral
                          • Feb 2009
                          • 2121

                          #13
                          Never felt the need for a quick change toolpost personally. Shimming a tool is no hardship and takes very little time.

                          Comment

                          • He Who Shall Not Be Named
                            Moderator
                            • Aug 2008
                            • 12287

                            #14
                            Originally posted by Subculture
                            Never felt the need for a quick change toolpost personally. Shimming a tool is no hardship and takes very little time.
                            Time is the enemy.

                            David
                            Who is John Galt?

                            Comment

                            • Ken_NJ
                              Captain
                              • Sep 2014
                              • 751

                              #15
                              So what did I get.

                              The arbor that I had in the tailstock chuck, top one, was too long.Now I have the proper short one for mini-lathes.

                              Click image for larger version

Name:	IMG_0717.jpg
Views:	144
Size:	51.0 KB
ID:	168934

                              The quick change post. Did not even use it just yet, love it. Shimming the bits, hate it, waste of time and PITA.

                              Click image for larger version

Name:	IMG_0726.jpg
Views:	151
Size:	58.0 KB
ID:	168929

                              Came with five tool holders. Have to get more of the 001's.

                              Click image for larger version

Name:	IMG_0727.jpg
Views:	139
Size:	46.7 KB
ID:	168932

                              Set of eight HSS bits. Some already mounted in the QCTP holders.

                              Click image for larger version

Name:	IMG_0728.jpg
Views:	131
Size:	50.3 KB
ID:	168931

                              And carbide bits.

                              Click image for larger version

Name:	IMG_0729.jpg
Views:	144
Size:	51.2 KB
ID:	168930

                              And the overpriced tach. The green "Power on' LED on the lathe is way way to dim. Someday maybe I'll replace the LED. In the meantime, the tach tells me spindle speed AND I can see that I left the lathe on. I always turn the speed down to zero then turn the lathe off. The tach is a visual for me to see if the lathe is on or off. I need to use my 'cabinet worker' skills to make a mount for this tach.

                              Click image for larger version

Name:	IMG_0730.jpg
Views:	156
Size:	54.6 KB
ID:	168928

                              Excited to get going!
                              Attached Files

                              Comment

                              Working...